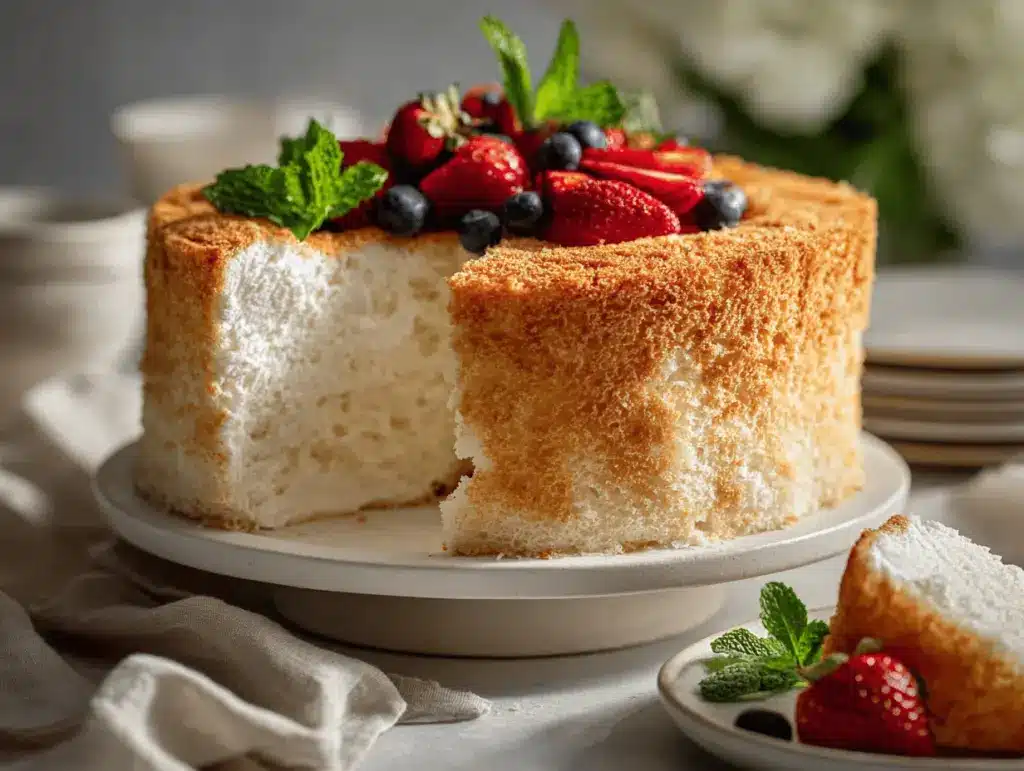
The first time I pulled a golden, towering angel food cake from my oven, I stood over it in awe, breathing in the sweet, vanilla-kissed aroma. It was like holding a cloud—soft, springy, and impossibly light. You know that feeling when you slice into something so delicate it almost sighs? That’s exactly what you get with this angel food cake recipe. No fork needed (though I won’t judge), just a piece torn off with your fingers and savored slowly.
Honestly, angel food cake has always reminded me of Sunday afternoons at my grandma’s. She’d whip up this classic dessert whenever eggs were piling up in the fridge, turning simple pantry staples into something magical. I’ve been perfecting this version for years, tweaking the whisking times and folding techniques until each bite feels like a sweet little miracle. And let’s face it—there’s something kind of amazing about a cake that’s so light, you barely feel guilty going back for seconds.
This angel food cake recipe isn’t just about nostalgia, though. It’s the ultimate crowd-pleaser: low in fat, naturally dairy-free, and utterly versatile. Whether you’re baking for a birthday, a brunch, or just a treat-yourself night, this cake delivers. I’ve tested it dozens of times, and every single time, someone asks for the recipe. If you’re new to homemade cakes, trust me—this one’s all about the technique, not fancy ingredients. Let me show you why angel food cake deserves a spot in every baker’s repertoire.
Why You’ll Love This Angel Food Cake Recipe
- Quick & Easy: No complicated steps—just whip, fold, and bake. The batter comes together in about 15 minutes, making it totally doable even on a weeknight.
- Simple Ingredients: You probably have everything you need: egg whites, sugar, flour, and vanilla. No oddball ingredients or last-minute grocery runs.
- Perfect for Every Occasion: This cake shines at summer parties, Easter brunch, baby showers, and even as a birthday cake for folks who prefer lighter desserts.
- Crowd-Pleaser: It’s always a hit—kids love the fluffy texture, and adults appreciate that it’s not too heavy or overly sweet.
- Unbelievably Delicious: With a melt-in-your-mouth crumb, subtle vanilla flavor, and just the right amount of sweetness, this angel food cake truly stands out.
What sets my angel food cake recipe apart? For one, I sift the flour and sugar multiple times, which makes the crumb extra fine and pillowy. I also swear by using room-temperature egg whites—makes a world of difference for volume and stability. And here’s a fun twist: I sometimes add a hint of almond extract for a flavor that’s a little unexpected but so, so good.
This isn’t just another angel food cake—it’s the version friends request for potlucks and family gatherings, the one that gets devoured before anything else on the dessert table. It’s comfort food, but light and airy, like a sweet promise of spring. If you’ve struggled with sunken, dense cakes before, don’t worry—I’ve made all those mistakes so you don’t have to.
Best of all, this cake can be dressed up or down. Serve it plain, with berries, or stacked high with whipped cream and lemon curd. However you slice it, you’ll get a dessert that feels fancy but is secretly so, so easy to make.
What Ingredients You Will Need
This angel food cake recipe uses simple, wholesome ingredients to deliver that iconic lightness and flavor. Most are pantry staples, and a few little tricks make all the difference in texture. Here’s what you’ll need:
- Large Egg Whites (12, room temperature)
- Fresh eggs are best for structure, but carton egg whites work in a pinch (just make sure they’re 100% egg whites, nothing else).
- Granulated Sugar (1 1/2 cups / 300g, divided)
- Half is beaten into the egg whites, half is sifted with the flour for an ultra-fine crumb.
- Superfine sugar dissolves best—pulse regular sugar in your blender for a few seconds if you like.
- Cake Flour (1 cup / 120g, sifted)
- Gives the cake its tender crumb. All-purpose can work, but sift it several times for lightness.
- Cream of Tartar (1 1/2 tsp / 6g)
- Stabilizes the egg whites (don’t skip it—your cake will thank you).
- Salt (1/4 tsp / 1.5g)
- Balances the sweetness and boosts the vanilla flavor.
- Pure Vanilla Extract (2 tsp / 10ml)
- Use the real stuff for the best flavor. I love Nielsen-Massey vanilla for special occasions.
- Almond Extract (1/4 tsp / 1ml, optional)
- Just a hint adds a lovely, subtle aroma—totally optional but highly recommended.
Ingredient Substitutions & Tips:
- For a gluten-free version, swap in a finely-milled gluten-free flour blend for the cake flour. I’ve had good luck with King Arthur’s blend.
- No cream of tartar? Use 1 tsp lemon juice or white vinegar, but cream of tartar gives the most reliable rise.
- If you don’t have almond extract, just use more vanilla—or try a splash of citrus zest for a spring vibe.
- You can use up to half coconut sugar for a hint of caramel flavor, though the cake will be a touch darker.
Honestly, the magic here isn’t in the ingredients—it’s in how you treat them. Gentle folding, careful sifting, and a little patience create that signature angel food cake texture. It’s worth every step, promise!
Equipment Needed
- 10-inch Tube Pan (with removable bottom): This pan gives the cake its height and airy texture. Don’t grease it—the batter needs to climb the sides.
- Stand Mixer or Hand Mixer: Whipping egg whites by hand is heroic, but an electric mixer makes it so much easier (and your arms will thank you).
- Fine Mesh Sieve or Sifter: Sifting flour and sugar is key to that cloud-like crumb. I’ve used everything from an old-school crank sifter to a fine mesh strainer—both work!
- Rubber Spatula: For gentle folding—go for something flexible but sturdy.
- Offset Spatula or Butter Knife: To level the top before baking (or swirl the batter for a fun marbled look).
- Thin Knife or Metal Skewer: For releasing the cake from the pan after cooling.
- Wire Rack: Essential for cooling the cake upside down—this keeps it from collapsing. If your pan doesn’t have feet, just balance the center tube on a bottle or funnel.
If you don’t have a tube pan, you can try a Bundt pan, but be warned—the cake might not release as easily. I’ve even baked mini angel food cakes in muffin tins for parties (just skip the liners and use a gentle hand when releasing). Clean your mixer bowl and beaters with a little vinegar and hot water—any grease can sabotage your egg whites. And if you’re on a budget, thrift stores are a treasure trove for vintage tube pans that bake like a dream.
Preparation Method
- Preheat and Prepare:
- Preheat your oven to 350°F (175°C).
Make sure your tube pan is clean and completely ungreased. Any residue can keep your cake from rising.
- Preheat your oven to 350°F (175°C).
- Sift the Dry Ingredients:
- In a bowl, combine 1 cup (120g) cake flour and 3/4 cup (150g) of the sugar.
Sift together three times to ensure a super-fine texture. (It seems tedious, but this step really makes a difference!)
- In a bowl, combine 1 cup (120g) cake flour and 3/4 cup (150g) of the sugar.
- Beat the Egg Whites:
- Place 12 large egg whites (room temp) in a large, grease-free bowl.
Add 1 1/2 tsp (6g) cream of tartar and 1/4 tsp (1.5g) salt.
Beat on medium speed until soft peaks form (about 2-3 minutes).
- Place 12 large egg whites (room temp) in a large, grease-free bowl.
- Add Sugar Gradually:
- With the mixer running, slowly add the remaining 3/4 cup (150g) of sugar, 1-2 tablespoons at a time.
Beat until glossy, stiff peaks form—don’t overbeat or the whites will look dry.
- With the mixer running, slowly add the remaining 3/4 cup (150g) of sugar, 1-2 tablespoons at a time.
- Mix in Flavors:
- Add 2 tsp (10ml) vanilla extract and 1/4 tsp (1ml) almond extract (if using).
Beat just until combined.
- Add 2 tsp (10ml) vanilla extract and 1/4 tsp (1ml) almond extract (if using).
- Fold in the Dry Ingredients:
- Sprinkle 1/4 of the sifted flour-sugar mixture over the egg whites.
Gently fold with a rubber spatula, using a light “scoop and turn” motion. Repeat until all the dry mixture is incorporated.
Go slowly—over-mixing will deflate the batter.
- Sprinkle 1/4 of the sifted flour-sugar mixture over the egg whites.
- Transfer to the Pan:
- Spoon the batter into the tube pan.
Use an offset spatula to smooth the top.
Run a thin knife through the batter to remove air pockets (I learned this trick after my first cake had big gaps inside!).
- Spoon the batter into the tube pan.
- Bake:
- Bake for 35-40 minutes, or until the top is golden and springs back when lightly touched.
A skewer inserted in the center should come out clean.
- Bake for 35-40 minutes, or until the top is golden and springs back when lightly touched.
- Invert and Cool:
- Immediately invert the pan (turn it upside down) and let the cake cool completely, about 1 1/2 hours.
If your pan doesn’t have feet, balance the center on a bottle.
- Immediately invert the pan (turn it upside down) and let the cake cool completely, about 1 1/2 hours.
- Release and Slice:
- Once cool, run a thin knife around the edges and the center tube to loosen the cake.
Gently lift it out, then run the knife along the bottom to release.
- Once cool, run a thin knife around the edges and the center tube to loosen the cake.
Notes: If your egg whites won’t whip, check for grease or yolk in the bowl. Sift the flour and sugar as lightly as possible—don’t press it down. If your cake shrinks or collapses, it probably needed a longer bake or a gentler folding hand. You’ll get the hang of it, I promise!
Cooking Tips & Techniques
Baking angel food cake is a little like performing kitchen magic, but there are a few tricks that make it totally foolproof. I’ve learned (sometimes the hard way) what really matters:
- Room-Temperature Egg Whites: They whip up fluffier and more stable. If you forget, place cold eggs in warm water for 5-10 minutes.
- Super-Clean Equipment: Even a smidge of grease or yolk can keep whites from whipping. I always wipe my bowl and beaters with vinegar and salt before starting.
- Sift, Sift, Sift: The more you sift, the finer your crumb. Don’t skip it (I used to, and my cakes were always a little coarse).
- Gentle Folding: Use a light touch—lift and turn the batter instead of stirring. I think of it like “hugging” the batter.
- Bake Immediately: Once the batter’s in the pan, get it in the oven right away. The air you whipped in starts to deflate if it sits out.
- Don’t Grease the Pan: The batter needs to cling to the sides to rise. Greasing will make your cake slip and collapse.
- Invert to Cool: This keeps the cake tall and fluffy as it sets. My first cake shrank into a pancake because I forgot this step—never again!
Multitasking tip: While the cake cools, whip up some fresh berries or a quick lemon glaze. That way, everything’s ready for serving at once. And if you’re worried about your cake sticking, don’t panic—just take your time with the knife and go slow. Practice makes perfect, and this cake is worth the patience!
Variations & Adaptations
- Gluten-Free Angel Food Cake: Swap cake flour for a gluten-free blend (I recommend King Arthur’s or Cup4Cup). Sift extra for the lightest crumb.
- Lemon or Orange Angel Food Cake: Fold in 2 tsp finely grated citrus zest with the extracts. Try a lemon glaze for extra zing!
- Chocolate Swirl: Gently swirl 1/4 cup (30g) sifted cocoa powder into half the batter, then marble together in the pan. Kids love this one!
- Berry-Filled: Gently fold in 1 cup diced fresh strawberries or blueberries before baking. The fruit adds pops of color and flavor.
- Low-Sugar Version: Replace half the sugar with a zero-calorie granulated sweetener like Swerve. The texture is slightly different, but still delicious.
- Personal Adaptation: On hot summer days, I’ll layer slices with whipped coconut cream and fresh peaches for a dairy-free, sunny treat.
If you don’t have a tube pan, try making cupcakes in a muffin tin (don’t use liners—just grease the pan lightly and watch them closely). For nut allergies, skip the almond extract and use all vanilla. The base recipe is super flexible—don’t be afraid to get creative!
Serving & Storage Suggestions
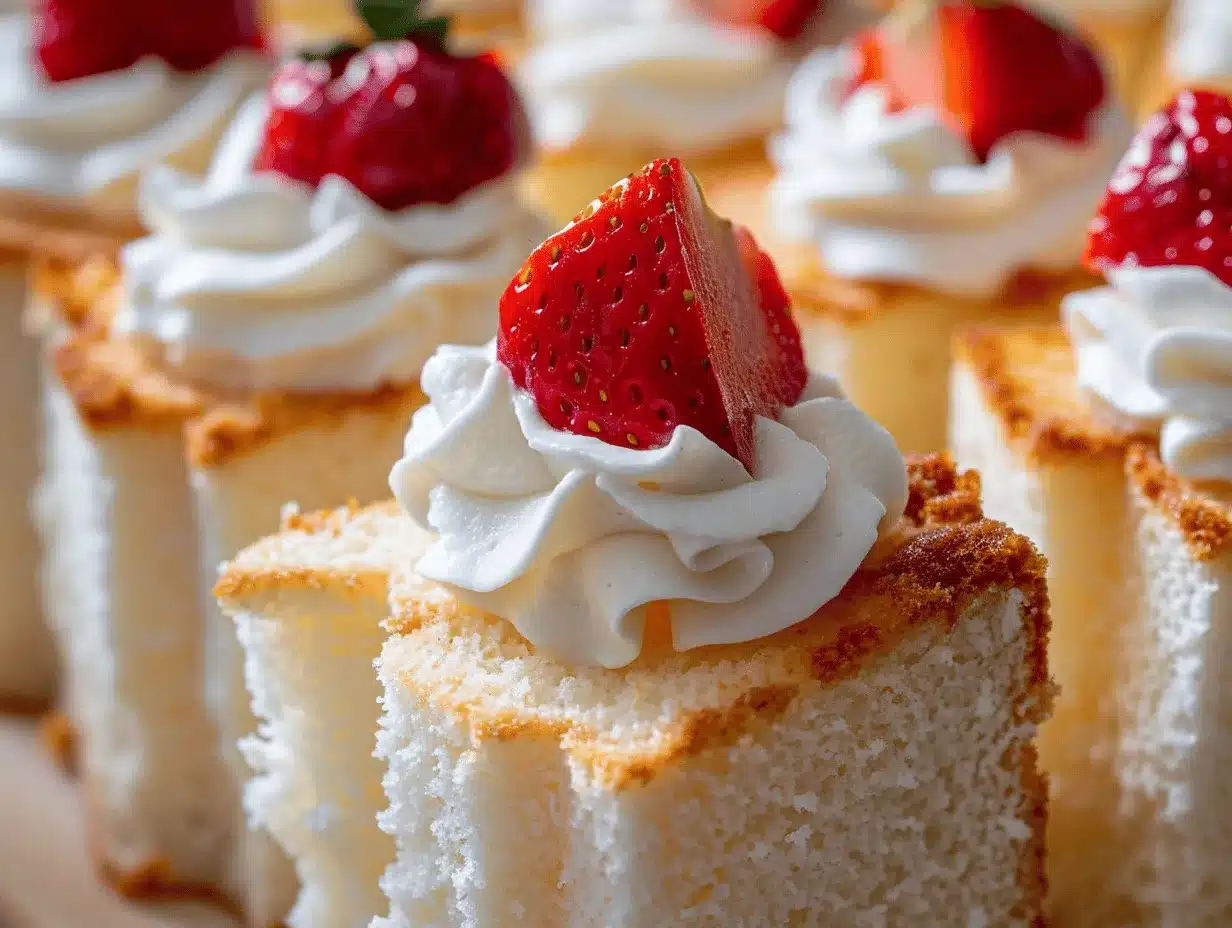
Angel food cake is best served at room temperature, sliced with a serrated knife for perfect, fluffy edges. For a classic look, dust the top with powdered sugar or serve with a cloud of whipped cream and fresh berries—strawberries, blueberries, and raspberries all pair beautifully.
Looking for something extra? Try a drizzle of chocolate sauce, a scoop of lemon curd, or even a scoop of vanilla ice cream. For brunch, I like to serve this cake alongside a fruit salad and hot coffee. For a summer picnic, pack slices in parchment and pair with sparkling lemonade. It’s a dessert that fits in anywhere.
To store, keep the cake covered at room temperature for up to 2 days (use a cake dome or an overturned bowl). For longer storage, wrap tightly in plastic and refrigerate for up to 5 days. You can freeze slices for up to 2 months—just thaw at room temp before serving. If the cake starts to dry out, a quick microwave (10-15 seconds) brings it right back to life. Honestly, the flavors get even better after a day as the vanilla settles in!
Nutritional Information & Benefits
Angel food cake is naturally low in fat and cholesterol since it uses egg whites and no butter or oil. Each slice (1/12 of the cake) has about 120 calories, 0g fat, 27g carbs, and 3g protein—making it a lighter dessert option.
Key ingredients like egg whites provide high-quality protein, and skipping dairy makes this recipe great for lactose-intolerant folks. If you use gluten-free flour, it’s totally celiac-friendly. Just watch out for potential egg allergies, and check your extracts for hidden gluten if you’re sensitive.
As someone who loves a sweet treat but tries to keep things balanced, angel food cake is my go-to for “dessert without the guilt.” It fits into most diets and feels special, even though it’s so simple.
Conclusion
If you’re looking for a dessert that’s as impressive as it is easy, this angel food cake recipe delivers every single time. It’s a celebration of simple ingredients, gentle technique, and that unmistakable, cloud-like crumb that makes everyone smile. Whether you’re a seasoned baker or new to homemade cakes, this classic never disappoints.
Go ahead and put your own spin on it—try citrus, chocolate, or a berry-filled version. I love this cake for its versatility and the way it brings people together around the table. There’s something special about a slice of angel food cake shared with friends or family.
So, what are you waiting for? Grab your eggs and let’s bake! If you try this recipe, leave a comment below, share your twists, or tag me on social media—I’d love to see your creations. Here’s to sweet memories and light, fluffy cake!
Frequently Asked Questions
Can I make angel food cake without a tube pan?
You can use a Bundt pan or muffin tins, but the cake might not rise as high or release as easily. A tube pan is best for that classic tall shape.
Why did my angel food cake collapse?
Collapsing usually happens if the cake is underbaked, the batter was over-mixed, or the pan was greased. Make sure to bake fully and cool upside down.
Can I use carton egg whites instead of fresh?
Yes, but make sure they’re 100% egg whites with no additives. Fresh egg whites tend to whip up fluffier, though.
How do I store leftover angel food cake?
Keep it covered at room temperature for up to 2 days, or refrigerate for 5 days. Freeze slices for up to 2 months—just thaw before serving.
Is angel food cake gluten-free or dairy-free?
It’s naturally dairy-free, and you can make it gluten-free by swapping in a gluten-free flour blend. Always check labels if you have allergies.
Pin This Recipe!
Angel Food Cake
This classic angel food cake is light, fluffy, and delicately sweet with a subtle vanilla flavor. Naturally low in fat and dairy-free, it’s the perfect crowd-pleasing dessert for any occasion.
- Prep Time: 15 minutes
- Cook Time: 40 minutes
- Total Time: 1 hour 55 minutes
- Yield: 12 servings 1x
- Category: Dessert
- Cuisine: American
Ingredients
- 12 large egg whites, room temperature
- 1 1/2 cups (300g) granulated sugar, divided
- 1 cup (120g) cake flour, sifted
- 1 1/2 teaspoons (6g) cream of tartar
- 1/4 teaspoon (1.5g) salt
- 2 teaspoons (10ml) pure vanilla extract
- 1/4 teaspoon (1ml) almond extract (optional)
Instructions
- Preheat your oven to 350°F (175°C). Ensure your 10-inch tube pan is clean and ungreased.
- In a bowl, combine 1 cup (120g) cake flour and 3/4 cup (150g) of the sugar. Sift together three times for a fine texture.
- Place 12 large egg whites in a large, grease-free bowl. Add cream of tartar and salt. Beat on medium speed until soft peaks form (about 2-3 minutes).
- With the mixer running, gradually add the remaining 3/4 cup (150g) sugar, 1-2 tablespoons at a time. Beat until glossy, stiff peaks form. Do not overbeat.
- Add vanilla extract and almond extract (if using). Beat just until combined.
- Sprinkle 1/4 of the sifted flour-sugar mixture over the egg whites. Gently fold with a rubber spatula. Repeat until all dry mixture is incorporated, folding gently to avoid deflating the batter.
- Spoon the batter into the tube pan. Smooth the top with an offset spatula. Run a thin knife through the batter to remove air pockets.
- Bake for 35-40 minutes, or until the top is golden and springs back when lightly touched. A skewer inserted in the center should come out clean.
- Immediately invert the pan and let the cake cool completely, about 1 1/2 hours. If your pan doesn’t have feet, balance the center on a bottle.
- Once cool, run a thin knife around the edges and center tube to loosen the cake. Gently lift it out, then run the knife along the bottom to release.
Notes
Use room-temperature egg whites for best volume. Ensure all equipment is grease-free. Sift flour and sugar multiple times for a fine crumb. Do not grease the pan. Cool the cake upside down to prevent collapse. For gluten-free, substitute a finely-milled gluten-free flour blend. Almond extract is optional but adds a lovely aroma.
Nutrition
- Serving Size: 1/12 of cake
- Calories: 120
- Sugar: 26
- Sodium: 60
- Carbohydrates: 27
- Protein: 3
Keywords: angel food cake, classic dessert, light cake, fat-free cake, dairy-free dessert, easy cake, vanilla cake, party dessert, spring dessert, fluffy cake


