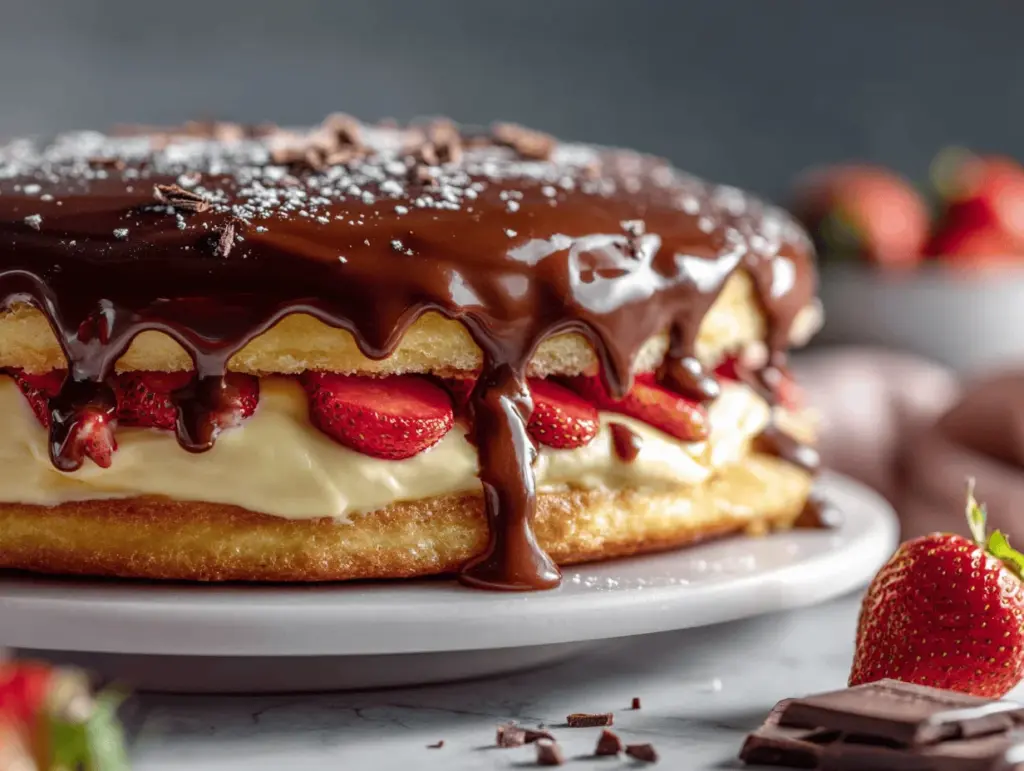
The first time I pulled a Strawberry Boston Cream Pie out of the fridge, my kitchen smelled like a bakery and a berry patch had a party—sweet, creamy, and just a little bit fancy. This isn’t the Boston Cream Pie you grew up with (though, let’s face it, that one’s awesome too). This version is layered with juicy strawberries, silky pastry cream, and that classic chocolate glaze, all piled onto a tender sponge cake. Each bite is a celebration—you get the nostalgic comfort of the original, plus a burst of fresh flavor that feels like summer on your fork.
I stumbled onto this Strawberry Boston Cream Pie recipe during a late-night baking spree, craving something more exciting than plain cake but less fussy than a full-blown layer cake. Honestly, it’s become my not-so-secret weapon for birthdays, potlucks, and lazy Sunday afternoons. The strawberries add just the right amount of tartness, making every forkful a little adventure. And here’s the kicker: it’s easier than it looks. With a few pantry basics and some ripe berries, you’ll have a show-stopping dessert that’s as good as any bakery—maybe better, since you made it yourself!
Whether you’re baking for your family, impressing friends, or just want to treat yourself, this Strawberry Boston Cream Pie recipe is your new go-to. I’ve tested it more times than I can count (it’s a tough job, but someone’s gotta do it). I’ve tweaked the filling, tried different chocolate glazes, and even played with cake bases—and this version is the one I keep coming back to. So grab your apron, your favorite mixing bowl, and let’s make something delicious together!
Why You’ll Love This Strawberry Boston Cream Pie Recipe
- Quick & Easy: You can bring this Strawberry Boston Cream Pie together in about 90 minutes (with some chilling time). No bakery degree required—just a little patience and a sweet tooth!
- Simple Ingredients: Everything you need is probably already in your kitchen. We’re talking eggs, sugar, flour, strawberries, a little milk, and some chocolate. No hunting for weird specialty items.
- Perfect for Any Occasion: This dessert shines at birthdays, Mother’s Day, summer picnics, or just because it’s Tuesday and you deserve a treat. It looks fancy but isn’t fussy.
- Crowd-Pleaser: Kids love it. Adults love it. Even that picky cousin who “doesn’t like cake” goes back for seconds. The combination of creamy, fruity, and chocolatey is irresistible.
- Unbelievably Delicious: The soft sponge soaks up the creamy filling, while strawberries add freshness and a pop of color. The chocolate glaze? It’s the cherry (well, strawberry) on top.
What really sets this Strawberry Boston Cream Pie apart is the homemade vanilla pastry cream—no boxed pudding here! It’s thick, rich, and just sweet enough, with real vanilla shining through. I like to slice the strawberries thin so they layer beautifully, releasing their juice into the cream and cake. And the chocolate glaze is glossy, rich, and smooth, thanks to a little butter and cream (trust me, don’t skip it!).
This isn’t just another Boston Cream Pie recipe—it’s my best version, perfected after plenty of taste tests. It’s comfort food with a twist: familiar flavors, but brightened up with fruit and a touch of elegance. And you know what? It’s way less intimidating than a layer cake, but just as impressive when you slice in.
Honestly, every time I make this, I’m reminded why I bake in the first place—to create something special out of simple ingredients, to share a little joy, and to make memories around the table. Give it a try, and let this become your family’s new favorite, too!
What Ingredients You Will Need
This recipe uses simple, wholesome ingredients to deliver bold flavor and satisfying texture without the fuss. Most are pantry staples, and you can always swap or substitute as needed. Here’s what you’ll need for your Strawberry Boston Cream Pie delight:
- For the Sponge Cake:
- 1 cup (120g) all-purpose flour (sifted for a light crumb)
- 1 cup (200g) granulated sugar
- 4 large eggs, room temperature (makes the cake airy)
- 1/4 cup (60ml) whole milk, room temperature
- 1/4 cup (60g) unsalted butter, melted and cooled
- 1 teaspoon vanilla extract (use real vanilla for best flavor)
- 1 teaspoon baking powder
- 1/4 teaspoon fine sea salt
- For the Pastry Cream:
- 2 cups (480ml) whole milk
- 1/2 cup (100g) granulated sugar
- 4 large egg yolks
- 1/4 cup (30g) cornstarch
- 2 tablespoons (30g) unsalted butter
- 1 teaspoon vanilla bean paste or extract
- Pinch of salt
- For the Strawberry Layer:
- 2 cups (300g) fresh strawberries, hulled and sliced (about 1/4-inch thick)
- 2 tablespoons (25g) granulated sugar (helps macerate the berries)
- 1 teaspoon lemon juice (brightens the flavor, but optional)
- For the Chocolate Glaze:
- 4 ounces (115g) semi-sweet or dark chocolate, chopped
- 1/2 cup (120ml) heavy cream
- 1 tablespoon (14g) unsalted butter
- 1 teaspoon light corn syrup (optional, for shine)
Ingredient Tips: For the cake, King Arthur or Gold Medal flour both work well. For strawberries, pick ripe, sweet ones—local if you can! In a pinch, frozen strawberries (thawed and well-drained) can be used. If you’re out of whole milk, 2% will work, but avoid skim for best texture. Gluten-free flour blends (like Cup4Cup) substitute well in the sponge.
Substitutions: Use plant-based butter and oat milk for a dairy-free version. Swap the chocolate for white chocolate glaze if you’re feeling adventurous. Don’t have cornstarch? Arrowroot powder works just as well for thickening the pastry cream.
Equipment Needed
- 9-inch (23cm) round cake pan (springform pans make for easy removal, but classic pans work too)
- Mixing bowls (at least two, for batter and pastry cream)
- Electric mixer or stand mixer (a whisk and elbow grease will do in a pinch!)
- Medium saucepan (for the pastry cream)
- Heatproof spatula (for stirring cream and folding batter)
- Wire cooling rack (helps the cake cool evenly)
- Offset spatula or butter knife (for spreading cream and glaze)
- Serrated knife (for slicing the cake horizontally)
- Small microwave-safe bowl (for melting chocolate glaze)
I’ve made this recipe using a hand whisk and a basic aluminum cake pan, and it still turned out fabulous! If you’re short on specialty equipment, line your pan with parchment to help with sticking. A glass bowl can double as a mixing and microwave bowl, making cleanup easier. For budget-friendly tools, check your local dollar store for spatulas and cake pans—they do the trick without breaking the bank. Just remember to dry everything thoroughly before starting, especially the mixing bowls, to keep the sponge light and fluffy.
How to Make Strawberry Boston Cream Pie Delight

-
Prep Your Ingredients (10 minutes):
Preheat your oven to 350°F (175°C). Grease a 9-inch (23cm) round cake pan and line the bottom with parchment paper for easy removal. Set out all your ingredients—let eggs and milk come to room temp for best results.
-
Make the Sponge Cake (20 minutes + 25 minutes baking):
- In a large bowl, beat 4 eggs and 1 cup (200g) sugar together for about 5-7 minutes, until thick and pale. The batter should form ribbons when you lift the whisk—if not, keep going!
- Whisk in 1 teaspoon vanilla extract.
- In a separate bowl, sift together 1 cup (120g) flour, 1 teaspoon baking powder, and 1/4 teaspoon salt.
- Gently fold the dry ingredients into the egg mixture, being careful not to deflate the batter. (Use a spatula and a light hand.)
- Stir together 1/4 cup (60ml) milk and 1/4 cup (60g) melted butter. Drizzle into the batter and fold until just combined—don’t overmix!
- Pour batter into prepared pan and smooth the top.
- Bake for 22-25 minutes, or until a toothpick comes out clean and the top springs back when pressed. (Don’t overbake; dry cake is a bummer.)
- Let the cake cool in the pan for 10 minutes, then run a knife around the edge and flip onto a wire rack. Cool completely.
-
Prepare the Pastry Cream (15 minutes + 1 hour chilling):
- In a medium saucepan, whisk 2 cups (480ml) milk, 1/2 cup (100g) sugar, and pinch of salt. Heat over medium until steaming, not boiling.
- In a separate bowl, whisk 4 egg yolks and 1/4 cup (30g) cornstarch until smooth.
- Gradually pour half the hot milk into the yolks, whisking constantly (this tempers the eggs so you don’t get scrambled bits).
- Return the mixture to the saucepan and cook over medium, whisking constantly, until thick and bubbling (about 3-5 minutes). When it’s ready, it should coat the back of a spoon and hold its shape.
- Remove from heat and stir in 2 tablespoons (30g) butter and 1 teaspoon vanilla bean paste/extract.
- Pour into a shallow bowl, press plastic wrap directly onto the surface, and chill for at least 1 hour. (This prevents a skin from forming.)
-
Prepare the Strawberries (5 minutes):
- Slice 2 cups (300g) strawberries about 1/4-inch thick.
- Toss with 2 tablespoons (25g) sugar and 1 teaspoon lemon juice. Let sit for 10 minutes to macerate and get juicy.
-
Make the Chocolate Glaze (5 minutes):
- Combine 4 ounces (115g) chocolate, 1/2 cup (120ml) heavy cream, 1 tablespoon (14g) butter, and 1 teaspoon corn syrup in a small microwave-safe bowl.
- Microwave in 20-second bursts, stirring in between, until smooth and glossy. Let cool for 5 minutes to thicken slightly.
-
Assemble the Pie (10 minutes):
- Slice the cooled cake horizontally into two even layers with a serrated knife. (Go slow—don’t rush this part!)
- Place the bottom layer on your serving plate.
- Spread all the chilled pastry cream over the bottom layer, going almost to the edge.
- Arrange sliced, macerated strawberries evenly over the cream.
- Top with the second cake layer.
- Pour the chocolate glaze over the top, letting it drip down the sides. Use an offset spatula to nudge it over the edges if needed.
- Chill for at least 30 minutes before serving (an hour is even better), so the flavors meld and the glaze sets.
-
Serve and Enjoy!
Slice with a sharp knife. If you want clean slices, wipe the blade between cuts. Bask in the oohs and ahhs—honestly, you earned them!
Troubleshooting: If your cake cracks while slicing, don’t worry—just patch it together with extra cream. If your glaze is too thick, add a splash more cream; too thin, pop it in the fridge for a few minutes. Pastry cream too runny? Chill it longer, or whisk in a bit more cornstarch and heat gently.
Cooking Tips & Techniques
Over the years, I’ve learned a few tricks to make this Strawberry Boston Cream Pie recipe even smoother (and foolproof!):
- Room Temperature Ingredients: Always let your eggs and dairy come to room temp before starting the cake. Cold ingredients can make the batter dense, and you want airy!
- Don’t Rush the Egg Beating: The cake’s texture depends on whipping the eggs and sugar well. Set a timer for 5-7 minutes—you want the batter to be thick, pale, and have visible ribbons.
- Folding is Key: Use a gentle folding motion when adding flour and melted butter. Overmixing will deflate your beautiful batter and leave you with a flat cake. I learned this the hard way once—flat as a pancake!
- Pastry Cream Consistency: If your pastry cream isn’t thickening, keep cooking and whisking over medium heat until you see big bubbles—don’t panic if it takes a few minutes longer.
- Chilling Time: Chill the cake and assembled pie for best flavor and clean slices. If you’re impatient (like me sometimes), 30 minutes is a minimum.
- Multitasking: While the cake bakes, prep your pastry cream and strawberries. You’ll finish in less time and feel like a kitchen pro!
- Glaze Trick: Pour the chocolate glaze while it’s still slightly warm for a shiny, smooth finish. If it cools too much, microwave for 10 seconds to loosen it up.
Honestly, I’ve had my share of flops—overbeaten batter, runny cream, and cakes stuck to the pan. Don’t stress! Each time you make it, you’ll get faster and more confident. If all else fails, just pile on more strawberries—nobody complains about extra fruit!
Variations & Adaptations
One of the joys of this Strawberry Boston Cream Pie recipe is how flexible it is. Here are some of my favorite twists and swaps:
- Gluten-Free: Replace all-purpose flour with a gluten-free blend (like Cup4Cup or Bob’s Red Mill 1-to-1). It works beautifully—just check that your baking powder is gluten-free, too.
- Dairy-Free: Use plant-based butter, almond or oat milk for the cake and cream, and dairy-free chocolate for the glaze. The results are still rich and satisfying (I’ve made it this way for friends with allergies, and they loved it!).
- Berry Switch-Up: Try blueberries, raspberries, or a mix of berries instead of (or alongside) strawberries. In winter, use thawed frozen berries—just pat them dry to avoid extra moisture.
- Lemon Zest: Add a teaspoon of lemon zest to the pastry cream for a citrusy kick. It brightens the flavors and pairs perfectly with strawberries.
- Mini Versions: Bake cupcakes or mini cakes and layer them in individual jars—adorable for parties or picnics!
- Extra Chocolate: For the chocolate lovers, sprinkle chocolate chips between the layers or use a dark chocolate glaze for more intensity.
My personal favorite? Swapping in a layer of macerated peaches in late summer. It’s a southern twist that’s just as dreamy! Don’t be afraid to get creative—half the fun is making it your own.
Serving & Storage Suggestions
Serve this Strawberry Boston Cream Pie chilled or at cool room temperature. It’s prettiest when sliced with a sharp knife and wiped clean between cuts—those gorgeous layers deserve to shine! Garnish with extra strawberries or a dusting of powdered sugar for a Pinterest-worthy presentation.
Pair with a cup of coffee, tea, or a glass of cold milk. For celebrations, a light sparkling wine or berry lemonade is a fun touch. This dessert is rich, so keep sides simple—a fresh green salad or grilled chicken is all you need before indulging.
Store leftovers covered in the fridge for up to 3 days. The flavors actually meld and get even better after a few hours! If you want to freeze it, wrap individual slices tightly and freeze for up to a month. Thaw overnight in the fridge, and the texture will still be dreamy. To reheat a cold slice, zap it in the microwave for 10-15 seconds—just enough to soften the glaze a bit.
Nutritional Information & Benefits
Each slice of this Strawberry Boston Cream Pie (based on 12 slices) is estimated to have:
- Calories: ~330
- Fat: 15g
- Carbohydrates: 45g
- Protein: 6g
The strawberries bring a healthy dose of vitamin C and antioxidants, while eggs and milk offer protein and calcium. If you opt for gluten-free or dairy-free versions, you can customize the recipe to suit nearly any diet. Just be mindful if you have egg, dairy, or wheat allergies, as this recipe contains all three (substitute as needed!).
I like to think of this dessert as an occasional treat—something to enjoy in good company or as a reward after a busy week. The real benefit? Making happy memories around the table, one delicious slice at a time.
Conclusion
If you’re looking for a dessert that’s equal parts nostalgic and exciting, this Strawberry Boston Cream Pie recipe is it. The blend of tender cake, creamy filling, fresh strawberries, and glossy chocolate is a combination that just works—every time. It’s easy enough for a weeknight, impressive enough for a party, and endlessly customizable.
I love how this recipe brings people together, sparks conversation, and leaves everyone asking for seconds (or the recipe itself!). Don’t be afraid to swap in your favorite berries or try a fun twist—I hope it becomes a regular in your kitchen, just like it is in mine.
Give it a try, snap a photo, and share your delicious masterpiece! I’d love to hear how you made it your own, so drop a comment or tag me on social. Happy baking, and remember: a little chocolate and strawberries can turn an ordinary day into something sweet.
FAQs About Strawberry Boston Cream Pie Recipe
Can I make this Strawberry Boston Cream Pie ahead of time?
Absolutely! You can make the cake, pastry cream, and glaze a day in advance. Assemble just before serving or chill the whole pie overnight—the flavors get even better.
Can I use frozen strawberries?
Yes, just thaw and drain them well before using. Pat the slices dry so they don’t make the cream runny.
What’s the best way to slice the cake evenly?
Use a long serrated knife and rotate the cake as you cut. A gentle, sawing motion helps keep the layers neat.
How do I prevent the chocolate glaze from getting dull?
Add a teaspoon of corn syrup for extra shine. Also, pour the glaze while it’s slightly warm for a glossy finish.
Can I substitute the pastry cream with whipped cream?
You can, but the texture and flavor will be lighter and less rich. Pastry cream is classic, but if you’re short on time, stabilized whipped cream works in a pinch.
Pin This Recipe!

Strawberry Boston Cream Pie
This Strawberry Boston Cream Pie is a delightful twist on the classic, featuring layers of tender sponge cake, silky homemade pastry cream, juicy strawberries, and a glossy chocolate glaze. It’s a show-stopping yet approachable dessert perfect for any occasion.
- Prep Time: 35 minutes
- Cook Time: 25 minutes
- Total Time: 1 hour 30 minutes (plus chilling)
- Yield: 12 servings 1x
- Category: Dessert
- Cuisine: American
Ingredients
- 1 cup (120g) all-purpose flour, sifted
- 1 cup (200g) granulated sugar
- 4 large eggs, room temperature
- 1/4 cup (60ml) whole milk, room temperature
- 1/4 cup (60g) unsalted butter, melted and cooled
- 1 teaspoon vanilla extract
- 1 teaspoon baking powder
- 1/4 teaspoon fine sea salt
- 2 cups (480ml) whole milk
- 1/2 cup (100g) granulated sugar
- 4 large egg yolks
- 1/4 cup (30g) cornstarch
- 2 tablespoons (30g) unsalted butter
- 1 teaspoon vanilla bean paste or extract
- Pinch of salt
- 2 cups (300g) fresh strawberries, hulled and sliced (about 1/4-inch thick)
- 2 tablespoons (25g) granulated sugar
- 1 teaspoon lemon juice (optional)
- 4 ounces (115g) semi-sweet or dark chocolate, chopped
- 1/2 cup (120ml) heavy cream
- 1 tablespoon (14g) unsalted butter
- 1 teaspoon light corn syrup (optional)
Instructions
- Preheat oven to 350°F (175°C). Grease a 9-inch round cake pan and line the bottom with parchment paper. Let eggs and milk come to room temperature.
- In a large bowl, beat 4 eggs and 1 cup sugar for 5-7 minutes until thick and pale. Whisk in vanilla extract.
- In a separate bowl, sift together flour, baking powder, and salt. Gently fold dry ingredients into egg mixture.
- Stir together milk and melted butter. Drizzle into batter and fold until just combined. Pour into prepared pan and smooth the top.
- Bake for 22-25 minutes, until a toothpick comes out clean. Cool in pan for 10 minutes, then turn out onto a wire rack to cool completely.
- For the pastry cream: In a saucepan, whisk milk, sugar, and salt. Heat over medium until steaming. In a bowl, whisk egg yolks and cornstarch until smooth.
- Gradually pour half the hot milk into yolks, whisking constantly. Return mixture to saucepan and cook over medium, whisking, until thick and bubbling (3-5 minutes).
- Remove from heat, stir in butter and vanilla. Pour into a shallow bowl, press plastic wrap onto surface, and chill at least 1 hour.
- For strawberries: Slice strawberries and toss with sugar and lemon juice. Let sit 10 minutes to macerate.
- For chocolate glaze: Combine chocolate, heavy cream, butter, and corn syrup in a microwave-safe bowl. Microwave in 20-second bursts, stirring, until smooth. Let cool 5 minutes.
- To assemble: Slice cooled cake horizontally into two layers. Place bottom layer on serving plate. Spread all pastry cream over bottom layer. Arrange strawberries evenly over cream. Top with second cake layer.
- Pour chocolate glaze over top, letting it drip down sides. Chill at least 30 minutes before serving.
- Slice with a sharp knife, wiping blade between cuts for clean slices. Serve and enjoy!
Notes
For best results, use room temperature eggs and milk. Chill the assembled pie for at least 30 minutes for clean slices. Substitute gluten-free flour or dairy-free alternatives as needed. If the glaze is too thick, add a splash of cream; if too thin, chill briefly. Pastry cream can be made a day ahead. Store leftovers covered in the fridge for up to 3 days.
Nutrition
- Serving Size: 1 slice (1/12 of pie)
- Calories: 330
- Sugar: 28
- Sodium: 180
- Fat: 15
- Saturated Fat: 8
- Carbohydrates: 45
- Fiber: 2
- Protein: 6
Keywords: Strawberry Boston Cream Pie, Boston Cream Pie, strawberry dessert, chocolate glaze, homemade cake, summer dessert, easy dessert, potluck dessert, bakery style, sponge cake, pastry cream, fruit dessert


