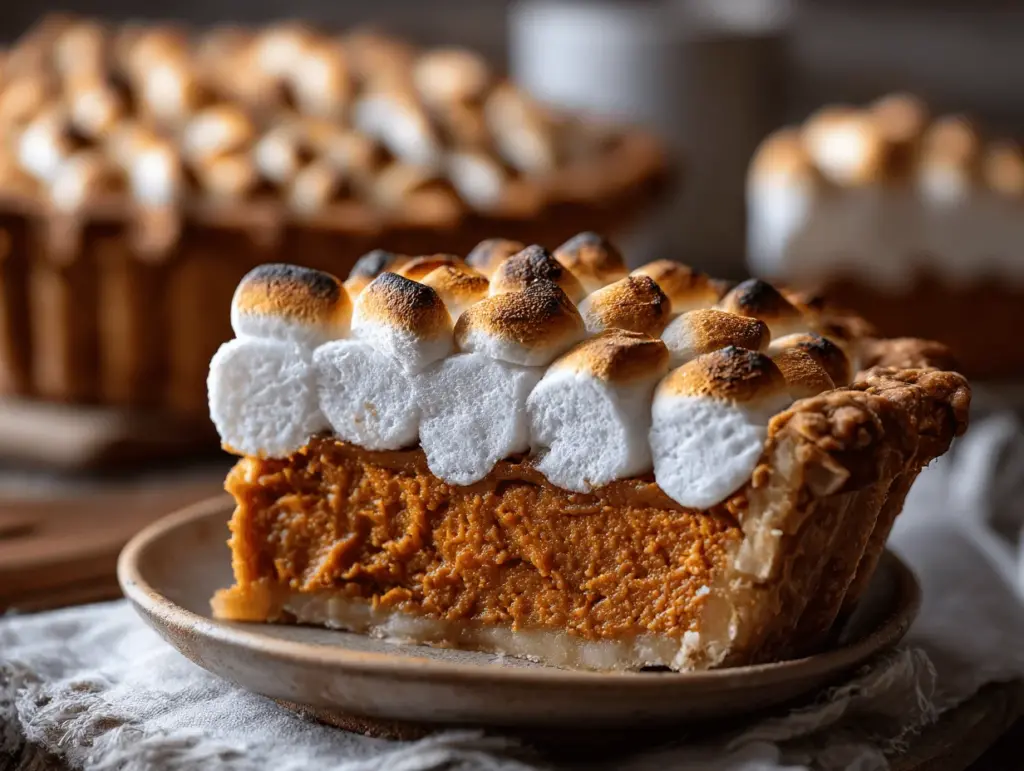
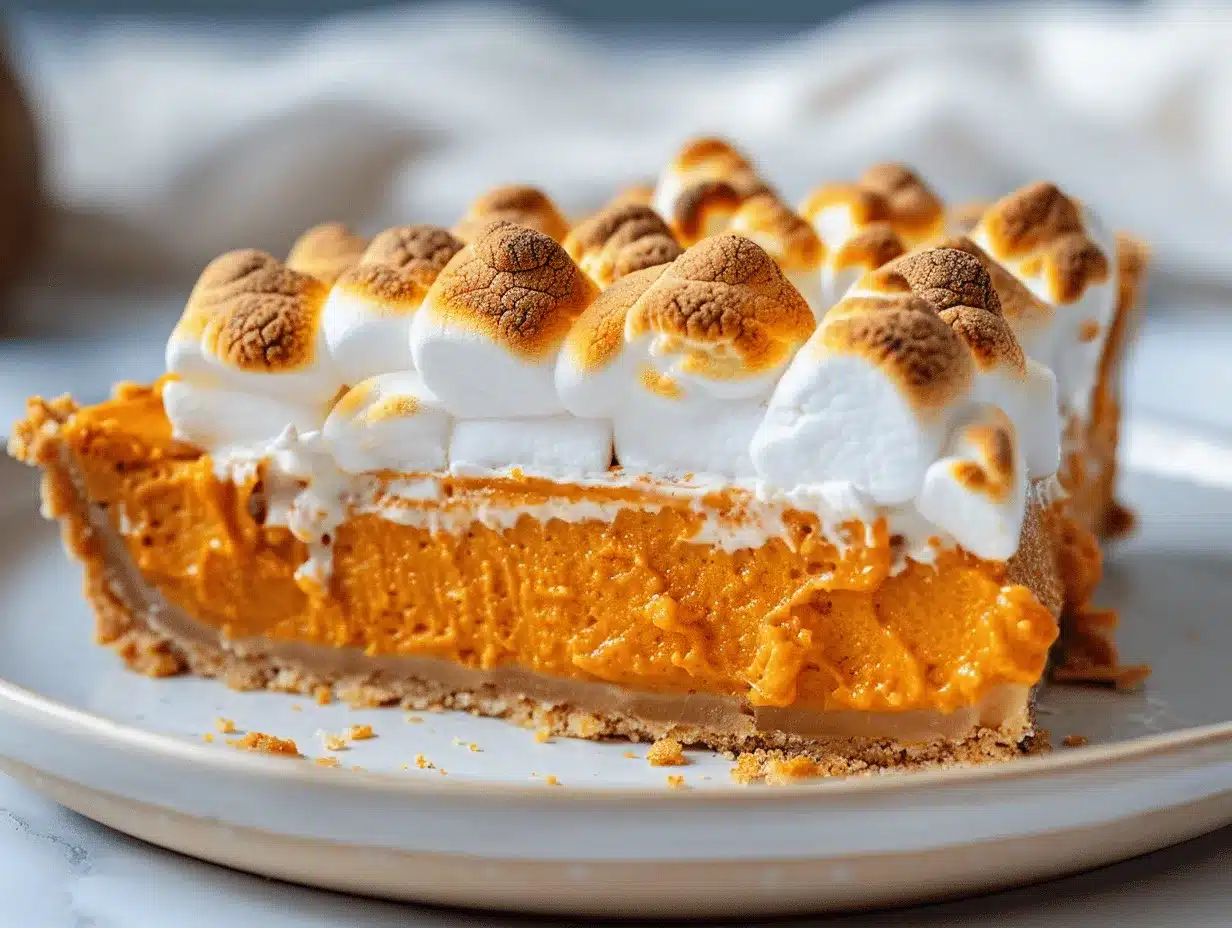
The moment you pull a marshmallow-topped sweet potato pie from the oven, something magical happens. The golden marshmallows gently bubble, their sugary tops just starting to caramelize, sending out that unmistakable aroma—sweet, toasty, and warm. Honestly, it’s impossible not to sneak a taste before the pie even cools down. I’ll admit, more than once I’ve found myself hovering over the kitchen counter, fork in hand, “testing” just one more slice. If you’re searching for a show-stopping, easy holiday dessert that brings everyone running, this marshmallow-topped sweet potato pie slice is the answer.
My love for sweet potato pie started at my grandma’s Thanksgiving table. She used to pile the filling high and finish it off with a big handful of marshmallows—pure bliss for a kid with a sweet tooth! Over the years, I’ve tested (and eaten) my way through dozens of versions, but this recipe has become my gold standard. It’s rich and custardy, with just a hint of cinnamon and nutmeg, and that marshmallow crown is, well, irresistible.
What I love most is how this recipe comes together without fuss. No complicated steps, no fancy gadgets, and—let’s be honest—no one ever complains about having seconds. Whether you’re hosting a big family gathering or just baking for yourself (late-night pie is totally a thing), this easy marshmallow-topped sweet potato pie slice is comfort food at its coziest. If you’re craving something classic, crowd-pleasing, and just a little bit nostalgic, keep reading—you’re about to meet your new favorite dessert recipe.
Why You’ll Love This Marshmallow-Topped Sweet Potato Pie Slice
- Quick & Easy: This sweet potato pie comes together in under 20 minutes of prep, making it the perfect last-minute holiday dessert or weeknight treat.
- Simple Ingredients: Everything you need is probably already in your pantry—no wild goose chase for specialty items required.
- Perfect for Celebrations: Thanksgiving, Friendsgiving, or even a random Tuesday—this pie slice brings the festive spirit to any table.
- Crowd-Pleaser: It’s a safe bet for picky eaters and adventurous foodies alike. Kids adore the gooey marshmallow topping (who wouldn’t?), and grown-ups appreciate the silky, spiced filling.
- Unbelievably Delicious: The combination of creamy sweet potato and toasted marshmallow is a flavor match made in dessert heaven. Seriously, it’s the kind of pie that disappears in minutes.
What sets this marshmallow-topped sweet potato pie slice apart? After baking countless pies, I realized that a perfectly smooth, rich filling (with just the right balance of sweet and spice) is the secret. Blending the cooked sweet potatoes until velvety prevents any stringiness, and using brown sugar adds a warm, caramel-like depth. Finishing with marshmallows instead of meringue or whipped cream gives you that classic, gooey sweet potato casserole vibe—only better, because it’s pie!
This recipe is more than just dessert—it’s a little taste of home, a conversation starter, and a guaranteed way to end any meal on a high note. I love that it’s approachable for new bakers but still impressive enough for seasoned hosts. After all, who can resist a golden, pillowy marshmallow topping? Not me, that’s for sure.
What Ingredients You Will Need
This marshmallow-topped sweet potato pie slice recipe uses everyday ingredients to deliver big flavor and a dreamy, creamy texture. Here’s what you’ll need for a classic pie that’s easy to adapt for your pantry and preferences:
- For the Pie Filling:
- 2 cups cooked sweet potatoes, mashed (about 2 large sweet potatoes or 500g; use orange-fleshed for best color and flavor)
- 1/2 cup brown sugar, packed (light or dark—dark gives a richer taste)
- 1/4 cup granulated sugar
- 2 large eggs, room temperature
- 1/2 cup evaporated milk (or whole milk for a slightly lighter texture; use unsweetened non-dairy milk if needed)
- 1/4 cup unsalted butter, melted and slightly cooled (adds richness)
- 1 teaspoon vanilla extract (pure vanilla is best—skip imitation if you can!)
- 1/2 teaspoon ground cinnamon
- 1/4 teaspoon ground nutmeg
- 1/4 teaspoon salt
- For the Crust:
- 1 unbaked 9-inch pie crust (store-bought or homemade; I love using a buttery, flaky crust for contrast)
- Optional: 1 tablespoon sugar for sprinkling (for extra crunch)
- For the Marshmallow Topping:
- 1 1/2 cups mini marshmallows (about 80g; regular size works in a pinch, but minis melt more evenly)
- Optional: 1/4 cup chopped pecans or walnuts (for nutty crunch, if you’re into that sort of thing)
Ingredient Tips: For the best texture, choose sweet potatoes that are firm and heavy for their size. I usually bake mine (instead of boiling) for deeper flavor. If you need a gluten-free crust, swap in a GF pie shell or press in a mixture of ground nuts and oats. And for that classic marshmallow finish, stick with the mini marshmallows—they melt and toast beautifully.
Substitution Ideas: No evaporated milk? Use half-and-half or full-fat coconut milk. Need to skip eggs? A flax egg (1 tablespoon flaxseed meal + 2.5 tablespoons water) works surprisingly well. And, yes, you can absolutely use canned sweet potato puree in a pinch—just make sure it’s 100% sweet potato, not pie filling with added spices and sugars.
Equipment Needed
- 9-inch Pie Plate: Glass or ceramic bakes evenly; metal works too (just check a few minutes earlier for doneness).
- Mixing Bowls: You’ll want at least two—one for the filling and one for prepping the crust or topping.
- Potato Masher or Food Processor: For the smoothest pie, I use my food processor, but a simple potato masher works if you don’t mind a rustic texture.
- Hand Mixer or Whisk: For blending the filling until creamy. I prefer a hand mixer for speed, but you can go old-school with a sturdy whisk.
- Measuring Cups and Spoons: Accuracy matters, especially for baking.
- Baking Sheet: Placing your pie on a baking sheet helps catch any sticky drips (trust me, cleaning burnt marshmallow off the oven isn’t fun).
- Aluminum Foil: For tenting the edges if they brown too fast.
- Cooling Rack: Helps the crust stay crisp as your pie cools.
If you’re missing a pie plate, a deep-dish cake pan can work as a backup (just line with parchment to help with removal). I’ve even baked this in a cast iron skillet when feeling adventurous—gives the crust a lovely crunch! Budget-wise, basic glass pie plates are affordable and easy to find, and a classic whisk gets the job done if you don’t own a mixer. Just be sure to wash your tools promptly—marshmallow can get surprisingly sticky once cooled.
How to Make Marshmallow-Topped Sweet Potato Pie Slice
-
Prep the Sweet Potatoes (15 minutes):
- Preheat your oven to 375°F (190°C).
- Wash, peel, and cut sweet potatoes into chunks. Place in a saucepan, cover with water, and bring to a boil. Cook until fork-tender, about 12-15 minutes. (Tip: Baking the potatoes at 400°F/200°C for 45 minutes gives deeper flavor, but boiling is faster.)
- Drain well, then mash until completely smooth. You should have about 2 cups (500g) mashed sweet potato. If you see strings, pull them out for a silkier pie.
-
Make the Filling (10 minutes):
- In a large bowl, whisk together mashed sweet potatoes, brown sugar, granulated sugar, eggs, evaporated milk, melted butter, vanilla, cinnamon, nutmeg, and salt.
- For extra-smooth filling, blend with a hand mixer or in a food processor for 1-2 minutes. The mixture should be velvety and pourable, not runny.
- Taste the filling—add a pinch more cinnamon if you want extra spice.
-
Prepare the Crust (2 minutes):
- Place your unbaked 9-inch pie crust into the pie plate. Flute the edges for a classic look, or just crimp with a fork.
- Optional: Sprinkle 1 tablespoon sugar over the bottom for a crispier crust.
-
Fill and Bake (40-45 minutes):
- Pour the sweet potato mixture into the prepared crust and smooth the top with a spatula.
- Place pie plate on a baking sheet (to catch drips) and bake at 375°F (190°C) for 30-35 minutes.
- The pie is ready for marshmallows when the edges are set and the center jiggles just slightly.
- If the crust starts to brown too quickly, cover edges with foil.
-
Add the Marshmallow Topping (5-10 minutes):
- Remove pie from oven and scatter mini marshmallows evenly over the top (about 1 1/2 cups).
- If using, sprinkle chopped nuts over the marshmallows.
- Return to oven and bake 6-8 minutes until marshmallows are puffed and golden brown. Watch closely—marshmallows can burn fast!
- For extra color, broil for 1 minute, but don’t walk away (voice of experience here—burnt marshmallow is not a vibe).
-
Cool and Slice (at least 1 hour):
- Let pie cool on a wire rack for at least an hour before slicing. This helps the filling set and makes for picture-perfect slices.
- For super clean slices, chill the pie for 2 hours and wipe your knife between cuts.
Troubleshooting: If your pie is runny, it probably needs more time to bake. Check with a toothpick in the center—it should come out mostly clean. If your marshmallows brown too fast, tent with foil until the pie is done. And if you forget to tent the crust (I always do), just embrace those rustic, golden edges!
Cooking Tips & Techniques
Over the years, I’ve picked up a few tricks that make this marshmallow-topped sweet potato pie slice foolproof (well, almost—hey, everyone burns marshmallows at least once):
- Roast for Flavor: Roasting sweet potatoes instead of boiling brings out their natural sweetness and gives your filling a deeper, caramel flavor. Just prick, wrap in foil, and bake at 400°F (200°C) for 45 minutes, then scoop and mash.
- Blend for Smoothness: If you want that classic, custardy filling, blend the mixture until velvety. Even a few lumps can make slices less pretty (though still delicious!).
- Don’t Overbake: The pie should jiggle slightly in the center when you take it out. If you overbake, the filling can crack or turn dry.
- Watch the Marshmallows: Marshmallows go from golden to scorched in seconds. If your oven runs hot, check after 5 minutes and turn the pie if needed for even browning.
- Crust Edges: Pie shields or a simple ring of foil can keep your crust from getting too brown. I’ve forgotten this step more times than I can count—and still, pie tastes great, just a little “rustic.”
- Slice Like a Pro: Use a hot knife (run under hot water, then dry) for clean cuts. Wipe between slices for bakery-worthy presentation.
One thing I learned the hard way: don’t skip cooling time! Slicing too soon means the filling runs everywhere (and you miss out on that perfect pie slice moment). And if you ever burn the marshmallows, just gently scrape off the top layer and add a fresh batch for a quick fix—no judgment, promise.
Variations & Adaptations
It’s easy to make this marshmallow-topped sweet potato pie slice your own. Here are a few ways to switch things up, whether you’re accommodating a diet or just feeling creative:
- Gluten-Free: Use a store-bought gluten-free pie crust or make one from almond flour and oat flour. I’ve even pressed in a crust of crushed gluten-free cookies mixed with a little melted butter.
- Dairy-Free: Swap evaporated milk with full-fat coconut milk, and use vegan butter. Most marshmallows are dairy-free, but check the label to be sure (some contain gelatin, so look for vegan-friendly brands if needed).
- Nutty Crunch: Stir 1/2 cup chopped pecans or walnuts into the filling for texture, or sprinkle on top with the marshmallows. It’s a Southern twist that adds a toasty depth.
- Spiced Up: Add a pinch of ground ginger or allspice for extra warmth. I sometimes like to grate in fresh orange zest for a bright, citrusy note.
- Mini Pies: Want single servings? Use a muffin tin and make mini sweet potato pies—just watch the bake time (about 15-18 minutes for minis).
One year, I tried swirling in a spoonful of Nutella before adding the marshmallows—wow, talk about decadent! You can also make this recipe with pumpkin instead of sweet potato for a fun twist. Don’t be afraid to play around—sometimes my “mistakes” turn into family favorites.
Serving & Storage Suggestions
For the ultimate marshmallow-topped sweet potato pie slice experience, serve slightly warm or at room temperature. I love to present each slice with a little extra sprinkle of cinnamon or a drizzle of maple syrup—trust me, it looks as good as it tastes.
This pie pairs beautifully with a cup of hot coffee, chai tea, or even a glass of cold milk. For the holidays, I’ve served it alongside a scoop of vanilla ice cream or fresh whipped cream (because, why not?). If you’re feeling extra, sprinkle a few toasted pecans or a pinch of sea salt on top just before serving for a fancy touch.
Storage: Cover leftovers with foil or plastic wrap and store in the refrigerator for up to 4 days. The marshmallow topping may soften, but the flavors actually deepen. For longer storage, wrap slices tightly and freeze for up to 2 months—thaw overnight in the fridge before serving.
Reheating: Warm individual slices in the microwave for 15-20 seconds, or pop the whole pie in a 300°F (150°C) oven for about 10 minutes. If the marshmallows start to melt too much, let the pie cool a few minutes before serving. I’ve discovered that this pie tastes just as dreamy cold, so don’t stress if you can’t reheat it perfectly.
Nutritional Information & Benefits
Each marshmallow-topped sweet potato pie slice (1/8 of a 9-inch pie) typically contains:
- Calories: ~320
- Fat: 11g
- Carbohydrates: 54g
- Sugar: 32g
- Protein: 4g
- Fiber: 3g
Sweet potatoes are naturally rich in vitamins A and C, plus fiber and antioxidants—so you’re getting a little nutritional boost even in dessert form. Using less butter and swapping in non-dairy milk keeps things lighter, and marshmallows add fun without heavy cream. This pie is vegetarian, and easily made gluten-free or dairy-free with a couple of tweaks.
Allergens to watch for: eggs, dairy (unless substituted), gluten (in traditional crust), and potentially nuts if you use them. I like knowing I can serve this pie to just about anyone with a few swaps. To me, dessert should be about joy and sharing—not stressing over labels.
Conclusion
If you want a dessert that captures the spirit of the holidays—and is as easy as it is impressive—this marshmallow-topped sweet potato pie slice is your ticket. It’s simple, nostalgic, and always a hit, whether you’re making it for family, friends, or yourself. I’ve made this pie for potlucks, bake sales, and quiet nights in, and it never fails to bring a smile (and maybe even requests for seconds).
Don’t be afraid to make it your own—switch up the spices, try a different crust, or add your favorite toppings. The real magic is in sharing something homemade, gooey, and just a little bit over-the-top. I hope you’ll fall in love with this recipe like I have.
Ready to try it? Leave a comment below with your favorite twist, share a photo on Pinterest, or let me know what you think! There’s nothing better than hearing your pie stories—except maybe having another slice.
Frequently Asked Questions
Can I use canned sweet potatoes for this recipe?
Yes, you can! Just make sure to use canned sweet potatoes or yams with no added sugar or syrup. Drain well and mash before measuring.
How do I keep my marshmallows from burning?
Watch them closely during the last few minutes of baking. If they brown too quickly, tent the pie loosely with foil to protect the marshmallows.
Can I make this pie ahead of time?
Absolutely. Bake the pie (without marshmallows), cool, and refrigerate up to 2 days ahead. Add and toast the marshmallows just before serving for the freshest look and taste.
Is it possible to make this pie vegan?
Yes! Use a vegan pie crust, swap eggs for flax eggs, use plant-based milk and butter, and choose vegan marshmallows (many brands are available now).
Can I freeze leftover sweet potato pie?
Yep. Wrap individual slices tightly and freeze for up to 2 months. Thaw overnight in the fridge before serving. Marshmallows may soften, but the flavor stays great.
Pin This Recipe!
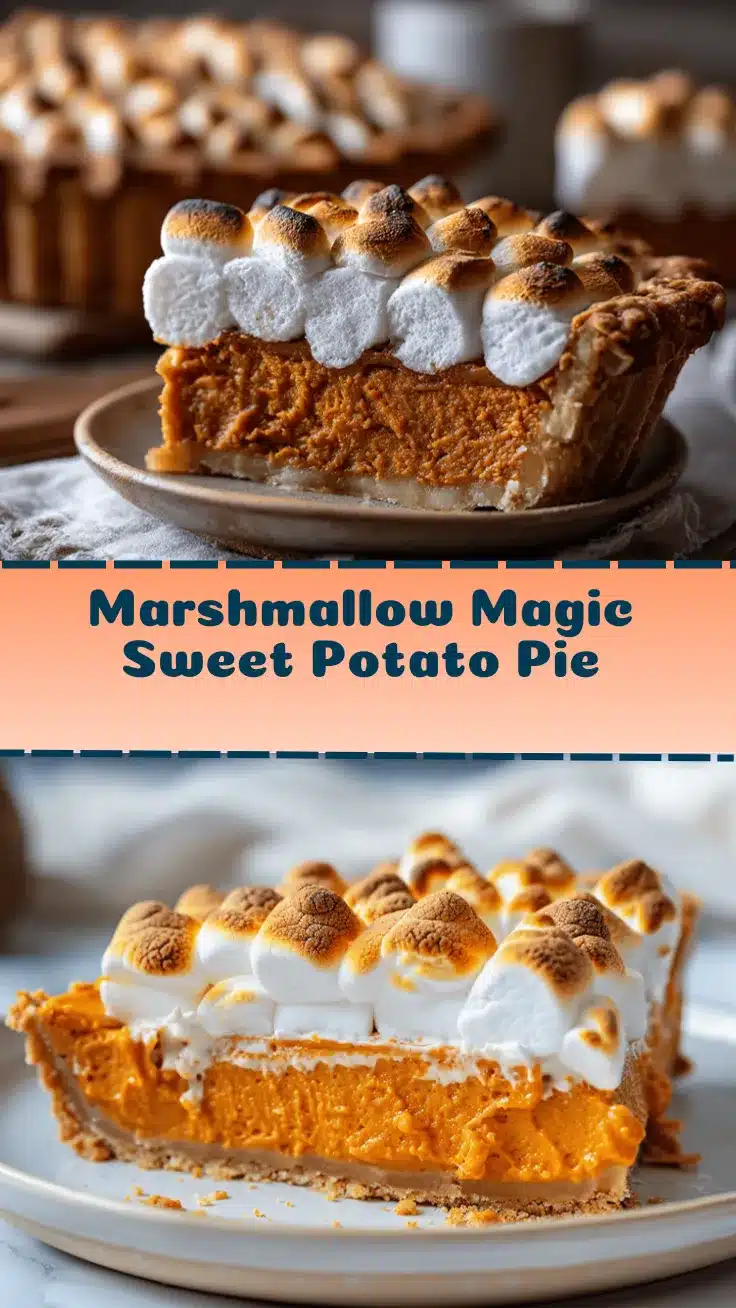
Marshmallow-Topped Sweet Potato Pie Slice

This easy holiday dessert features a creamy, spiced sweet potato filling topped with golden, gooey marshmallows. It’s a nostalgic, crowd-pleasing pie that’s simple to make and perfect for celebrations.
- Prep Time: 20 minutes
- Cook Time: 45 minutes
- Total Time: 1 hour 5 minutes
- Yield: 8 servings 1x
- Category: Dessert
- Cuisine: American
Ingredients
- 2 cups cooked sweet potatoes, mashed (about 2 large sweet potatoes or 500g)
- 1/2 cup brown sugar, packed (light or dark)
- 1/4 cup granulated sugar
- 2 large eggs, room temperature
- 1/2 cup evaporated milk (or whole milk or unsweetened non-dairy milk)
- 1/4 cup unsalted butter, melted and slightly cooled
- 1 teaspoon vanilla extract
- 1/2 teaspoon ground cinnamon
- 1/4 teaspoon ground nutmeg
- 1/4 teaspoon salt
- 1 unbaked 9-inch pie crust (store-bought or homemade)
- Optional: 1 tablespoon sugar for sprinkling on crust
- 1 1/2 cups mini marshmallows (about 80g)
- Optional: 1/4 cup chopped pecans or walnuts
Instructions
- Preheat oven to 375°F (190°C).
- Wash, peel, and cut sweet potatoes into chunks. Boil in water until fork-tender, about 12-15 minutes. Drain and mash until smooth (about 2 cups).
- In a large bowl, whisk together mashed sweet potatoes, brown sugar, granulated sugar, eggs, evaporated milk, melted butter, vanilla, cinnamon, nutmeg, and salt. Blend with a hand mixer or food processor for a velvety texture.
- Place unbaked 9-inch pie crust into pie plate. Flute or crimp edges. Optional: Sprinkle 1 tablespoon sugar over the bottom.
- Pour sweet potato mixture into prepared crust and smooth the top.
- Place pie plate on a baking sheet and bake at 375°F (190°C) for 30-35 minutes, until edges are set and center jiggles slightly. Cover crust edges with foil if browning too quickly.
- Remove pie from oven and scatter mini marshmallows evenly over the top. Sprinkle with chopped nuts if using.
- Return to oven and bake 6-8 minutes until marshmallows are puffed and golden brown. For extra color, broil for 1 minute, watching closely.
- Let pie cool on a wire rack for at least 1 hour before slicing. For cleaner slices, chill for 2 hours and wipe knife between cuts.
Notes
For deeper flavor, roast sweet potatoes instead of boiling. Blend filling for a smooth, custardy texture. Watch marshmallows closely to prevent burning. Use a gluten-free crust or dairy-free substitutes as needed. Let pie cool fully for clean slices.
Nutrition
- Serving Size: 1 slice (1/8 of 9-inch pie)
- Calories: 320
- Sugar: 32
- Sodium: 220
- Fat: 11
- Saturated Fat: 5
- Carbohydrates: 54
- Fiber: 3
- Protein: 4
Keywords: sweet potato pie, marshmallow topping, holiday dessert, Thanksgiving, easy pie, Southern dessert, vegetarian, comfort food


