Introduction
The first time the aroma of freshly brewed espresso mingled with sweet vanilla cake in my kitchen, I knew something special was happening. Picture this: pillowy-soft cupcakes, a hint of coffee, a touch of cocoa, and the creamiest whipped mascarpone frosting you’ll ever try. That’s Tiramisu Latte Cupcakes for you. If you’re a fan of classic tiramisu, but crave the fun and convenience of a cupcake, you’re about to fall in love.
I discovered tiramisu latte cupcakes during a late-night baking session—let’s say I was craving dessert and a coffee pick-me-up at the same time (happens more than I’d like to admit!). I had mascarpone in the fridge and espresso powder in the pantry, so the idea basically baked itself. Honestly, these cupcakes blend the charm of Italian tiramisu with the comfort of a coffeehouse latte, all wrapped in a handheld treat. The whipped mascarpone frosting sets them apart—think creamy, not-too-sweet, and cloud-like.
This recipe is perfect for busy families, cozy gatherings, or anyone who wants to impress with minimal fuss. It’s been my go-to for birthdays, book clubs, and even just because. I’ve tested this recipe a dozen times (seriously—I’ve got cupcake liners for days) and tweaked every step for maximum flavor and ease. So if you adore tiramisu but want something portable, low-maintenance, and Instagram-worthy, these tiramisu latte cupcakes are your new best friend.
Why You’ll Love This Recipe
- Quick & Easy: You’ll have a batch of tiramisu latte cupcakes ready in under an hour—just right for last-minute cravings or spontaneous celebrations.
- Simple Ingredients: No need to hunt down specialty items; most ingredients are probably chilling in your kitchen already.
- Perfect for Any Occasion: These cupcakes shine at brunch, birthdays, or as a sweet pick-me-up after dinner. Honestly, they even make Mondays better.
- Crowd-Pleaser: Kids love the soft, fluffy cake and adults swoon over the espresso kick and creamy mascarpone frosting. I’ve never had leftovers at a party!
- Unbelievably Delicious: The depth of coffee, the hint of cocoa, and the silky frosting combine for a dessert that’s both comforting and just a little bit fancy.
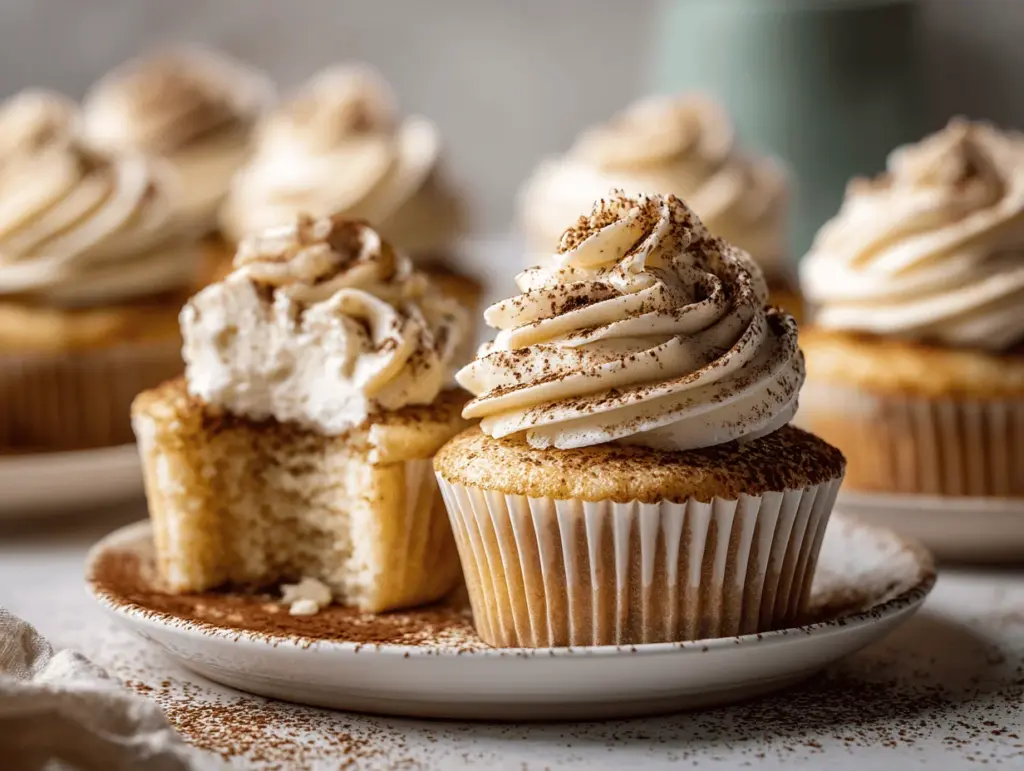
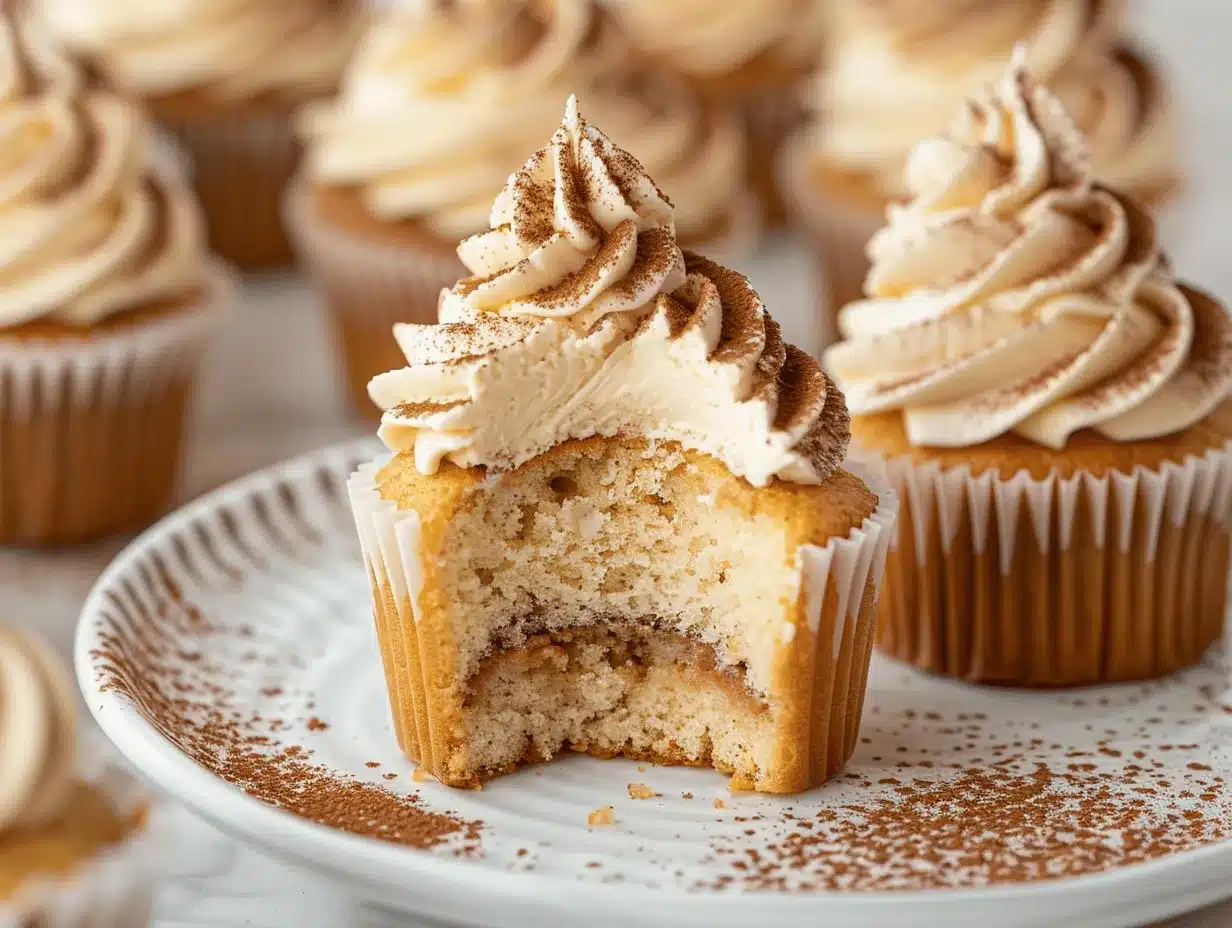
What sets my tiramisu latte cupcakes apart? Instead of just adding coffee flavor, I infuse the batter with espresso and soak the baked cupcakes with a light coffee syrup. The whipped mascarpone frosting is a game-changer—no gritty buttercream here! It’s smooth, light, and tastes like the filling of classic tiramisu. I also use a dusting of cocoa powder for that signature finish. You know, it’s the little touches that matter.
This recipe isn’t just about taste—it’s about experience. You get the rich, cozy flavors of tiramisu with the convenience of cupcakes. No slicing, no plates, just pure joy in every bite. If you’ve ever closed your eyes after a forkful of tiramisu, these cupcakes will give you that same blissful moment. They’re comfort food, but with a little extra sparkle.
What Ingredients You Will Need
This recipe uses simple, wholesome ingredients to deliver bold flavor and a satisfying texture—no fussy shopping trips required! Most of these are pantry staples, and you can easily swap items if needed.
For the Cupcake Batter
- 1 1/2 cups (190g) all-purpose flour
- 1 cup (200g) granulated sugar
- 1/2 cup (120ml) whole milk (room temperature for best results)
- 1/4 cup (60ml) strong brewed espresso or coffee (cooled)
- 1/2 cup (115g) unsalted butter (softened)
- 2 large eggs (room temperature)
- 1 1/2 teaspoons baking powder
- 1/2 teaspoon baking soda
- 1/4 teaspoon salt
- 1 teaspoon vanilla extract (I love Nielsen-Massey for pure flavor)
- 2 teaspoons espresso powder (for extra coffee punch)
For the Coffee Syrup
- 1/3 cup (80ml) brewed espresso or strong coffee
- 1 tablespoon granulated sugar
- 1 teaspoon coffee liqueur (optional, but gives authentic tiramisu flavor)
For the Whipped Mascarpone Frosting
- 1 cup (240g) mascarpone cheese (use Galbani or BelGioioso for creaminess)
- 1 cup (240ml) heavy whipping cream (cold)
- 1/2 cup (60g) powdered sugar (add more for sweeter frosting)
- 1 teaspoon vanilla extract
For Garnish
- Unsweetened cocoa powder (for dusting)
- Chocolate shavings or curls (optional but gorgeous!)
Substitution Tips: Swap whole milk for almond or oat milk if you need dairy-free. Use gluten-free all-purpose flour for sensitive diets. If you don’t have espresso powder, instant coffee works in a pinch (just use a bit more for flavor).
For mascarpone, don’t use cream cheese! The flavor is just not right for tiramisu. If you’re watching sugar, you can reduce it in the frosting or syrup. And for the coffee liqueur—skip it for kids, but adults will appreciate the depth.
Everything in this ingredient list has a job: structure, moisture, flavor, or that signature tiramisu vibe. Trust me, these choices make the cupcakes sing.
Equipment Needed
- 12-cup muffin tin (standard size)
- Paper cupcake liners (or reusable silicone ones—less mess!)
- Electric mixer or stand mixer (hand mixing works, but whipped frosting needs power)
- Medium and large mixing bowls
- Fine mesh sieve (for dusting cocoa powder)
- Small saucepan (for coffee syrup)
- Spatula and whisk
- Ice cream scoop or spoon (for filling cupcake liners evenly)
- Piping bag with round tip (for pretty frosting swirls—zip-top bag with the corner snipped works too)
- Cake tester or toothpick
If you don’t have an electric mixer, a sturdy whisk can work for the cupcake batter, but whipping mascarpone frosting by hand is a workout—been there, arms sore! For piping, I’ve used zip-top bags for years when I’m out of piping bags. Maintenance tip: rinse your mesh sieve immediately after dusting cocoa to prevent clogging. Budget-friendly? Silicone cupcake liners are reusable and save you money over time.
Preparation Method
-
Preheat & Prep: Preheat your oven to 350°F (175°C). Line a 12-cup muffin tin with cupcake liners. Set out all ingredients to come to room temperature for best mixing.
-
Mix Dry Ingredients: In a medium bowl, whisk together 1 1/2 cups (190g) flour, 1 1/2 tsp baking powder, 1/2 tsp baking soda, 1/4 tsp salt, and 2 tsp espresso powder. The espresso powder will deepen the coffee flavor—don’t skip!
-
Cream Butter & Sugar: In a large bowl, beat 1/2 cup (115g) softened butter with 1 cup (200g) sugar until light and fluffy (about 2-3 minutes). The mixture should be pale and slightly voluminous.
-
Add Eggs & Vanilla: Add 2 eggs one at a time, beating well after each addition. Stir in 1 tsp vanilla extract. If your batter looks curdled, it’s okay—the flour will fix it.
-
Combine Wet & Dry: With the mixer on low, add half the flour mixture to the butter mixture, then pour in 1/2 cup (120ml) milk and 1/4 cup (60ml) espresso. Add the remaining flour mixture. Mix until just combined—don’t overwork or your cupcakes will be dense. Batter should be smooth and faintly tan from the coffee.
-
Fill & Bake: Divide the batter evenly among cupcake liners (use an ice cream scoop for consistency). Bake at 350°F (175°C) for 18-22 minutes until a toothpick inserted in the center comes out clean. Tops should be lightly golden and spring back when touched.
-
Make Coffee Syrup: While cupcakes bake, combine 1/3 cup (80ml) brewed espresso, 1 tbsp sugar, and 1 tsp coffee liqueur (if using) in a small saucepan. Heat gently until sugar dissolves, about 2 minutes. Cool slightly.
-
Brush or Soak Cupcakes: Once cupcakes cool for 5 minutes in the pan, poke a few holes in each with a toothpick. Brush coffee syrup generously over each cupcake, letting it soak in. (If you over-soak, cupcakes get soggy—go slowly, about 1-2 tsp per cupcake.)
-
Make Whipped Mascarpone Frosting: In a chilled bowl, whip 1 cup (240ml) heavy cream to soft peaks using a mixer. Add 1 cup (240g) mascarpone, 1/2 cup (60g) powdered sugar, and 1 tsp vanilla. Whip until thick and fluffy—don’t overmix or it could curdle. It should look like billowy clouds and taste mildly sweet.
-
Frost & Garnish: Pipe or spread frosting onto cooled cupcakes. Dust with unsweetened cocoa powder and add chocolate shavings if desired. The cocoa gives that classic tiramisu finish—don’t skip!
Troubleshooting: If cupcakes sink, check baking powder freshness. Frosting too runny? Chill all ingredients and bowl, whip a bit longer. Over-mixing leads to dense cupcakes—one of my early mistakes!
Personal Tips: Make the frosting while cupcakes cool for perfect timing. Clean as you go for less chaos (learned the hard way). If you want extra coffee kick, double the espresso powder. These cupcakes fill your kitchen with a coffee shop aroma—pure joy.
Cooking Tips & Techniques
- Don’t Overmix: Once you add flour, mix just until no dry spots remain. Overmixing develops gluten and makes cupcakes tough (I’ve had a few hockey puck batches—trust me).
- Room Temperature Ingredients: Butter, eggs, and milk at room temp blend smoother and make lighter cupcakes. If you forget, microwave milk for 10 seconds and submerge eggs in warm water for 5 minutes.
- Whipped Frosting Perfection: Chill your mixing bowl and beaters before whipping cream and mascarpone. If frosting seems loose, pop it in the fridge for 10 minutes then whip again.
- Consistent Cupcake Size: Use an ice cream scoop—ensures even baking and pretty tops.
- Avoid Soggy Cupcakes: Brush coffee syrup lightly. Wait for cupcakes to cool, then brush in layers. A little patience saves your batch.
- Multitasking: Start frosting prep while cupcakes bake. Clean up between steps so you’re not swamped at the end (my kitchen has seen some disasters, but this keeps things sane).
- Classic Tiramisu Touch: Always dust with cocoa for that authentic look and flavor. I once forgot and my guests noticed!
Consistency comes from following these little details. Timing matters—don’t rush the cooling. I learned this after my frosting melted one summer afternoon. For maximum coffee flavor, use espresso powder and brewed espresso (not just one!).
Variations & Adaptations
- Gluten-Free: Substitute the all-purpose flour with a gluten-free blend (like Bob’s Red Mill). Cupcakes remain soft and flavorful—my neighbor couldn’t tell the difference!
- Dairy-Free: Use almond or oat milk, and swap mascarpone with a vegan cream cheese (I’ve tried Kite Hill, works well). Use coconut whipped cream for the frosting base.
- Mocha Tiramisu Cupcakes: Add 2 tablespoons unsweetened cocoa powder to the batter and use chocolate liqueur in the syrup for an extra chocolaty twist.
- Seasonal Touch: For spring, fold in 1/2 cup chopped strawberries into the batter. In winter, add a pinch of cinnamon and nutmeg for warmth.
- Nut-Free Option: All ingredients are nut-free, but always check mascarpone labels for cross-contamination if allergies are severe.
One of my favorite tweaks? Swapping the coffee syrup for a caramel drizzle—kids go wild for it. For adults, a splash of amaretto in the syrup is divine. You can bake these as mini cupcakes for parties; just reduce the baking time by 5 minutes.
Serving & Storage Suggestions
Serve tiramisu latte cupcakes at room temperature for the softest cake and creamiest frosting. Arrange on a cake stand and dust with extra cocoa just before guests arrive—it’s a showstopper! Pair with espresso, cappuccino, or even a glass of milk for kids. These cupcakes are a great dessert on their own, but also lovely alongside fresh berries or a simple fruit salad.
For storage, keep cupcakes in an airtight container in the fridge for up to 3 days. The mascarpone frosting needs refrigeration, but let cupcakes sit on the counter for 20 minutes before serving for best flavor. Freeze unfrosted cupcakes for up to one month; thaw and frost fresh. To reheat (if you like a warm cupcake), microwave for 10 seconds—just don’t melt the frosting!
Flavor deepens overnight, so they’re even better the next day. I often make them ahead for parties—the frosting holds up beautifully. If you’re gifting, package in cupcake boxes with a little ice pack for safe travels.
Nutritional Information & Benefits
Each tiramisu latte cupcake (with frosting) is approximately 220 calories, with 10g fat, 28g carbs, and 3g protein. They’re not health food, but they’re lighter than traditional tiramisu. The mascarpone brings calcium and protein, and swapping in whole milk adds a bit more nutrition.
If you use gluten-free flour or dairy-free milk, these cupcakes can fit special diets. Major allergens include wheat, dairy, and eggs, so check substitutions if needed. For me, the real benefit is portion control—one cupcake gives you all the joy of tiramisu without overindulging. Plus, the whipped frosting means you use less sugar than a standard buttercream.
My personal wellness tip: enjoy with a cup of coffee and a friend—dessert is better shared!
Conclusion
If you’re after a dessert that’s equal parts cozy and impressive, these tiramisu latte cupcakes with whipped mascarpone frosting are it. They pack all the flavor and charm of classic tiramisu—layered coffee, cocoa, and cream—into a handheld, fuss-free treat. I love making these for birthdays, holidays, or just when I need a pick-me-up.
Customize the recipe to your taste—switch up flavors, make it gluten-free, or go mini for a party platter. The method is simple, the results are always stunning, and you’ll never look at cupcakes the same way. I bake these for friends, family, and sometimes just for myself (no shame!).
Try them and let me know how it goes—drop a comment below, share your own twist, or tag me on social media so I can see your gorgeous cupcakes. Honestly, baking is always better together—so let’s make some sweet memories, one cupcake at a time!
FAQs
Can I make tiramisu latte cupcakes ahead of time?
Absolutely! Bake cupcakes and make frosting up to a day ahead. Store separately and frost just before serving for freshest results.
What if I don’t have mascarpone cheese?
Use full-fat cream cheese as a last resort, but the flavor will be different. For true tiramisu taste, mascarpone is key.
Can I make these cupcakes without coffee liqueur?
Yes, just skip the liqueur for a kid-friendly version. The coffee syrup will still give plenty of tiramisu flavor.
How do I prevent the frosting from becoming runny?
Use cold ingredients, a chilled bowl, and whip just until thick. If it’s too soft, refrigerate for 15 minutes before piping.
Can I freeze tiramisu latte cupcakes?
Freeze unfrosted cupcakes in an airtight container for up to a month. Thaw, frost, and serve fresh for the best texture.
Pin This Recipe!

Tiramisu Latte Cupcakes – Easy Homemade Recipe with Whipped Mascarpone Frosting
These Tiramisu Latte Cupcakes combine the rich flavors of classic tiramisu with the convenience of a handheld cupcake, featuring espresso-infused cake, a coffee syrup soak, and a cloud-like whipped mascarpone frosting. Perfect for any occasion, they’re easy to make, crowd-pleasing, and deliver all the cozy charm of your favorite Italian dessert.
- Prep Time: 20 minutes
- Cook Time: 22 minutes
- Total Time: 50 minutes
- Yield: 12 cupcakes 1x
- Category: Dessert
- Cuisine: Italian
Ingredients
- 1 1/2 cups (190g) all-purpose flour
- 1 cup (200g) granulated sugar
- 1/2 cup (120ml) whole milk, room temperature
- 1/4 cup (60ml) strong brewed espresso or coffee, cooled
- 1/2 cup (115g) unsalted butter, softened
- 2 large eggs, room temperature
- 1 1/2 teaspoons baking powder
- 1/2 teaspoon baking soda
- 1/4 teaspoon salt
- 1 teaspoon vanilla extract
- 2 teaspoons espresso powder
- 1/3 cup (80ml) brewed espresso or strong coffee (for syrup)
- 1 tablespoon granulated sugar (for syrup)
- 1 teaspoon coffee liqueur (optional, for syrup)
- 1 cup (240g) mascarpone cheese
- 1 cup (240ml) heavy whipping cream, cold
- 1/2 cup (60g) powdered sugar
- 1 teaspoon vanilla extract (for frosting)
- Unsweetened cocoa powder (for dusting)
- Chocolate shavings or curls (optional, for garnish)
Instructions
- Preheat your oven to 350°F (175°C). Line a 12-cup muffin tin with cupcake liners. Set out all ingredients to come to room temperature.
- In a medium bowl, whisk together flour, baking powder, baking soda, salt, and espresso powder.
- In a large bowl, beat softened butter with granulated sugar until light and fluffy, about 2-3 minutes.
- Add eggs one at a time, beating well after each addition. Stir in vanilla extract.
- With mixer on low, add half the flour mixture to the butter mixture, then pour in milk and espresso. Add remaining flour mixture. Mix until just combined.
- Divide batter evenly among cupcake liners. Bake for 18-22 minutes, until a toothpick inserted in the center comes out clean.
- While cupcakes bake, combine brewed espresso, sugar, and coffee liqueur (if using) in a small saucepan. Heat gently until sugar dissolves, about 2 minutes. Cool slightly.
- Let cupcakes cool for 5 minutes in the pan. Poke a few holes in each with a toothpick. Brush coffee syrup generously over each cupcake, about 1-2 teaspoons per cupcake.
- In a chilled bowl, whip heavy cream to soft peaks. Add mascarpone, powdered sugar, and vanilla. Whip until thick and fluffy. Do not overmix.
- Pipe or spread frosting onto cooled cupcakes. Dust with unsweetened cocoa powder and add chocolate shavings if desired.
Notes
For best results, use room temperature ingredients and chill your mixing bowl for the frosting. Don’t overmix the batter or frosting. Brush coffee syrup lightly to avoid soggy cupcakes. Cupcakes can be made gluten-free or dairy-free with substitutions. Store in the fridge for up to 3 days; flavor deepens overnight.
Nutrition
- Serving Size: 1 cupcake
- Calories: 220
- Sugar: 17
- Sodium: 140
- Fat: 10
- Saturated Fat: 6
- Carbohydrates: 28
- Protein: 3
Keywords: tiramisu cupcakes, latte cupcakes, mascarpone frosting, coffee dessert, Italian cupcakes, easy tiramisu, espresso cupcakes, homemade cupcakes, party dessert, whipped frosting


