Introduction
The very first bite of this No-Bake Mocha Oreo Icebox Pie is like a cool, creamy hug on a hot summer afternoon—impossibly smooth, with a gentle buzz of coffee and that unmistakable Oreo chocolate crunch. I’ll be honest: I first whipped up this dreamy pie during a summer heatwave when turning on the oven felt like a crime. The whole family was craving something sweet (and let’s face it, I needed a caffeine boost just to make it through the day). That’s when the idea for a mocha Oreo icebox pie hit me. I’d seen a similar dessert at a coffee shop years ago, but their version was fiddly and required a fancy espresso machine. I knew it could be easier—and honestly, even better—at home.
This recipe is now my go-to for potlucks, lazy weekends, and anytime I want to impress coffee lovers without breaking a sweat. What I love most about this No-Bake Mocha Oreo Icebox Pie is how it brings together everyone’s favorite flavors: rich chocolate, creamy coffee mousse, and the satisfying crunch of an Oreo cookie crust. Kids love it for the cookies, adults love it for the mocha kick, and I love it because it takes barely any effort and tastes like a treat from a fancy bakery. If you have a soft spot for coffee desserts, you’ll find yourself making this again and again. After testing this pie at least a dozen times (and tweaking the ratios until friends practically begged for the recipe), I can say with total confidence—this is the ultimate summer dessert for coffee fans.
Whether you’re throwing a backyard BBQ, hosting brunch, or just need something cold and chocolatey to get you through a heatwave, this no-bake mocha Oreo icebox pie delivers pure creamy coffee bliss, every single time.
Why You’ll Love This Recipe
If you’re a coffee enthusiast or just love an easy, crowd-pleasing dessert, this No-Bake Mocha Oreo Icebox Pie will win you over from the very first slice. After many rounds of taste-testing and a few accidental kitchen flops (don’t ask about the time I forgot to chill the whipped cream), I can honestly say this pie is foolproof and ridiculously satisfying. Here’s why it stands out:
- Quick & Easy: No oven, no water baths, no complicated steps. You’ll have this pie chilling in the fridge in about 20 minutes—perfect for those last-minute cravings or unplanned guests.
- Simple Ingredients: All you need are Oreos, instant coffee, cream cheese, and a few pantry staples. There’s a good chance you already have everything on hand.
- Perfect for Summer: This is the ultimate cold dessert for sweltering days. It’s light, refreshing, and won’t heat up your kitchen.
- Crowd-Pleaser: Kids go wild for the cookies and cream, while adults appreciate that subtle coffee flavor. It’s been a hit at every family gathering and potluck I’ve brought it to.
- Unbelievably Delicious: The combination of creamy mocha filling and crunchy Oreo crust is pure comfort food—but with a little grown-up twist.
What truly makes this No-Bake Mocha Oreo Icebox Pie different is the way the coffee is balanced—just enough to give you that café vibe without overpowering the chocolate. I use a little instant espresso powder for bold flavor, but you can use whatever instant coffee you like. And by folding whipped cream into the filling, the texture is airy and mousse-like instead of dense. It’s one of those desserts that makes you close your eyes and savor every spoonful. Honestly, it’s my secret weapon for making any summer gathering feel extra special—without any stress or oven drama.
If you’ve ever wanted to serve a dessert that looks and tastes like a showstopper but comes together with zero hassle, this pie is your answer. Whether you’re a baking newbie or a seasoned cook, you’ll find yourself coming back to this recipe all summer long.
What Ingredients You Will Need
This No-Bake Mocha Oreo Icebox Pie is all about using simple, readily available ingredients to create a dessert that feels way fancier than the sum of its parts. Most of these are pantry staples (and let’s be real, who doesn’t have a secret Oreo stash?). Here’s what you’ll need:
- For the Crust:
- Oreo cookies – 24 whole cookies (regular, not Double Stuf; about 250 grams). The filling helps the crust stick together.
- Unsalted butter, melted – 5 tablespoons (70 grams). This binds the crust and adds a rich flavor.
- For the Mocha Filling:
- Cream cheese – 8 ounces (225 grams), softened. Go for full-fat for the creamiest texture (I use Philadelphia brand for consistency).
- Powdered sugar – 3/4 cup (90 grams). Sifts in easily and blends without lumps.
- Instant espresso powder (or instant coffee granules) – 2 tablespoons (10 grams). This gives the pie its signature mocha kick; adjust to taste.
- Vanilla extract – 1 teaspoon (5 ml). Rounds out the flavors.
- Heavy whipping cream – 1 1/2 cups (360 ml), cold. Whips up fluffy and lightens the filling.
- Dark chocolate, melted and cooled – 3 ounces (85 grams). You can use chocolate chips or a chopped chocolate bar; this adds depth and a fudgy finish.
- For the Topping (Optional but highly recommended):
- Additional whipped cream – about 1 cup (240 ml), for swirling on top.
- Oreo cookies, crushed – 3 to 4 cookies (about 35 grams), for garnish.
- Chocolate shavings or cocoa powder – a sprinkle, for that fancy coffee shop look.
A couple of ingredient notes: If you want to make it gluten-free, just swap in gluten-free chocolate sandwich cookies. For a deeper mocha vibe, use dark chocolate with at least 60% cacao. And if you’re sensitive to caffeine, feel free to go decaf—the flavor will still be spot on. In a pinch, you can use store-brand cream cheese, but I’ve found the name brands hold up better in the filling.
Honestly, the best part about this recipe is how flexible it is. If you don’t have instant espresso, regular instant coffee works great. And you can mix up the toppings—sometimes I add a drizzle of chocolate syrup or a handful of chocolate-covered espresso beans for extra flair.
Equipment Needed
Making this No-Bake Mocha Oreo Icebox Pie doesn’t require any fancy gadgets—just a few basics you probably already own. Here’s what you’ll need:
- 9-inch (23 cm) pie pan – Classic glass or metal works; a springform pan also makes for easy slicing.
- Food processor or blender – For crushing Oreos into fine crumbs. If you don’t have one, a sturdy zip-top bag and a rolling pin (or a heavy skillet!) work just as well. I’ve definitely gone the bag-and-rolling-pin route after a few late-night cravings.
- Mixing bowls – At least two; one for the crust, one for the filling.
- Hand mixer or stand mixer – For whipping the cream and blending the filling. A sturdy whisk and some elbow grease can do the job if you’re feeling ambitious.
- Measuring cups and spoons – Precise measurements really do make a difference with creamy desserts like this.
- Rubber spatula – Essential for scraping every bit of mocha filling out of the bowl (and for taste-testing, if you ask me).
If you don’t own a pie pan, a square 8×8-inch (20×20 cm) baking dish or even a deep-dish cake pan will work in a pinch. Just be sure to chill your mixing bowl and beaters before whipping the cream—this helps it set up beautifully. And here’s a tip: a cheap springform pan from the dollar store works wonders for no-bake pies and makes for cleaner slices, especially when you want that Pinterest-perfect presentation.
Preparation Method
-
Prepare the Oreo Crust:
- Place 24 Oreo cookies (about 250 grams) in a food processor and pulse until you have fine crumbs. If you don’t have a processor, put the cookies in a zip-top bag and crush them with a rolling pin until no big chunks remain.
- Add 5 tablespoons (70 grams) melted unsalted butter and pulse or stir until the crumbs are evenly moistened. The mixture should look like wet sand and clump together when pressed.
- Press the crumbs firmly into the bottom and up the sides of a 9-inch (23 cm) pie pan. Use the bottom of a measuring cup or glass for smooth, even pressure. Pop the crust in the freezer while you prep the filling (about 10 minutes).
-
Make the Mocha Filling:
- In a large mixing bowl, beat 8 ounces (225 grams) softened cream cheese with 3/4 cup (90 grams) powdered sugar, 2 tablespoons (10 grams) instant espresso powder, and 1 teaspoon (5 ml) vanilla extract. Mix until smooth and fluffy, about 2-3 minutes. If your cream cheese is too cold, you’ll get lumps, so let it soften at room temp first.
- Pour in 3 ounces (85 grams) melted and cooled dark chocolate. Beat again until fully combined—it should look luscious and chocolatey.
- In a separate chilled bowl, whip 1 1/2 cups (360 ml) cold heavy cream to stiff peaks. This takes about 3-4 minutes with a mixer (don’t overmix or you’ll end up with butter!).
- Gently fold the whipped cream into the mocha cream cheese mixture in two additions. Use a rubber spatula and a light hand to keep the filling fluffy. The finished mixture should be mousse-like and hold soft peaks.
-
Assemble the Pie:
- Spoon the mocha filling into the chilled Oreo crust. Smooth the top with a spatula, swirling for a little texture if you like. If you want to get fancy, reserve a little filling for piping decorative rosettes on top.
-
Chill:
- Cover the pie loosely with plastic wrap or foil and refrigerate for at least 4 hours, or overnight. This step is crucial—the filling needs time to set (trust me, I once sliced too soon, and it was more like mocha pudding!).
-
Add Toppings:
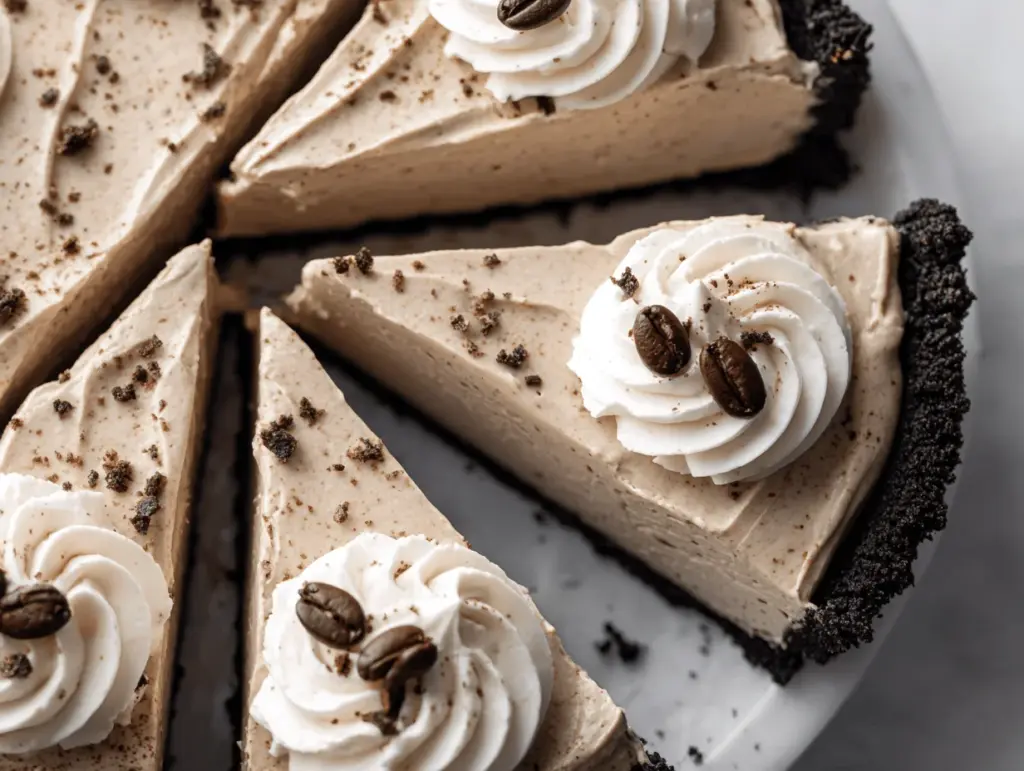
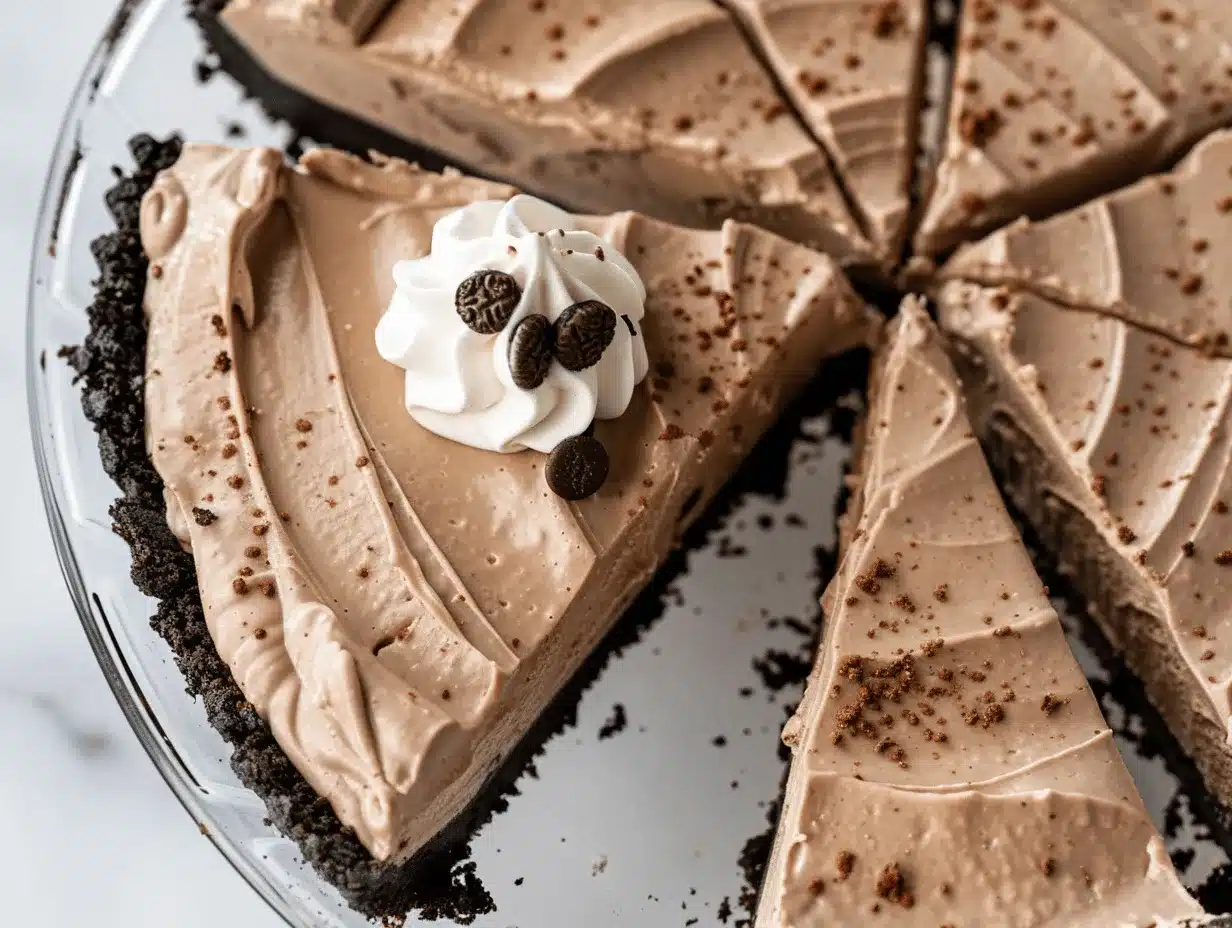
- Just before serving, top with additional whipped cream (about 1 cup/240 ml), a sprinkle of crushed Oreos, and chocolate shavings or a dusting of cocoa powder for that classic café look.
-
Slice and Serve:
- Use a sharp knife dipped in hot water (and wiped dry) for the cleanest slices. Serve chilled for best texture and flavor.
Troubleshooting tips: If your crust cracks, don’t worry—just patch it with a little extra crumb mixture. If your filling looks grainy, double-check that your cream cheese was fully softened before mixing. And don’t skip the chill time; it’s what makes the pie hold together!
Personal hack: Prep the crust and filling the night before a party and finish with toppings right before guests arrive. The pie slices like a dream after a long chill, and the flavors deepen overnight. Plus, you get to enjoy the party instead of fussing in the kitchen!
Cooking Tips & Techniques
Making the perfect No-Bake Mocha Oreo Icebox Pie isn’t about fancy skills—it’s about the little details that make a big difference. Here’s what I’ve learned through many, many batches (including a few “oops” moments!):
- Chill Everything: Cold cream whips faster and holds its shape better. I pop my mixing bowl and beaters in the freezer for 10 minutes before starting.
- Don’t Overbeat: Stop whipping the cream as soon as stiff peaks form. Overmixing can turn it grainy or even buttery—learned that the hard way!
- Gentle Folding: When combining the whipped cream with the mocha mixture, use slow, wide strokes. This keeps the filling airy and mousse-like.
- Even Crust Thickness: Press the Oreo crumbs evenly up the sides and across the bottom of the pan. If it’s too thin in spots, it’ll crumble when sliced.
- Let It Set: The hardest part is waiting, but don’t skimp on chilling time. Four hours is minimum for neat slices; overnight is even better for the best texture and flavor meld.
- Slice Smart: For the prettiest pieces, dip your knife in hot water and wipe it between slices. This little trick makes a huge difference on presentation, especially if you’re sharing pics online!
If you’re multitasking (like wrangling kids or prepping for a party), assemble the crust and filling separately, then combine when you have a moment. And if your filling cracks on top after chilling, cover it with a thick swirl of whipped cream—no one will ever know. Trust me, I’ve had to “rescue” a few pies this way and they still disappeared in minutes.
Consistency and patience are the real secrets here. Even if your pie isn’t picture-perfect, it’ll still taste like creamy, coffee-chocolate heaven!
Variations & Adaptations
One of the best things about this No-Bake Mocha Oreo Icebox Pie is how easily you can tweak it to fit different cravings or dietary needs. Here are a few of my favorite ways to switch things up:
- Gluten-Free: Use gluten-free chocolate sandwich cookies for the crust. The taste and texture are almost identical—you won’t miss a thing.
- Decaf or Kid-Friendly: Swap in decaf instant coffee for a caffeine-free version that’s safe for all ages. My niece loves this with extra whipped cream and sprinkles!
- Vegan Option: Go dairy-free by using vegan cream cheese (like Kite Hill), coconut cream for whipping, and plant-based butter. Choose vegan chocolate sandwich cookies for the crust.
- Flavor Twists: Use mint Oreos and a splash of peppermint extract for a mocha-mint pie, or add a layer of caramel sauce between the crust and filling for a caramel-mocha swirl.
- Different Cooking Methods: If you don’t have a pie pan, use a loaf pan lined with parchment for sliceable bars. Or make individual pies in mason jars for cute (and portable) dessert jars—perfect for picnics!
My personal favorite? Swapping the instant espresso for hazelnut instant coffee and adding roasted chopped hazelnuts on top. It’s like a fancy hazelnut mocha from your favorite café, but in pie form. Honestly, once you try this recipe, you’ll find yourself dreaming up endless ways to make it your own.
Serving & Storage Suggestions
For the best experience, serve this No-Bake Mocha Oreo Icebox Pie thoroughly chilled—straight from the fridge, it holds its shape and that creamy, mousse-like texture. I love to pile on a big cloud of whipped cream and a generous sprinkle of crushed Oreos or chocolate shavings. For extra flair, a dusting of cocoa powder or a few chocolate-covered espresso beans on top look super cute in photos (and taste amazing!).
Pair the pie with iced coffee or a glass of cold brew for the ultimate coffee-lover’s dessert, or serve alongside fresh berries and a little mint to brighten things up. If you’re hosting brunch, it makes a showstopping centerpiece—just slice and serve right from the pan.
To store, cover the pie tightly with plastic wrap or aluminum foil and refrigerate for up to 4 days. The crust stays crisp and the flavors meld, making it even better on day two. For longer storage, freeze slices individually (wrapped in plastic and foil) for up to 1 month. Thaw in the fridge before serving. When reheating isn’t needed (since it’s no-bake), you’re always just a fork away from creamy coffee bliss!
Pro tip: As the pie sits, the coffee and chocolate flavors deepen—so if you can wait a day, it’s worth it. But honestly, leftovers are rare at my house!
Nutritional Information & Benefits
Here’s a rough estimate per slice (assuming 10 slices): Calories: 370, Fat: 25g, Carbs: 35g, Sugar: 22g, Protein: 4g. Keep in mind this is a treat, but it does offer a little calcium and protein from the cream cheese and whipped cream.
The No-Bake Mocha Oreo Icebox Pie is naturally egg-free and can be made gluten-free or vegan with simple swaps. There’s a little caffeine from the espresso powder, so keep that in mind if you’re serving kids or caffeine-sensitive folks. Common allergens include dairy, wheat (in Oreos), and possibly soy (check your chocolate and cookies).
From a wellness perspective, I find that homemade desserts like this let you control the ingredients—use organic cream, fair-trade chocolate, or low-sugar cookies if you like. And honestly, a slice now and then is pure joy—especially when shared with friends.
Conclusion
If you’re looking for a no-fuss dessert that brings together the best of chocolate and coffee, this No-Bake Mocha Oreo Icebox Pie is a must-try. It’s creamy, cool, and packed with flavor—perfect for summer, or honestly, anytime you need a sweet pick-me-up.
Don’t be afraid to make it your own by tweaking the toppings or adapting for special diets. I love this pie not just for its taste, but because it’s so reliable—every time I serve it, people ask for the recipe (and sometimes, for seconds!).
Give this pie a try and let me know in the comments how it turns out or what creative spins you add. If you share your version on social media, tag me so I can see your gorgeous creations! Here’s to creamy coffee bliss and making sweet memories, one slice at a time.
FAQs
Can I make the No-Bake Mocha Oreo Icebox Pie ahead of time?
Absolutely! In fact, the pie tastes even better after chilling overnight. Just add whipped cream and toppings right before serving for the freshest look.
What if I don’t have instant espresso powder?
No problem—instant coffee granules work just as well. Use a little more if you want a stronger coffee flavor. Decaf versions are also great for a milder pie.
How do I make this pie gluten-free?
Simply swap in certified gluten-free chocolate sandwich cookies for the crust. The rest of the ingredients are naturally gluten-free, so it’s an easy adjustment.
Can I freeze the pie?
Yes! Freeze the whole pie or individual slices tightly wrapped. Thaw in the fridge before serving for best texture. I’ve stored slices for up to a month with great results.
What’s the best way to get clean slices?
Dip your knife in hot water and wipe it dry between cuts. This helps you get neat, photo-worthy slices every time—even with that luscious, creamy filling.
Pin This Recipe!
No-Bake Mocha Oreo Icebox Pie
This easy, no-bake pie combines a crunchy Oreo crust with a creamy mocha filling, making it the perfect cool coffee dessert for summer. It’s a crowd-pleaser that comes together quickly and is ideal for potlucks, brunches, or any time you want a sweet treat without turning on the oven.
- Prep Time: 20 minutes
- Cook Time: 0 minutes
- Total Time: 4 hours 20 minutes
- Yield: 10 servings 1x
- Category: Dessert
- Cuisine: American
Ingredients
- 24 Oreo cookies (about 250g, regular, not Double Stuf)
- 5 tablespoons unsalted butter, melted
- 8 ounces cream cheese, softened
- 3/4 cup powdered sugar
- 2 tablespoons instant espresso powder or instant coffee granules
- 1 teaspoon vanilla extract
- 1 1/2 cups heavy whipping cream, cold
- 3 ounces dark chocolate, melted and cooled
- Optional Topping:
- 1 cup additional whipped cream
- 3 to 4 Oreo cookies, crushed
- Chocolate shavings or cocoa powder, for garnish
Instructions
- Prepare the Oreo Crust: Place 24 Oreo cookies in a food processor and pulse until fine crumbs form. Alternatively, crush cookies in a zip-top bag with a rolling pin.
- Add melted butter to the crumbs and mix until evenly moistened.
- Press the mixture firmly into the bottom and sides of a 9-inch pie pan. Freeze crust for 10 minutes while preparing the filling.
- Make the Mocha Filling: In a large bowl, beat softened cream cheese, powdered sugar, instant espresso powder, and vanilla extract until smooth and fluffy (2-3 minutes).
- Add melted and cooled dark chocolate and beat until fully combined.
- In a separate chilled bowl, whip heavy cream to stiff peaks (about 3-4 minutes).
- Gently fold whipped cream into the mocha cream cheese mixture in two additions, keeping the filling light and mousse-like.
- Assemble the Pie: Spoon mocha filling into the chilled Oreo crust and smooth the top.
- Chill: Cover loosely and refrigerate for at least 4 hours, or overnight, until set.
- Add Toppings: Before serving, top with additional whipped cream, crushed Oreos, and chocolate shavings or cocoa powder.
- Slice and Serve: Use a sharp knife dipped in hot water for clean slices. Serve chilled.
Notes
Chill mixing bowl and beaters before whipping cream for best results. For gluten-free, use gluten-free chocolate sandwich cookies. Decaf instant coffee can be used for a kid-friendly version. Vegan adaptations are possible with plant-based cream cheese, coconut cream, and vegan cookies. Let the pie chill overnight for best flavor and texture. Dip knife in hot water for clean slices.
Nutrition
- Serving Size: 1 slice (1/10 of pie)
- Calories: 370
- Sugar: 22
- Sodium: 220
- Fat: 25
- Saturated Fat: 15
- Carbohydrates: 35
- Fiber: 2
- Protein: 4
Keywords: no-bake, mocha, Oreo, icebox pie, coffee dessert, summer dessert, easy pie, chocolate, creamy, potluck, brunch, kid-friendly, crowd-pleaser


