The first time I made these no bake chocolate peanut butter cheesecake bars with pretzel crust, the kitchen turned into a chocolate wonderland—rich cocoa aroma, creamy peanut butter, and that salty crunch from the pretzel base. You know, sometimes you just need dessert but can’t face the oven. Honestly, these bars are my go-to solution for those moments. I’ve whipped them up for lazy summer cookouts, late-night family treats, and even potlucks where the only rule is “bring something irresistible!” The best part? No baking, no fuss, and every bite tastes like pure happiness.
I stumbled onto this recipe during a heatwave when my oven was basically off-limits. Peanut butter and chocolate is my favorite combo—classic, comforting, and always a hit with kids and adults. But let’s face it, it’s the pretzel crust that totally steals the show. That savory crunch against the creamy cheesecake layer? Unreal. My background as a recipe developer means I’m picky about texture and flavor, and trust me, I’ve tweaked this recipe more times than I care to admit (you should see my kitchen notebook!).
If you’re craving something sweet but don’t want a complicated process, these no bake chocolate peanut butter cheesecake bars will change your dessert game. They’re fast, foolproof, and loaded with bold flavors. Whether you’re a busy parent, a college student with questionable kitchen skills, or just someone who loves treating themselves, this easy pretzel crust dessert is for you. Honestly, after making it a dozen times, I’m convinced it’s the ultimate crowd-pleaser for any occasion.
Why You’ll Love This Recipe
- Quick & Easy: You can whip these no bake chocolate peanut butter cheesecake bars together in about 25 minutes, then just let them chill. Perfect for last-minute cravings or when you’re short on time!
- Simple Ingredients: Most of what you need is probably already in your pantry—cream cheese, peanut butter, chocolate chips, pretzels, and a few basics. No fancy grocery runs or specialty items needed.
- Perfect for Any Occasion: These bars shine at birthday parties, potlucks, holiday gatherings, or casual family movie nights. I’ve served them at brunch, and they disappear fast every time.
- Crowd-Pleaser: Kids love them, adults love them—there are never leftovers when I make this dessert. The blend of sweet, salty, creamy, and crunchy is magic.
- Unbelievably Delicious: That velvety cheesecake layer, rich chocolate topping, and salty pretzel crust make every bite memorable. You’ll want to close your eyes and savor the flavors!
What sets this recipe apart from all those other no bake bars? First, the pretzel crust isn’t just for texture—it’s a flavor bomb that balances out the rich sweetness. I blend the cream cheese and peanut butter until it’s ultra-smooth, then fold in whipped cream for a lighter texture. You get layers of flavor and crunch that most bars just can’t match. My friend called these “little bites of heaven” after her second helping (and she’s picky about dessert!).
Emotionally, this recipe is pure comfort food—just healthier and way less stressful than traditional cheesecake. It’s the dessert you make to impress guests, treat yourself, or make ordinary days feel special. If you’re looking for a recipe that brings smiles and second servings, these no bake chocolate peanut butter cheesecake bars are the answer. I promise, you’ll never look at no bake desserts the same way again.
What Ingredients You Will Need
This recipe uses simple, wholesome ingredients to deliver bold flavor and satisfying texture without any elaborate steps. Most are pantry staples, and you can easily swap or adjust based on what you have at home.
- For the Pretzel Crust:
- 2 cups (180g) pretzel twists or sticks, finely crushed (salted pretzels give the best savory crunch)
- 1/2 cup (115g) unsalted butter, melted (adds richness and helps the crust set)
- 2 tablespoons (25g) granulated sugar (balances the saltiness)
- For the Cheesecake Layer:
- 8 ounces (225g) cream cheese, softened (full-fat for best results; use dairy-free if needed)
- 1 cup (250g) creamy peanut butter (I prefer natural brands like Smucker’s or Jif—just avoid “no stir” if possible)
- 1 cup (120g) powdered sugar (sifts in easily, keeps the layer smooth)
- 1 teaspoon vanilla extract (real vanilla makes a difference!)
- 1 cup (240ml) heavy whipping cream, cold (whipped for lightness; swap coconut cream for dairy-free)
- For the Chocolate Topping:
- 1 cup (180g) semisweet chocolate chips (milk or dark work too—use allergy-friendly if needed)
- 2 tablespoons (30g) unsalted butter (for glossy, smooth chocolate)
- 1/4 cup (60ml) heavy cream (makes the topping soft enough to slice)
- Pinch of salt (optional, brings out the chocolate flavor)
- Optional Toppings:
- Crushed pretzels
- Mini chocolate chips
- Peanut butter drizzle
- Sea salt flakes
If you need substitutions, swap almond flour for the pretzel crust for a gluten-free option (but you’ll lose the salty crunch). Dairy-free butter and cream cheese work, but the texture will be a bit less creamy. For a lower sugar option, use monk fruit sweetener instead of powdered sugar. In winter, I sometimes swap in dark chocolate for a richer flavor, and in summer, a swirl of raspberry jam on top is amazing. The ingredients are flexible—just keep that peanut butter and cream cheese combo front and center for the classic taste.
Equipment Needed
- 8×8 inch (20x20cm) baking pan (I use a glass one for easy slicing)
- Food processor or zip-top bag and rolling pin (for crushing pretzels)
- Mixing bowls (one large, one medium)
- Hand mixer or stand mixer (for whipping cream and blending cheesecake layer; a whisk works, but takes more elbow grease)
- Rubber spatula (for folding and scraping)
- Measuring cups and spoons (accuracy matters!)
- Small saucepan (for melting chocolate topping)
- Parchment paper (makes lifting bars out a breeze)
If you don’t have a food processor, placing pretzels in a zip-top bag and smashing with a rolling pin is seriously therapeutic (and works just fine). For the mixing, a sturdy whisk can replace an electric mixer, but it’ll give your arms a workout—been there, done that. Budget pans from the dollar store work, but line them with parchment for easy cleanup. I’ve used metal pans, but glass gives a prettier finish for serving. Just keep your tools simple, clean, and ready to go.
Preparation Method
- Prepare the Pretzel Crust:
Crush 2 cups (180g) pretzels in a food processor until fine crumbs form. If you’re going old-school, use a zip-top bag and rolling pin. Mix pretzel crumbs with 1/2 cup (115g) melted butter and 2 tablespoons (25g) granulated sugar in a medium bowl. Stir until evenly coated—mixture should look like wet sand and smell buttery.
Press the mixture firmly into the bottom of a lined 8×8 inch (20x20cm) pan. Use a measuring cup to pack it down tightly for a solid base. Chill in the fridge while you prep the filling (about 10 minutes).
- Make the Cheesecake Layer:
In a large bowl, beat 8 ounces (225g) softened cream cheese with 1 cup (250g) creamy peanut butter until smooth and fluffy—about 2 minutes with a hand mixer. Add 1 cup (120g) powdered sugar and 1 teaspoon vanilla extract, then beat again until fully blended. Scrape sides of the bowl to catch every bit.
In a separate bowl, whip 1 cup (240ml) heavy cream until stiff peaks form (about 2–3 minutes). Gently fold whipped cream into the peanut butter mixture using a rubber spatula. Don’t overmix—just fold until combined and light. The filling should look creamy, thick, and pale tan.
Spread cheesecake mixture evenly over chilled pretzel crust. Smooth top with spatula. Chill again while you prep the topping (about 10 minutes).
- Prepare the Chocolate Topping:
In a small saucepan over low heat, combine 1 cup (180g) chocolate chips, 2 tablespoons (30g) butter, and 1/4 cup (60ml) heavy cream. Stir constantly until melted and glossy. Remove from heat and add a pinch of salt if using. Warning: Don’t overheat—chocolate can seize quickly.
Let chocolate cool 1–2 minutes, then pour over cheesecake layer. Spread gently to cover completely. If you want fancy swirls, drizzle a little melted peanut butter and use a toothpick to swirl.
- Chill and Set:
Cover pan with foil or plastic wrap. Refrigerate for at least 3 hours, or until bars are firm and easy to slice. If you’re impatient, 90 minutes in the freezer works, but you may need to let them soften before cutting.
- Slice and Serve:
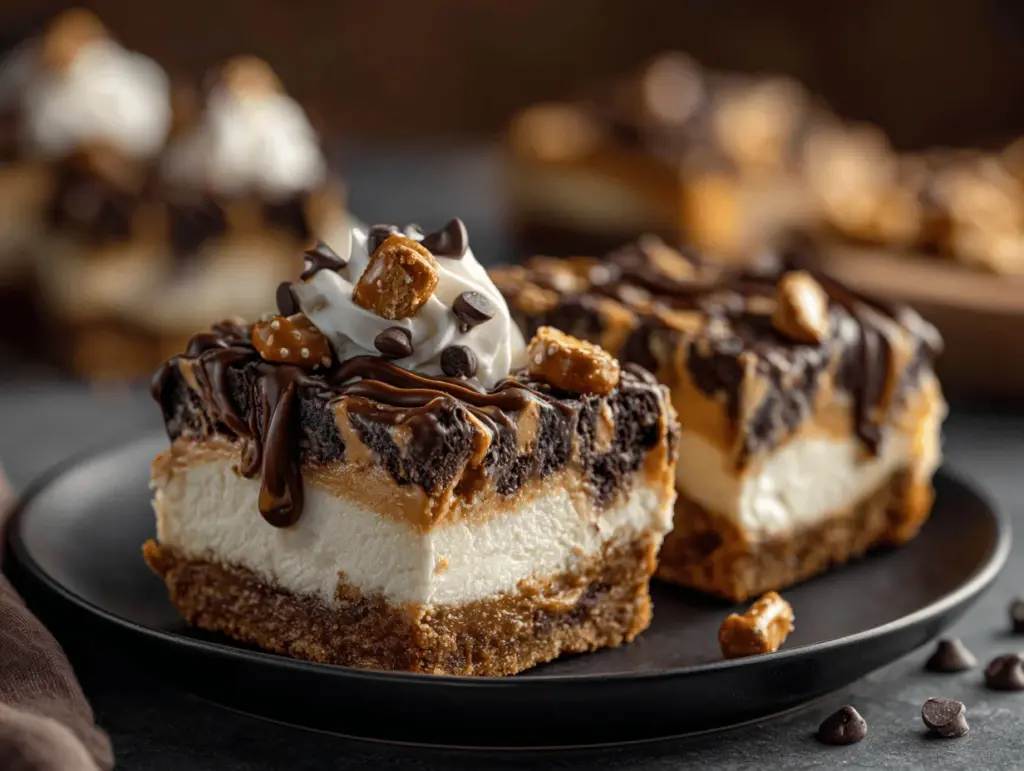
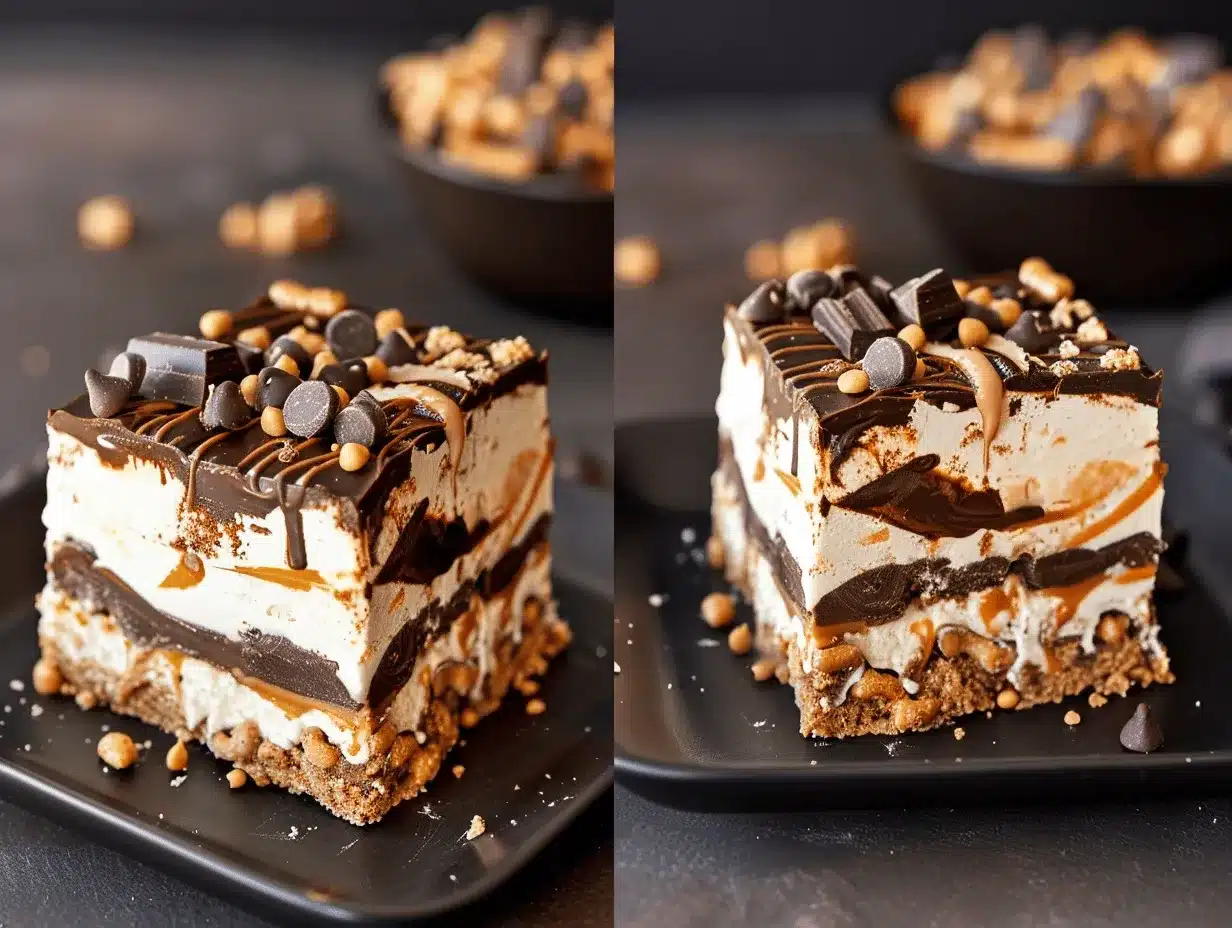
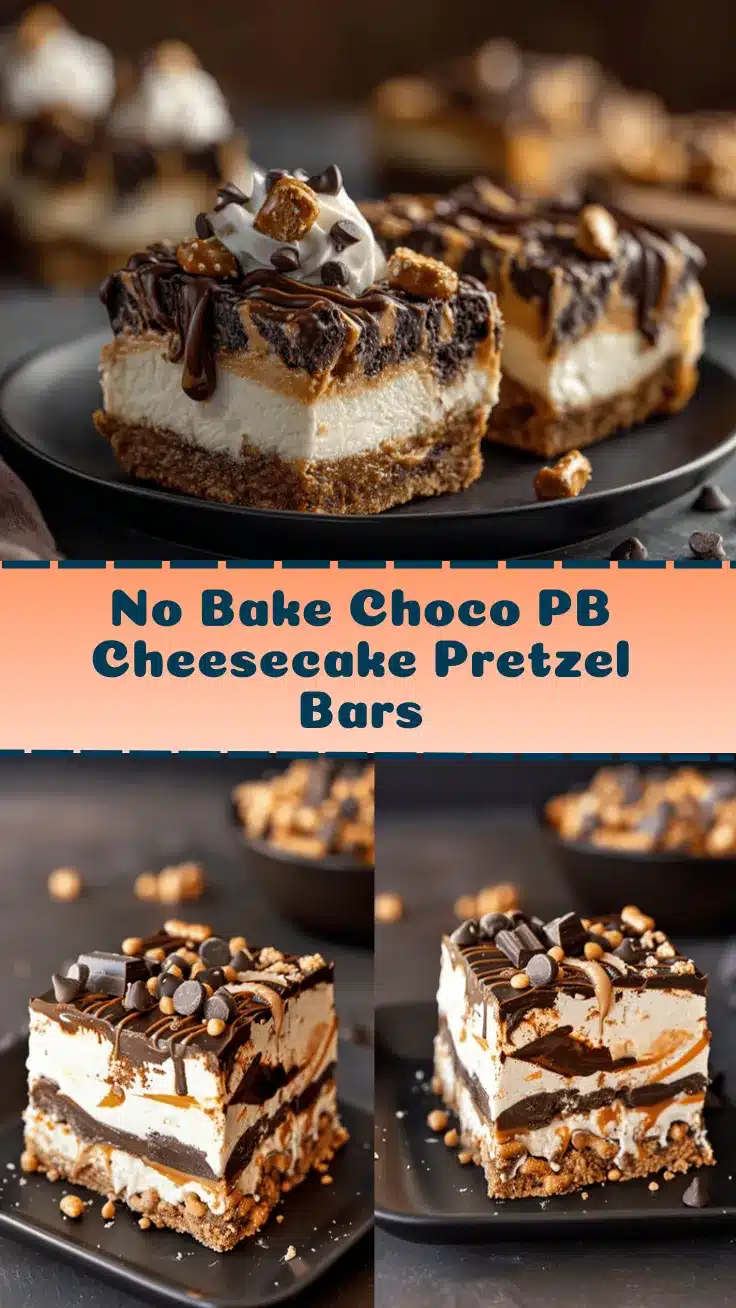
Lift bars out using parchment paper. Cut into 16 squares with a sharp knife (wipe knife between cuts for clean edges). Garnish with extra pretzels, chocolate chips, or sea salt if desired. Bars should look layered—crunchy bottom, creamy middle, glossy top!
Troubleshooting: If crust crumbles, it probably needed more butter or firmer packing. If filling feels runny, make sure cream was whipped to stiff peaks. If chocolate cracks, let bars sit at room temp for 10 minutes before slicing.
Tip: I always freeze the bars for 30 minutes before serving if I want cleaner slices. And don’t worry if the layers aren’t perfectly even—the flavor makes up for it!
Cooking Tips & Techniques
After testing this recipe a dozen times (and eating way too many bars), I’ve picked up a few tricks for perfect results every time. First off, make sure your cream cheese is truly softened—it blends smoother and avoids lumps. If the pretzel crust seems dry, just add a tablespoon more melted butter. You want it to stick together, not crumble under the filling.
When whipping cream, cold bowl and beaters help. I learned the hard way that warm cream won’t whip! If you’re folding whipped cream into the peanut butter mix, use a gentle hand—overmixing can deflate the filling. I once made a batch that turned dense because I went wild with the spatula. Lesson learned!
For the chocolate topping, low heat is essential. I’ve burnt my share of chocolate—always stir and pull off the heat as soon as it’s smooth. If you want a softer chocolate layer, add a splash more cream. For a firmer top, use less. Timing matters—let layers chill properly before adding the next, or you’ll get messy swirls instead of neat layers.
Multitasking: While the crust chills, whip up the cheesecake filling to save time. I always prep toppings while the bars set—crushed pretzels, a little sea salt, maybe a peanut butter drizzle. Consistency is key: measure ingredients, use parchment paper, and don’t rush the chilling. Each step has its own magic, and honestly, a little patience makes these bars truly irresistible.
Variations & Adaptations
- Gluten-Free: Replace pretzels with gluten-free pretzels or use almond flour for the crust. It’s not quite as salty, but still tasty.
- Dairy-Free: Swap cream cheese and butter for dairy-free alternatives (like Kite Hill or Earth Balance), and use coconut cream instead of heavy cream. The texture is a little lighter, but the flavor holds up!
- Seasonal Flavors: In fall, add a teaspoon of cinnamon or pumpkin spice to the cheesecake layer. In summer, swirl in a few tablespoons of raspberry or strawberry jam before topping with chocolate.
- Crunchy Add-Ins: Stir chopped peanuts or mini chocolate chips into the cheesecake layer for extra crunch.
- Nut-Free Option: Use sunflower seed butter instead of peanut butter—my nephew has a peanut allergy, and this swap worked perfectly.
- Personal Twist: I sometimes add a layer of sliced bananas between the crust and filling. It’s a little messy, but the combo is unreal!
Don’t be afraid to get creative—swap ingredients to fit your cravings or dietary needs. I’ve had friends try almond butter, cookie crusts, even a dash of chili powder for a spicy kick. Every batch is a little different, but always delicious!
Serving & Storage Suggestions
Serve these no bake chocolate peanut butter cheesecake bars chilled, straight from the fridge. I love arranging them on a pretty platter with a sprinkle of crushed pretzels and a drizzle of melted chocolate. For parties, cut into small squares for bite-sized treats. Pair with iced coffee, cold milk, or even a scoop of vanilla ice cream—trust me, it’s decadent!
If you’ve got leftovers (rare, but it happens), store bars in an airtight container in the fridge for up to 5 days. They stay firm and flavorful. For longer storage, freeze in layers separated by parchment paper—thaw in the fridge overnight before serving. Reheating isn’t needed, but if bars get too firm from the freezer, let them sit at room temperature for 10–15 minutes.
Flavor actually gets better after a day or two—the cheesecake layer settles and the crust softens just a bit, making each bite even more dreamy. Bars travel well, so pack them for picnics or lunch treats. Just keep them cool so the chocolate doesn’t melt!
Nutritional Information & Benefits
Each bar (based on 16 servings) contains approximately:
- Calories: 275
- Fat: 19g
- Carbs: 22g
- Protein: 6g
- Fiber: 1g
- Sugar: 13g
Peanut butter is packed with protein and healthy fats, making these bars more satisfying than typical desserts. The pretzel crust adds a little iron and fiber, while cream cheese gives a calcium boost. If you use dark chocolate, you’ll get antioxidants in every bite. For gluten-free or low-carb diets, swap the crust as needed. Allergens to watch for: dairy, peanuts, gluten (unless modified). Honestly, I love knowing I can treat myself without a sugar overload—these bars hit the sweet spot!
Conclusion
No bake chocolate peanut butter cheesecake bars with pretzel crust are the kind of dessert you’ll crave again and again. They’re easy, fast, and truly indulgent—perfect for sharing, gifting, or just enjoying with a good book and a cup of coffee. I love how the salty pretzel crunch meets creamy peanut butter and rich chocolate, making every bite unforgettable.
Customize this recipe however you like—dairy-free, gluten-free, or with your favorite nuts or jams. Honestly, I make these bars for every gathering because they never disappoint (and I secretly hope for leftovers). Give them a try, and let me know how you make them your own!
If you enjoyed this recipe, please leave a comment below, share it with friends, or tag your version—your feedback always makes my day. Happy (no) baking!
Frequently Asked Questions
Can I make these bars ahead of time?
Absolutely! You can make them up to two days in advance and store in the fridge. The flavors get better as they chill.
Can I freeze no bake chocolate peanut butter cheesecake bars?
Yes! Freeze them in an airtight container with parchment paper between layers. Thaw in the fridge overnight before serving.
What if I don’t have pretzels for the crust?
You can use graham crackers, digestive biscuits, or even crushed cookies. The flavor will change, but the bars will still be delicious.
How do I make these gluten-free?
Swap regular pretzels for gluten-free pretzels or use almond flour for the crust. Make sure other ingredients are gluten-free as well.
Can I use chunky peanut butter instead of creamy?
You can! It’ll add some crunch to the cheesecake layer. Just be aware the texture will be a bit more rustic—still tasty though!
Pin This Recipe!
No Bake Chocolate Peanut Butter Cheesecake Bars
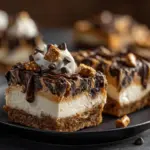
These no bake chocolate peanut butter cheesecake bars feature a salty pretzel crust, creamy peanut butter cheesecake filling, and a rich chocolate topping. Quick to make and perfect for any occasion, they’re a crowd-pleasing dessert that requires no oven time.
- Prep Time: 25 minutes
- Cook Time: 0 minutes
- Total Time: 3 hours 25 minutes (includes chilling time)
- Yield: 16 bars 1x
- Category: Dessert
- Cuisine: American
Ingredients
- 2 cups pretzel twists or sticks, finely crushed (about 180g, salted preferred)
- 1/2 cup unsalted butter, melted (about 115g)
- 2 tablespoons granulated sugar (about 25g)
- 8 ounces cream cheese, softened (about 225g, full-fat recommended)
- 1 cup creamy peanut butter (about 250g, natural preferred)
- 1 cup powdered sugar (about 120g)
- 1 teaspoon vanilla extract
- 1 cup heavy whipping cream, cold (about 240ml)
- 1 cup semisweet chocolate chips (about 180g)
- 2 tablespoons unsalted butter (about 30g)
- 1/4 cup heavy cream (about 60ml)
- Pinch of salt (optional)
- Optional toppings: crushed pretzels, mini chocolate chips, peanut butter drizzle, sea salt flakes
Instructions
- Crush pretzels in a food processor or in a zip-top bag with a rolling pin until fine crumbs form.
- Mix pretzel crumbs with melted butter and granulated sugar in a medium bowl until evenly coated.
- Press the mixture firmly into the bottom of a lined 8×8 inch pan. Chill in the fridge for about 10 minutes.
- In a large bowl, beat softened cream cheese with peanut butter until smooth and fluffy (about 2 minutes).
- Add powdered sugar and vanilla extract, then beat again until fully blended.
- In a separate bowl, whip heavy cream until stiff peaks form (about 2–3 minutes).
- Gently fold whipped cream into the peanut butter mixture with a rubber spatula until just combined.
- Spread cheesecake mixture evenly over the chilled pretzel crust. Smooth the top and chill again for about 10 minutes.
- In a small saucepan over low heat, combine chocolate chips, butter, and heavy cream. Stir constantly until melted and glossy. Remove from heat and add a pinch of salt if desired.
- Let chocolate cool for 1–2 minutes, then pour over the cheesecake layer. Spread gently to cover completely.
- Cover the pan and refrigerate for at least 3 hours, or until bars are firm and easy to slice. (For faster setting, freeze for 90 minutes, then let soften before cutting.)
- Lift bars out using parchment paper. Cut into 16 squares with a sharp knife, wiping between cuts for clean edges.
- Garnish with extra pretzels, chocolate chips, or sea salt if desired. Serve chilled.
Notes
For best results, ensure cream cheese is fully softened and heavy cream is very cold before whipping. If the crust seems dry, add a bit more melted butter. Chill each layer thoroughly before adding the next for clean layers. Bars can be made gluten-free with gluten-free pretzels or almond flour for the crust, and dairy-free with plant-based substitutes. Store in the fridge for up to 5 days or freeze for longer storage.
Nutrition
- Serving Size: 1 bar (1/16 of recipe)
- Calories: 275
- Sugar: 13
- Sodium: 220
- Fat: 19
- Saturated Fat: 8
- Carbohydrates: 22
- Fiber: 1
- Protein: 6
Keywords: no bake, cheesecake bars, chocolate peanut butter, pretzel crust, easy dessert, summer dessert, potluck, crowd-pleaser, kid-friendly, peanut butter dessert