
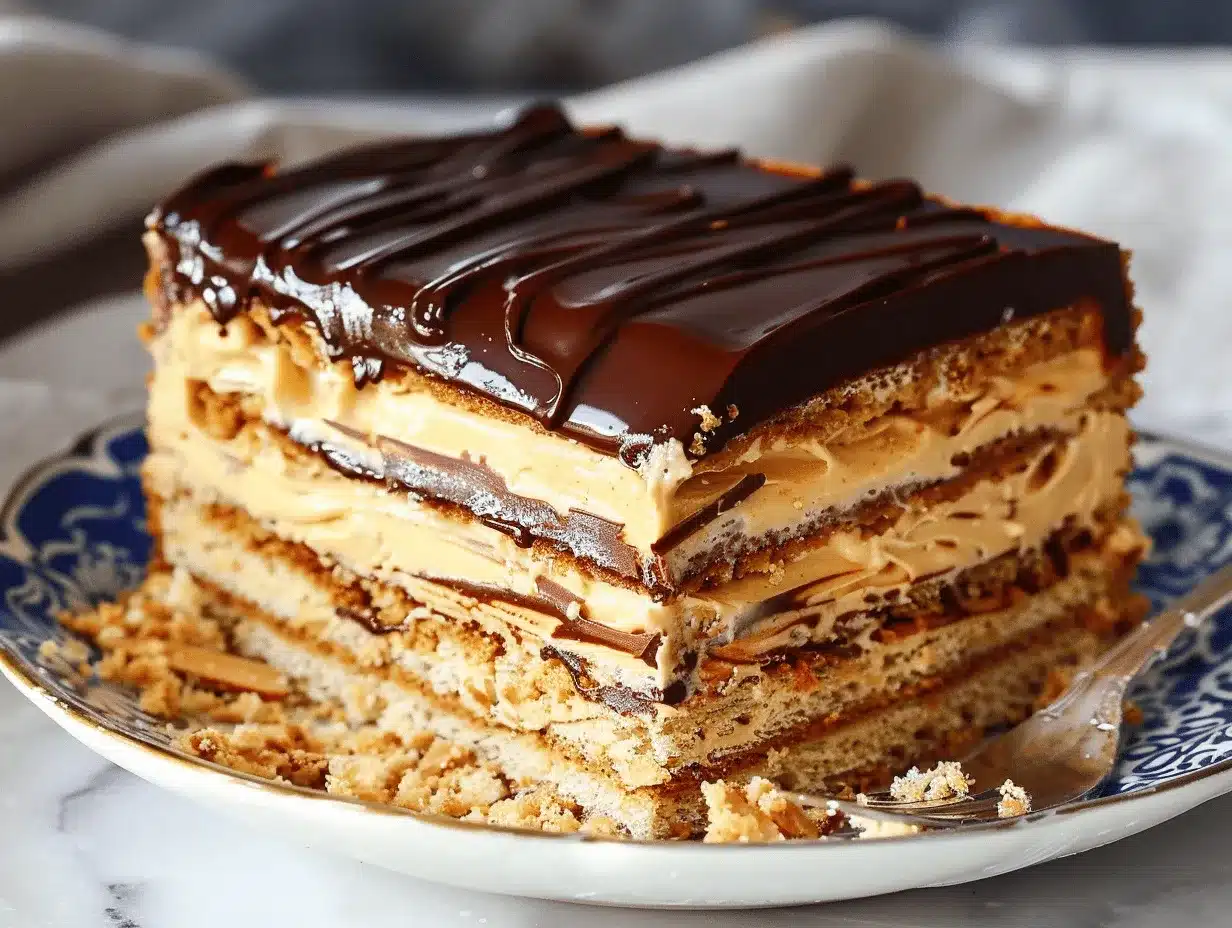
The first time I tasted this no-bake peanut butter eclair cake, I couldn’t stop smiling—seriously, it’s that good. Imagine creamy peanut butter, velvety pudding, and crisp graham crackers layered together—no oven required. The magic truly happens overnight in the fridge, and when you slice into it, every bite is a dreamy mix of silky, crunchy, and peanut-buttery bliss. It’s a dessert you’ll crave whenever you need something sweet but don’t want to fuss with baking.
Honestly, I stumbled onto this recipe during a hectic week when my oven was acting up (you know how appliances pick the worst time to misbehave). I wanted something comforting, easy, and crowd-pleasing—so I went for a twist on classic eclair cake. Peanut butter took center stage, and suddenly this became a family favorite. My kids beg for it, my friends request it for potlucks, and even picky eaters ask for seconds. There’s just something about the way the graham crackers soften and meld with the creamy filling—it feels almost nostalgic, like those beloved icebox cakes from grandma’s kitchen.
If you’re looking for a dessert that’s big on flavor but light on effort, this no-bake peanut butter eclair cake layers recipe is absolutely worth making. It’s perfect for busy families, those last-minute gatherings, or days when turning on the oven just isn’t happening. I’ve made this more times than I can count (sometimes with a few tweaks), so you can trust these steps to deliver spot-on results. Let’s get into why you’ll love it!
Why You’ll Love This No-Bake Peanut Butter Eclair Cake Layers Recipe
- Quick & Easy: Comes together in about 20 minutes—plus chilling time—so you can prepare it after work or when you’re short on time.
- No-Bake: No oven needed, making it perfect for hot days or small kitchens.
- Simple Ingredients: Uses common pantry staples. You probably have everything you need right now!
- Perfect for Gatherings: Whether it’s a birthday, brunch, or Sunday dinner, this cake fits every occasion. It’s a hit at potlucks and casual get-togethers.
- Crowd-Pleaser: Adults love the rich peanut butter flavor, and kids adore the creamy layers—bonus points for picky eaters.
- Unbelievably Delicious: The texture is a beautiful marriage of creamy, crunchy, and soft, with just the right amount of sweetness.
What really sets this cake apart is the peanut butter twist. Most eclair cakes stick to vanilla or chocolate, but here, peanut butter blends with pudding for a luscious, nutty filling. I always blend my peanut butter into the pudding mixture so it’s ultra-smooth—no weird clumps, just pure creaminess. The graham crackers soak up just enough moisture overnight to become cake-like, but they never get soggy. Trust me, I’ve tried skipping the overnight chill—don’t do it! The flavors need that time to meld and transform.
If you’re a fan of comfort food with a playful twist, this recipe is for you. It’s the kind of treat that makes you close your eyes after the first bite. Plus, it’s easy to adapt for allergies or preferences (I’ve tested it with gluten-free crackers and almond butter, and it’s still fantastic). I love how this cake delivers that classic eclair vibe, but better—no baking, less mess, and pure joy in every forkful.
What Ingredients You Will Need
This no-bake peanut butter eclair cake layers recipe uses wholesome, everyday ingredients to create rich flavor and a satisfying texture. Most items are pantry staples, making this dessert super convenient. If you’re missing something, there’s usually an easy swap.
- Graham crackers (about 14 oz / 400g): Classic or honey-flavored work best. For gluten-free, use your favorite GF graham-style crackers.
- Peanut butter (1 cup / 250g, creamy): I prefer smooth peanut butter for blending. If you’re into chunky, go for it—it’ll add texture.
- Instant vanilla pudding mix (2 packages, 3.4 oz / 96g each): These set up quickly and are super easy. You can use sugar-free if you want.
- Cold milk (3 cups / 720ml): Whole milk gives a richer taste, but 2% or non-dairy milk (like oat or almond) also works well.
- Whipped topping (2 cups / 500ml, thawed): I usually grab Cool Whip for convenience. Homemade whipped cream is delicious, too.
- Powdered sugar (1/2 cup / 60g): Adds just the right sweetness to the peanut butter layer.
- Chocolate frosting (1 tub, 16 oz / 450g): Ready-made makes life easy, but homemade ganache or fudge frosting is a great upgrade.
- Vanilla extract (1 tsp / 5ml): Optional, but adds depth to the pudding-peanut butter mix.
If you want to experiment, try swapping almond butter or sunflower seed butter for peanut butter (great for nut allergies). For a lighter version, use low-fat graham crackers and sugar-free pudding. Some folks add a pinch of salt to the peanut butter for balance—I’m a fan of that, especially if you use natural peanut butter. And don’t worry about buying fancy brands; store brands work perfectly here. Just make sure your peanut butter is fresh and creamy for the best texture.
During berry season, I sometimes toss in a handful of sliced strawberries between the layers. It’s a fun twist and adds color. If you’re feeling decadent, sprinkle mini chocolate chips over the top before chilling. The best part? You can make this cake your own without losing that irresistible flavor.
Equipment Needed
- 9×13-inch (23x33cm) baking dish: Glass or ceramic works best for layering and serving.
- Medium mixing bowls (2): One for pudding mixture, one for the peanut butter blend.
- Whisk: For mixing pudding and milk. An electric hand mixer speeds things up, but a sturdy whisk does the trick.
- Rubber spatula: Helps scrape every bit of filling and spread layers evenly.
- Offset spatula or butter knife: Makes smoothing the frosting layer a breeze.
- Measuring cups and spoons: Accurate measurements mean perfect layers every time.
- Plastic wrap or foil: For covering the cake while it chills.
If you don’t have a 9×13 pan, use two smaller pans or even a glass loaf pan—just adjust your layers so everything fits. I’ve used disposable aluminum pans when traveling to parties, and they work fine (just be gentle when serving). For mixing, hand-held beaters make life easier, but I’ve used a fork in a pinch—it’s a workout, but it works!
Maintenance tip: If you use a glass dish, avoid sudden temperature changes (don’t go straight from freezer to oven). For spatulas, I prefer silicone because they’re easy to clean and don’t stain from peanut butter. Budget-friendly tools are totally fine—no need for fancy gadgets here!
Preparation Method
- Gather Ingredients:
Set out all ingredients and let whipped topping thaw if needed. Measure everything for easy assembly. - Prep the Baking Dish:
Lightly grease a 9×13-inch (23x33cm) dish or line with parchment if you want easy removal later. - Mix the Pudding:
In a medium bowl, whisk together 2 packages (3.4 oz / 96g each) of instant vanilla pudding mix and 3 cups (720ml) cold milk. Whisk for 2 minutes until thickened. Let it sit for another 2 minutes to fully set—look for a creamy, spoonable texture. - Blend Peanut Butter Layer:
In another bowl, combine 1 cup (250g) creamy peanut butter and 1/2 cup (60g) powdered sugar. Mix until smooth. Add 1 cup (250ml) whipped topping and 1 tsp (5ml) vanilla extract. Stir until creamy and well-blended. If mixture seems too stiff, add 1-2 tbsp milk for easier spreading. - Combine Layers:
Fold the peanut butter mixture into the prepared pudding. Stir gently until combined—don’t overmix, as you want it fluffy. - Layer Graham Crackers:
Cover the bottom of the dish with a single layer of graham crackers. Break crackers as needed to fit snugly, but it’s okay if some overlap. - Add Filling:
Spread half the pudding-peanut butter mixture over the graham crackers. Use a spatula to smooth evenly. - Repeat Layers:
Add another layer of graham crackers, then the remaining pudding-peanut butter mixture. Top with a final layer of graham crackers. - Frost the Cake:
Remove the lid and foil from a tub of chocolate frosting (16 oz / 450g). Microwave for 15-20 seconds to soften (not melt). Spread frosting evenly over the top graham cracker layer. - Chill:
Cover tightly with plastic wrap or foil. Refrigerate for at least 6 hours, preferably overnight. This step is crucial—layers need time to soften and flavors meld. - Serve:
Slice into squares and serve chilled. Use a sharp knife for neat pieces. Wipe the blade between cuts for best presentation.
Prep notes: If your pudding doesn’t thicken, make sure you’re using instant pudding and cold milk. If the frosting is too thick to spread, microwave it in 10-second bursts and stir well. Sometimes the graham crackers may float—just press them gently with a spatula before chilling. For cleaner slices, let the cake sit for 10 minutes at room temp before cutting.
Cooking Tips & Techniques
I’ve made this no-bake peanut butter eclair cake layers recipe more times than I can count, and each batch teaches me something new. Here are my best tips for perfect results:
- Layering Matters: Overlap graham crackers slightly to prevent gaps—uneven layers can cause soggy spots.
- Chilling Time: Don’t rush the chill. Overnight is best, but if you’re in a hurry, 6 hours is the minimum for soft layers and full flavor.
- Pudding Consistency: Use cold milk and instant pudding. If the mix is runny, let it sit longer before layering.
- Frosting Technique: Warming the frosting helps spread it evenly. If you go too hot, it’ll melt into the cake—aim for soft, not liquid.
- Personal Fails: Once, I used natural peanut butter and didn’t mix well enough—clumps everywhere! Blend thoroughly for that velvety filling.
- Multitasking: While the pudding sets, prep the peanut butter mix and arrange graham crackers. You’ll save time and keep things organized.
- Consistency: For a firmer cake, use less milk in the pudding (2.5 cups / 600ml). For extra creamy, stick with 3 cups.
- Garnishing: Top with chopped peanuts or mini chocolate chips after frosting for crunch and visual appeal.
If you mess up a layer, don’t worry—this cake is super forgiving. The fridge does most of the heavy lifting. Just avoid over-mixing and make sure you chill long enough. You’ll get that beautiful layered look every time!
Variations & Adaptations
One of my favorite things about this no-bake peanut butter eclair cake layers recipe is how adaptable it is. You can tweak it for dietary needs, flavor cravings, or what you’ve got in your pantry. Here are some fun options:
- Gluten-Free: Swap regular graham crackers with gluten-free ones—taste and texture stay spot-on.
- Dairy-Free: Use almond or coconut milk and dairy-free whipped topping. Sub a vegan pudding mix if needed.
- Flavor Swaps: Try almond or cashew butter for a different nutty vibe. Add a layer of sliced bananas or strawberries for a fruity twist.
- Chocolate Lovers: Mix 1/4 cup (30g) cocoa powder into the peanut butter layer or use chocolate graham crackers.
- Nut-Free: Use sunflower seed butter and allergy-friendly graham crackers for a safe version.
I’ve tried adding a sprinkle of sea salt on top—such a game changer! The contrast with the sweet layers is just fantastic. For a holiday spin, add crushed peppermint candies or drizzle caramel over the frosting. You can even split the cake into individual cups for cute, single-serve desserts. The possibilities are endless, and honestly, every version I’ve made has disappeared fast.
Serving & Storage Suggestions
This cake is best served chilled, straight from the fridge. I love slicing it into neat squares and plating each piece with a dollop of whipped cream or a drizzle of chocolate syrup. If you want to impress, sprinkle chopped peanuts or chocolate shavings on top for a bakery-style finish.
Pair this no-bake peanut butter eclair cake layers recipe with cold milk, coffee, or even a scoop of vanilla ice cream—it’s a dream combo. For parties, cut the cake into smaller pieces for bite-sized treats. It’s sturdy enough to travel, so I often bring it to potlucks in a lidded pan.
Store leftovers covered in the fridge for up to 4 days. The flavors deepen as it sits, and the texture stays just right. For longer storage, freeze slices individually wrapped in foil for up to 2 months. Thaw overnight in the fridge before serving. To reheat (if you like it slightly warm), microwave a slice for 10 seconds—just enough to soften but not melt the layers.
Nutritional Information & Benefits
A typical slice (1/12th of the pan) of this no-bake peanut butter eclair cake layers recipe has about 320 calories, 18g fat, 36g carbs, and 6g protein. The peanut butter provides healthy fats and protein, which helps keep you fuller, and the milk adds calcium. If you use low-fat or non-dairy options, you can cut calories and saturated fat.
This cake can be adapted for gluten-free or lower-sugar diets by using sugar-free pudding and graham crackers. Major allergens include peanuts, wheat, and dairy, so check your labels if you’re serving guests with sensitivities. From a wellness perspective, it’s a treat—so enjoy it mindfully as part of a balanced diet. I find a small square is all you need to satisfy a sweet tooth!
Conclusion
Honestly, this no-bake peanut butter eclair cake layers recipe is a keeper. It’s easy, adaptable, and so satisfying—whether you’re baking for family or bringing dessert to a party. The creamy peanut butter, soft graham crackers, and chocolate frosting make every bite irresistible. Plus, you can customize it for allergies or flavor cravings without losing that classic, nostalgic vibe.
I love this cake because it takes me back to childhood, but with a grown-up peanut butter twist. It’s the kind of recipe you’ll want to share, tweak, and remake. Give it a try, and let me know how you make it your own! Drop your comments below, share your favorite variations, or tag me if you try it—let’s spread the peanut butter joy together.
Wishing you lots of sweet moments and happy kitchen adventures!
FAQs
Can I use natural peanut butter in this recipe?
Yes, but make sure to blend it thoroughly with the powdered sugar and whipped topping. Natural peanut butter can be a bit oilier, so mix well for a creamy texture.
How long does the no-bake peanut butter eclair cake need to chill?
At least 6 hours for best results, but overnight is ideal. This allows the graham crackers to soften and the flavors to blend perfectly.
What can I substitute for graham crackers?
You can use digestive biscuits, vanilla wafers, or gluten-free graham-style crackers. Just make sure they’re crisp and not too sweet.
Can I make this ahead for a party?
Absolutely! Prepare the cake a day in advance and keep it chilled until serving. It actually gets better as it sits.
Is this dessert safe for nut allergies?
If you need a nut-free version, use sunflower seed butter and nut-free graham crackers. Always check your labels for hidden allergens before serving.
Pin This Recipe!
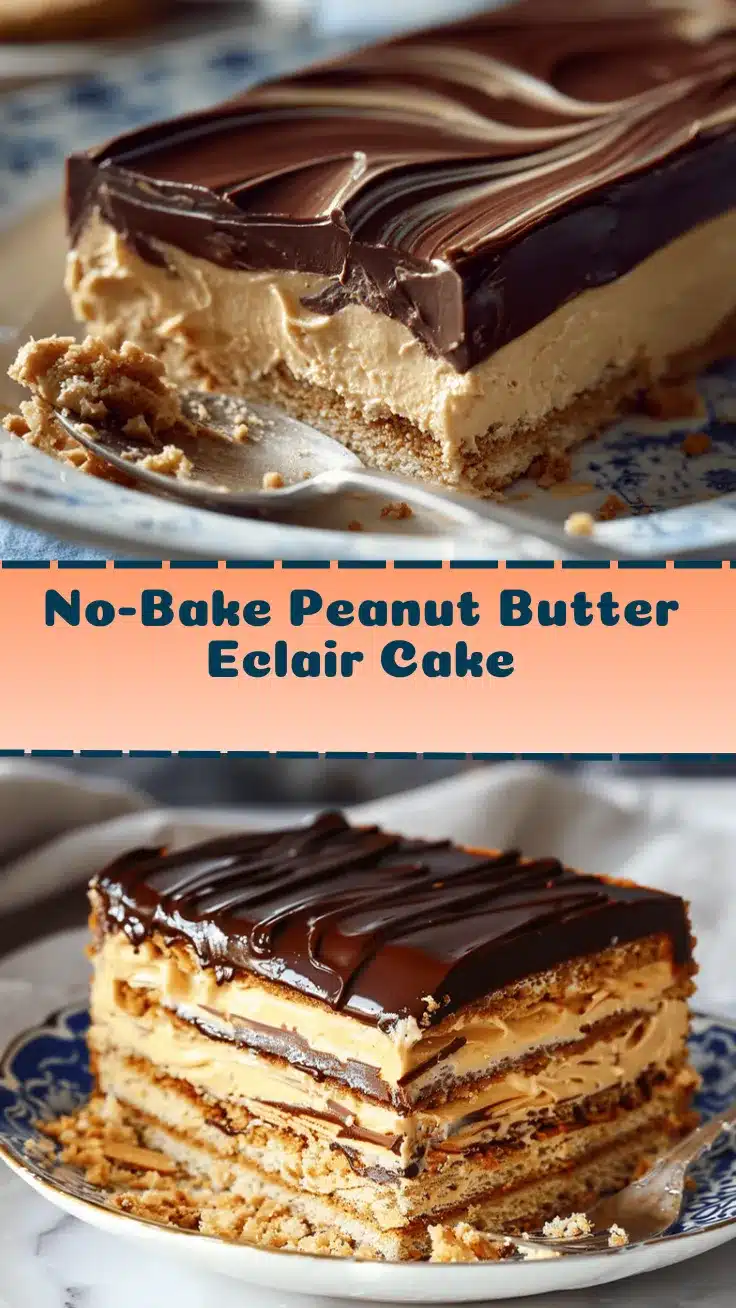
No-Bake Peanut Butter Eclair Cake Layers Easy Dessert Recipe
This no-bake peanut butter eclair cake features creamy peanut butter, velvety pudding, and crisp graham crackers layered together for a dreamy, crowd-pleasing dessert. It’s easy to make, requires no oven, and is perfect for gatherings or busy weeknights.
- Prep Time: 20 minutes
- Cook Time: 0 minutes
- Total Time: 6 hours 20 minutes
- Yield: 12 servings 1x
- Category: Dessert
- Cuisine: American
Ingredients
- 14 oz graham crackers (about 400g), classic or honey-flavored
- 1 cup creamy peanut butter (250g)
- 2 packages instant vanilla pudding mix (3.4 oz each, 96g each)
- 3 cups cold milk (whole, 2%, or non-dairy)
- 2 cups whipped topping (thawed, 500ml)
- 1/2 cup powdered sugar (60g)
- 1 tub chocolate frosting (16 oz, 450g)
- 1 tsp vanilla extract (5ml, optional)
Instructions
- Set out all ingredients and let whipped topping thaw if needed. Measure everything for easy assembly.
- Lightly grease a 9×13-inch baking dish or line with parchment for easy removal.
- In a medium bowl, whisk together instant vanilla pudding mix and cold milk for 2 minutes until thickened. Let sit for another 2 minutes to fully set.
- In another bowl, combine creamy peanut butter and powdered sugar. Mix until smooth. Add 1 cup whipped topping and vanilla extract, stirring until creamy and well-blended. If mixture is too stiff, add 1-2 tbsp milk.
- Fold the peanut butter mixture into the prepared pudding. Stir gently until combined.
- Cover the bottom of the dish with a single layer of graham crackers, breaking as needed to fit.
- Spread half the pudding-peanut butter mixture over the graham crackers and smooth evenly.
- Add another layer of graham crackers, then the remaining pudding-peanut butter mixture. Top with a final layer of graham crackers.
- Remove lid and foil from chocolate frosting tub. Microwave for 15-20 seconds to soften (not melt). Spread frosting evenly over the top graham cracker layer.
- Cover tightly with plastic wrap or foil. Refrigerate for at least 6 hours, preferably overnight.
- Slice into squares and serve chilled. Use a sharp knife for neat pieces, wiping the blade between cuts.
Notes
For best results, chill overnight to allow layers to soften and flavors to meld. You can substitute almond or sunflower seed butter for peanut butter for allergies. Garnish with chopped peanuts or mini chocolate chips for extra crunch. Use gluten-free graham crackers and non-dairy milk/whipped topping for dietary adaptations.
Nutrition
- Serving Size: 1 slice (1/12th of pan)
- Calories: 320
- Sugar: 24
- Sodium: 320
- Fat: 18
- Saturated Fat: 7
- Carbohydrates: 36
- Fiber: 2
- Protein: 6
Keywords: no-bake, peanut butter, eclair cake, easy dessert, layered cake, potluck, pudding, graham crackers, chocolate frosting, icebox cake


