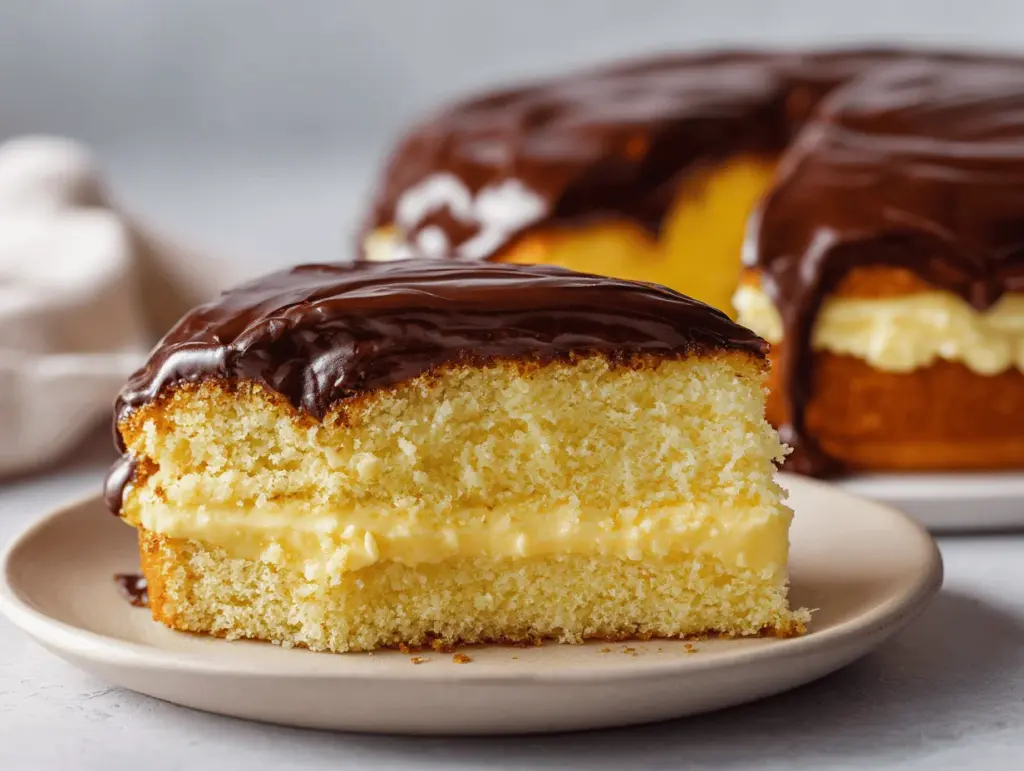
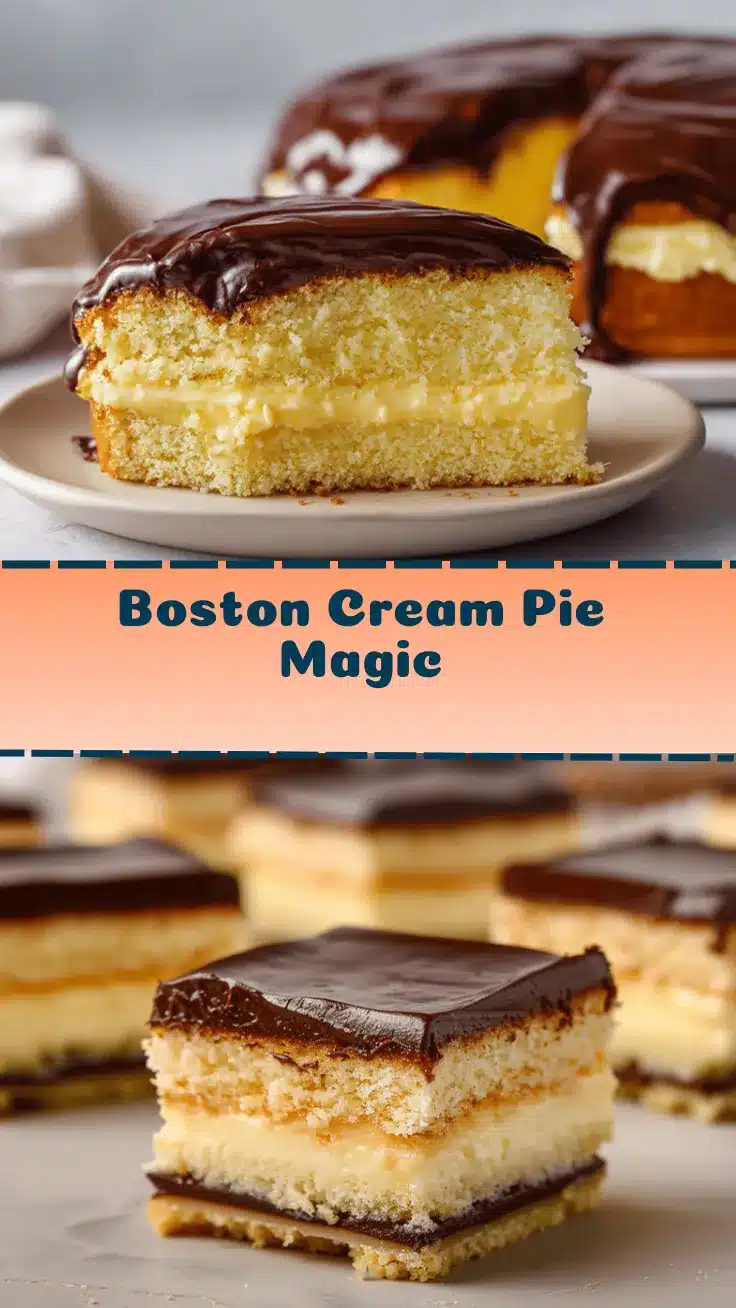
The sound of a fork cracking through glossy chocolate glaze and sinking into soft, custard-filled cake layers—oh, that’s pure magic. Boston Cream Pie isn’t really a pie at all, but let’s face it, the name just adds to the charm. The first time I tried making this classic dessert, I was honestly nervous. Would the custard set? Would my cake collapse? But, after a few messy kitchen adventures (and a couple of accidental “pie” puddles), I finally nailed a Boston Cream Pie recipe that’s simple enough for beginners and delicious enough to make you want seconds.
This recipe has become a go-to for celebrations and family gatherings. There’s something comforting about the vanilla sponge, silky pastry cream, and shiny chocolate topping. My grandma used to say that a Boston Cream Pie brings everyone to the table. She was right. Whether you’re a baking newbie or a dessert devotee, this is one recipe that’ll have you coming back for more. I’ve tested different techniques, played with ingredient tweaks, and now I’m sharing all my favorite tips (plus the occasional “oops” story) to help you make the best Boston Cream Pie ever.
Here’s why you’ll love this recipe: it’s not fussy, it uses pantry staples, and it delivers bakery-level flavor right from your kitchen. It’s perfect for busy families, beginner bakers, or anyone who wants to impress without breaking a sweat. After making Boston Cream Pie over a dozen times, I can confidently say—this dessert deserves a spot in your recipe box, and I’m excited to walk you through every step.
Why You’ll Love This Boston Cream Pie Recipe
- Quick & Easy: You won’t need fancy equipment or complicated steps—just basic mixing, baking, and layering. Total hands-on time is under an hour (not counting cooling), making it perfect for last-minute dessert cravings.
- Simple Ingredients: Most of what you need is probably already in your kitchen: eggs, sugar, flour, milk, butter, and chocolate. No runs to specialty stores here!
- Perfect for Celebrations: Boston Cream Pie is a showstopper for birthdays, holidays, or even casual Sunday dinners. It’s impressive but not intimidating.
- Crowd-Pleaser: Kids love the creamy filling and chocolate glaze, adults appreciate the nostalgia and balance of flavors. I’ve never had leftovers last more than a day.
- Unbelievably Delicious: The combo of tender cake, rich vanilla pastry cream, and glossy chocolate ganache is next-level comfort food. The first bite gets you hooked every time.
I’ve tested this Boston Cream Pie recipe over and over, tweaking the custard so it’s thick but not stodgy and making sure the sponge stays soft for days. What sets this apart? I blend the pastry cream until silky smooth, and I use real chocolate (not cocoa powder) for that bakery-style shine on the glaze. There’s no shortcut for flavor, but the process itself is forgiving—even if you’re a bit clumsy, this dessert lets you recover and still serve something amazing.
Honestly, Boston Cream Pie is more than just cake—it’s a memory-maker. Whether you’re celebrating or just need a pick-me-up, this dessert brings warmth and smiles. I love how it turns a regular night into something special, and you’ll feel that every time you share a slice.
What Ingredients You Will Need
This Boston Cream Pie recipe uses classic, everyday ingredients that come together for a truly indulgent treat. You’ll find most of these in your pantry or fridge, and if not, there are easy swaps that won’t compromise flavor or texture.
For the Sponge Cake Layers:
- 1 cup (120g) all-purpose flour (for a lighter cake, sift before using)
- 1 cup (200g) granulated sugar
- 1/4 cup (60g) unsalted butter, softened (adds richness)
- 2 large eggs, room temperature
- 1/2 cup (120ml) whole milk (can substitute with almond milk for dairy-free)
- 1 1/2 teaspoons baking powder
- 1/2 teaspoon salt
- 1 teaspoon pure vanilla extract (I love Nielsen-Massey for deep flavor)
For the Pastry Cream Filling:
- 2 cups (480ml) whole milk
- 1/2 cup (100g) granulated sugar
- 4 large egg yolks
- 1/4 cup (30g) cornstarch (helps thicken without being grainy)
- 2 tablespoons (30g) unsalted butter
- 1 teaspoon pure vanilla extract
- Pinch of salt
For the Chocolate Glaze:
- 4 oz (115g) semisweet chocolate, chopped (use bittersweet for a more intense flavor)
- 1/2 cup (120ml) heavy cream
- 1 tablespoon (14g) unsalted butter (for shine and smoothness)
Ingredient Tips:
- Use good quality vanilla extract for the best aroma.
- If you’re gluten-free, swap the flour for a 1:1 gluten-free blend (like King Arthur).
- Dairy-free options work well: swap milk for oat or almond, and use plant-based butter.
- For richer flavor, add a tablespoon of sour cream to the cake batter.
- If you’re short on chocolate, a mix of chocolate chips and chopped chocolate works (been there, done that!).
Honestly, there’s no need to overthink the ingredients—keep it simple, use what you have, and enjoy the process. That’s the secret to a great Boston Cream Pie every time.
Equipment Needed
- Two 9-inch (23 cm) round cake pans: Nonstick or greased. If you only have one pan, bake the layers one at a time (I’ve done it plenty of times—it just takes a bit longer).
- Medium saucepan: For the pastry cream. A heavy-bottomed one helps prevent scorching.
- Whisk: For smooth pastry cream and lump-free batter.
- Mixing bowls: At least two—one for wet, one for dry ingredients.
- Electric mixer or hand mixer: Optional, but helpful for fluffy cake batter.
- Rubber spatula: For folding and scraping every last bit.
- Wire cooling rack: For cooling the cake layers evenly.
- Offset spatula: Makes spreading pastry cream and glaze much easier (but a butter knife works in a pinch).
- Small microwave-safe bowl: For melting chocolate.
If you’re just starting out, don’t worry about having every tool. I’ve baked this with a whisk and a spoon before, and it turned out just fine. For specialty equipment like an offset spatula, a regular knife does the trick—just go slow and be gentle. Clean your whisk and saucepan immediately after making custard; otherwise, the cream can get stubborn. If your cake pans are old, line them with parchment to avoid sticking (trust me, I learned the hard way).
For budget-friendly options, I often grab mixing bowls and pans from discount stores or use hand-me-downs. The important thing is to have fun and not stress about the gear—Boston Cream Pie doesn’t judge!
Preparation Method
-
Prep Your Pans and Oven:
Preheat oven to 350°F (175°C). Grease two 9-inch (23cm) round cake pans and line bottoms with parchment paper. This helps the cake release easily—don’t skip it! -
Make the Sponge Cake:
In a mixing bowl, sift together 1 cup (120g) flour, 1 1/2 teaspoons baking powder, and 1/2 teaspoon salt. Set aside.
In another bowl, beat 1/4 cup (60g) softened butter and 1 cup (200g) sugar until light and fluffy (about 2-3 minutes). Add eggs one at a time, mixing well after each. Stir in 1 teaspoon vanilla extract.
Alternately add dry ingredients and 1/2 cup (120ml) milk to the butter mixture, starting and ending with dry. Mix until just combined—don’t overbeat or the cake may toughen.
Divide batter evenly between pans. Smooth tops with a spatula.
Bake for 20-25 minutes, or until a toothpick inserted in the center comes out clean.
Cool in pans for 10 minutes, then turn out onto wire racks to cool completely. -
Prepare the Pastry Cream:
In a medium saucepan, heat 2 cups (480ml) milk over medium heat until steaming (not boiling).
In a separate bowl, whisk 4 egg yolks, 1/2 cup (100g) sugar, and 1/4 cup (30g) cornstarch until smooth.
Slowly pour hot milk into egg mixture, whisking constantly to avoid curdling.
Return mixture to saucepan. Cook over medium heat, whisking constantly, until thickened (about 4-5 minutes). You’ll feel it “tighten” and see slow bubbles—don’t stop whisking!
Remove from heat. Stir in 2 tablespoons (30g) butter, 1 teaspoon vanilla, and a pinch of salt.
Pour pastry cream into a bowl. Cover with plastic wrap directly on the surface to prevent skin from forming. Chill for at least 1 hour. -
Make the Chocolate Glaze:
Place 4 oz (115g) semisweet chocolate and 1 tablespoon (14g) butter in a small bowl.
Heat 1/2 cup (120ml) heavy cream in a saucepan until just simmering. Pour over chocolate.
Let sit 2 minutes, then whisk until smooth and glossy. If needed, microwave in 10-second bursts to finish melting. -
Assemble the Boston Cream Pie:
Place one cake layer on a serving plate. Spread all the chilled pastry cream evenly over the top (don’t worry if a little spills—messy is delicious!).
Top with second cake layer. Gently press down.
Pour ganache over the center, letting it drip down the sides. Use an offset spatula or knife to spread if needed.
Chill assembled cake for at least 1 hour before serving for best texture.
Preparation Notes: If your cake sinks in the middle, it’s usually under-baked—pop it back in for a few more minutes. If pastry cream is lumpy, blend briefly with a hand mixer (I do this every time for silky results). Chocolate glaze too thick? Add a splash more cream. Don’t worry if your layers aren’t perfectly even; a little rustic charm is part of the Boston Cream Pie story.
Efficiency Tip: Start pastry cream while cake bakes, then make chocolate glaze as everything cools. Multitasking saves time and keeps you moving!
Cooking Tips & Techniques
- Whisking Is Key: Don’t stop whisking the pastry cream—seriously, even one minute of distraction can mean scrambled eggs instead of custard. (Learned that one the hard way!)
- Room Temperature Ingredients: Eggs and butter blend more smoothly when they’re not cold. If you forget, submerge eggs in warm water for a few minutes.
- Layering Like a Pro: If your cake domes, trim the top with a serrated knife for a flat surface. It makes assembly much easier (and you get to snack on cake scraps).
- Chocolate Glaze Shine: Butter in the glaze gives it that glossy look and keeps it soft. If your glaze dulls, add a teaspoon more butter.
- Troubleshooting: If pastry cream won’t set, chill longer or add a tablespoon more cornstarch next time. For dry cake, use cake flour instead of all-purpose.
- Time Management: Bake, then prep filling and glaze while cake cools. Assembly can be done just before serving.
- Consistency: Measure carefully—too much flour makes dry cake, too little cornstarch means runny cream. I always use a scale for accuracy.
I’ve had my share of Boston Cream Pie “mishaps”—split custard, sliding layers, even a ganache spill. Each time, I learned a trick that made future bakes better. Don’t stress about perfection, just trust the process and remember, a homemade dessert always tastes better (even if it’s a little lopsided!).
Variations & Adaptations
- Gluten-Free Boston Cream Pie: Swap all-purpose flour for a 1:1 gluten-free blend. The cake stays tender, no one will notice the difference.
- Dairy-Free Adaptation: Use plant-based milk and butter in both cake and pastry cream. Coconut milk adds a subtle flavor twist that’s surprisingly good.
- Seasonal Twist: Add a layer of fresh strawberries or raspberries between cake and pastry cream for a fruity kick (I love this in summer).
- Chocolate Lovers: Use bittersweet chocolate for the glaze or add a tablespoon of cocoa powder to the cake for extra richness.
- Nut-Free: All ingredients are naturally nut-free, but double-check labels if allergies are a concern.
I once swapped vanilla extract for almond, and it gave the Boston Cream Pie a whole new vibe (delicious, but different!). If you crave extra crunch, sprinkle toasted coconut on top. For mini pies, bake in cupcake tins and layer individually—kids go wild for this version.
Don’t be afraid to play with flavors. A dash of orange zest in the custard, a drizzle of caramel over the glaze, or a gluten-free base. Adapt to your taste and dietary needs—there’s no wrong way to enjoy Boston Cream Pie!
Serving & Storage Suggestions
Boston Cream Pie is best served chilled or at room temperature, so plan to let it sit out for 20 minutes before slicing. For a Pinterest-worthy presentation, garnish with a sprinkle of powdered sugar or chocolate shavings.
- Pairings: Serve with coffee, black tea, or a glass of cold milk. A scoop of vanilla ice cream is a dreamy sidekick.
- Storage: Cover leftovers with plastic wrap or place in an airtight container. Store in the fridge for up to 4 days. The flavors mellow and meld over time—the pastry cream stays silky and the cake gets even softer.
- Freezing: You can freeze the cake layers (unfilled) for up to 2 months. Defrost and fill before serving. Assembled pie doesn’t freeze well—the custard gets watery.
- Reheating: Not necessary, but if you want a slightly warm slice, microwave for 10 seconds (just don’t melt the cream!).
Honestly, Boston Cream Pie rarely lasts long enough to worry about storage. The flavors deepen overnight, so leftovers can be even better the next day.
Nutritional Information & Benefits
| Serving Size | Calories | Fat | Carbs | Protein |
|---|---|---|---|---|
| 1 slice (1/10th of pie) | 320 | 15g | 38g | 6g |
Boston Cream Pie isn’t exactly diet food, but it’s got some redeeming qualities. Eggs and milk in the pastry cream provide protein and calcium. Using real chocolate means antioxidants. For gluten-free or dairy-free eaters, simple swaps make it accessible. Be aware of common allergens: wheat, dairy, and eggs. From a wellness standpoint, I treat desserts like this as joyful, occasional treats—they feed the soul as much as the body. Balance is key, and a slice shared with friends is always worth it.
Conclusion
If you’re looking for a classic dessert that’s easy to make but always wins hearts, Boston Cream Pie is the answer. This recipe is beginner-friendly, customizable, and absolutely delicious—plus, it’s packed with nostalgic flavor.
I love this recipe because it brings people together and makes ordinary moments special. Don’t be shy about tweaking it: swap flavors, try gluten-free, add berries. Make it yours! Honestly, after one bite, you’ll see why Boston Cream Pie has been a favorite for generations.
Ready to bake? Share your results, leave a comment, or tag your pie photos on Pinterest! Your kitchen story matters—and I’d love to hear how your Boston Cream Pie turns out.
Here’s to sweet memories and irresistible desserts—happy baking!
Frequently Asked Questions
How do I keep the pastry cream from getting lumpy?
Whisk constantly while cooking and don’t rush the thickening stage. If lumps form, blend the cream with a hand mixer until smooth—works like a charm!
Can I make Boston Cream Pie ahead of time?
Absolutely. Prepare all layers a day in advance, then assemble and glaze before serving. The flavors actually get better overnight!
What’s the best chocolate for the glaze?
Semisweet or bittersweet chocolate works best for a rich, shiny glaze. Avoid milk chocolate—it can be too sweet and less glossy.
Can I use cake flour instead of all-purpose?
Yes! Cake flour creates a lighter, softer sponge. Just swap it 1:1 for all-purpose flour in the recipe.
How do I prevent the cake from sticking to the pan?
Grease the pans well and line the bottoms with parchment paper. Let cakes cool 10 minutes before turning out. If you forget the parchment, run a knife around the edges to loosen before unmolding.
Pin This Recipe!
Boston Cream Pie Recipe: Easy Homemade Classic Dessert for Beginners

This beginner-friendly Boston Cream Pie features tender vanilla sponge cake, silky pastry cream, and a glossy chocolate glaze. It’s a classic dessert that’s perfect for celebrations and sure to impress with its bakery-level flavor.
- Prep Time: 25 minutes
- Cook Time: 25 minutes
- Total Time: 1 hour 30 minutes
- Yield: 10 servings 1x
- Category: Dessert
- Cuisine: American
Ingredients
- 1 cup (120g) all-purpose flour, sifted
- 1 cup (200g) granulated sugar
- 1/4 cup (60g) unsalted butter, softened
- 2 large eggs, room temperature
- 1/2 cup (120ml) whole milk
- 1 1/2 teaspoons baking powder
- 1/2 teaspoon salt
- 1 teaspoon pure vanilla extract
- 2 cups (480ml) whole milk (for pastry cream)
- 1/2 cup (100g) granulated sugar (for pastry cream)
- 4 large egg yolks
- 1/4 cup (30g) cornstarch
- 2 tablespoons (30g) unsalted butter (for pastry cream)
- 1 teaspoon pure vanilla extract (for pastry cream)
- Pinch of salt (for pastry cream)
- 4 oz (115g) semisweet chocolate, chopped
- 1/2 cup (120ml) heavy cream
- 1 tablespoon (14g) unsalted butter (for glaze)
Instructions
- Preheat oven to 350°F (175°C). Grease two 9-inch round cake pans and line bottoms with parchment paper.
- In a mixing bowl, sift together flour, baking powder, and salt. Set aside.
- In another bowl, beat softened butter and sugar until light and fluffy (2-3 minutes). Add eggs one at a time, mixing well after each. Stir in vanilla extract.
- Alternately add dry ingredients and milk to the butter mixture, starting and ending with dry. Mix until just combined.
- Divide batter evenly between pans. Smooth tops with a spatula.
- Bake for 20-25 minutes, or until a toothpick inserted in the center comes out clean.
- Cool in pans for 10 minutes, then turn out onto wire racks to cool completely.
- For pastry cream: In a medium saucepan, heat milk over medium heat until steaming (not boiling).
- In a separate bowl, whisk egg yolks, sugar, and cornstarch until smooth.
- Slowly pour hot milk into egg mixture, whisking constantly.
- Return mixture to saucepan. Cook over medium heat, whisking constantly, until thickened (about 4-5 minutes).
- Remove from heat. Stir in butter, vanilla, and a pinch of salt.
- Pour pastry cream into a bowl. Cover with plastic wrap directly on the surface. Chill for at least 1 hour.
- For chocolate glaze: Place chopped chocolate and butter in a small bowl.
- Heat heavy cream in a saucepan until just simmering. Pour over chocolate.
- Let sit 2 minutes, then whisk until smooth and glossy. Microwave in 10-second bursts if needed.
- To assemble: Place one cake layer on a serving plate. Spread all the chilled pastry cream evenly over the top.
- Top with second cake layer. Gently press down.
- Pour ganache over the center, letting it drip down the sides. Use an offset spatula or knife to spread if needed.
- Chill assembled cake for at least 1 hour before serving.
Notes
For best results, use room temperature eggs and butter. If pastry cream is lumpy, blend briefly with a hand mixer. If chocolate glaze is too thick, add a splash more cream. Cake flour can be used for a lighter sponge. Gluten-free and dairy-free adaptations work well. Chill the assembled cake for at least 1 hour before serving for best texture.
Nutrition
- Serving Size: 1 slice (1/10th of pie)
- Calories: 320
- Sugar: 27
- Sodium: 220
- Fat: 15
- Saturated Fat: 9
- Carbohydrates: 38
- Fiber: 1
- Protein: 6
Keywords: Boston Cream Pie, classic dessert, easy cake, beginner baking, chocolate glaze, pastry cream, celebration cake, American dessert