Introduction
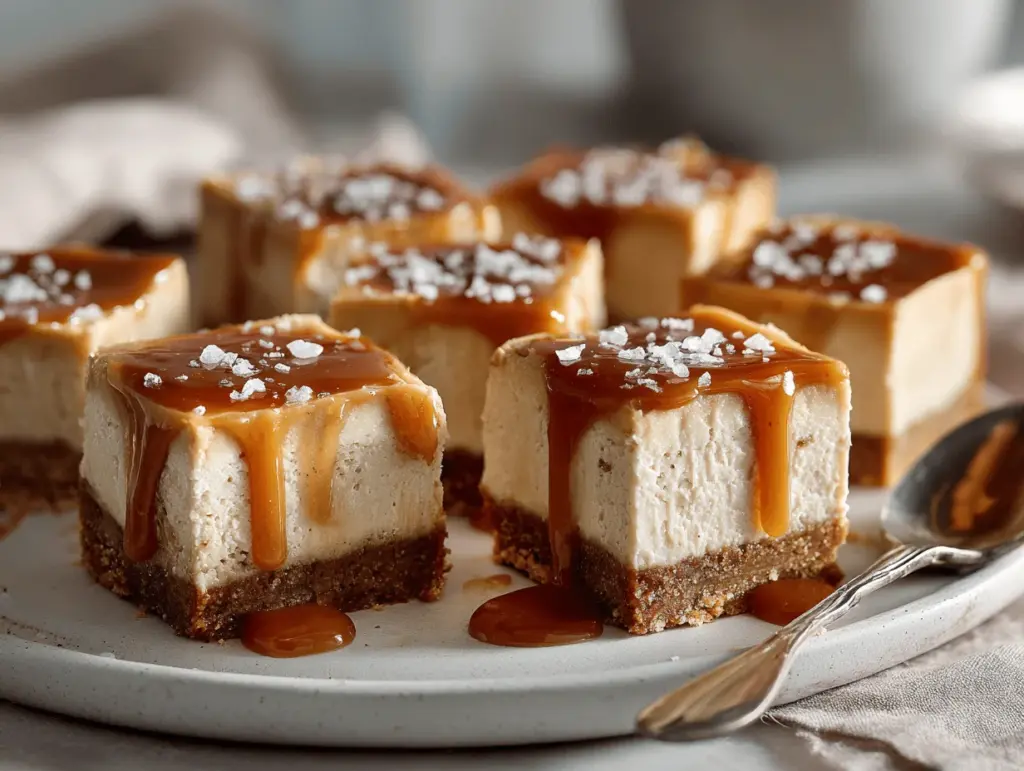
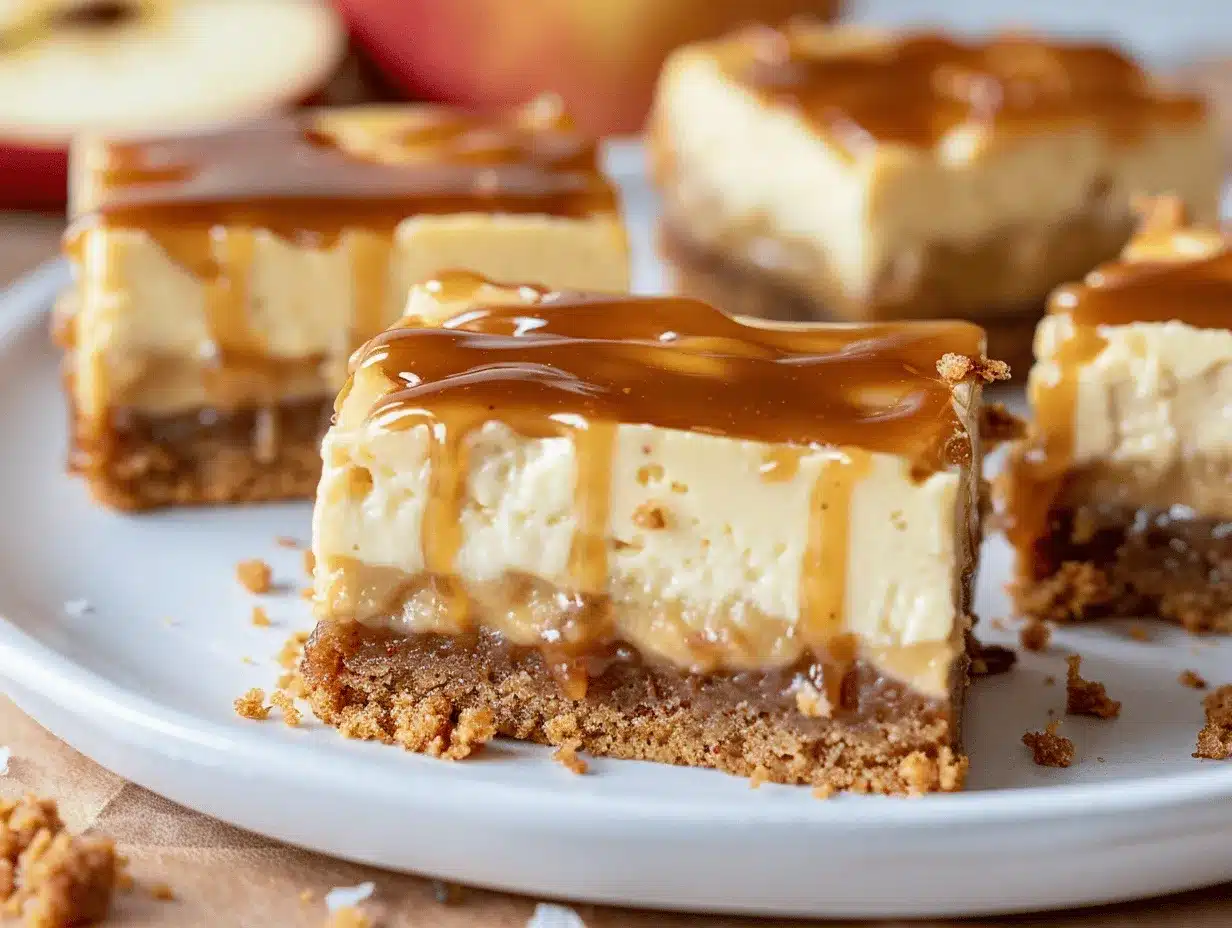
The sweet scent of brown butter swirling through my kitchen always signals fall. It’s that nutty aroma, mingled with hints of apple cider, that brings back memories of crisp afternoons and cozy sweaters. These Brown Butter Apple Cider Cheesecake Bars with Salted Caramel aren’t just a dessert—they’re autumn baked into every bite. I still remember the first time I made these bars; the leaves outside were just starting to turn, and I was looking for a treat that tasted like the season itself. Mixing brown butter into the crust changed everything. Seriously, you’ll notice the difference right away—the flavor’s deeper, almost toasty, and it pairs perfectly with tangy apple cider and creamy cheesecake.
Ever since that first batch, these bars have become my go-to for family gatherings and chilly evenings. They’re simple enough for a weeknight baking session, but fancy enough to bring to Friendsgiving or a holiday brunch. Plus, you know, the salted caramel drizzle just takes things over the top. If you’re searching for a dessert that’s both comforting and impressive, this is it. Trust me, I’ve made these more times than I can count (and honestly, I never get tired of licking the spoon). The apple cider cheesecake layer is silky and just the right amount of tart, while the brown butter crust and caramel finish keep every bite interesting. Whether you’re a seasoned baker or just starting out, these bars are practically foolproof—no water baths, no fussy steps. If fall flavors make you swoon, or you’re obsessed with salted caramel anything, you’re in for a treat. Let’s dig in to the ultimate autumn dessert: brown butter apple cider cheesecake bars!
Why You’ll Love This Recipe
After years of baking and testing fall desserts, I can honestly say these Brown Butter Apple Cider Cheesecake Bars are something special. They’ve passed the “family approval” test more times than I can count, and even my picky nephew comes back for seconds. Here’s why you’ll want to bookmark this recipe:
- Quick & Easy: Comes together in about an hour (plus chilling). No complicated steps—just mix, bake, and drizzle.
- Simple Ingredients: Nothing fancy here. You probably have most things in your pantry already—just grab some apple cider and cream cheese.
- Perfect for Any Occasion: These bars work for everything from weekday snacks to Thanksgiving dessert tables. They travel well, too.
- Crowd-Pleaser: Kids love the sweet caramel, adults appreciate the subtle tang from cider and cream cheese. Everyone asks for the recipe (trust me).
- Unbelievably Delicious: The combo of nutty brown butter, tart apple cider, rich cheesecake, and salted caramel is next-level. It’s comfort food with a little flair!
What makes these bars different? The brown butter crust gives a toasted, almost shortbread-like base that holds up beautifully. The apple cider reduction adds a punch of real apple flavor without making things soggy. And the salted caramel—well, let’s just say it’s the kind you’ll want to drizzle on everything. I’ve tested plenty of cheesecake bar recipes, and this one stands out for its balance: not too sweet, definitely not bland, and layered with flavor. If you want something that feels special but won’t keep you in the kitchen all day, you’ve found your match.
Honestly, these bars are the kind you savor. The first bite is creamy, the second is tangy, and by the third, you’re hooked. They’re the dessert I make when I want to impress—without the stress. Comfort, convenience, and a little bit of “wow”—that’s what you get with these Brown Butter Apple Cider Cheesecake Bars with Salted Caramel.
What Ingredients You Will Need
This recipe uses simple, wholesome ingredients to deliver bold flavor and satisfying texture without the fuss. Most of what you’ll need is probably already in your kitchen, and a quick trip to the store will cover the rest. Here’s what goes into each yummy layer:
For the Brown Butter Crust
- 1/2 cup (115g) unsalted butter (for browning)
- 1 cup (120g) all-purpose flour (or use gluten-free blend)
- 1/4 cup (50g) packed light brown sugar (adds richness)
- 1/4 teaspoon fine sea salt
For the Apple Cider Cheesecake Layer
- 8 ounces (227g) cream cheese, softened (full fat for best texture)
- 1/4 cup (60ml) apple cider (fresh or store-bought, but not apple juice)
- 1 large egg, room temperature
- 1/4 cup (50g) granulated sugar
- 1/2 teaspoon ground cinnamon (optional, for warmth)
- 1/2 teaspoon vanilla extract
For the Salted Caramel Topping
- 1/2 cup (120ml) prepared salted caramel sauce (homemade or store-bought)
- Flaky sea salt, for sprinkling (Maldon is my favorite)
Optional Add-ins & Substitutions
- Swap gluten-free flour for all-purpose if needed
- Use coconut sugar instead of brown sugar for a deeper flavor
- Try dairy-free cream cheese for a lactose-friendly version
- Add a pinch of nutmeg or ginger for extra spice
Ingredient Tips: I recommend using high-quality butter for browning (it makes a real difference in flavor). For apple cider, look for one that’s unfiltered and not too sweet—some local brands are amazing. If you’re making your own salted caramel, let it cool completely before drizzling over the bars. If you want to go all out, top with thin apple slices for a pretty finish.
Equipment Needed
- 8×8-inch (20x20cm) baking pan: Lined with parchment for easy removal. I use a glass pan, but metal works fine.
- Medium saucepan: For browning butter. Nonstick is nice, but any sturdy pan will do.
- Mixing bowls: At least two—one for crust, one for filling.
- Hand mixer or stand mixer: Makes the cheesecake layer super smooth. A whisk and elbow grease work in a pinch.
- Measuring cups and spoons: Precision matters with cheesecake bars!
- Parchment paper: Prevents sticking and helps lift bars out easily.
- Rubber spatula: Good for scraping down sides and smoothing layers.
If you don’t have a mixer, don’t worry—you can mix by hand, just make sure the cream cheese is really soft. For browning butter, watch closely; I’ve burned mine more than once by walking away. Cleanup’s a breeze if you soak the pan right after. On a budget? Most tools here are basics, and you can find decent pans at thrift stores or online for cheap. Maintenance tip: Wipe down your mixer after using sticky caramel to keep it in top shape.
Preparation Method
- Prep the Pan: Line an 8×8-inch (20x20cm) baking pan with parchment paper, leaving an overhang for easy removal. Preheat your oven to 350°F (175°C).
- Brown the Butter: Place 1/2 cup (115g) unsalted butter in a medium saucepan over medium heat. Stir frequently as it melts, then foams. Watch for golden-brown specks and a nutty aroma—about 5–7 minutes. Remove from heat immediately (don’t let it burn!). Pour into mixing bowl and let cool 5 minutes.
- Make the Crust: To the cooled brown butter, add 1 cup (120g) all-purpose flour, 1/4 cup (50g) light brown sugar, and 1/4 teaspoon salt. Mix until dough resembles wet sand. Press evenly into prepared pan. Bake 12–15 minutes, until edges are lightly golden. Cool while you prep filling.
- Reduce the Apple Cider: Pour 1/4 cup (60ml) apple cider into a small saucepan and simmer over medium heat until reduced to about 2 tablespoons—should take 5–7 minutes. This intensifies flavor without extra liquid. Let cool slightly.
- Make Cheesecake Filling: In a bowl, beat 8 ounces (227g) softened cream cheese with 1/4 cup (50g) granulated sugar until smooth and fluffy—about 2 minutes. Add 1 large egg, reduced apple cider, 1/2 teaspoon cinnamon, and 1/2 teaspoon vanilla. Beat just until combined, scraping down sides as needed.
- Layer & Bake: Pour cheesecake mixture over cooled crust and smooth with a spatula. Bake at 350°F (175°C) for 22–26 minutes, until edges are set and center is slightly wobbly (don’t overbake—it will firm up as it cools).
- Cool & Chill: Remove from oven and let cool to room temperature, then refrigerate at least 2 hours or overnight. This sets the cheesecake layer for clean slices.
- Add Salted Caramel: Once chilled, lift bars out using parchment. Drizzle 1/2 cup (120ml) salted caramel sauce evenly over top. Sprinkle with flaky sea salt.
- Slice & Serve: Cut into 16 squares with a sharp knife, wiping knife between cuts for neat edges. Serve chilled or at room temp.
Troubleshooting Tips: If your crust seems dry, add 1–2 teaspoons more melted butter. If cheesecake cracks, don’t sweat it—the caramel covers everything. The apple cider reduction is key; too much liquid will make bars soggy. Visual cues: the crust should look golden, and the cheesecake layer should jiggle just a little in the center when done. Efficiency tip: Prep caramel while bars chill, or use store-bought for speed.
Cooking Tips & Techniques
After a few attempts (and a couple of burnt batches), I’ve picked up some tricks for perfect Brown Butter Apple Cider Cheesecake Bars every time:
- Brown Butter Watch: Don’t walk away during browning! It goes from golden to burnt in seconds. Use a light-colored pan if you can—it makes it easier to see the color change.
- Room Temp Ingredients: Softened cream cheese and room temp eggs blend smoother, preventing lumps. If you forget, pop cream cheese in the microwave on low for 10 seconds.
- Apple Cider Reduction: Reducing cider concentrates flavor and keeps the filling from getting watery. Don’t skip this step, even if you’re tempted to speed things up.
- Slicing Bars: Chill bars thoroughly before slicing. Use a hot, clean knife (run under hot water and wipe dry). This gives the neatest, most Pinterest-worthy squares.
- Caramel Drizzle: If your caramel is too thick, microwave for 10 seconds to loosen. Drizzle with a spoon for stripes or pour for full coverage.
Common mistakes? Overbaking is the big one—the cheesecake layer should be just set, not firm. If the bars seem too soft after chilling, give them another hour in the fridge. My own lesson: Don’t skip lining the pan! The parchment makes lifting and slicing so much easier. For multitasking, reduce cider while the crust bakes, and prep caramel as the bars cool. Consistency tip: Always measure ingredients by weight if possible. It’s more accurate, and cheesecake bars are all about precision.
Variations & Adaptations
I love tweaking recipes to fit different diets and tastes. Here are some of my favorite ways to switch up these Brown Butter Apple Cider Cheesecake Bars:
- Gluten-Free: Sub your favorite gluten-free flour blend for the all-purpose flour. Bob’s Red Mill 1-to-1 works great here.
- Dairy-Free: Use a plant-based butter for browning and dairy-free cream cheese for the filling. Make sure to check labels for allergens.
- Spiced Up: Add 1/4 teaspoon ground ginger or cardamom to the cheesecake layer for a warming kick. Apple pie spice is also fantastic.
- Apple Chunks: Mix in 1/4 cup finely diced sautéed apples to the filling for extra texture.
- Lemon Twist: Swap apple cider for lemon juice and zest for a summery version. Top with lemon curd instead of caramel.
- Nutty Crunch: Sprinkle chopped toasted pecans or walnuts on top before drizzling caramel.
I once made these with coconut sugar and a gingerbread crust for Christmas—so good! If you prefer less sweetness, skip the caramel or go light on the drizzle. For a boozy twist, add a splash of bourbon to the caramel (just keep it away from the kiddos).
Serving & Storage Suggestions
For best results, serve these bars chilled or at cool room temperature. The flavors pop more when cold, and the texture stays creamy. I like to arrange them on a pretty platter and sprinkle extra flaky salt or cinnamon over the top. They pair beautifully with hot apple cider, spiced tea, or even a scoop of vanilla ice cream.
Storing is easy: Place bars in an airtight container and refrigerate for up to 5 days. The caramel may set a bit, but it’s just as tasty. For longer storage, freeze the bars (before adding caramel) for up to 2 months. Thaw in the fridge overnight, then add the caramel right before serving. If you want to reheat, zap a single bar in the microwave for 15 seconds—but honestly, they’re best cold. Over time, the flavors meld and get even richer—so sometimes, leftovers are better than the first day!
Nutritional Information & Benefits
Each Brown Butter Apple Cider Cheesecake Bar (1/16th of the pan) is estimated to contain:
- Calories: ~180
- Fat: ~10g
- Carbs: ~20g
- Protein: ~2g
Health Highlights: Apple cider brings antioxidants and vitamin C, while the cream cheese offers a little protein and calcium. Using real butter and fresh cider means you’re getting wholesome ingredients—no weird additives. This recipe can be made gluten-free or dairy-free with simple swaps. Allergens: Contains dairy, eggs, and gluten (unless modified). As someone who watches sugar, I find these are a satisfying treat without going overboard. Enjoy in moderation, and they fit nicely into a balanced fall menu.
Conclusion
Brown Butter Apple Cider Cheesecake Bars with Salted Caramel aren’t just another fall dessert—they’re the recipe I reach for when I want something comforting, impressive, and easy. The layers of flavor (nutty, tangy, creamy, sweet) make every bite memorable. Plus, you can tweak them for gluten-free or dairy-free diets without losing the magic.
Honestly, these bars are my favorite way to celebrate autumn. They’re easy enough for weeknight baking, but fancy enough for guests. Try your own twist—add nuts, swap spices, go heavy or light on caramel. I’d love to hear how you make them yours! Drop a comment, share on Pinterest, or tag me with your creations. Happy baking, and remember: messy caramel is always a win!
Now go grab your apples and butter—your kitchen is about to smell amazing.
FAQs
Can I use apple juice instead of apple cider?
It’s best to use apple cider for a more intense, tart flavor. Apple juice is sweeter and less complex, but in a pinch, you can use it—just expect a milder taste.
Can I make these bars ahead of time?
Absolutely! They’re even better after chilling overnight. Just add the salted caramel right before serving for that fresh look and taste.
What if I don’t have salted caramel sauce?
No worries! You can use plain caramel and sprinkle flaky sea salt on top, or make a quick homemade version with butter, sugar, cream, and salt.
How do I know when the cheesecake layer is baked?
The edges should be set and the center just a bit wobbly. If you overbake, the layer gets dense instead of creamy—so keep an eye out!
Can I freeze these cheesecake bars?
Yes, you can! Freeze without the caramel topping for up to 2 months. Thaw in the fridge and add caramel before serving. They taste just as delicious after freezing.
Pin This Recipe!
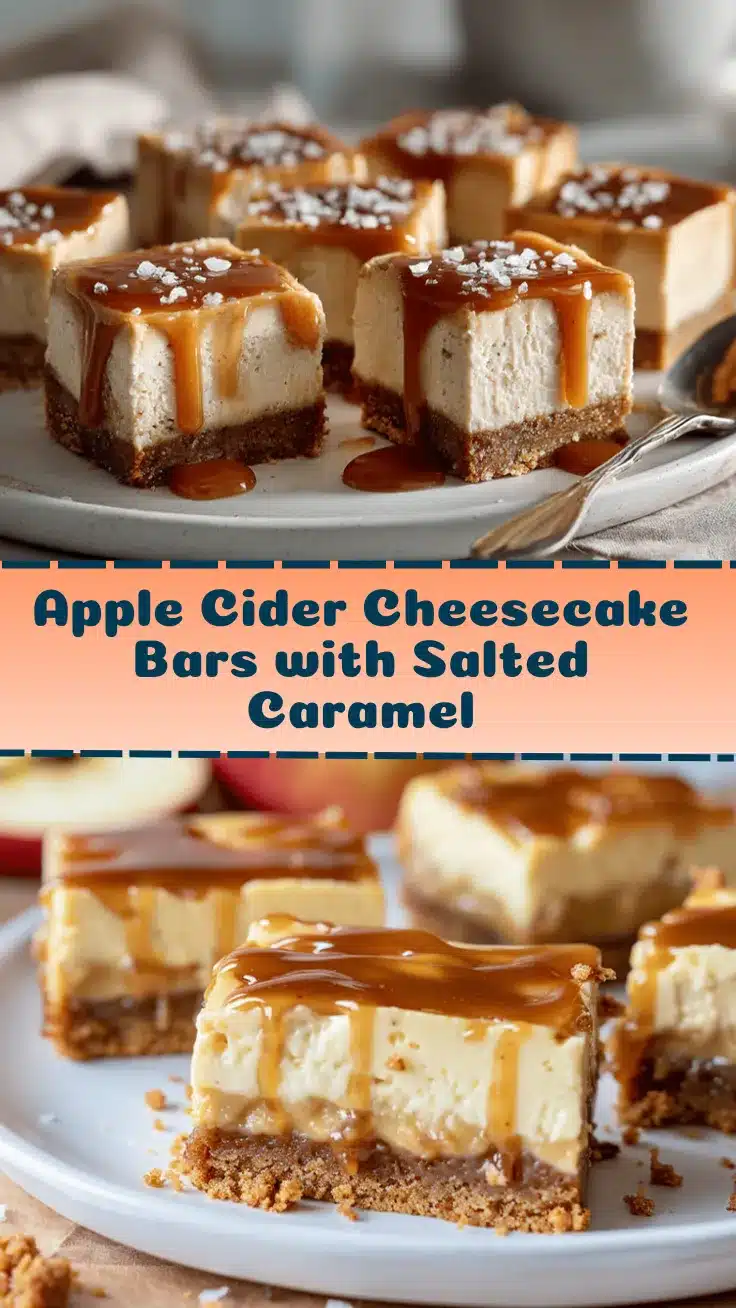
Brown Butter Apple Cider Cheesecake Bars with Salted Caramel
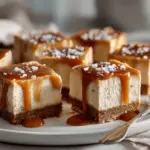
These cheesecake bars feature a nutty brown butter crust, tangy apple cider-infused cheesecake filling, and a decadent salted caramel drizzle. The perfect easy fall dessert for gatherings or cozy nights in.
- Prep Time: 20 minutes
- Cook Time: 40 minutes
- Total Time: 1 hour (plus chilling)
- Yield: 16 bars 1x
- Category: Dessert
- Cuisine: American
Ingredients
- 1/2 cup unsalted butter (for browning)
- 1 cup all-purpose flour (or gluten-free blend)
- 1/4 cup packed light brown sugar
- 1/4 teaspoon fine sea salt
- 8 ounces cream cheese, softened
- 1/4 cup apple cider (not apple juice)
- 1 large egg, room temperature
- 1/4 cup granulated sugar
- 1/2 teaspoon ground cinnamon (optional)
- 1/2 teaspoon vanilla extract
- 1/2 cup prepared salted caramel sauce
- Flaky sea salt, for sprinkling
Instructions
- Line an 8×8-inch baking pan with parchment paper, leaving an overhang for easy removal. Preheat oven to 350°F (175°C).
- Brown the butter: Place 1/2 cup unsalted butter in a medium saucepan over medium heat. Stir frequently until golden-brown specks appear and a nutty aroma develops (about 5–7 minutes). Remove from heat and let cool for 5 minutes.
- Make the crust: To the cooled brown butter, add flour, brown sugar, and salt. Mix until dough resembles wet sand. Press evenly into prepared pan. Bake 12–15 minutes, until edges are lightly golden. Cool while prepping filling.
- Reduce the apple cider: Pour apple cider into a small saucepan and simmer over medium heat until reduced to about 2 tablespoons (5–7 minutes). Let cool slightly.
- Make cheesecake filling: In a bowl, beat softened cream cheese with granulated sugar until smooth and fluffy (about 2 minutes). Add egg, reduced apple cider, cinnamon, and vanilla. Beat just until combined.
- Layer & bake: Pour cheesecake mixture over cooled crust and smooth with a spatula. Bake at 350°F for 22–26 minutes, until edges are set and center is slightly wobbly.
- Cool & chill: Remove from oven and let cool to room temperature, then refrigerate at least 2 hours or overnight.
- Add salted caramel: Once chilled, lift bars out using parchment. Drizzle salted caramel sauce evenly over top. Sprinkle with flaky sea salt.
- Slice & serve: Cut into 16 squares with a sharp knife, wiping knife between cuts for neat edges. Serve chilled or at room temperature.
Notes
For best results, use high-quality butter and unfiltered apple cider. Chill bars thoroughly before slicing for clean edges. The apple cider reduction is key for flavor and texture. Bars can be made gluten-free or dairy-free with simple swaps. Store in the fridge for up to 5 days or freeze (without caramel) for up to 2 months.
Nutrition
- Serving Size: 1 bar (1/16th of pan)
- Calories: 180
- Sugar: 13
- Sodium: 120
- Fat: 10
- Saturated Fat: 6
- Carbohydrates: 20
- Protein: 2
Keywords: cheesecake bars, apple cider, brown butter, salted caramel, fall dessert, easy baking, autumn recipe, Thanksgiving dessert