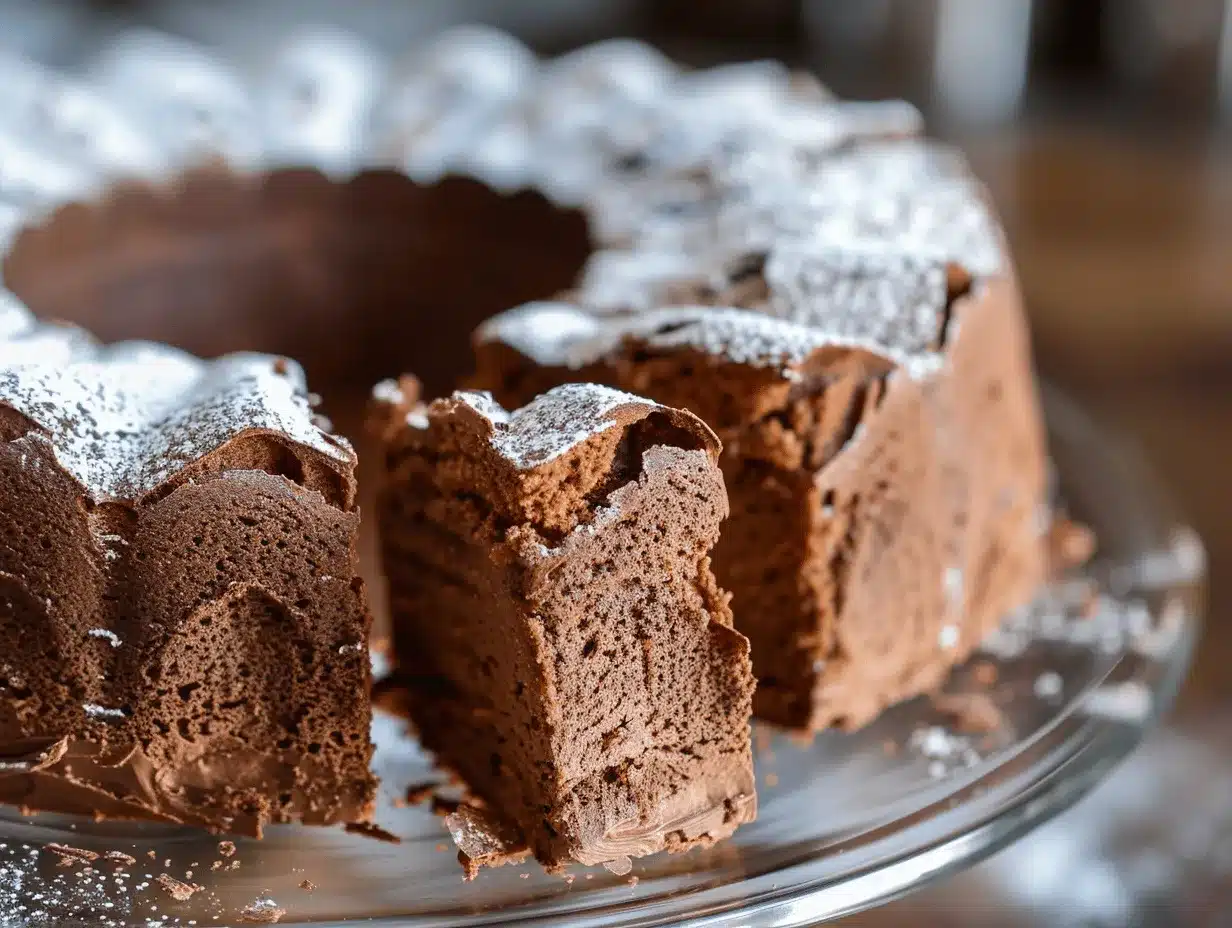
Imagine sinking your fork into a slice of chocolate angel food cake so light, it almost floats—but with a deep, rich cocoa flavor that makes you close your eyes in pure bliss. That’s exactly what this chocolate angel food cake recipe delivers: the dreamy texture of classic angel food cake, paired with a chocolatey decadence that’s somehow still guilt-free. I first baked this fluffy wonder for my sister’s birthday, after she begged for “something chocolatey, but not heavy”—and honestly, the whole family was stunned. Nobody believed a chocolate dessert could taste this good while feeling so airy!
There’s just something magical about angel food cake, you know? The first time I made chocolate angel food cake, I was honestly a bit skeptical—would the cocoa make it dense? Would it lose that signature cloud-like bite? But after a few tweaks (and probably a dozen test bakes), I nailed it. The secret is all in the gentle folding, and a little patience. This cake has become my go-to for birthdays, summer gatherings, or whenever I want something decadent without feeling weighed down.
Chocolate angel food cake is perfect for anyone craving a lighter dessert—whether you’re hosting a brunch, looking for a sweet treat after dinner, or need a showstopper for a potluck. Plus, it’s naturally low-fat, which feels like a bonus on top of its melt-in-your-mouth texture. If you’ve ever wanted to bake the ultimate crowd-pleaser that’s both stunning and secretly simple, this is the recipe for you. Trust me, after making this chocolate angel food cake a few times, you’ll never go back to plain vanilla.
Why You’ll Love This Chocolate Angel Food Cake Recipe
Okay, let’s get real. There are plenty of chocolate cake recipes out there, but chocolate angel food cake is in a league of its own. Here’s why I keep coming back to this recipe—and why you’ll probably do the same:
- Light as Air: Each bite practically melts on your tongue. No heavy, dense cake here—just pure chocolatey fluffiness.
- Simple Ingredients: No weird specialty items. If you bake even occasionally, you probably have everything you need right in your pantry.
- Quick & Easy: This cake comes together faster than you’d think (about 20 minutes to prep)—and it bakes in just 35-40 minutes. Perfect for last-minute desserts!
- Perfect for Any Occasion: Whether it’s a birthday, brunch, potluck, or just a Tuesday, this chocolate angel food cake fits the bill. It’s elegant enough for a celebration, but easy enough for an everyday treat.
- Crowd-Pleaser: I’ve served this to kids, adults, and even folks who “don’t like chocolate cake”—they’re all converted after one bite. It just disappears at parties.
- Surprisingly Guilt-Free: With no butter or oil, and only egg whites for fat, this cake is naturally low in fat and cholesterol. It’s the kind of dessert you don’t have to feel bad about enjoying (or going back for seconds… or thirds!).
What really sets this chocolate angel food cake apart is the technique. I always sift the cocoa and flour together three times (yes, really!)—it makes the crumb super fine and even. The cake ends up with this beautiful, delicate structure—almost like a chocolate cloud. And here’s the thing: the chocolate flavor is bold and rich, but not overwhelming. It’s balanced, never bitter, and just sweet enough to satisfy a craving without feeling over the top.
If you’ve ever found angel food cake a little boring, this chocolate version will change your mind. It’s comfort food, but it feels special—something you’ll want to share with friends, or just savor with a big mug of coffee. After countless test bakes and rave reviews from my toughest critics (my family), I can honestly say this is my favorite chocolate angel food cake recipe. And I think it’ll be yours, too.
What Ingredients You Will Need
This chocolate angel food cake uses straightforward ingredients, but each one plays a key role in creating that signature light, airy texture and chocolate flavor. Most are pantry staples, and if you bake even occasionally, you’re probably set. Here’s what you’ll need:
- Egg Whites (12 large, room temperature, about 1 1/2 cups / 360 ml): The heart and soul of angel food cake—these whip up into a glossy meringue that gives the cake all its lift.
- Cream of Tartar (1 1/2 teaspoons / 6 g): Helps stabilize the egg whites, so they reach those impressive heights without collapsing. Don’t skip it!
- Granulated Sugar (1 cup / 200 g, divided): Adds sweetness and structure. Using half with the egg whites and half with the dry ingredients keeps the cake fluffy and light.
- All-Purpose Flour (3/4 cup / 90 g): Just enough to provide structure without weighing the cake down. For extra lightness, you can swap in cake flour (same amount) if you have it on hand.
- Unsweetened Cocoa Powder (1/3 cup / 30 g): The star of the show! I love using Dutch-process cocoa for a deeper chocolate flavor, but natural cocoa powder works too.
- Salt (1/4 teaspoon): Just a pinch to balance sweetness and bring out the chocolate notes.
- Vanilla Extract (2 teaspoons / 10 ml): Rounds out the flavors and adds that classic bakery aroma.
Optional (but recommended) add-ins:
- Espresso Powder (1/2 teaspoon): Deepens the chocolate flavor. Trust me, you won’t taste coffee—just better chocolate!
- Mini Chocolate Chips (1/4 cup / 45 g): For chocolate lovers who want a little extra indulgence. Toss them in flour before folding in, so they don’t sink.
Ingredient Tips and Substitutions:
- Egg Whites: Fresh eggs whip up best, but boxed egg whites work in a pinch—just make sure they’re 100% pure, no additives.
- Flour: Cake flour makes this cake even lighter, but all-purpose is totally fine. Gluten-free blend also works (I’ve tried Bob’s Red Mill 1-to-1 with great results).
- Sugar: Superfine (caster) sugar dissolves more easily, but regular granulated is fine—just sift it well.
- Cocoa Powder: Use high-quality cocoa for the best flavor. I love Ghirardelli or Hershey’s Special Dark.
- Cream of Tartar: No cream of tartar? Use 1 teaspoon of lemon juice or white vinegar instead—just as effective for stabilizing egg whites.
All in all, it’s a short and sweet list—nothing fancy, but the results are pure magic. You’ll be amazed at how these basic ingredients come together for the most delicious chocolate angel food cake!
Equipment Needed
You really don’t need a ton of fancy equipment for chocolate angel food cake, but a few trusty tools make all the difference:
- Tubed Angel Food Cake Pan (10-inch / 25 cm, ungreased): This is non-negotiable, honestly. The tube and tall sides help the cake rise sky-high. If you don’t have one, a bundt pan can work, but you’ll need to line the bottom with parchment and skip the nonstick spray. I’ve tried both, and the classic pan gives the fluffiest results.
- Electric Mixer (stand or hand): Whipping egg whites by hand is a serious arm workout—use a mixer for consistent, glossy peaks. I’ve used both my old hand mixer and my stand mixer; both work, but the stand mixer is easier for multitasking.
- Fine Mesh Sieve or Sifter: Sifting the flour, sugar, and cocoa together is key for that delicate crumb. A wire whisk can work in a pinch, but a sieve gives better results.
- Large Mixing Bowl: Preferably metal or glass (plastic can hold grease, which ruins meringue).
- Rubber Spatula: For gentle folding—don’t use a whisk or spoon, you’ll deflate the batter!
- Offset Spatula or Butter Knife: To swirl and smooth the top before baking.
Equipment Tips: Never grease your angel food cake pan! The batter needs to cling to the sides to rise. If you’re using your pan for the first time, wash it with hot soapy water to remove any oily residue (I learned this the hard way after my first cake slid right out!). And if you don’t have a tube pan, try making cupcakes instead—just use unlined, ungreased muffin tins and bake for about 20-22 minutes.
How to Make Chocolate Angel Food Cake
-
Prep your pan and ingredients.
Preheat your oven to 350°F (175°C). Do not grease your 10-inch tube pan. Separate 12 large eggs while cold (it’s easier), then let the whites come to room temperature—this helps them whip up to their full volume.
-
Sift dry ingredients.
In a medium bowl, sift together 3/4 cup (90 g) all-purpose flour, 1/3 cup (30 g) unsweetened cocoa powder, 1/4 teaspoon salt, and 1/2 cup (100 g) granulated sugar. Sift at least three times for a super-light crumb. (Yes, it’s a bit of a hassle, but it’s worth it!)
-
Make the meringue.
In a large, clean bowl (wipe it down with a little vinegar if you’re worried about grease), beat the 12 egg whites on medium speed until foamy—about 1-2 minutes. Add 1 1/2 teaspoons (6 g) cream of tartar and continue beating until soft peaks form. Gradually add the remaining 1/2 cup (100 g) granulated sugar, one tablespoon at a time, and beat until stiff, glossy peaks form—about 4-5 minutes. Don’t overbeat or the whites will turn dry.
-
Add vanilla (and espresso powder, if using).
Beat in 2 teaspoons (10 ml) vanilla extract and 1/2 teaspoon espresso powder just until combined.
-
Fold in dry ingredients.
Sift one-third of the flour-cocoa mixture over the meringue. Gently fold it in with a rubber spatula using big, slow strokes. Repeat two more times, folding just until combined—don’t overmix or the batter will deflate. If using mini chocolate chips, toss them with a spoonful of flour and fold them in now.
-
Fill the pan and smooth the top.
Carefully spoon the batter into the ungreased tube pan. Run a butter knife or offset spatula through the batter to eliminate air pockets, then smooth the top. The pan will be almost full, and that’s perfect.
-
Bake.
Bake for 35-40 minutes, or until the top is dry, cracked, and springs back when gently pressed. A skewer inserted near the center should come out clean. (If your oven runs hot, start checking at 33 minutes.)
-
Cool upside down.
Immediately invert the pan onto a bottle or metal funnel (most angel food cake pans have feet for this). Let the cake cool completely—at least 1.5 hours. Don’t be tempted to rush; this prevents collapse and keeps the cake airy.
-
Release and serve.
Once cool, run a thin knife around the edges and center tube to loosen the cake. Lift out, then run the knife along the bottom to fully release. Slice with a serrated knife, using a gentle sawing motion for clean pieces.
Tips: If your egg whites won’t whip, double-check that the bowl and beaters are spotless and grease-free. If your cake sinks, it might’ve been underbaked—give it a few extra minutes next time. And don’t skip the cooling upside down! That’s what keeps the cake from collapsing.
Cooking Tips & Techniques
I’ve made my fair share of chocolate angel food cakes, and let’s just say I’ve learned a few things the hard way. Here are my best pro tips (some I wish I’d known from the start):
- Room Temp Egg Whites: Cold egg whites don’t whip up as high. Let them sit out at least 30 minutes before beating. If you’re in a rush, set the bowl over warm water for a couple minutes—just don’t cook them!
- Spotless Bowl & Beaters: Even the tiniest bit of grease or egg yolk can ruin your meringue. I wipe my bowl and beaters down with a bit of vinegar first, just to be sure. If you see the whites refusing to form peaks, start again with fresh whites and a clean bowl.
- Sift, Sift, Sift: This isn’t the time to skip sifting. It gets rid of lumps and makes the cake extra light. I always sift the flour, cocoa, and half the sugar three times (yep, it’s tedious, but worth it).
- Gentle Folding: This is where most cakes deflate. Use a wide rubber spatula and big, slow strokes, turning the bowl as you go. Don’t stir—fold!
- Don’t Rush Cooling: Cooling the cake upside down is non-negotiable. It keeps the structure light and prevents the cake from sinking. I once tried to cheat and cool it right-side up—the result was a sad, flat cake.
- Don’t Grease the Pan: The batter needs to cling to the sides to rise. Greasing the pan is the quickest way to end up with a pancake instead of an angel food cake.
- Bake Immediately: Once the batter is mixed, get it in the oven right away. The structure starts setting as soon as the folding is done—waiting too long can make the cake dense.
And here’s a personal favorite trick: If you want perfect, cloudlike slices, use a serrated bread knife and saw gently. Pressing straight down squishes the cake—learned that the hard way! If you follow these little tweaks, you’ll have a chocolate angel food cake that turns out beautifully every time.
Variations & Adaptations
One of my favorite things about chocolate angel food cake is how flexible it is. Here are some delicious ways to make this recipe your own:
- Gluten-Free Chocolate Angel Food Cake: Swap the all-purpose flour for a gluten-free 1-to-1 baking flour blend (I love Bob’s Red Mill). The cake still comes out tender and airy. Just be sure to sift well.
- Mocha Angel Food Cake: Add 1 tablespoon instant espresso powder to the dry ingredients and swirl in a tablespoon of finely grated dark chocolate. It’s subtle, but the coffee flavor really perks up the chocolate.
- Berry-Topped Angel Food Cake: In summer, I pile fresh raspberries or strawberries over the top and finish with a dusting of powdered sugar. It’s gorgeous and adds a pop of freshness.
- Dairy-Free Option: This recipe is naturally dairy-free, but make sure your chocolate chips (if using) are also dairy-free.
- Nutty Variation: Swirl in 1/2 cup finely chopped toasted hazelnuts or almonds before baking for a chocolate-nutty twist. (Just be mindful of allergies!)
Personally, I sometimes brush the finished cake with a quick chocolate glaze (just melted chocolate and a splash of almond milk) for a shiny finish. If you want to get really fancy, layer slices with whipped coconut cream and fresh berries—it’s a showstopper for parties.
Serving & Storage Suggestions
Chocolate angel food cake is best served at room temperature, ideally within a few hours of baking (that’s when it’s at its fluffiest!). For a pretty presentation, I like to slice it with a serrated knife and fan the pieces out on a platter, then dust with powdered sugar or cocoa powder. A dollop of whipped cream or a scoop of vanilla ice cream takes it over the top!
This cake pairs beautifully with fresh berries, a drizzle of raspberry sauce, or even a handful of chocolate shavings. For beverages, you can’t go wrong with strong coffee, a creamy latte, or a glass of cold milk.
To store leftovers, wrap the cake tightly in plastic wrap or place in an airtight container. It’ll keep at room temp for up to 2 days, or in the fridge for 4-5 days (though it may dry out a bit). For longer storage, slice and freeze individual pieces—just thaw at room temp for 30 minutes before serving. If the cake gets dry, a quick zap in the microwave (10-15 seconds) softens it right up.
Honestly, the flavor deepens after a day or two—so if you have the patience, leftovers are even better. But don’t count on having much… this cake goes fast!
Nutritional Information & Benefits
One of the sneaky best things about chocolate angel food cake? It’s naturally lighter than most desserts. Each slice (1/12 of the cake) clocks in at roughly 120 calories, with less than 0.5g fat, 26g carbs, and 4g protein (estimated, will vary with mix-ins). There’s no butter or oil, and it’s cholesterol-free since it uses only egg whites.
The cocoa powder brings a dose of antioxidants, and if you use Dutch-process, you’ll get a deeper flavor with less bitterness. Plus, it’s naturally dairy-free, and can easily be made gluten-free for those with sensitivities. The only major allergen is eggs—so it’s not suitable for those with egg allergies.
From a wellness perspective, I love this cake because it lets me satisfy my chocolate cravings without a sugar crash or heavy feeling. It’s proof that dessert can be both decadent and lighter—making it a favorite in my healthy kitchen rotation.
Conclusion
If you’re searching for a chocolate dessert that’s both decadent and light, this chocolate angel food cake recipe is a total winner. It’s easy enough for beginners, impressive enough for guests, and honestly, just plain fun to make. Whether you stick to the classic or try out a few variations, you’ll end up with a cake that’s as beautiful as it is delicious.
One of the reasons I love this recipe so much is how customizable it is—dress it up for a party, keep it simple for a weeknight treat, or tweak the flavors to match your mood. Every time I bake it, I’m reminded why chocolate angel food cake is such a timeless favorite.
I’d love to hear how your cake turns out! If you have questions, want to share your own twists, or just feel like talking chocolate, leave a comment below. Don’t forget to pin this recipe for later and share with fellow dessert lovers. Happy baking—and may your chocolate angel food cake always rise high!
FAQs About Chocolate Angel Food Cake
Can I make chocolate angel food cake without an angel food cake pan?
Yes, you can use a bundt pan or even muffin tins as a substitute, but make sure not to grease the pans. The cake may not rise as high, but it’ll still taste great.
Why did my chocolate angel food cake deflate or collapse?
This usually happens if the egg whites are over- or under-whipped, or if you didn’t cool the cake upside down. Make sure your pan is ungreased and always cool the cake inverted for best results.
Can I use boxed egg whites instead of fresh eggs?
Yes, as long as they’re 100% egg whites with no additives. The texture might be slightly less airy, but it still works well.
How do I know when the cake is done baking?
The top should be dry, cracked, and spring back when pressed lightly. A skewer inserted near the center should come out clean—start checking at 35 minutes.
Is chocolate angel food cake gluten-free or dairy-free?
The basic recipe is dairy-free. For gluten-free, use a 1-to-1 gluten-free baking flour. Always check your chocolate chips if you add them, as some contain dairy.
Pin This Recipe!
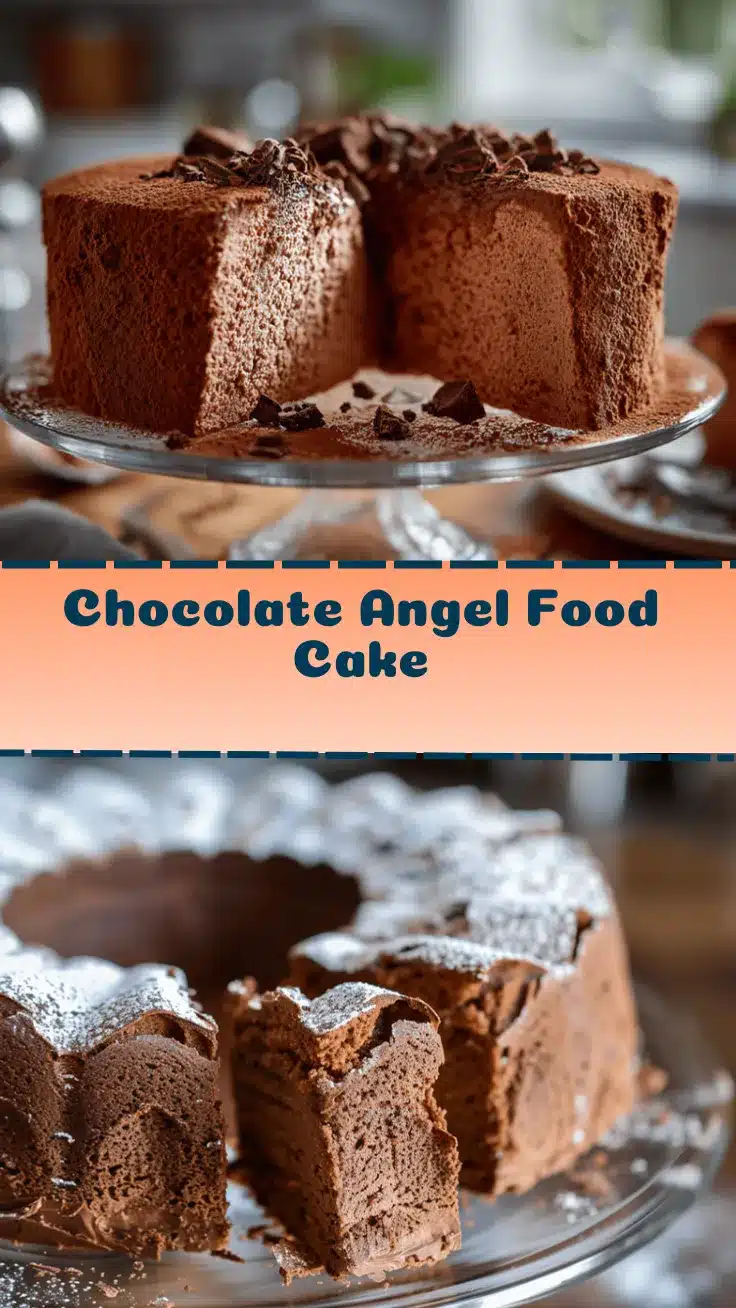
Chocolate Angel Food Cake
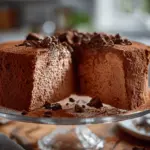
This chocolate angel food cake is light as air with a deep, rich cocoa flavor—perfect for when you want a decadent dessert that won’t weigh you down. It’s easy to make, naturally low in fat, and always a crowd-pleaser for birthdays, brunches, or any celebration.
- Prep Time: 20 minutes
- Cook Time: 35-40 minutes
- Total Time: 1 hour 5 minutes
- Yield: 12 servings 1x
- Category: Dessert
- Cuisine: American
Ingredients
- 12 large egg whites (room temperature, about 1 1/2 cups)
- 1 1/2 teaspoons cream of tartar
- 1 cup granulated sugar, divided
- 3/4 cup all-purpose flour (or cake flour for extra lightness)
- 1/3 cup unsweetened cocoa powder (Dutch-process or natural)
- 1/4 teaspoon salt
- 2 teaspoons vanilla extract
- Optional: 1/2 teaspoon espresso powder
- Optional: 1/4 cup mini chocolate chips (tossed in flour before folding in)
Instructions
- Preheat oven to 350°F (175°C). Do not grease a 10-inch tube pan. Separate 12 large eggs while cold, then let whites come to room temperature.
- In a medium bowl, sift together flour, cocoa powder, salt, and 1/2 cup sugar. Sift at least three times for a super-light crumb.
- In a large, clean bowl, beat egg whites on medium speed until foamy (1-2 minutes). Add cream of tartar and continue beating until soft peaks form.
- Gradually add remaining 1/2 cup sugar, one tablespoon at a time, and beat until stiff, glossy peaks form (about 4-5 minutes).
- Beat in vanilla extract and espresso powder (if using) just until combined.
- Sift one-third of the flour-cocoa mixture over the meringue. Gently fold in with a rubber spatula. Repeat two more times, folding just until combined. If using mini chocolate chips, fold them in now.
- Carefully spoon batter into the ungreased tube pan. Run a butter knife or offset spatula through the batter to eliminate air pockets and smooth the top.
- Bake for 35-40 minutes, or until the top is dry, cracked, and springs back when gently pressed. A skewer inserted near the center should come out clean.
- Immediately invert the pan onto a bottle or metal funnel and let the cake cool completely (at least 1.5 hours).
- Once cool, run a thin knife around the edges and center tube to loosen the cake. Lift out, then run the knife along the bottom to fully release. Slice with a serrated knife using a gentle sawing motion.
Notes
Do not grease the pan—this is essential for the cake to rise properly. Sift dry ingredients at least three times for the lightest crumb. Cool the cake upside down to prevent collapse. For gluten-free, use a 1-to-1 gluten-free flour blend. Cake is best served at room temperature and can be topped with berries, whipped cream, or a dusting of powdered sugar.
Nutrition
- Serving Size: 1/12 of cake (about 1 slice)
- Calories: 120
- Sugar: 18
- Sodium: 90
- Fat: 0.5
- Carbohydrates: 26
- Fiber: 2
- Protein: 4
Keywords: chocolate angel food cake, light chocolate cake, low fat dessert, dairy free cake, easy chocolate cake, angel food cake, birthday cake, crowd pleaser, gluten free option, healthy dessert