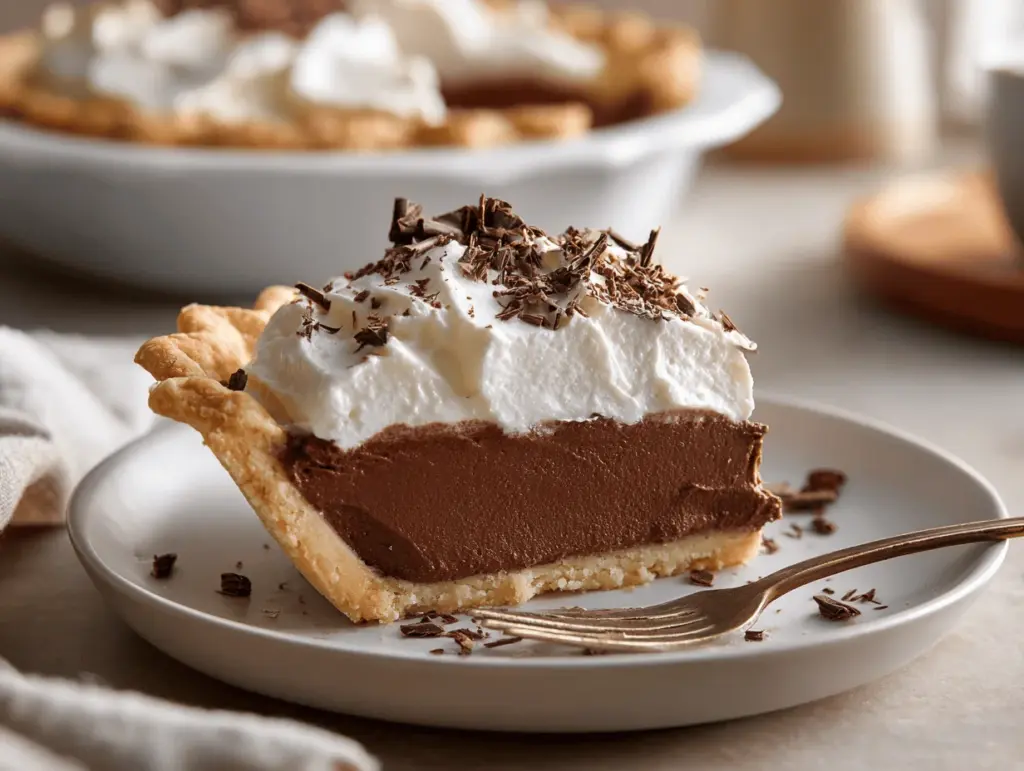
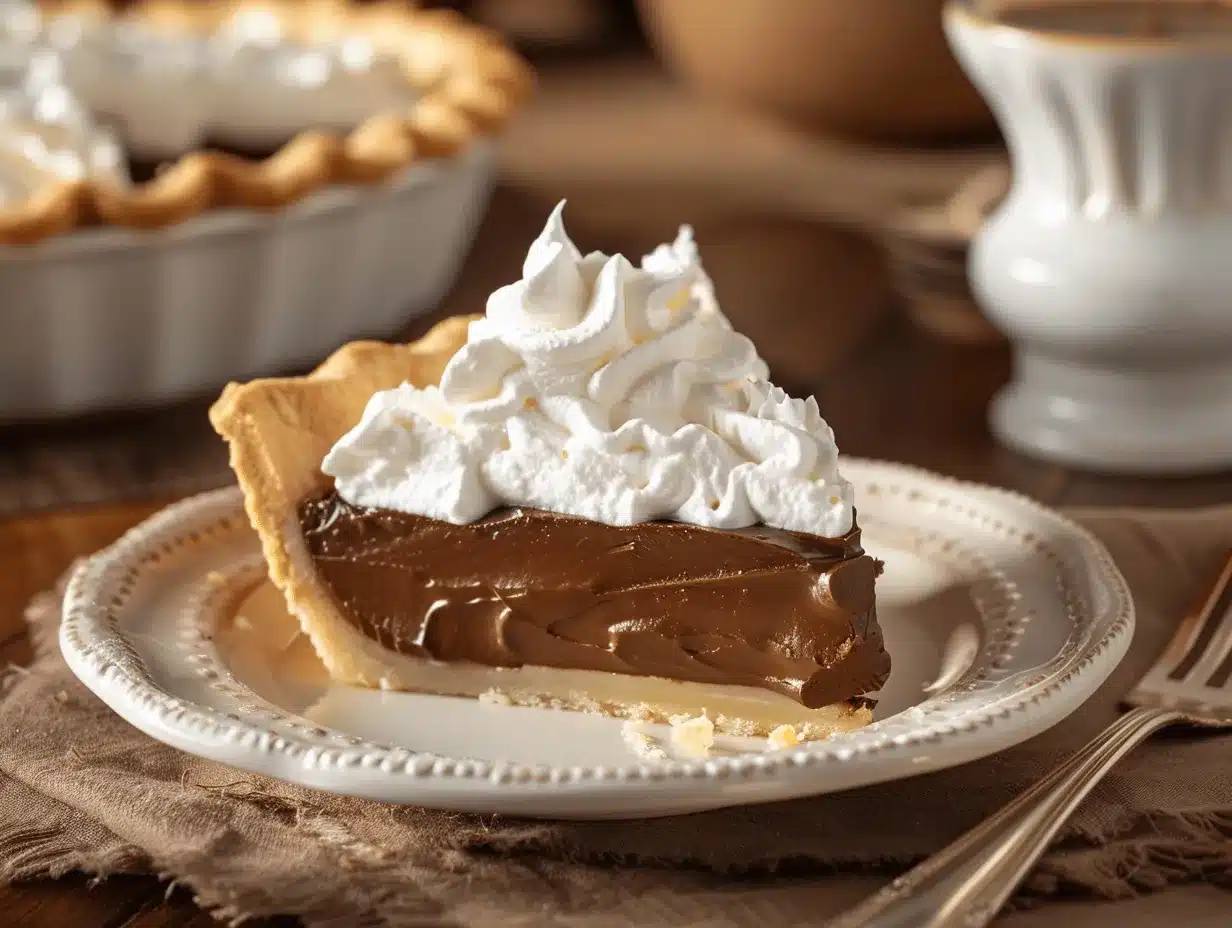
The first time I tasted French Silk Pie, I knew dessert would never be the same for me. Imagine a fork gliding through silky layers of creamy chocolate—darker and richer than any pudding—with just enough whipped cream to make you close your eyes and savor the moment. The crunch of the buttery crust beneath all that chocolate? It’s downright addictive. I bet you can almost smell the cocoa wafting through your kitchen as you read this!
I stumbled onto this French Silk Pie recipe on a snowy Sunday when my pantry was bare except for a few baking staples and—thank goodness—a bar of good bittersweet chocolate. That day, I learned the secret to a truly luxurious chocolate dessert isn’t complicated techniques or rare ingredients; it’s about patience, passion, and a willingness to whip a little longer than you think necessary.
This French Silk Pie recipe is my go-to for special occasions, birthdays, and those “just because” moments when my family craves something decadent. I’ve tweaked the steps over a dozen bakes to guarantee a lush, mousse-like texture and a deep chocolate flavor that doesn’t overwhelm. Whether you’re celebrating a milestone or just want to treat yourself, this easy homemade French Silk Pie delivers every time.
Trust me, once you make this, you’ll never look at store-bought pies the same way again. It’s a chocolate lover’s dream—simple enough for a weeknight, yet sophisticated enough to steal the show at holiday gatherings. Let’s get whisking!
Why You’ll Love This French Silk Pie Recipe
Honestly, I can’t count how many times this French Silk Pie has saved my dessert reputation. If you’re wondering what makes it so special, here’s why this pie deserves a permanent spot in your recipe box:
- Quick & Easy: Comes together in about 40 minutes of active prep (plus chilling time), making it perfect for last-minute celebrations.
- Simple Ingredients: You probably have almost everything on hand—no fancy grocery trip required.
- Perfect for Special Occasions: Birthdays, anniversaries, Valentine’s Day (honestly, any day that needs chocolate magic).
- Crowd-Pleaser: Kids love it, adults rave about it, and even picky eaters have gone back for seconds. I’ve served this pie at family reunions and watched it vanish in minutes.
- Unbelievably Delicious: The contrast between the crisp crust, velvety chocolate layers, and pillow-like whipped cream is out of this world.
What sets this version apart is the old-school mixing technique—whipping the eggs and sugar until they’re impossibly airy before folding in the melted chocolate and butter. It’s a trick I learned from my grandma, and it guarantees a feather-light texture. Plus, using quality chocolate (I’m partial to Ghirardelli or Valrhona) makes all the difference.
This isn’t just another chocolate pie. It’s the kind of dessert that makes people close their eyes after the first bite. French Silk Pie is comfort food at its most extravagant—without being fussy or over-the-top.
If you want to impress guests without breaking a sweat, or just want to turn an ordinary evening into something memorable, this recipe is your ticket. It’s pure chocolate bliss with a homey touch—every slice is a little celebration on its own.
What makes French Silk Pie different from other chocolate pies?
French Silk Pie isn’t baked once the filling is made. Instead, it’s all about whipping air into the chocolate mixture for that signature mousse-like texture. There’s no starch or flour, so the chocolate flavor is more intense and the texture is like silk—hence the name!
What Ingredients You Will Need
This French Silk Pie recipe keeps things simple and classic—no weird ingredients, just pure chocolate goodness built on a buttery crust. Here’s what you’ll need:
For the Pie Crust
- 1 9-inch pie shell (homemade or store-bought; I prefer a classic flaky butter crust)
For the Chocolate Silk Filling
- 170g (6 oz) bittersweet or semisweet chocolate, chopped (Ghirardelli or Valrhona recommended for best flavor)
- 226g (1 cup) unsalted butter, softened to room temperature
- 300g (1 1/2 cups) granulated sugar
- 3 large eggs (room temperature; pasteurized if you’re concerned about raw eggs)
- 1 tsp pure vanilla extract
- 1/4 tsp kosher salt
For the Whipped Cream Topping
- 240ml (1 cup) heavy whipping cream, cold
- 2 tbsp powdered sugar
- 1/2 tsp vanilla extract
Optional Garnishes
- Chocolate curls or shavings (just use a vegetable peeler on a chocolate bar)
- Cocoa powder (for a pretty dusting)
- Fresh berries (raspberries or strawberries add a nice tart contrast)
Ingredient Tips: If you need to make this gluten-free, swap in a gluten-free ready-made pie shell or make your own with almond flour. For dairy-free, try using plant-based butter and coconut cream for the topping, but expect a slightly different texture. For the eggs, pasteurized eggs are a good idea if you’re serving to children or elderly guests, since the filling isn’t cooked.
I always recommend using real vanilla extract (not imitation) and high-quality chocolate—the flavor is noticeably deeper and more complex. If you’re a fan of darker chocolate, go for 70% cacao or higher, but semisweet works perfectly for most palates.
Can I use milk chocolate instead of bittersweet?
You can, but expect a sweeter, less intense flavor. I’ve tried it, and while the pie is still delicious, the bittersweet variety delivers that classic French Silk Pie richness.
Equipment Needed
- 9-inch pie pan (glass or metal; I find metal bakes the crust a touch crisper)
- Electric mixer (stand mixer is ideal, but a hand mixer works fine—just expect a workout!)
- Heatproof bowl (for melting chocolate)
- Spatula (silicone recommended for scraping every bit of chocolate)
- Whisk (for blending the whipped cream)
- Measuring cups and spoons (accurate measurements matter with chocolate desserts)
- Vegetable peeler (for making chocolate curls, if desired)
If you don’t have an electric mixer, you can whip everything by hand, but it’ll take some serious elbow grease. I’ve done it once—never again! For melting chocolate, a microwave works fine, just go in short bursts and stir often. If you’re using a glass pie pan, let your pie cool completely before slicing to avoid cracks.
Budget-friendly tip: You can make whipped cream with a simple hand whisk if you don’t mind a mini workout. And if you find yourself making pies often, a sturdy metal pie pan is worth the small investment—it lasts forever and bakes evenly.
Preparation Method
- Bake the Pie Crust: Preheat your oven to 190°C (375°F). Roll out your pie dough and fit it into a 9-inch pie pan. Prick the bottom all over with a fork, line with parchment, and fill with pie weights or dried beans. Bake for 20-25 minutes or until golden brown. Cool completely before filling. (Don’t skip cooling—warm crust will melt the filling!)
- Melt the Chocolate: Place 170g (6 oz) chopped chocolate in a heatproof bowl. Melt gently over a pan of simmering water, or microwave in 30-second bursts, stirring until smooth. Let cool until just warm to the touch, not hot.
- Beat the Butter and Sugar: In a large bowl, beat 226g (1 cup) unsalted butter and 300g (1 1/2 cups) sugar on medium-high speed for 3-5 minutes, or until pale and fluffy. The sugar should be mostly dissolved—rub a bit between your fingers to check.
- Add the Melted Chocolate: With the mixer on low, pour in the cooled chocolate and mix until fully combined. Scrape down the bowl to get every bit blended.
- Mix in the Eggs: Add 3 large eggs, one at a time, beating for 2 minutes after each addition. This step is the secret to the silky texture—don’t rush! The filling should look glossy, thick, and lighter in color.
- Flavor and Finish: Add 1 tsp vanilla extract and 1/4 tsp kosher salt. Mix until just combined. Taste for sweetness—if you prefer, add a pinch more salt or a splash more vanilla.
- Fill the Pie Shell: Spoon the chocolate silk filling into the cooled pie crust. Smooth the top with a spatula. Chill in the refrigerator for at least 4 hours, or overnight for best results.
- Make the Whipped Cream: In a cold bowl, whip 240ml (1 cup) heavy cream, 2 tbsp powdered sugar, and 1/2 tsp vanilla extract to soft peaks. Spread or pipe over the chilled pie.
- Garnish: Top with chocolate curls, a dusting of cocoa powder, or fresh berries if you like. Slice and serve chilled.
Troubleshooting: If your filling looks grainy, it’s usually from adding hot chocolate to cold butter—make sure everything’s room temp. If the whipped cream won’t thicken, chill your bowl and beaters before starting. For perfectly clean slices, dip your knife in hot water and wipe between cuts.
Prep Notes: The filling contains raw eggs—if that worries you, use pasteurized eggs. I find chilling the pie overnight gives the best texture and flavor.
Sensory Cues: The finished filling should be shiny, thick, and light brown. Whipped cream should be soft but hold its shape. When you slice in, you’ll see distinct layers—the crust, the silk, and the cloud-like topping.
Efficiency Tip: You can bake the crust and prepare the filling ahead of time. Just save the whipped cream for right before serving.
Cooking Tips & Techniques
After making French Silk Pie more times than I can count (some wins, some fails), here are the tips I wish someone had shared with me early on:
- Use Room Temperature Ingredients: Cold butter won’t whip up light and fluffy, and cold eggs can cause the mixture to seize. Let everything sit out for 30 minutes before starting.
- Beat the Eggs Well: Two minutes per egg is not a suggestion—it’s the secret weapon for that mousse-like silkiness. I once rushed this step and ended up with a dense, fudgy filling. Still tasty, but not the classic texture.
- Melt Chocolate Slowly: High heat burns chocolate fast. Use a double boiler or microwave in short bursts. Stir until smooth and shiny.
- Don’t Overwhip the Cream: Stop at soft peaks; overwhipped cream turns grainy and stiff. If that happens, stir in a splash of cream to rescue it.
- Chill Time Is Non-Negotiable: The pie needs at least 4 hours to set, but overnight is best for clean slices and full flavor.
- Clean Slices: For Pinterest-worthy slices, use a hot, dry knife and wipe between cuts. It’s a little extra work but so worth it for those gorgeous layers.
Common mistakes? Adding warm chocolate to cold butter—the mixture curdles. Or underwhipping the eggs, which leads to a flat, heavy filling. I learned the hard way that patience pays off. If you’re multitasking, bake the crust first, prep the filling as it cools, and whip the cream while the pie chills. It’s a rhythm that keeps things moving smoothly.
Consistency tip: Always measure your ingredients carefully, especially with chocolate and butter. Too much butter and the filling won’t set; too little sugar and the chocolate can taste harsh. When in doubt, taste as you go—nothing wrong with a little spoon test!
Variations & Adaptations
French Silk Pie is endlessly customizable. Here are some tried-and-true twists to make it your own:
- Gluten-Free: Use a gluten-free pie shell or make your own with almond or oat flour. I’ve had great results with Bob’s Red Mill gluten-free crust mix.
- Dairy-Free: Swap in plant-based butter and coconut cream for the whipped topping. The texture will be a little different, but the chocolate flavor shines through.
- Mint Chocolate Silk: Add 1/2 tsp peppermint extract to the filling for a refreshing twist—perfect for winter holidays!
- Peanut Butter Layer: Spread a thin layer of creamy peanut butter on the crust before adding the chocolate silk. I tried this for my son’s birthday, and it was a hit.
- Mocha Silk: Dissolve 1 tbsp instant espresso powder into the melted chocolate for a coffee-infused upgrade.
- Seasonal Fruit: Garnish with fresh berries, cherries, or even poached pears for a fruity accent.
For different cooking methods, you can use a press-in cookie crust (like Oreos or graham crackers) instead of traditional pastry. If you’re nut-free, skip any nut-based crusts or toppings. Allergens? Check labels on everything—especially chocolate and pie shells.
My favorite adaptation is adding a pinch of flaky sea salt on top. It brings out the chocolate even more and adds a nice crunch. Whatever variation you choose, this French Silk Pie recipe is forgiving—so have fun and make it your own!
Serving & Storage Suggestions
French Silk Pie is best served chilled, straight from the fridge. For presentation, pile on the whipped cream and sprinkle with chocolate curls—guaranteed to catch eyes on Pinterest! I love serving each slice with a few fresh berries on the side for a pop of color and acidity.
This pie pairs beautifully with coffee, black tea, or a glass of milk. If you’re feeling extra fancy, try it with a scoop of vanilla ice cream or even a drizzle of raspberry sauce.
To store, cover the pie loosely with foil or plastic wrap and refrigerate for up to 4 days. The flavors actually deepen as it sits. For longer storage, freeze individual slices wrapped tightly—thaw in the fridge overnight before serving. Reheating isn’t recommended, but if you want to freshen up the whipped cream, just whip a new batch and spread it on top.
Pro tip: The crust stays crisp for about 2 days, then softens a bit (but honestly, that’s never stopped my family from finishing every last bite!).
Nutritional Information & Benefits
Each slice of French Silk Pie (1/8 of the pie) is roughly:
- Calories: 440
- Fat: 28g
- Carbohydrates: 45g
- Protein: 6g
This French Silk Pie recipe is indulgent, but the high-quality chocolate offers antioxidants and a little mood boost (no joke, chocolate is a true happiness food!). Using real butter and eggs provides richness and satiety. For gluten-free or dairy-free diets, simple swaps make this recipe accessible to everyone. Be aware: the filling contains eggs and dairy, so it’s not suitable for those with allergies to either.
Personally, I see desserts like this as a treat—enjoyed mindfully, shared with loved ones, and savored with gratitude. Life’s too short for bland pie!
Conclusion
French Silk Pie is the kind of dessert that turns any occasion into a celebration. It’s rich, creamy, and so easy, you’ll wonder why you ever settled for store-bought. I love how this recipe brings people together—whether it’s a holiday dinner, a birthday surprise, or just a Tuesday night when you need something sweet.
Don’t be afraid to mix things up—add a new flavor, swap the crust, or decorate with your favorite toppings. That’s the beauty of homemade pie! For me, the joy is in sharing a slice with someone I care about and hearing that happy sigh after the first forkful.
Go ahead and give this French Silk Pie recipe a try! Leave a comment below with your favorite twist, share your photos on Pinterest, or tag me if you bake it for a special occasion. I can’t wait to hear how your chocolate adventure turns out. Here’s to delicious memories and many more slices—cheers!
Frequently Asked Questions
Can I make French Silk Pie ahead of time?
Absolutely! It actually tastes better after chilling overnight. Just wait to add the whipped cream until right before serving.
Is it safe to eat raw eggs in this recipe?
If you’re concerned, use pasteurized eggs. They’re safe for recipes where eggs aren’t cooked, and the texture stays perfect.
Can I use a store-bought crust?
Yes! A ready-made crust saves time and works just fine. Homemade adds a little extra flavor and crunch, but it’s not required.
How do I get perfect chocolate curls for topping?
Use a vegetable peeler on a cold chocolate bar. If the curls break, let the bar warm up slightly and try again.
Can I freeze French Silk Pie?
You can freeze individual slices wrapped tightly in plastic. Thaw in the fridge overnight for best texture. Don’t refreeze once thawed.
Pin This Recipe!

French Silk Pie

This easy homemade French Silk Pie features a rich, mousse-like chocolate filling in a buttery crust, topped with pillowy whipped cream. It’s a decadent dessert perfect for special occasions or whenever you crave a chocolate treat.
- Prep Time: 40 minutes
- Cook Time: 25 minutes
- Total Time: 4 hours 45 minutes
- Yield: 8 servings 1x
- Category: Dessert
- Cuisine: American
Ingredients
- 1 9-inch pie shell (homemade or store-bought)
- 6 oz (170g) bittersweet or semisweet chocolate, chopped
- 1 cup (226g) unsalted butter, softened
- 1 1/2 cups (300g) granulated sugar
- 3 large eggs (room temperature; pasteurized if desired)
- 1 tsp pure vanilla extract
- 1/4 tsp kosher salt
- 1 cup (240ml) heavy whipping cream, cold
- 2 tbsp powdered sugar
- 1/2 tsp vanilla extract
- Chocolate curls or shavings (optional garnish)
- Cocoa powder (optional garnish)
- Fresh berries (optional garnish)
Instructions
- Preheat oven to 375°F (190°C). Roll out pie dough and fit into a 9-inch pie pan. Prick bottom with a fork, line with parchment, and fill with pie weights or dried beans. Bake for 20-25 minutes or until golden brown. Cool completely.
- Melt chopped chocolate in a heatproof bowl over simmering water or in the microwave in 30-second bursts, stirring until smooth. Let cool until just warm.
- In a large bowl, beat softened butter and granulated sugar on medium-high speed for 3-5 minutes, until pale and fluffy. The sugar should be mostly dissolved.
- With mixer on low, pour in cooled melted chocolate and mix until fully combined. Scrape down the bowl.
- Add eggs one at a time, beating for 2 minutes after each addition. The filling should become glossy, thick, and lighter in color.
- Mix in 1 tsp vanilla extract and 1/4 tsp kosher salt until just combined. Taste and adjust salt or vanilla if desired.
- Spoon chocolate silk filling into cooled pie crust. Smooth the top with a spatula. Chill in the refrigerator for at least 4 hours, or overnight for best results.
- In a cold bowl, whip heavy cream, powdered sugar, and 1/2 tsp vanilla extract to soft peaks. Spread or pipe over the chilled pie.
- Garnish with chocolate curls, cocoa powder, or fresh berries if desired. Slice and serve chilled.
Notes
Use room temperature ingredients for best texture. Beat eggs for a full 2 minutes each for a silky filling. Chill the pie at least 4 hours (overnight is best) before serving. For gluten-free, use a gluten-free pie shell. For dairy-free, substitute plant-based butter and coconut cream. Use pasteurized eggs if concerned about raw eggs. For clean slices, dip your knife in hot water and wipe between cuts.
Nutrition
- Serving Size: 1 slice (1/8 of pie)
- Calories: 440
- Sugar: 34
- Sodium: 180
- Fat: 28
- Saturated Fat: 17
- Carbohydrates: 45
- Fiber: 2
- Protein: 6
Keywords: French Silk Pie, chocolate pie, easy dessert, special occasion dessert, homemade pie, mousse pie, whipped cream pie, holiday dessert, chocolate mousse pie, no bake chocolate pie