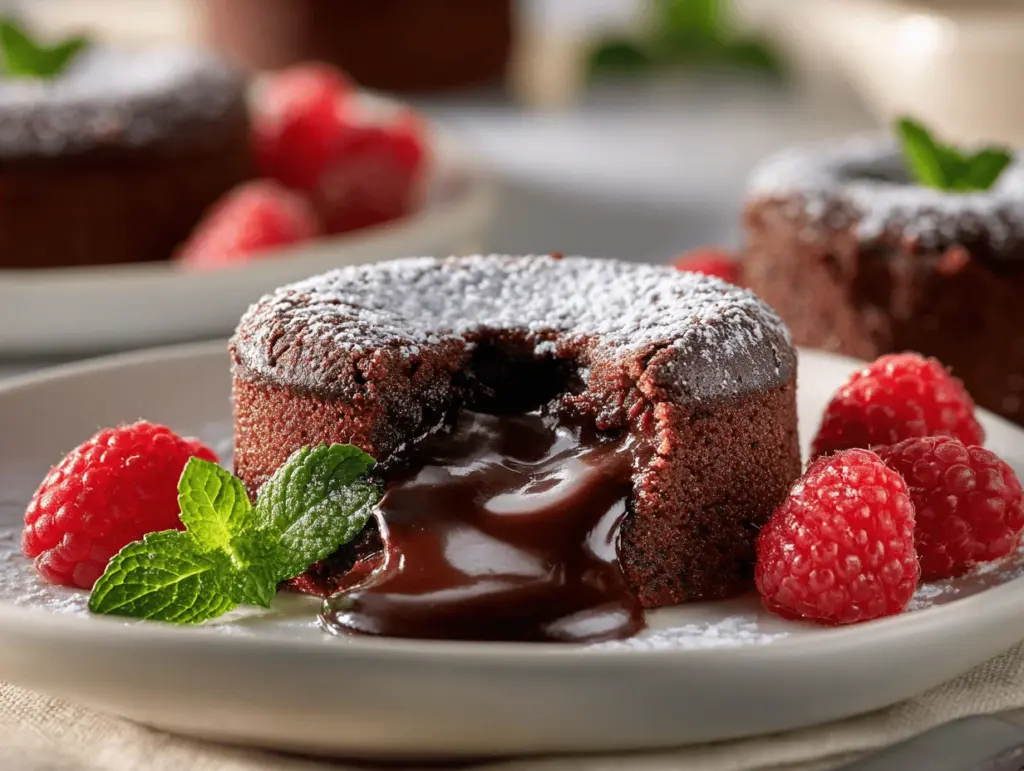
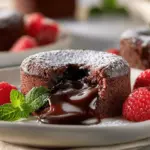
There’s something magical about cutting into a warm chocolate cake and watching silky, molten chocolate ooze out—like uncovering a hidden treasure. The first time I made molten chocolate lava cakes, I was a little nervous (okay, a lot nervous), but the smell of rich chocolate wafting out of the oven made me forget all about my worries. It’s hard not to feel a little fancy when you’re serving up a dessert that looks like it belongs in a restaurant, but honestly, this recipe is so simple, you’ll feel like a total pro in your own kitchen.
I discovered molten chocolate lava cakes by accident—really! One evening, I wanted something decadent but didn’t want to wait hours for a full cake to cool. I remembered those fancy little cakes with gooey centers and figured, “Why not give it a shot?” Years later, this has become my go-to for cozy date nights, birthdays, or when I just need a chocolate fix that feels special. It’s the kind of dessert that brings everyone to the table with excited smiles and spoons ready.
This molten chocolate lava cakes recipe isn’t just about indulgence—it’s also about convenience. You only need a handful of ingredients, minimal prep, and less than 30 minutes from start to finish. If you’ve got busy evenings, picky eaters, or just a craving for chocolate that won’t quit, this recipe will hit the spot. As someone who’s baked this lava cake recipe dozens of times (and tweaked it for every occasion), I promise you’ll love how easy and foolproof it is. Get ready to experience the joy of decadent chocolate lava cakes that are perfect for two—but honestly, you might want to keep both for yourself!
Why You’ll Love This Recipe
- Quick & Easy: You can whip up these molten chocolate lava cakes in less than 30 minutes—perfect for last-minute dessert emergencies or when you just want a little luxury after dinner.
- Simple Ingredients: No need for a fancy grocery run. Everything you need is probably waiting in your pantry right now—chocolate, butter, eggs, sugar, and flour.
- Perfect for Date Night: This recipe is designed for two, making it an ideal treat for cozy evenings, anniversaries, or Valentine’s Day. (But you know, no judgment if you make it just for yourself!)
- Crowd-Pleaser: Whether you’re baking for kids, friends, or that special someone, molten chocolate lava cakes always get wide-eyed reactions and requests for seconds.
- Unbelievably Delicious: The contrast between the tender cake and the gooey chocolate center is pure dessert magic. Every bite is chocolaty, warm, and totally addictive.
What sets this molten chocolate lava cakes recipe apart? I blend the chocolate and butter together for an ultra-smooth, rich base, and use just the right ratio of eggs to create that perfect “lava” effect—never too runny, never too dry. Plus, you don’t need any complicated techniques; it’s as simple as mixing, pouring, and baking. There’s nothing fussy or intimidating here, just pure chocolate bliss.
This recipe has been tested in my kitchen more times than I can count. I’ve tried different chocolates, swapped in gluten-free flour, and even experimented with single-serve ramekins versus muffin tins. Each time, the result is the same: a dessert that feels like a special occasion, but doesn’t require a culinary degree. If you want to wow your loved ones (or just treat yourself), this molten chocolate lava cakes recipe is the ticket. It’s the kind of comfort food that makes you close your eyes after the first bite, savoring every delicious moment.
What Ingredients You Will Need
This molten chocolate lava cakes recipe uses a handful of simple, high-quality ingredients to deliver big flavor and that irresistible gooey texture. Most of these are pantry staples, and I love how easy it is to swap things if needed.
- For the Cake Batter:
- Bittersweet chocolate (60–70% cacao, chopped or chips) – The star of the show! I recommend Valrhona or Ghirardelli for deep chocolate flavor.
- Unsalted butter (56g / 4 tablespoons, cubed) – Adds richness and helps create that molten center.
- Large eggs (2, room temperature) – Bind everything together and make the cake tender.
- Granulated sugar (50g / ¼ cup) – Sweetens the cake without overpowering the chocolate.
- All-purpose flour (30g / ¼ cup, sifted) – Just enough to hold the cake, but not so much it gets dense.
- Salt (pinch) – Balances the sweetness and deepens the chocolate flavor.
- Vanilla extract (½ teaspoon, optional) – Adds warmth and complexity.
- For Serving (optional):
- Powdered sugar – For a pretty finish.
- Fresh berries (raspberries or strawberries) – Their tartness pairs beautifully with the rich chocolate.
- Ice cream or whipped cream – Vanilla ice cream is a classic, but I sometimes use salted caramel or coffee for a twist.
Ingredient Notes & Substitutions:
- Chocolate: You can use semisweet if you prefer a sweeter cake. I’ve even used dark chocolate bars when I’m out of chips—just chop them up!
- Butter: For a dairy-free option, swap with vegan butter. (I’ve done it, and it’s still awesome!)
- Flour: Almond flour or gluten-free blend works too, though the texture gets a little fudgier.
- Eggs: I don’t recommend egg substitutes here—the eggs are key for that “lava” effect.
- Vanilla: Totally optional, but I love how it rounds out the flavors.
This recipe is forgiving—don’t stress if you need to make a substitution for dietary needs or just what’s on hand. Honestly, some of my best lava cakes have been made with whatever was lurking in the back of my pantry!
Equipment Needed
You don’t need fancy equipment for molten chocolate lava cakes—just a few basics you probably already own.
- Ramekins (6 oz / 180 ml): Classic choice for lava cakes. I’ve used both ceramic and glass—both work, but ceramic holds heat a little better.
- Muffin tin: In a pinch, a standard muffin tin can substitute. Just be sure to grease and flour each cup thoroughly.
- Mixing bowls: One for melting chocolate/butter, one for mixing eggs and sugar.
- Whisk or electric hand mixer: A whisk works fine, but a mixer makes whipping the eggs and sugar quick and easy.
- Rubber spatula: For folding in flour and scraping out every last bit of batter (never waste chocolate, right?).
- Baking sheet: If your ramekins are small, place them on a baking sheet for easier handling.
Personal Tips: I’ve tried making lava cakes in silicone molds—they work but can be tricky to unmold. If you don’t have ramekins, you can use oven-safe coffee mugs (just watch the baking time). Always grease and flour your molds well—trust me, scraping out stuck cake is never fun.
For budget-friendly options, check thrift stores for ramekins or use cupcake liners in a muffin tin. Keep your tools clean and dry—chocolate hates water and can seize up if there’s moisture in your mixing bowl.
Preparation Method

- Prep Your Baking Vessels:
Grease two 6 oz (180 ml) ramekins generously with butter. Dust with flour, tapping out any excess. If using a muffin tin, grease and flour two cups. This prevents sticking and makes unmolding a breeze. - Melt the Chocolate and Butter:
Combine 3 oz (85g) bittersweet chocolate and 4 tablespoons (56g) unsalted butter in a heatproof bowl. Microwave in 20-second bursts, stirring until smooth. Alternatively, use a double boiler over simmering water. The mixture should be glossy and lump-free. - Whip Eggs and Sugar:
In a separate bowl, whisk 2 large eggs and ¼ cup (50g) granulated sugar until pale and thick—about 2 minutes. If you have a hand mixer, use it for extra volume. The mixture should leave a ribbon when lifted. - Combine Wet Ingredients:
Pour the melted chocolate mixture into the egg/sugar mixture. Add ½ teaspoon vanilla extract (if using) and a pinch of salt. Whisk gently until just combined—don’t overmix, or the cakes can get tough. - Fold in Flour:
Sift ¼ cup (30g) all-purpose flour over the batter. Fold in gently with a rubber spatula until no streaks remain. Batter will be thick and shiny. - Fill the Ramekins:
Divide batter evenly between the prepared ramekins. They should be filled about ¾ full. Smooth the tops for even baking. - Bake:
Place ramekins on a baking sheet and bake at 425°F (220°C) for 10–12 minutes. Cakes are done when edges are set but centers still jiggle slightly. (Err on the side of underbaked—molten center is the goal!) - Cool Briefly:
Let cakes rest for 1 minute, then run a thin knife around the edge to loosen. Invert onto plates while still warm. If using a muffin tin, use the same technique. - Serve:
Dust with powdered sugar, add fresh berries, and top with a scoop of vanilla ice cream for maximum wow-factor. Serve immediately—these should be enjoyed warm for the best molten effect.
Troubleshooting & Tips: If cakes overbake, the centers won’t be molten (but still delicious!). If the cakes stick, they may not have been greased/floured enough—next time, use more butter. The batter can be made a few hours ahead and kept in the fridge; just bring to room temp before baking. The cakes shouldn’t be runny, just soft in the center.
Personal Note: The first time I made these, I overbaked them and ended up with “chocolate muffins.” Still tasty, but not lava! Watch carefully—every oven is a little different.
Cooking Tips & Techniques
I’ve learned a thing or two about getting molten chocolate lava cakes just right (including a couple of kitchen flops!). Here’s how to make sure yours come out perfect every time:
- Chocolate Quality Matters: Use real chocolate bars or high-quality chips. Cheap chocolate can taste waxy and won’t melt as smoothly.
- Don’t Overmix: Once you add the flour, fold gently—overmixing can make the cakes dense instead of tender.
- Baking Time is Everything: The difference between molten and muffin is a minute or two. Set a timer and trust your eyes—the edges should be firm, but the center should wobble when gently shaken.
- Prep Ahead for Efficiency: You can mix the batter and pour into ramekins, then refrigerate for up to 8 hours. Just bring to room temperature before baking.
- Check Oven Hot Spots: If your oven bakes unevenly, rotate the baking sheet halfway through. (I learned this after one lava cake came out perfect, the other a bit dry!)
- Unmolding Like a Pro: Run a thin knife around the edge and invert quickly but gently. If you’re nervous, leave the cake in the ramekin and eat it straight from there—no shame!
- Consistency Tip: Use a kitchen scale for flour and chocolate—it’s more accurate and helps avoid dry cakes.
Common Mistakes: Overbaking, under-greasing, and using cold eggs are the big ones. If you forget to bring eggs to room temp, just place them in warm water for 5 minutes. If your cakes crack when unmolding, they’re probably overbaked (but honestly, they’ll still taste amazing).
I’ve messed up a few lava cakes in my time, but every “mistake” taught me something new. Now, I always set a timer and peek through the oven window for those magical, jiggly centers. Multitask by prepping toppings while the cakes bake—efficiency means you get dessert even faster!
Variations & Adaptations
I love how versatile molten chocolate lava cakes can be. Whether you want to switch things up for dietary needs, seasonal flavors, or just a creative twist, here are some tried-and-true variations:
- Gluten-Free: Swap the all-purpose flour for a gluten-free blend or almond flour. The result is a fudgier texture, but still deliciously molten.
- Peanut Butter Center: Add a teaspoon of creamy peanut butter to the center of each ramekin before baking. It melts into the chocolate and tastes like a giant, fancy peanut butter cup.
- White Chocolate Lava: Replace half the bittersweet chocolate with white chocolate for a sweeter, creamier cake. You can even swirl the two for a marbled effect.
- Coffee Infused: Add ½ teaspoon instant espresso powder to the batter. It intensifies the chocolate flavor and adds a subtle mocha vibe.
- Dairy-Free: Use vegan butter and dairy-free chocolate. I’ve tried it for friends who are lactose intolerant—no one could tell the difference!
- Seasonal Fruit: Top warm lava cakes with roasted cherries or poached pears for a stunning finish.
Personal Favorite: I once added a pinch of cayenne pepper and cinnamon for a Mexican chocolate twist—warm, spicy, and totally unforgettable.
If you have nut allergies, skip nuts and use seed butter or fruit preserves for a surprise center. There’s really no wrong way to make these your own. The best part? You get to taste-test every version!
Serving & Storage Suggestions
Molten chocolate lava cakes are all about drama—serve them warm, with that gooey center ready to spill out. For the best experience, plate them right after baking and top with a scoop of vanilla ice cream or a dollop of whipped cream. The cold ice cream against the warm cake makes every bite heavenly.
Fresh berries (raspberries or strawberries) add a pop of color and tartness that cuts through the richness. If you’re feeling fancy, drizzle with salted caramel or a spoonful of berry coulis. For a dinner party, serve in the ramekins for a rustic feel, or invert onto plates for a restaurant-style presentation.
Storage: Unbaked batter can be refrigerated (covered) for up to 8 hours. Baked cakes are best enjoyed immediately, but you can store leftovers (covered) in the fridge for up to 2 days. Reheat gently in the microwave for about 20 seconds—just enough to warm the center without overcooking. Cakes may lose their “molten” effect after chilling but will still taste rich and fudgy.
Flavors deepen as the cake rests, so if you save one for the next day, expect an even richer chocolate profile. (If you can resist eating both in one sitting, that is!)
Nutritional Information & Benefits
Each molten chocolate lava cake (without toppings) provides approximately:
- Calories: 370
- Fat: 22g
- Carbs: 38g
- Protein: 6g
- Sugar: 26g
Key Benefits: Dark chocolate is rich in antioxidants and may support heart health. Eggs provide protein and vitamin D, while the simple ingredient list keeps things straightforward. You can make these gluten-free or dairy-free if needed, and there are no artificial additives.
Dietary Considerations: Contains eggs, dairy, and wheat (unless adapted). If you have nut allergies, keep toppings nut-free. As a chocolate lover who tries to eat mindfully, I love that these portion-controlled cakes satisfy my sweet tooth without going overboard.
Conclusion
If you’re searching for a decadent dessert that’s easy enough for a weeknight but impressive enough for special occasions, molten chocolate lava cakes are the answer. With their gooey centers and rich chocolate flavor, these cakes are the kind of treat you’ll want to make again and again. Don’t be afraid to customize—try new chocolates, add a surprise center, or swap out the flour to suit your needs.
I keep coming back to this recipe because it’s reliable, quick, and always delivers that “wow” moment. Whether you’re baking for two or just treating yourself, these molten chocolate lava cakes fit any occasion. If you try it, let me know your favorite twist or if you ran into any kitchen adventures—I love hearing from fellow chocolate fans!
So grab your ramekins, preheat your oven, and treat yourself to a little chocolate magic tonight. You deserve it!
Frequently Asked Questions
Can I make molten chocolate lava cakes ahead of time?
Yes! You can prepare the batter and fill the ramekins up to 8 hours in advance. Store them covered in the refrigerator, then bring to room temperature before baking.
What if I don’t have ramekins?
You can use a standard muffin tin or oven-safe coffee mugs. Just adjust the baking time and grease/flour the cups well to avoid sticking.
How do I know when the cakes are done?
The edges should look firm and set, but the centers should still jiggle slightly when you shake the pan. It’s better to underbake than overbake for that molten effect.
Can I freeze molten chocolate lava cakes?
It’s best to freeze unbaked batter in the ramekins, then thaw and bake as needed. Baked cakes lose their molten centers after freezing but can be reheated for a fudgy treat.
What kind of chocolate works best for this recipe?
Bittersweet chocolate (60–70% cacao) gives the deepest flavor and best molten texture. You can use semisweet if you prefer a sweeter cake, or experiment with dark chocolate bars.
Pin This Recipe!

Molten Chocolate Lava Cakes
Decadent, restaurant-style molten chocolate lava cakes with gooey centers, perfect for two and ready in under 30 minutes. This easy dessert uses simple pantry ingredients and delivers a rich, indulgent treat for any occasion.
- Prep Time: 10 minutes
- Cook Time: 12 minutes
- Total Time: 22 minutes
- Yield: 2 servings 1x
- Category: Dessert
- Cuisine: American
Ingredients
- 3 oz (85g) bittersweet chocolate (60–70% cacao), chopped or chips
- 4 tablespoons (56g) unsalted butter, cubed
- 2 large eggs, room temperature
- 1/4 cup (50g) granulated sugar
- 1/4 cup (30g) all-purpose flour, sifted
- Pinch of salt
- 1/2 teaspoon vanilla extract (optional)
- Butter and flour for greasing ramekins
- Powdered sugar, for serving (optional)
- Fresh berries (raspberries or strawberries), for serving (optional)
- Ice cream or whipped cream, for serving (optional)
Instructions
- Grease two 6 oz (180 ml) ramekins generously with butter and dust with flour, tapping out excess. If using a muffin tin, grease and flour two cups.
- Combine chocolate and butter in a heatproof bowl. Microwave in 20-second bursts, stirring until smooth, or melt over a double boiler. Mixture should be glossy and lump-free.
- In a separate bowl, whisk eggs and sugar until pale and thick, about 2 minutes. A hand mixer can be used for extra volume.
- Pour melted chocolate mixture into the egg/sugar mixture. Add vanilla extract (if using) and salt. Whisk gently until just combined.
- Sift flour over the batter and fold in gently with a rubber spatula until no streaks remain. Batter will be thick and shiny.
- Divide batter evenly between prepared ramekins, filling about 3/4 full. Smooth tops.
- Place ramekins on a baking sheet and bake at 425°F (220°C) for 10–12 minutes. Cakes are done when edges are set but centers still jiggle slightly.
- Let cakes rest for 1 minute, then run a thin knife around the edge to loosen. Invert onto plates while still warm.
- Dust with powdered sugar, add fresh berries, and top with ice cream or whipped cream. Serve immediately for best molten effect.
Notes
Use high-quality chocolate for best results. Do not overmix after adding flour to keep cakes tender. Baking time is crucial—edges should be set, centers should jiggle. Batter can be made ahead and refrigerated up to 8 hours. For gluten-free, substitute almond flour or a gluten-free blend. Dairy-free butter and chocolate work well. Serve warm for the best molten effect.
Nutrition
- Serving Size: 1 cake (half recipe)
- Calories: 370
- Sugar: 26
- Sodium: 80
- Fat: 22
- Saturated Fat: 13
- Carbohydrates: 38
- Fiber: 3
- Protein: 6
Keywords: molten chocolate lava cake, chocolate dessert, easy lava cake, dessert for two, date night dessert, quick chocolate cake, gooey chocolate cake, restaurant-style dessert