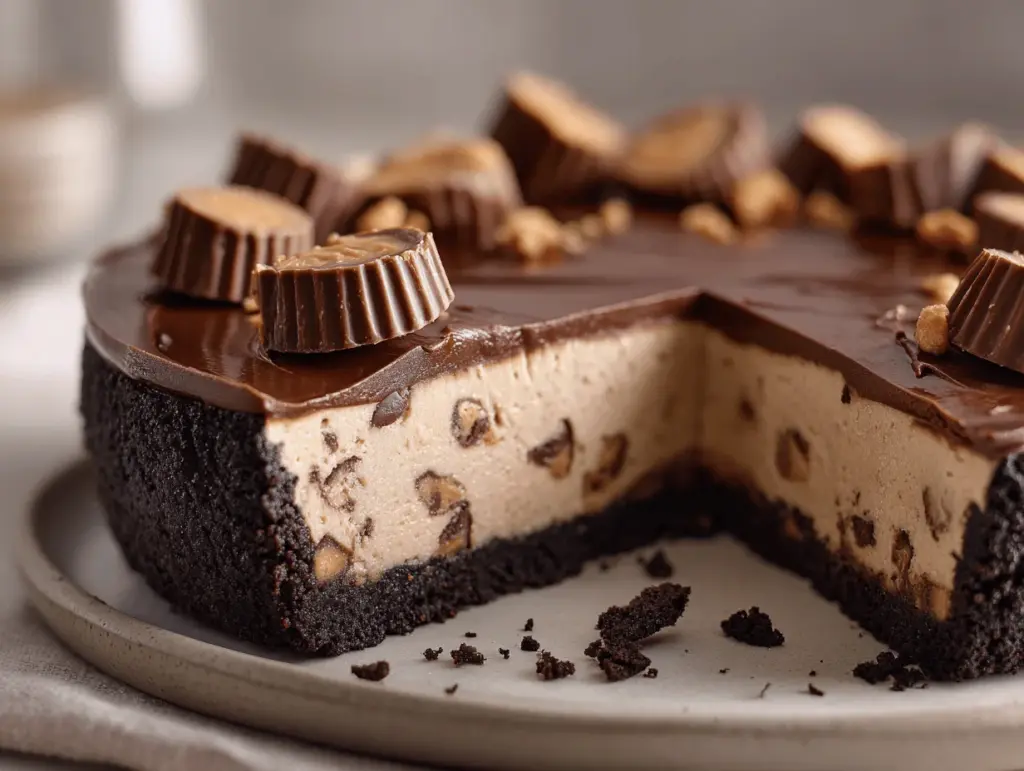
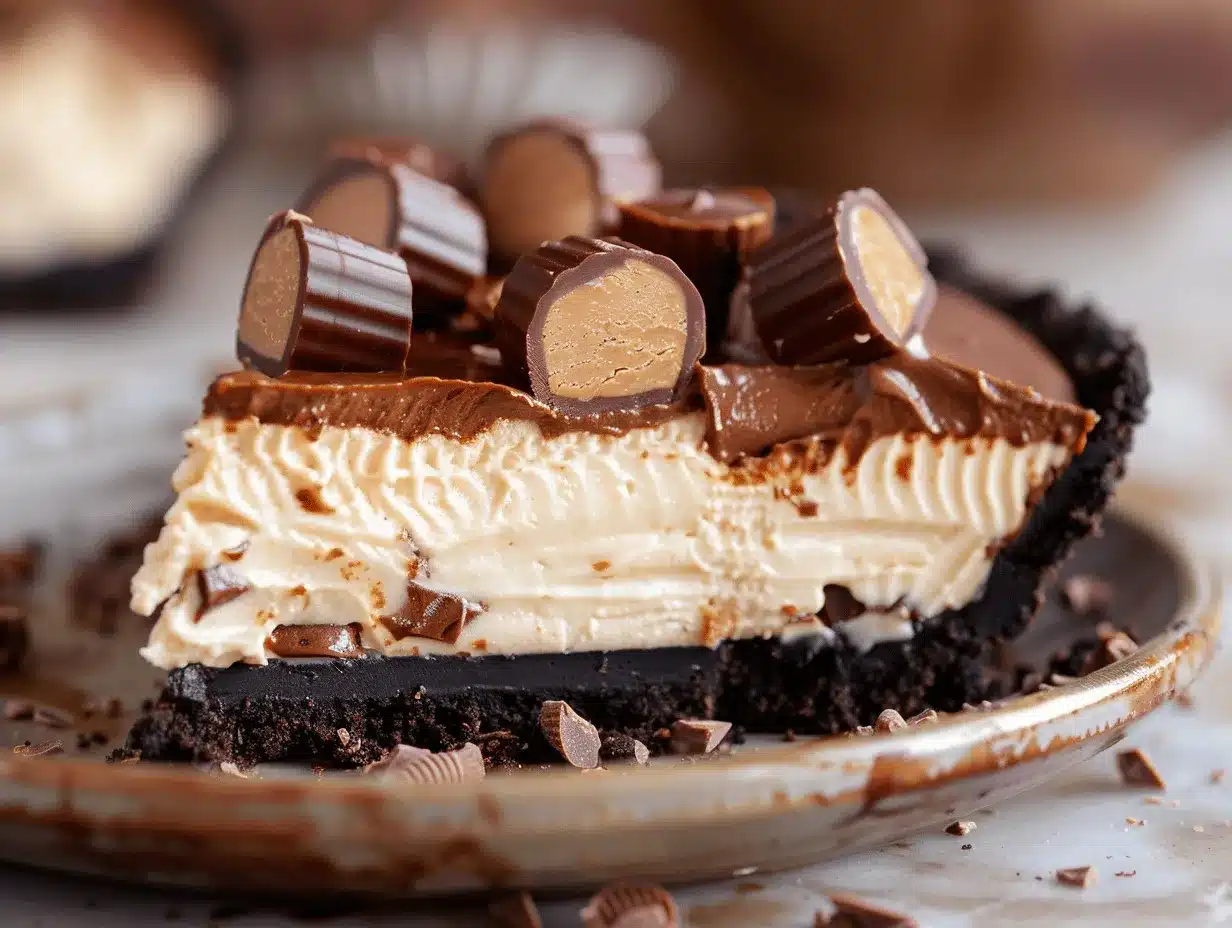
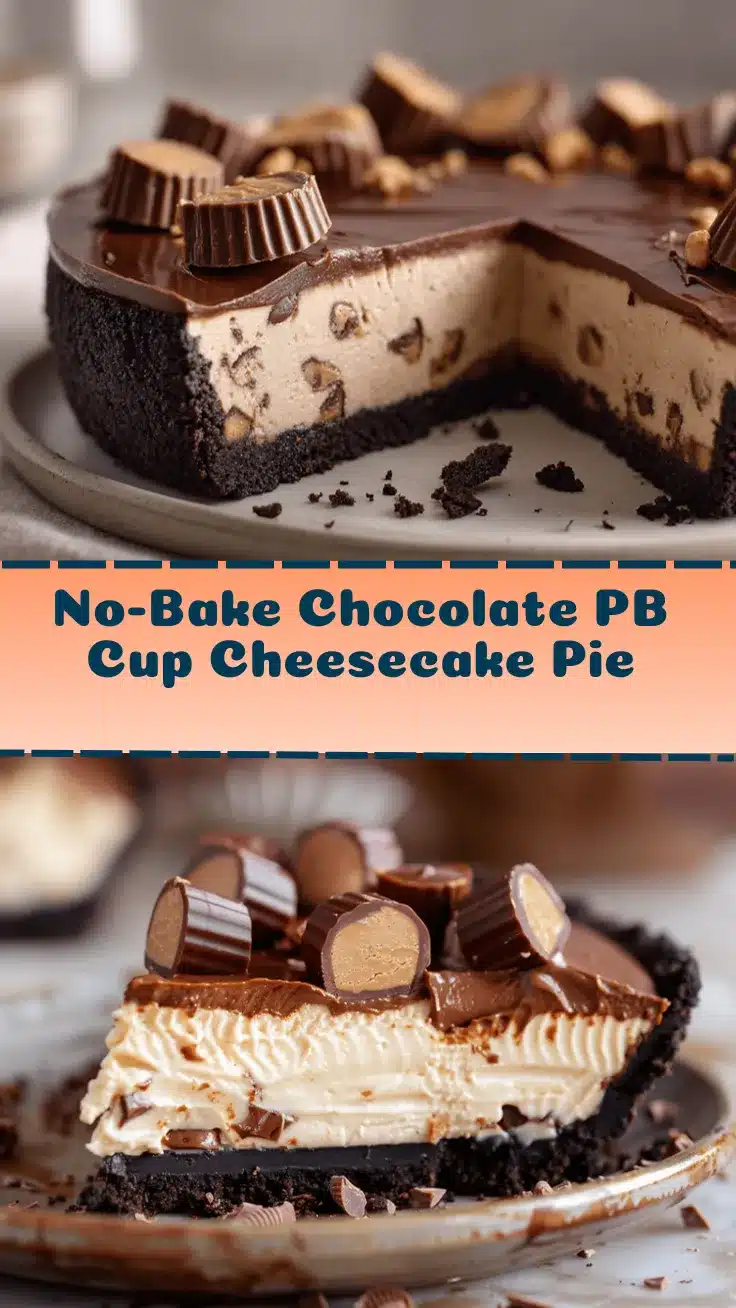
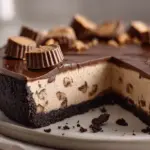
The first time I made this No-Bake Chocolate Peanut Butter Cup Cheesecake Pie, the aroma of creamy peanut butter and rich chocolate swirling together (no oven required!) totally won me over. You know that feeling when you sneak a peanut butter cup from the candy jar and savor every bite? Imagine that, but in pie form—soft, silky, and over-the-top decadent. Honestly, I dreamed up this recipe when my oven quit on me right before a family birthday. Desperation gave way to creativity, and now it’s a regular star at our gatherings. There’s something magical about layering velvety cheesecake over a crunchy chocolate crust and then crowning it with chopped peanut butter cups. It’s not just dessert—it’s comfort, nostalgia, and a little indulgence rolled into one glorious slice.
This pie is perfect when you want something impressive but don’t want to fuss. If you’ve got kids (or, let’s face it, grown-ups) who adore peanut butter and chocolate, this recipe is pretty much irresistible. As a long-time recipe developer, I’ve tweaked and tested this pie over a dozen times—trust me, you want to chill it overnight for the best flavor hit. Plus, it’s great for making ahead, which means less stress when you’re hosting! Whether you’re celebrating a birthday, bringing a treat to a potluck, or just craving something sweet, this No-Bake Chocolate Peanut Butter Cup Cheesecake Pie delivers every time. You’ll love how easy it is and how every slice disappears in minutes. If you’re a peanut butter cup fan, this one belongs in your recipe rotation!
Why You’ll Love This Recipe
- Quick & Easy: Comes together in about 30 minutes (plus chilling time). No oven, no water baths, no fuss. Perfect for those busy days when you just want dessert pronto.
- Simple Ingredients: Nothing fancy here—just everyday pantry staples and a couple of grocery store gems. If you’ve got cream cheese, peanut butter, and chocolate, you’re halfway there!
- Perfect for Any Occasion: Whether it’s a birthday bash, holiday feast, or a movie night snack attack, this pie fits the bill. It’s also a hit at potlucks and family dinners.
- Crowd-Pleaser: Kids, grandparents, picky eaters—everyone goes nuts for this. I’ve brought it to school bake sales and there’s never a crumb left.
- Unbelievably Delicious: The creamy cheesecake filling and crunchy chocolate crust are a match made in heaven. Topped with peanut butter cups, it’s honestly next level.
What makes this recipe stand out from the rest? It’s the way the cheesecake filling is whipped to fluffy perfection—thanks to blending the cream cheese and peanut butter until ultra-smooth. The crust is no ordinary base; it’s made with chocolate sandwich cookies for a deep cocoa flavor and a hint of salt. And let’s not forget the peanut butter cups on top—those little bursts of sweetness are just the icing on the cake (or, well, the pie). I’ve tried a lot of no-bake pies over the years, but this one is my go-to for its outsized flavor and effortless prep.
This No-Bake Chocolate Peanut Butter Cup Cheesecake Pie isn’t just about taste—it’s about the memories you’ll make sharing it. I love how people close their eyes after the first bite, savoring the creamy, chocolaty richness. It’s comfort food in pie form, but with less work and more joy. If you want to impress without the stress, or just treat yourself to something truly special, this is the recipe you need.
What Ingredients You Will Need
This recipe uses simple, wholesome ingredients to deliver bold flavor and a satisfying texture without the fuss. Most of these are pantry staples, and there’s plenty of room to substitute if needed. I’ve grouped them by their role in the pie, so you can easily see what you’ll need.
- For the crust:
- Chocolate sandwich cookies (like Oreos) – about 24 cookies, finely crushed (use gluten-free cookies if needed)
- Unsalted butter – 6 tablespoons (85g), melted (adds richness and helps bind the crust)
- A pinch of salt (optional, enhances the chocolate flavor)
- For the cheesecake filling:
- Cream cheese – 16 ounces (450g), softened (full fat for best texture; I like Philadelphia brand)
- Powdered sugar – 3/4 cup (90g), sifted (helps keep the filling silky smooth)
- Peanut butter – 1 cup (250g), creamy style (Jif or Skippy work great; crunchy if you like texture)
- Heavy whipping cream – 1 cup (240ml), chilled (adds fluffiness and stability)
- Pure vanilla extract – 1 teaspoon (for a warm, sweet undertone)
- For the topping:
- Mini chocolate peanut butter cups – 1 cup (about 20 pieces), chopped (Reese’s is classic, but use your favorite)
- Chocolate syrup or melted chocolate – 2 tablespoons (optional, for drizzling)
- Crushed peanuts or extra cookie crumbs – 2 tablespoons (for crunch and flavor, optional)
Ingredient Tips: Look for full-fat cream cheese for the creamiest filling. If you’re avoiding dairy, swap in a vegan cream cheese and coconut cream. For the crust, gluten-free cookies work perfectly—no one will know the difference. You can also substitute almond butter if you want a different nutty flavor. If you prefer less sugar, use natural peanut butter and reduce the powdered sugar a bit (taste as you go!).
Honestly, this recipe is forgiving—if you’re missing something, just swap or omit. I’ve made it with all sorts of cookies and even added a pinch of espresso powder to the crust for a mocha vibe. No matter what, you’ll end up with a delicious pie that’s truly decadent.
Equipment Needed
- 9-inch (23cm) pie pan or springform pan – Either works; I like springform for easy release.
- Food processor or blender – For crushing cookies and blending the filling (a sturdy zip-top bag and rolling pin work in a pinch).
- Large mixing bowl – You’ll need one for the filling and one for the whipped cream.
- Hand mixer or stand mixer – For whipping cream and blending the cheesecake filling; a whisk and some elbow grease work too, but your arms may not thank you.
- Silicone spatula – Great for scraping every bit of filling out of the bowl.
- Measuring cups and spoons – For accuracy (I always recommend using a kitchen scale for baking, but it’s not required).
- Plastic wrap or foil – For covering the pie while chilling.
- Sharp knife – For chopping peanut butter cups and slicing the pie.
If you don’t have a food processor, just use a zip-top bag and a rolling pin to smash the cookies. I’ve done this in hotel kitchens and it works surprisingly well! For mixing, a hand mixer is budget-friendly and gets the job done. If you’re using a springform pan, run a butter knife around the edge before releasing—it helps with a clean presentation and less mess. I always rinse my silicone spatulas right away so the filling doesn’t stick. These little habits keep kitchen cleanup easy!
Preparation Method
-
Make the crust:
Finely crush 24 chocolate sandwich cookies (about 2 cups/240g) using a food processor, blender, or zip-top bag and rolling pin. Pour into a bowl and add 6 tablespoons (85g) melted unsalted butter. Stir until evenly moistened. Press firmly into a 9-inch (23cm) pie pan or springform pan, using the bottom of a glass to pack it down. Freeze for 15 minutes while you prep the filling. If your crust feels crumbly, add an extra tablespoon of melted butter.
-
Prepare the filling:
In a large mixing bowl, beat 16 ounces (450g) softened cream cheese and 3/4 cup (90g) powdered sugar until smooth and creamy—about 2 minutes. Scrape down the sides as needed. Add 1 cup (250g) creamy peanut butter and 1 teaspoon vanilla extract; blend until fully combined and fluffy. The mixture should be thick and a little glossy. If it’s lumpy, keep mixing—sometimes colder cream cheese takes longer to smooth out.
-
Whip the cream:
In a separate bowl, whip 1 cup (240ml) chilled heavy cream until stiff peaks form—about 2-3 minutes with a mixer. Don’t over-whip or it’ll turn grainy! Gently fold the whipped cream into the peanut butter cheesecake mixture, using a spatula. This makes the filling light and airy. Fold just until combined; a few streaks are okay.
-
Assemble the pie:
Spread the cheesecake filling evenly over the chilled crust. Smooth the top with a spatula. Scatter 1 cup chopped mini peanut butter cups over the surface. Drizzle with chocolate syrup or melted chocolate, then sprinkle with crushed peanuts or extra cookie crumbs if you like. Cover with plastic wrap or foil and refrigerate for at least 4 hours, preferably overnight. The longer it chills, the more set and flavorful it gets.
-
Serve:
Remove from fridge, run a butter knife around the edge, and slice into wedges. Wipe the knife between cuts for neat slices. If the pie feels too firm, let it sit at room temp for 10 minutes before serving. Enjoy cold for the classic texture, or let it soften slightly for extra creaminess.
Prep Notes: If your filling feels too soft, chill it for 30 minutes before adding to the crust. I’ve learned that patience pays off—a well-chilled pie slices beautifully! If you’re using a springform pan, wrap the bottom with foil to catch any crumbs. The peanut butter flavor intensifies overnight, so don’t rush the chill time.
Cooking Tips & Techniques
Here’s the truth—no-bake pies are simple, but a few expert tricks make all the difference. Whipping the cream separately is my secret for a lighter, mousse-like cheesecake texture. Don’t skip this, even if you’re tempted to toss everything into one bowl. Mixing the crust well (really pack it down!) prevents crumbling when you slice. If you want that bakery-perfect look, use a springform pan and run a hot knife around the edge before releasing.
Common mistakes? Over-mixing the whipped cream—stop as soon as you see stiff peaks. Once I let my mixer run too long, and the cream got grainy (still tasted good, but the texture was off). Another pitfall: a warm filling. Always start with softened cream cheese but chilled cream. If your kitchen is hot, chill your bowl and beaters first. For the crust, make sure the butter is fully melted and the cookies crushed fine (big chunks make the crust crack).
Multitasking tip: Crush the cookies while the cream cheese softens. If you’re making this for a party, prep the crust and filling the night before, then add toppings right before serving. Consistency is key—measure ingredients carefully for best results. And don’t stress if your pie isn’t picture-perfect; the flavor always shines through. I’ve learned that pie slices are meant to be enjoyed, not scrutinized!
How do I keep my crust from crumbling?
Press the crust firmly into the pan and add a touch more melted butter if it seems dry. Chilling is crucial—don’t skip the freezer step.
Variations & Adaptations
Want to make this No-Bake Chocolate Peanut Butter Cup Cheesecake Pie your own? Here are a few fun twists I’ve tried (and loved):
- Gluten-Free: Swap chocolate sandwich cookies for gluten-free versions. The crust stays just as rich and crunchy!
- Dairy-Free: Use vegan cream cheese and coconut cream in place of dairy. I’ve made this for a lactose-intolerant friend, and honestly, you can’t tell the difference.
- Nut-Free: Try using sunflower seed butter and nut-free chocolate candies instead of peanut butter cups. It’s allergy-friendly and still totally delicious.
- Seasonal Flavors: Mix in a swirl of caramel or add a sprinkle of sea salt on top for a grown-up twist. In autumn, a dash of cinnamon or pumpkin spice in the filling adds warmth.
- Different Toppings: Use chopped pretzels, toffee bits, or fresh berries for a fun crunch or pop of color.
My personal favorite adaptation? Adding a layer of sliced bananas under the cheesecake filling for a chocolate-peanut butter-banana vibe. The fruit adds sweetness and freshness, and it’s a hit with kids. Don’t be afraid to experiment—this pie is a blank canvas for your flavor cravings!
Serving & Storage Suggestions
Serve this No-Bake Chocolate Peanut Butter Cup Cheesecake Pie chilled, straight from the fridge. I like to present it on a pretty cake stand, garnished with extra peanut butter cups and a drizzle of chocolate syrup. Pair each slice with a cold glass of milk, hot coffee, or (if you’re feeling festive) a scoop of vanilla ice cream. It’s great for birthdays, brunches, or an after-dinner treat.
Storage is easy—cover leftovers tightly with plastic wrap or foil and refrigerate for up to 5 days. The flavors actually deepen after a day or two. For longer storage, freeze slices on a baking sheet, then wrap individually and store for up to 2 months. Thaw in the fridge overnight before serving. To reheat (if you want a softer texture), leave at room temperature for 10-15 minutes. I’ve noticed the peanut butter flavor gets richer after freezing, so don’t be surprised if you like it even better the second time around!
Nutritional Information & Benefits
| Per Slice (1/10 of pie) | Approx. 410 calories, 28g fat, 34g carbs, 7g protein |
|---|
This pie is indulgent, but it does offer some benefits! Peanut butter is a good source of protein and healthy fats, while cream cheese provides calcium. If you use gluten-free or dairy-free substitutions, it’s easy to adapt for different dietary needs. Just keep in mind the allergens—peanuts, dairy, wheat (if using regular cookies), and possible traces of soy in chocolate candies.
Personally, I think treats like this are part of a happy, balanced life. I enjoy a slice after a long day or share it with friends for a little celebration. If you’re watching your sugar, swap in natural peanut butter and reduce the powdered sugar a bit. Life’s too short to skip dessert!
Conclusion
If you’re searching for a dessert that’s decadent, easy, and guaranteed to impress, this No-Bake Chocolate Peanut Butter Cup Cheesecake Pie is the answer. It’s simple enough for beginner bakers but delicious enough for special occasions. Customize it with your favorite toppings and substitutions—make it gluten-free, dairy-free, or go wild with extra peanut butter cups. I love how this pie brings people together, sparking smiles and happy memories.
Why do I keep coming back to this recipe? It’s the flavor, the nostalgia, and the ease. Plus, it’s just plain fun to make! I’d love to hear how you make it your own—drop a comment below with your twists or share your photos. Let’s spread the peanut butter-chocolate joy, one slice at a time. Happy no-baking!
FAQs
Can I make this pie ahead of time?
Absolutely! It’s even better when chilled overnight. Just add toppings right before serving for freshest flavor.
What if I don’t have chocolate sandwich cookies?
Use graham crackers, vanilla wafers, or any crunchy cookie you like. Just add a little cocoa powder for chocolatey depth.
Can I freeze the cheesecake pie?
Yes, slice and freeze for up to 2 months. Thaw in the fridge and enjoy—texture stays creamy and delicious.
Is there a way to make this nut-free?
Swap peanut butter for sunflower seed butter and use nut-free chocolate candies. Tastes great and safe for allergies!
How do I get clean slices?
Wipe your knife between cuts and use a hot, dry blade for neat edges. Chilling the pie fully makes slicing easier.
Pin This Recipe!
No-Bake Chocolate Peanut Butter Cup Cheesecake Pie
This decadent no-bake cheesecake pie features a crunchy chocolate cookie crust, a creamy peanut butter cheesecake filling, and a topping of chopped peanut butter cups. It’s an easy, crowd-pleasing dessert perfect for birthdays, potlucks, or any occasion—no oven required!
- Prep Time: 30 minutes
- Cook Time: 0 minutes
- Total Time: 4 hours 30 minutes (includes chilling)
- Yield: 10 servings 1x
- Category: Dessert
- Cuisine: American
Ingredients
- 24 chocolate sandwich cookies (like Oreos), finely crushed (about 2 cups)
- 6 tablespoons unsalted butter, melted
- Pinch of salt (optional)
- 16 ounces cream cheese, softened (full fat recommended)
- 3/4 cup powdered sugar, sifted
- 1 cup creamy peanut butter
- 1 cup heavy whipping cream, chilled
- 1 teaspoon pure vanilla extract
- 1 cup mini chocolate peanut butter cups, chopped (about 20 pieces)
- 2 tablespoons chocolate syrup or melted chocolate (optional, for drizzling)
- 2 tablespoons crushed peanuts or extra cookie crumbs (optional, for topping)
Instructions
- Finely crush the chocolate sandwich cookies using a food processor, blender, or by placing them in a zip-top bag and crushing with a rolling pin. Pour into a bowl and add melted butter (and salt, if using). Stir until evenly moistened.
- Press the mixture firmly into a 9-inch pie pan or springform pan, using the bottom of a glass to pack it down. Freeze for 15 minutes while preparing the filling.
- In a large mixing bowl, beat softened cream cheese and powdered sugar until smooth and creamy (about 2 minutes). Scrape down the sides as needed.
- Add peanut butter and vanilla extract to the cream cheese mixture. Blend until fully combined and fluffy.
- In a separate bowl, whip the chilled heavy cream until stiff peaks form (about 2-3 minutes). Gently fold the whipped cream into the peanut butter cheesecake mixture until just combined.
- Spread the cheesecake filling evenly over the chilled crust. Smooth the top with a spatula.
- Scatter chopped mini peanut butter cups over the surface. Drizzle with chocolate syrup or melted chocolate, and sprinkle with crushed peanuts or extra cookie crumbs if desired.
- Cover with plastic wrap or foil and refrigerate for at least 4 hours, preferably overnight, to set.
- To serve, remove from fridge, run a butter knife around the edge, and slice into wedges. Wipe the knife between cuts for neat slices. Enjoy chilled.
Notes
For best results, chill the pie overnight before serving. Use full-fat cream cheese for the creamiest texture. Gluten-free cookies and vegan cream cheese/coconut cream can be substituted for dietary needs. Whip the cream separately for a lighter filling. Press the crust firmly and chill well to prevent crumbling. Add toppings just before serving for freshness.
Nutrition
- Serving Size: 1 slice (1/10 of pie)
- Calories: 410
- Sugar: 22
- Sodium: 270
- Fat: 28
- Saturated Fat: 13
- Carbohydrates: 34
- Fiber: 2
- Protein: 7
Keywords: no-bake, cheesecake, peanut butter, chocolate, pie, dessert, easy, peanut butter cups, potluck, birthday, make-ahead