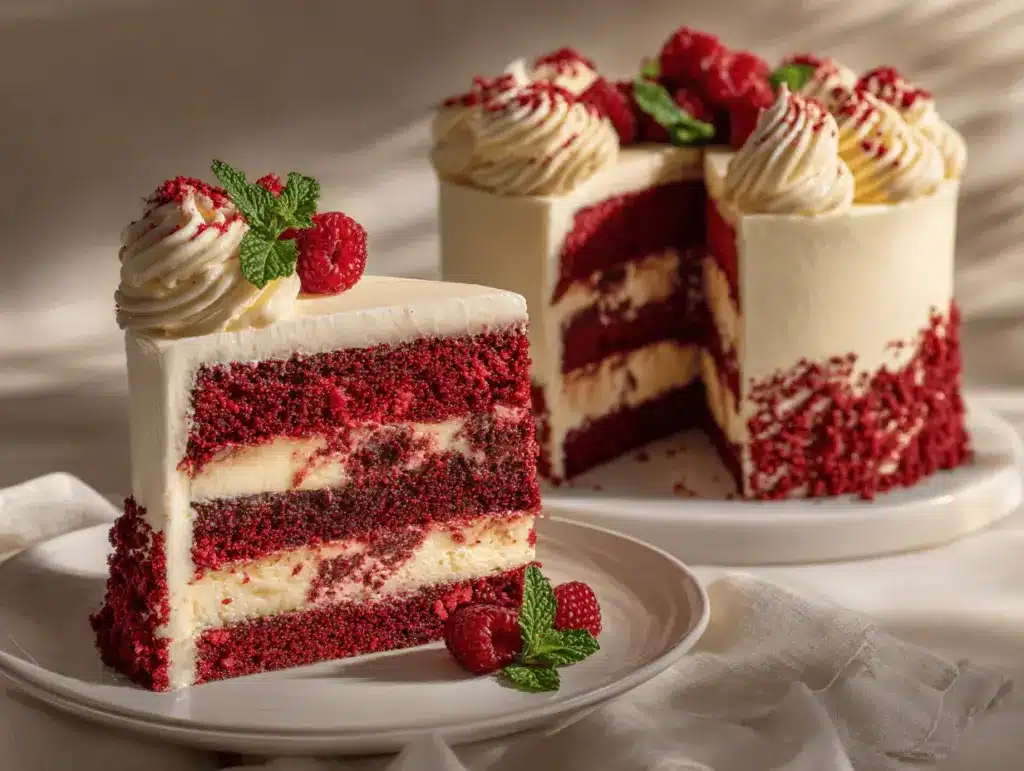
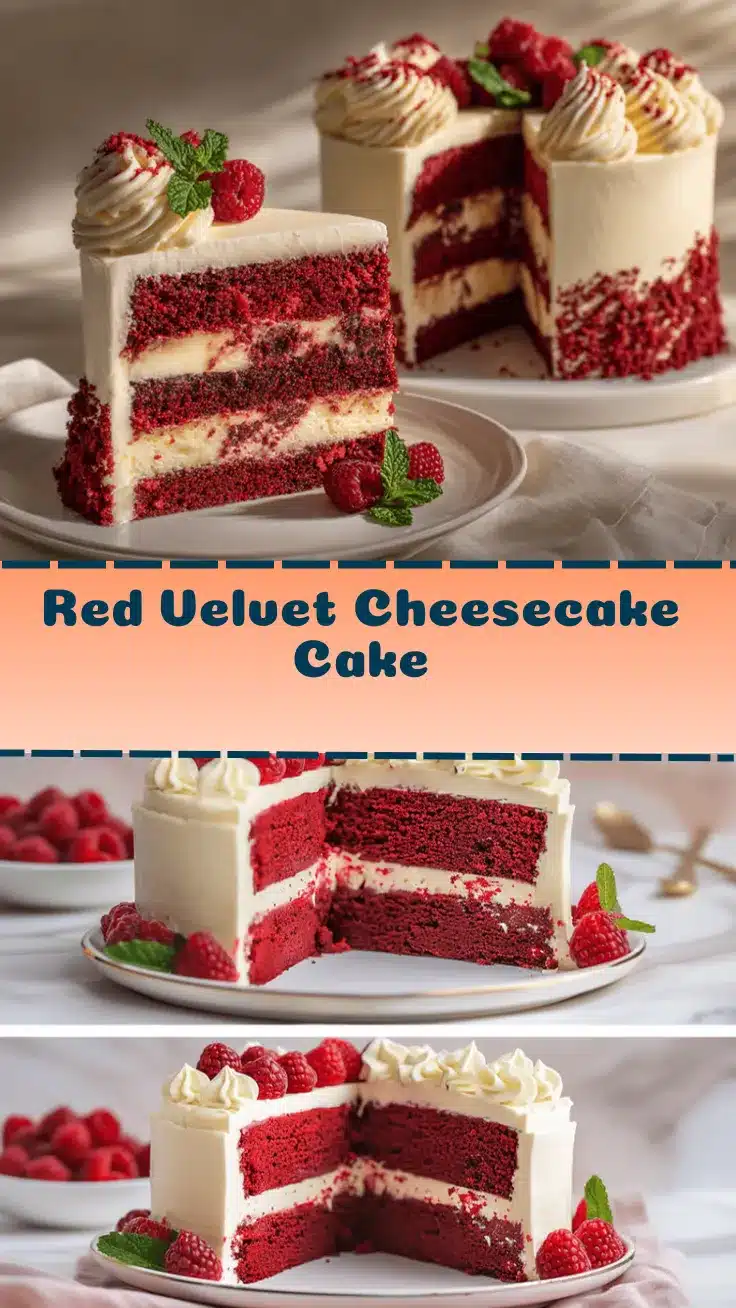
The first time I sliced into a Red Velvet Cheesecake Cake, the layers looked so stunning I almost didn’t want to eat it—almost! That deep scarlet cake, creamy cheesecake, and swirls of tangy frosting practically begged me to grab a fork. The aroma? It was like walking into a bakery on Valentine’s Day: hints of cocoa, vanilla, and buttery richness. I’ll never forget the look on my best friend’s face when I unveiled this dessert at her birthday dinner. She actually gasped. Honestly, there’s just something magical about red velvet—maybe it’s the color, or the subtle cocoa flavor, or how it somehow feels both festive and cozy.
I first discovered this layered delight years ago, flipping through an old Southern cookbook my grandmother had tucked away. The original red velvet cake was already a classic in our house, but adding a cheesecake layer? That’s next-level celebration. I’ve made dozens of versions since, tweaking the ratios, experimenting with fillings, and testing every possible way to make it foolproof. This Red Velvet Cheesecake Cake recipe is the result of all those years of baking, tasting, sharing, and, let’s face it, a few cake mishaps.
Whether you’re baking for a birthday, holiday, or just because you need a slice of something sweet, this cake is pure joy. It’s big enough for a crowd, but honestly, leftovers are the best part. The layers hold up beautifully, and the flavors only get better overnight. If you love classic red velvet, creamy cheesecake, and desserts that make people say “wow,” you’ll want this recipe in your back pocket. Trust me—this is the ultimate celebration dessert, and it’s become a tradition in my family for good reason.
Why You’ll Love This Red Velvet Cheesecake Cake Recipe
- Showstopper Looks: That vibrant red velvet cake paired with creamy cheesecake and pillowy frosting is a total centerpiece. It’s the kind of dessert that makes jaws drop at any party.
- Perfect Texture: Moist, tender cake meets the silky, rich cheesecake layer. It’s like two desserts in one, and the combo is unreal.
- Easy Homemade Layers: The steps are broken down so you don’t need to be a pastry chef. I’ve tested every trick to keep it simple but impressive.
- Celebration Ready: Whether it’s a birthday, anniversary, or just a Tuesday night, this layered dessert turns any occasion into something special.
- Crowd-Pleaser: Even picky eaters love it! Kids, adults, and anyone who’s ever loved red velvet or cheesecake will be asking for seconds.
- Make-Ahead Friendly: You can prep the cheesecake layer ahead of time, making party prep a breeze. (I do this every time I host.)
After baking this Red Velvet Cheesecake Cake for nearly every major family event, I can say with confidence—it never disappoints. The secret? Blending classic Southern flavors with a creamy filling that’s just the right amount of tangy. I use a little extra vanilla in my cheesecake for depth, and just enough cocoa in the cake to keep things balanced.
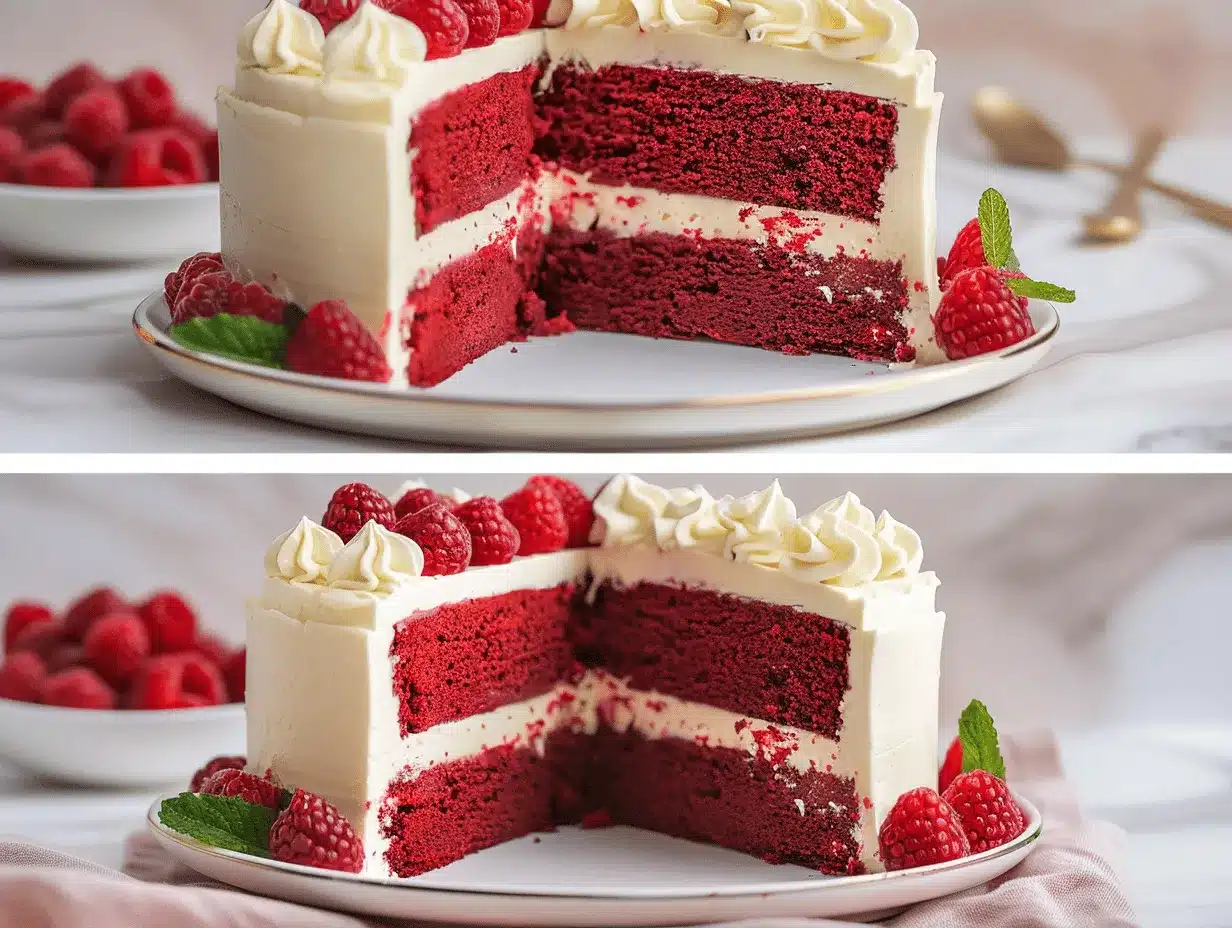
What sets this recipe apart is the layering technique: you bake the cheesecake first, then sandwich it between two rounds of red velvet cake, all topped with a generous swirl of cream cheese frosting. It’s not just about looks (though, let’s be real, this cake is Pinterest gold). It’s about that moment when you taste all three layers together and realize you’ve found your new favorite celebration dessert.
This cake has rescued more than one special occasion in my house, and I’ve even had friends request it as their birthday cake year after year. If you want a dessert that’s as memorable as it is delicious, this Red Velvet Cheesecake Cake is the one to try.
What Ingredients You Will Need
This recipe uses familiar ingredients you probably have in your pantry, but each one plays a key role in creating that decadent, layered effect. If you’re out of something, don’t worry—I’ll share my favorite swaps and substitutions along the way. Here’s what you’ll need:
- For the Red Velvet Cake:
- All-purpose flour (240g) – gives the cake structure and a soft crumb
- Cocoa powder (2 tbsp/16g, unsweetened) – for that classic red velvet flavor
- Baking soda (1 tsp/5g) – helps the cake rise
- Salt (½ tsp/3g) – enhances flavor
- Granulated sugar (1½ cups/300g)
- Vegetable oil (1¼ cups/300ml) – keeps the cake moist
- Large eggs (2, room temperature)
- Buttermilk (1 cup/240ml) – for tenderness and tang
- White vinegar (1 tsp/5ml) – reacts with baking soda for lift
- Vanilla extract (2 tsp/10ml)
- Red food coloring (2 tbsp/30ml, gel-type preferred for deeper color)
- For the Cheesecake Layer:
- Cream cheese (16 oz/450g, full-fat, softened) – the star of the show
- Granulated sugar (½ cup/100g)
- Large egg (1)
- Vanilla extract (1 tsp/5ml)
- Sour cream (¼ cup/60g) – for extra richness (can sub plain Greek yogurt)
- For Cream Cheese Frosting:
- Cream cheese (8 oz/225g, softened)
- Unsalted butter (½ cup/115g, softened)
- Powdered sugar (3 cups/360g), sifted – for smooth, lump-free frosting
- Vanilla extract (1½ tsp/7ml)
- Pinch of salt
- Optional Garnishes:
- Red velvet cake crumbs (from trimmings)
- White chocolate curls or shavings
- Fresh berries
Ingredient Tips: I always use Philadelphia cream cheese for the cheesecake—it’s tried-and-true for the creamiest texture. For the food coloring, gel works best (Wilton or AmeriColor are my picks) because it’s vibrant and doesn’t thin the batter. If you need a gluten-free version, swap the flour for your favorite 1-to-1 gluten-free blend. If you’re dairy-free, use coconut yogurt and plant-based cream cheese—I’ve tested this, and it works surprisingly well!
The buttermilk is key for that signature red velvet flavor; if you don’t have any, mix 1 cup milk with 1 tbsp vinegar and let it sit for 5 minutes. Sometimes, I’ll toss in a handful of mini chocolate chips for extra decadence. This recipe is forgiving—if you need to adapt, go for it!
Equipment Needed
- 9-inch (23cm) round cake pans (2) – for the red velvet layers
- 9-inch (23cm) springform pan – for the cheesecake layer (makes removal a breeze)
- Electric mixer – stand or hand mixer works (I’ve used both, but my old hand mixer is still kicking)
- Mixing bowls – at least two, preferably three
- Spatula and wooden spoon – for folding and scraping down sides
- Whisk – for blending dry ingredients
- Measuring cups and spoons – accuracy matters here
- Cooling rack
- Offset spatula or butter knife – for frosting and layering
- Parchment paper – for lining pans and easy release
- Kitchen scale (optional, but I love it for precision)
If you don’t have a springform pan, you can bake the cheesecake layer in a regular cake pan lined with parchment, leaving an overhang for easy lifting. I’ve tried both, and while springform is easiest, parchment gets the job done. For those on a budget, most of these tools can be found at discount stores—my favorite offset spatula was $3 and has lasted for years. After use, wash cake pans gently with warm water and avoid abrasive scrubbers to keep them in top shape.
Preparation Method
- Make the Cheesecake Layer: Preheat oven to 325°F (163°C). Line the bottom of a 9-inch (23cm) springform pan with parchment. In a large bowl, beat 16 oz (450g) cream cheese until smooth. Add ½ cup (100g) sugar and mix until creamy. Beat in 1 egg, 1 tsp (5ml) vanilla, and ¼ cup (60g) sour cream. Pour into pan and smooth top.
Bake 35-40 minutes, until just set (center may jiggle slightly). Cool to room temp, then freeze for 2 hours for easy stacking. If you notice cracks, don’t stress—the frosting will cover them! - Prepare the Red Velvet Cake Layers: Preheat oven to 350°F (177°C). Grease and line two 9-inch (23cm) cake pans. In a bowl, whisk together 2 cups (240g) flour, 2 tbsp (16g) cocoa, 1 tsp (5g) baking soda, and ½ tsp (3g) salt. In another bowl, beat 1½ cups (300g) sugar and 1¼ cups (300ml) oil until combined. Add 2 eggs, one at a time. Mix in 1 cup (240ml) buttermilk, 1 tsp (5ml) vinegar, 2 tsp (10ml) vanilla, and 2 tbsp (30ml) red food coloring.
Gradually add dry ingredients, mixing gently until just combined. (Don’t overmix—some lumps are fine.) Divide batter evenly between pans. Bake 25-30 minutes, until a toothpick comes out clean. Cool 10 minutes, then turn cakes out onto racks. Cool completely. If cakes dome, level with a serrated knife (save trimmings for garnish). - Make Cream Cheese Frosting: Beat 8 oz (225g) cream cheese and ½ cup (115g) butter until fluffy. Add 3 cups (360g) powdered sugar, 1½ tsp (7ml) vanilla, and a pinch of salt. Beat until smooth and spreadable. If frosting is too soft, chill for 10-15 minutes.
- Assemble the Cake: Place one red velvet layer on a serving plate. Top with cheesecake layer (remove parchment). Add second red velvet cake layer. If layers slide, stick toothpicks in for stability while frosting.
- Frost and Decorate: Spread a thick layer of cream cheese frosting on top and sides. Use an offset spatula for smooth swirls. Garnish with cake crumbs, chocolate shavings, or berries. Chill cake for 1 hour before slicing for clean layers.
Preparation Notes: Freezing the cheesecake makes stacking easier! If your cake layers stick to the pan, run a knife around the edge before turning out. For the perfect frosting swirl, work in small circles and wipe your spatula often. If you’re short on time, bake the cheesecake a day ahead—it holds up beautifully.
Cooking Tips & Techniques
Honestly, the Red Velvet Cheesecake Cake isn’t as intimidating as it looks. Here are some tricks I’ve learned from baking it (and from a few hilarious fails):
- Room Temperature Ingredients: Always start with softened cream cheese and butter—it prevents lumpy frosting and uneven cheesecake.
- Don’t Overmix: When combining cake batter, gentle folding is key. Overmixing makes the cake dense.
- Level Your Layers: Trim any domed tops off cake layers so stacking is easier—plus, you get those tasty crumbs for garnish!
- Freeze Cheesecake Layer: Freezing before assembly makes stacking way less stressful. Trust me, I’ve tried assembling while warm—it slides everywhere!
- Chill for Clean Slices: Refrigerate the assembled cake before cutting. This keeps the layers sharp and the frosting tidy.
- Use Gel Food Coloring: Liquid food coloring can thin your batter and dull the color. Gel is vibrant and precise.
- Multitasking: While the cheesecake is baking, prep your cake batter and measure out frosting ingredients. It saves loads of time.
I once tried skipping the freezing step for the cheesecake—bad move! The whole layer slid right off. Now, I never skip it. For the best texture, let the cake come to room temp for about 20 minutes before serving. And if you’re new to layering cakes, don’t panic if things aren’t perfect—frosting covers a multitude of sins. The most important thing is to enjoy the process and not sweat the small stuff.
Variations & Adaptations
- Gluten-Free: Use a 1-to-1 gluten-free flour blend in the cake layers. I’ve made this swap for my cousin, and nobody could tell the difference.
- Dairy-Free: Substitute plant-based cream cheese and yogurt for the cheesecake and frosting. Earth Balance and Kite Hill are my favorites for this.
- Flavor Twists: Add orange zest to the cheesecake layer for a citrusy punch, or swirl raspberry jam into the filling for a berry-red velvet vibe.
- Seasonal Adaptations: Top with fresh strawberries in summer, or sprinkle crushed peppermint over the frosting for a winter holiday twist.
- Nut-Free: This cake is naturally nut-free, but always check ingredient labels if you’re baking for someone with allergies.
One of my favorite personal tweaks is to add mini chocolate chips to the cheesecake layer. It’s a little unexpected and absolutely delicious! You can also swap the cream cheese frosting for whipped mascarpone if you want a lighter touch. Whatever your dietary needs or flavor preferences, this cake is super adaptable—just don’t skip the red velvet layers!
Serving & Storage Suggestions
This Red Velvet Cheesecake Cake is best served slightly chilled—about 20 minutes out of the fridge is perfect. I love slicing it with a warm, sharp knife for those gorgeous layers. For presentation, sprinkle the top with cake crumbs, a few white chocolate shavings, and maybe a few fresh berries if you’re feeling fancy.
Pair it with coffee, milk, or even a glass of prosecco for a festive touch. For a full dessert spread, serve alongside chocolate-dipped strawberries or a simple fruit salad.
To store, cover the cake loosely with plastic wrap or foil and refrigerate for up to 5 days. It actually tastes even better on day two, as the flavors meld. For longer storage, slice and freeze individual pieces wrapped tightly—they’ll keep for up to a month. To reheat, let slices thaw in the fridge overnight, then bring to room temp before serving. The cheesecake layer stays creamy, and the cake remains moist. If you notice any dryness, a quick zap in the microwave for 10 seconds does the trick.
Nutritional Information & Benefits
Each slice (about 1/12 of the cake) delivers approximately 450 calories, with 28g fat, 48g carbohydrates, and 7g protein. The real nutritional stars are the calcium from cream cheese and protein from eggs and dairy.
Red velvet cake is lower in cocoa than a typical chocolate cake, making it gentler for those sensitive to caffeine. This recipe is nut-free by default, and with recommended substitutions, it can be made gluten-free or dairy-free.
If you’re watching your sugar intake, swap in a sugar substitute like Swerve for the cake and frosting. As someone who tries to balance indulgence and nutrition, I find this cake is best enjoyed in moderation—it’s a celebration treat, after all!
Conclusion
If you’re looking for a dessert that’s guaranteed to impress, this Red Velvet Cheesecake Cake is it. The layers, the flavor, the sheer wow factor—it’s a recipe that’s earned a permanent spot in my celebration lineup. You don’t need fancy skills or tools, just a little patience and a love for baking.
Honestly, I make this cake whenever I want to turn an ordinary day into something special. Customize it to suit your taste, experiment with seasonal toppings, and make it your own.
I’d love to hear how you adapt this recipe—leave a comment, share your photos, and let me know your favorite variations. Here’s to more sweet moments and slices of joy!
FAQs
Can I make the Red Velvet Cheesecake Cake ahead of time?
Absolutely! You can bake the cheesecake layer a day or two ahead, and even assemble the whole cake a day before your event. Just keep it refrigerated until serving.
What if I don’t have buttermilk for the cake?
No problem—mix 1 cup milk with 1 tablespoon vinegar and let it sit for 5 minutes. It works just as well.
How do I prevent the cheesecake layer from cracking?
Make sure all ingredients are at room temperature before mixing, and avoid overbaking. If cracks happen, don’t worry—the frosting hides everything!
Can I freeze leftover Red Velvet Cheesecake Cake?
Yes! Wrap individual slices tightly and freeze for up to a month. Thaw in the fridge overnight before serving.
Is this recipe suitable for nut allergies?
Yes, it’s nut-free as written. Just double-check labels if you’re using substitutions, especially for dairy-free products.
Pin This Recipe!
Red Velvet Cheesecake Cake
This showstopping layered dessert combines classic red velvet cake, a creamy cheesecake center, and tangy cream cheese frosting. Perfect for celebrations, it’s easy to make at home and guaranteed to impress any crowd.
- Prep Time: 40 minutes
- Cook Time: 70 minutes
- Total Time: 3 hours (includes cooling and chilling)
- Yield: 12 servings 1x
- Category: Dessert
- Cuisine: American
Ingredients
- 2 cups all-purpose flour (240g)
- 2 tablespoons unsweetened cocoa powder (16g)
- 1 teaspoon baking soda (5g)
- 1/2 teaspoon salt (3g)
- 1 1/2 cups granulated sugar (300g)
- 1 1/4 cups vegetable oil (300ml)
- 2 large eggs, room temperature
- 1 cup buttermilk (240ml)
- 1 teaspoon white vinegar (5ml)
- 2 teaspoons vanilla extract (10ml)
- 2 tablespoons red food coloring (30ml, gel-type preferred)
- 16 ounces cream cheese, full-fat, softened (450g)
- 1/2 cup granulated sugar (100g)
- 1 large egg
- 1 teaspoon vanilla extract (5ml)
- 1/4 cup sour cream (60g, or plain Greek yogurt)
- 8 ounces cream cheese, softened (225g)
- 1/2 cup unsalted butter, softened (115g)
- 3 cups powdered sugar, sifted (360g)
- 1 1/2 teaspoons vanilla extract (7ml)
- Pinch of salt
- Optional: red velvet cake crumbs (from trimmings)
- Optional: white chocolate curls or shavings
- Optional: fresh berries
Instructions
- Make the Cheesecake Layer: Preheat oven to 325°F (163°C). Line the bottom of a 9-inch springform pan with parchment. In a large bowl, beat 16 oz cream cheese until smooth. Add 1/2 cup sugar and mix until creamy. Beat in 1 egg, 1 tsp vanilla, and 1/4 cup sour cream. Pour into pan and smooth top. Bake 35-40 minutes, until just set (center may jiggle slightly). Cool to room temp, then freeze for 2 hours for easy stacking.
- Prepare the Red Velvet Cake Layers: Preheat oven to 350°F (177°C). Grease and line two 9-inch cake pans. In a bowl, whisk together flour, cocoa, baking soda, and salt. In another bowl, beat sugar and oil until combined. Add eggs one at a time. Mix in buttermilk, vinegar, vanilla, and red food coloring. Gradually add dry ingredients, mixing gently until just combined. Divide batter evenly between pans. Bake 25-30 minutes, until a toothpick comes out clean. Cool 10 minutes, then turn cakes out onto racks. Cool completely. Level cakes if needed.
- Make Cream Cheese Frosting: Beat 8 oz cream cheese and 1/2 cup butter until fluffy. Add powdered sugar, vanilla, and a pinch of salt. Beat until smooth and spreadable. Chill if needed.
- Assemble the Cake: Place one red velvet layer on a serving plate. Top with cheesecake layer (remove parchment). Add second red velvet cake layer. Use toothpicks for stability if needed.
- Frost and Decorate: Spread cream cheese frosting on top and sides. Use an offset spatula for smooth swirls. Garnish with cake crumbs, chocolate shavings, or berries. Chill cake for 1 hour before slicing.
Notes
Freeze the cheesecake layer before stacking for easy assembly. Use gel food coloring for vibrant color. Level cake layers for neat stacking. The cake is nut-free and can be adapted to gluten-free or dairy-free with substitutions. For best results, serve slightly chilled and slice with a warm, sharp knife.
Nutrition
- Serving Size: 1 slice (1/12 of cake)
- Calories: 450
- Sugar: 36
- Sodium: 350
- Fat: 28
- Saturated Fat: 16
- Carbohydrates: 48
- Fiber: 1
- Protein: 7
Keywords: red velvet, cheesecake cake, layered dessert, cream cheese frosting, celebration cake, birthday cake, Southern dessert, easy cake recipe