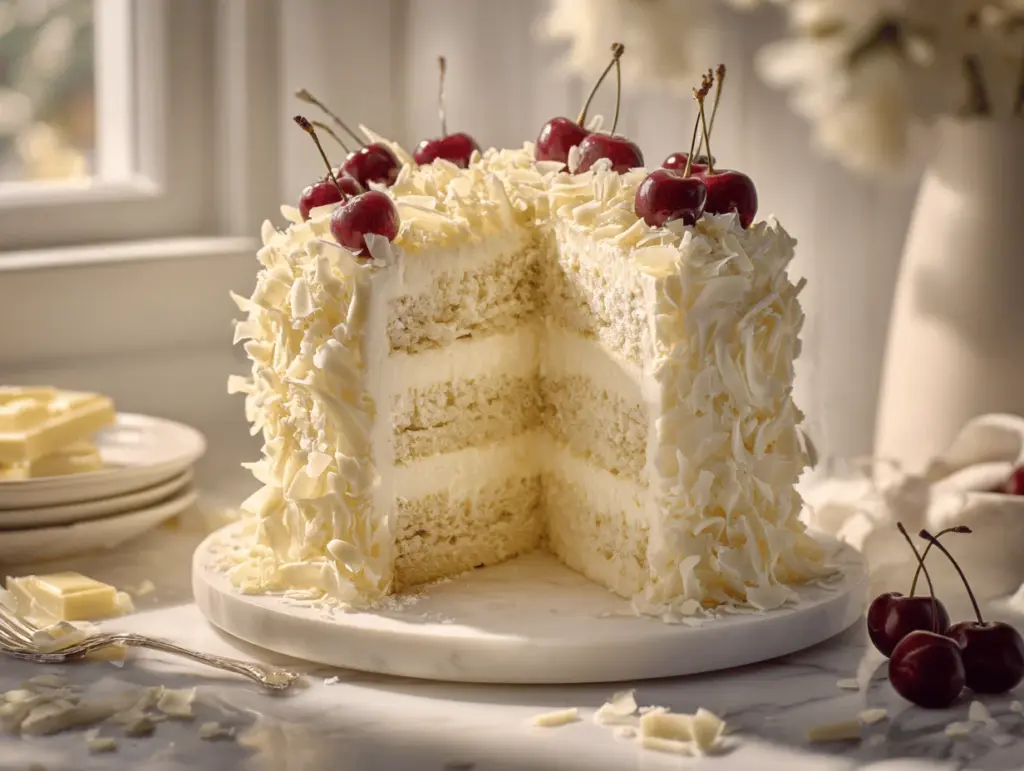
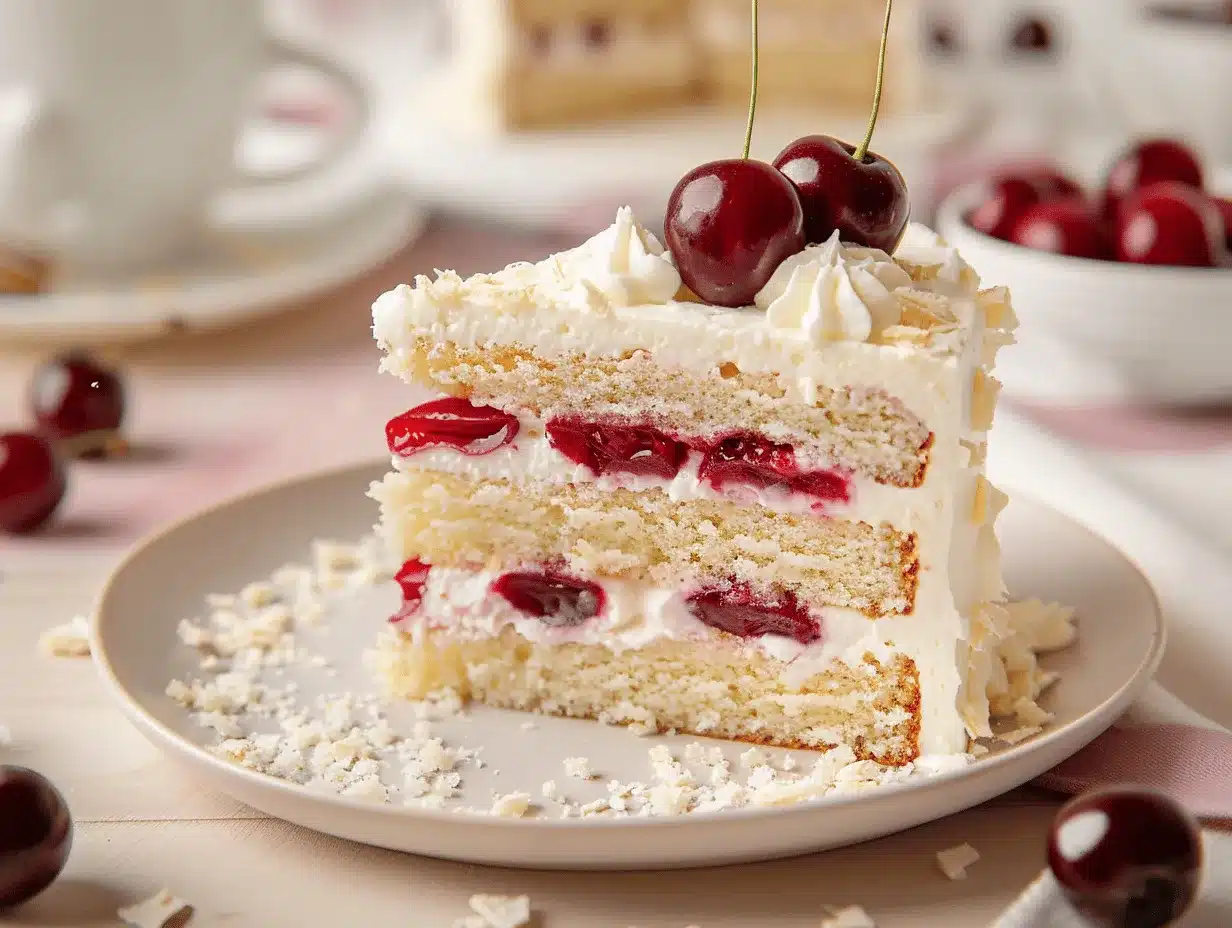
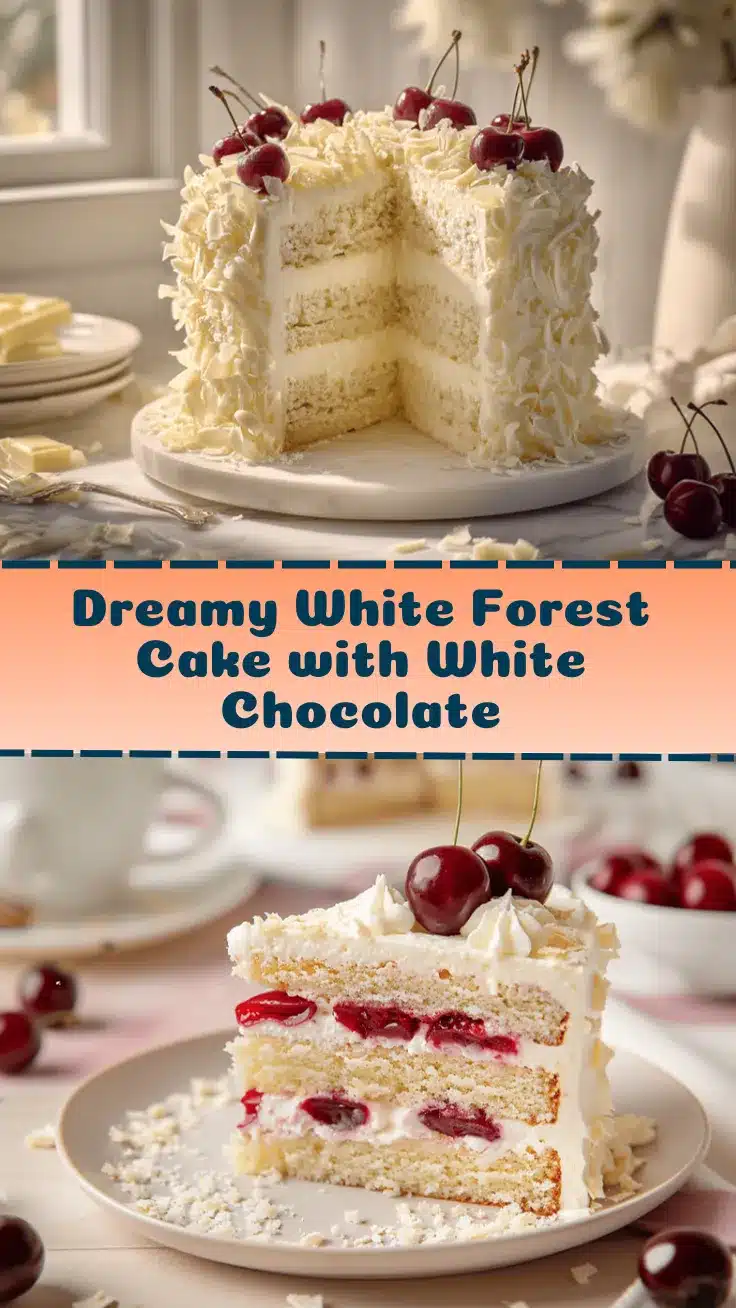
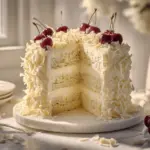
The first time I sliced into a homemade White Forest Cake, the kitchen filled with the scent of white chocolate and sweet cherries—honestly, it was like walking into a fairy tale bakery. You know that moment when you taste a cake so fluffy and creamy, you have to close your eyes? That’s exactly what this white forest cake recipe does, every single time. It’s decadent, dreamy, and surprisingly easy to make at home. If you love classic Black Forest Cake but fancy a lighter, more elegant twist, you’re in for a treat.
I stumbled onto this recipe last winter, trying to replicate a slice I’d had at a tiny café in Vienna. The original was layered with pillowy white chocolate sponge, tart cherry filling, and clouds of whipped cream. After a few attempts (and more than a few sticky counters), I finally landed on a version that’s easy enough for a weeknight bake but fancy enough for birthdays, anniversaries, or just because you deserve it. Whether you’re a confident baker or just dipping your toes into layer cakes, this white forest cake recipe is totally doable—and it never fails to impress.
I’ve tested this cake at least a dozen times and tweaked it along the way for flavor and simplicity. The result? A cake that’s light but rich, with layers that never dry out and a white chocolate ganache that’s practically a hug in frosting form. It’s perfect for families, celebrations, or anyone who’s got a soft spot for cherries and chocolate. So, if you’re craving something sweet, beautiful, and Pinterest-worthy, this homemade white chocolate layer cake is exactly what you need.
Why You’ll Love This White Forest Cake Recipe
- Quick & Easy: The white forest cake comes together in about 90 minutes (including cooling), so you don’t need to block off your whole afternoon.
- Simple Ingredients: Most ingredients are pantry staples—think flour, eggs, sugar, and white chocolate. Honestly, you probably have most of them right now.
- Perfect for Any Occasion: Whether it’s a birthday, holiday brunch, or just a lazy Sunday, this cake fits the bill. It’s got that “wow” factor without the stress.
- Crowd-Pleaser: Kids love the sweet cherries and creamy layers, adults love the elegant look and flavor. It’s always the first dessert gone at family dinners.
- Unbelievably Delicious: Each bite is a perfect mix of fluffy sponge, dreamy white chocolate, and juicy cherries. It’s comfort food with a sophisticated edge.
What makes this white forest cake recipe different? First, blending melted white chocolate right into the batter gives a rich, moist crumb that doesn’t dry out (trust me, I’ve tried skipping it—big mistake). Second, layering with tart cherry preserves instead of syrup keeps the flavor balanced, not overly sweet. And third, whipped cream frosting is light and airy, never heavy—so you get that classic forest cake feel without any stodgy bites.
This cake isn’t just dessert—it’s a memory-maker. It’s the sort of cake that gets people talking, snapping photos, and asking for seconds. If you’re nervous about layer cakes, I promise this recipe is forgiving. I’ve made it for birthday parties, neighborhood potlucks, and just for myself on a rainy day. It always comes out gorgeous, and the flavor is next-level.
So, whether you’re baking for someone special or just spoiling yourself, this white forest cake has everything you want: flavor, texture, and visual wow. Give it a try—you’ll be hooked after the first slice.
What Ingredients You Will Need
This recipe uses simple, wholesome ingredients to deliver bold flavor and satisfying texture without the fuss. Most items are easy to find, and you can swap a few things to suit your pantry or dietary needs.
- For the White Chocolate Sponge:
- 2 cups (250g) all-purpose flour
- 1 cup (200g) granulated sugar
- 1/2 cup (115g) unsalted butter, softened (adds richness)
- 1/2 cup (120ml) whole milk (use dairy-free milk if needed)
- 4 large eggs, room temperature
- 1 tsp vanilla extract (for depth)
- 1 tbsp baking powder
- 1/2 tsp salt
- 6 oz (170g) white chocolate, melted and slightly cooled (look for high-quality brands for best texture)
- For the Cherry Filling:
- 1 1/2 cups (340g) cherry preserves or tart cherry jam (not cherry pie filling)
- 1/2 cup (120ml) cherry juice (optional, for extra moisture)
- 1 cup (150g) fresh or frozen pitted cherries (for texture; in summer, use fresh!)
- For the Whipped Cream Frosting:
- 2 cups (480ml) heavy whipping cream, chilled
- 1/2 cup (60g) powdered sugar
- 1 tsp vanilla extract
- For the White Chocolate Ganache:
- 4 oz (115g) white chocolate, chopped
- 1/2 cup (120ml) heavy cream
- For Garnish:
- Extra cherries (fresh or maraschino, for decoration)
- White chocolate curls or shavings
Substitution Tips: You can swap all-purpose flour for gluten-free flour if needed (I’ve used Bob’s Red Mill 1:1 and it works well). For dairy-free, use plant-based butter and milk. If you can’t find cherry preserves, raspberry works in a pinch (though it’s a little sweeter). For the chocolate, I recommend Lindt or Ghirardelli for ultra-smooth ganache.
Most of these ingredients are pantry basics, but the key is using good white chocolate. Cheap white chocolate can get chalky—so spend a tiny bit more, it makes all the difference. And if cherries aren’t in season, frozen work just fine. Just thaw and pat dry before layering.
Equipment Needed
- Two 8-inch (20cm) round cake pans (nonstick or lined with parchment for easy release)
- Mixing bowls (you’ll want at least two, one for batter and one for whipped cream)
- Electric mixer or stand mixer (makes whipping cream and batter much easier)
- Spatula (for folding and spreading)
- Offset spatula or butter knife (for smooth frosting)
- Wire cooling rack (don’t skip this—helps cakes cool evenly)
- Small saucepan (for melting white chocolate and making ganache)
- Kitchen scale (optional, but great for accurate measurements)
- Cake turntable (not required but handy for frosting layers)
If you don’t own a stand mixer, a hand mixer works fine—just takes a little longer to whip up the cream. For cake pans, I’ve used both standard metal and silicone; parchment helps with sticking, especially for the white chocolate sponge. If you’re on a budget, you can improvise with a plate for turning cakes and a butter knife for smoothing frosting. Just keep your tools clean and dry—white chocolate likes to seize if water sneaks in!
Preparation Method
- Prep the cake pans: Grease two 8-inch (20cm) round cake pans with butter. Line the bottoms with parchment paper. Preheat oven to 350°F (175°C). Tip: If you skip parchment, your cake might stick—don’t risk it! (5 minutes)
- Melt the white chocolate: Place 6 oz (170g) white chocolate in a small saucepan over low heat. Stir constantly until smooth, then let cool slightly. The chocolate should be warm but not hot—otherwise, it’ll scramble the eggs later. (5 minutes)
- Make the sponge batter: In a large bowl, beat 1/2 cup (115g) softened butter and 1 cup (200g) sugar until light and fluffy (about 3 minutes with an electric mixer). Add eggs one at a time, mixing well after each. Stir in 1 tsp vanilla extract. In a separate bowl, whisk together 2 cups (250g) flour, 1 tbsp baking powder, and 1/2 tsp salt. Gradually add dry ingredients to wet, alternating with 1/2 cup (120ml) milk. Mix just until combined—overmixing can make the cake tough. Finally, fold in the melted white chocolate until no streaks remain. The batter should be thick but pourable and smell heavenly! (10 minutes)
- Bake the cakes: Divide batter evenly between pans. Smooth tops with a spatula. Bake for 25-30 minutes, or until a toothpick comes out clean. Cakes should be pale golden and springy to the touch. If edges brown too fast, tent with foil. (25-30 minutes)
- Cool the cakes: Let cakes cool in pans for 10 minutes. Run a knife around the edge, then turn onto a wire rack to cool completely. Warm cake + whipped cream = melted mess, so don’t rush! (30 minutes)
- Prepare the cherry filling: While cakes cool, stir together 1 1/2 cups (340g) cherry preserves and 1 cup (150g) cherries. If using cherry juice, sprinkle it over the cake layers later for extra moisture. I like to mash half the cherries for more texture. (5 minutes)
- Make whipped cream frosting: In a chilled bowl, whip 2 cups (480ml) heavy cream, 1/2 cup (60g) powdered sugar, and 1 tsp vanilla until stiff peaks form. Don’t over-whip—stop when the cream holds its shape but isn’t grainy. (5 minutes)
- Make white chocolate ganache: Heat 1/2 cup (120ml) heavy cream until just steaming (don’t boil). Pour over 4 oz (115g) chopped white chocolate; let sit for 2 minutes, then stir until smooth. If ganache splits, add a splash of warm milk and whisk—it’ll come back together. (5 minutes)
- Assemble the cake: Place one cake layer on your serving plate. Brush with cherry juice if using. Spread half the cherry filling evenly over the cake. Top with a thick layer of whipped cream. Add second cake layer, then repeat with the remaining cherry filling and whipped cream. Work quickly—the whipped cream can soften if it sits too long!
- Frost and decorate: Pour cooled white chocolate ganache over the top, letting it drip down the sides for that Pinterest-perfect look. Garnish with extra cherries and white chocolate curls. If you want crisp lines, chill the cake for 20 minutes before decorating.
Personal tip: If your cake layers dome in the oven, trim the tops with a serrated knife for easy stacking. And if you’re short on time, you can freeze the cake layers for 30 minutes before frosting—they’ll be easier to handle.
Cooking Tips & Techniques
Here’s where experience really pays off! I’ve learned a few tricks (and survived a few mishaps) with this white forest cake recipe:
- Don’t rush the cooling: Even a slightly warm cake will melt the whipped cream, so let layers cool completely. Trust me, I’ve tried to speed things up—ended up with a sliding, gooey mess!
- Use real white chocolate: Avoid “white baking chips”—they’re not true chocolate and won’t melt as smoothly. It’s worth the extra dollar for the real stuff.
- Gentle folding: When adding melted chocolate to the batter, fold gently to keep the sponge light. Over-mixing knocks out all the air.
- Consistency for whipped cream: Chill your bowl and beaters before whipping cream. If it starts to look grainy, add a tablespoon more cream and beat just until smooth.
- Multitasking: While the cakes bake, prep your cherries and whip the cream. It saves time and keeps things flowing.
- Troubleshooting: If your ganache splits or looks oily, whisk in a splash of warm milk. If your cake sticks, run a thin knife around the edge and gently shake to release.
The biggest mistake I made early on was over-baking. White chocolate cakes can dry out fast—check at 25 minutes, and pull them as soon as a toothpick comes out clean. And about layering: don’t worry if things aren’t perfectly even! A little rustic charm is part of homemade cake magic.
Variations & Adaptations
Here’s where you can have fun and make this white forest cake recipe your own:
- Dietary swaps: Use gluten-free flour and plant-based milk/butter for a gluten- and dairy-free version. I’ve tried almond milk and vegan butter—works great, just chill layers longer before assembling.
- Seasonal twist: Swap cherries for raspberries or blueberries in summer, or use cranberry preserves for a wintery vibe.
- Flavor boost: Add a splash of kirsch (cherry liqueur) to the cherry filling for an adults-only treat. Or try orange zest in the sponge for a subtle citrus note.
- Cooking method: Bake as cupcakes for easy serving—just reduce bake time to 15-18 minutes and layer with whipped cream and cherries in the middle.
- Allergen substitutions: For nut allergies, make sure your chocolate is nut-free and skip any almond extract.
Personally, I love adding a thin layer of lemon curd under the cherry filling for a little tang. It sounds strange, but the citrus and cherry combo is surprisingly good! You can also use coconut whipped cream for a tropical spin—just keep it chilled.
Serving & Storage Suggestions
This white forest cake is best served slightly chilled, so the layers hold up and the flavors meld. I like to slice it right out of the fridge and let it sit for 10 minutes at room temp—just enough for the whipped cream to soften.
- Presentation: Top with extra cherries and white chocolate curls for a Pinterest-worthy finish. Use a sharp knife for clean slices.
- Pairings: Serve with black coffee, a glass of milk, or even a light rosé. Fresh berries on the side make it extra festive.
- Storage: Store leftovers in an airtight container in the fridge for up to 3 days. The whipped cream may soften a bit, but the flavor gets even better overnight.
- Freezing: You can freeze unfrosted cake layers for up to 2 months. Wrap tightly in plastic and thaw before assembling.
- Reheating: Not recommended for whipped cream cakes, but you can bring slices to room temp for a softer bite.
Pro tip: If you want to prep ahead, make the cake layers and cherry filling a day early, then assemble just before serving. The flavors develop overnight—so if you’re patient, it’s even better on day two!
Nutritional Information & Benefits
Here’s a rough estimate per serving (based on 12 slices):
- Calories: ~420
- Fat: ~22g
- Carbs: ~52g
- Protein: ~6g
Health benefits: Cherries are packed with antioxidants and vitamin C; white chocolate provides a little calcium. If you use gluten-free flour and dairy-free swaps, this cake suits most special diets (just watch for sugar content if you’re low-carb).
Potential allergens include eggs, dairy, wheat, and possibly nuts (depending on your choice of chocolate). Always check ingredient labels if you’re baking for someone with allergies. Personally, I love that this cake feels indulgent but isn’t super heavy—thanks to the whipped cream and fruit!
Conclusion
So, why should you make this white forest cake recipe? Because it’s beautiful, delicious, and honestly easier than you’d think. Every slice is a celebration—creamy, fruity, and loaded with white chocolate goodness. It’s the kind of cake that makes a regular day feel special.
Don’t be afraid to tweak the flavors or swap out ingredients—this cake is super forgiving. I love it for birthdays and family get-togethers, but sometimes I make it just because. If you try it, let me know your favorite adaptation or trick! Drop your comments below, share your photos on Pinterest, or tag me if you post your masterpiece.
Baking should be fun, so enjoy the process and treat yourself to a slice (or two) of this irresistible white forest cake. Happy baking and happy celebrating!
Frequently Asked Questions
How do I keep my white forest cake from drying out?
Don’t over-bake the sponge layers—check them at 25 minutes and pull them as soon as a toothpick comes out clean. Storing the cake in the fridge in an airtight container helps keep it moist, too.
Can I make this cake ahead of time?
Yes! Bake the cake layers and prepare the cherry filling a day ahead. Assemble and frost the cake just before serving for best results. The flavors actually get richer overnight.
What if I can’t find cherry preserves?
You can use raspberry, blueberry, or even cranberry preserves. The key is a tart, chunky fruit filling. Avoid overly sweet pie fillings—they’ll overwhelm the delicate cake.
Is it possible to make this cake gluten-free?
Absolutely—just swap all-purpose flour for a 1:1 gluten-free blend. I’ve had great results with Bob’s Red Mill. The texture stays light and fluffy!
Can I freeze white forest cake?
You can freeze the unfrosted cake layers for up to 2 months. After assembling with whipped cream, freezing isn’t recommended, as the cream won’t hold up well. Store leftovers in the fridge and enjoy within 3 days.
Pin This Recipe!
White Forest Cake Recipe Easy Homemade White Chocolate Layer Cake
This decadent White Forest Cake features fluffy white chocolate sponge layers, tart cherry filling, and clouds of whipped cream, all topped with a silky white chocolate ganache. It’s an elegant, crowd-pleasing dessert that’s surprisingly easy to make at home.
- Prep Time: 30 minutes
- Cook Time: 30 minutes
- Total Time: 1 hour 30 minutes
- Yield: 12 servings 1x
- Category: Dessert
- Cuisine: European
Ingredients
- 2 cups (250g) all-purpose flour
- 1 cup (200g) granulated sugar
- 1/2 cup (115g) unsalted butter, softened
- 1/2 cup (120ml) whole milk
- 4 large eggs, room temperature
- 1 tsp vanilla extract
- 1 tbsp baking powder
- 1/2 tsp salt
- 6 oz (170g) white chocolate, melted and slightly cooled
- 1 1/2 cups (340g) cherry preserves or tart cherry jam
- 1/2 cup (120ml) cherry juice (optional)
- 1 cup (150g) fresh or frozen pitted cherries
- 2 cups (480ml) heavy whipping cream, chilled
- 1/2 cup (60g) powdered sugar
- 1 tsp vanilla extract
- 4 oz (115g) white chocolate, chopped
- 1/2 cup (120ml) heavy cream
- Extra cherries (fresh or maraschino, for decoration)
- White chocolate curls or shavings
Instructions
- Grease two 8-inch round cake pans with butter and line the bottoms with parchment paper. Preheat oven to 350°F (175°C).
- Melt 6 oz white chocolate in a small saucepan over low heat, stirring constantly until smooth. Let cool slightly.
- In a large bowl, beat softened butter and sugar until light and fluffy (about 3 minutes). Add eggs one at a time, mixing well after each. Stir in vanilla extract.
- In a separate bowl, whisk together flour, baking powder, and salt. Gradually add dry ingredients to wet, alternating with milk. Mix just until combined.
- Fold in the melted white chocolate until no streaks remain.
- Divide batter evenly between pans and smooth tops. Bake for 25-30 minutes, or until a toothpick comes out clean.
- Let cakes cool in pans for 10 minutes, then turn onto a wire rack to cool completely.
- While cakes cool, stir together cherry preserves and cherries. If using cherry juice, sprinkle it over the cake layers later for extra moisture.
- In a chilled bowl, whip heavy cream, powdered sugar, and vanilla until stiff peaks form.
- Heat heavy cream until just steaming. Pour over chopped white chocolate; let sit for 2 minutes, then stir until smooth to make ganache.
- Place one cake layer on a serving plate. Brush with cherry juice if using. Spread half the cherry filling evenly over the cake. Top with a thick layer of whipped cream.
- Add second cake layer, then repeat with remaining cherry filling and whipped cream.
- Pour cooled white chocolate ganache over the top, letting it drip down the sides. Garnish with extra cherries and white chocolate curls.
- Chill the cake for 20 minutes before decorating for crisp lines, if desired.
Notes
For gluten-free or dairy-free adaptations, substitute with 1:1 gluten-free flour and plant-based milk/butter. Use high-quality white chocolate for best texture and flavor. Chill cake layers before assembling for easier handling. Store leftovers in the fridge for up to 3 days. Freeze unfrosted cake layers for up to 2 months.
Nutrition
- Serving Size: 1 slice (1/12 of cake)
- Calories: 420
- Sugar: 36
- Sodium: 220
- Fat: 22
- Saturated Fat: 13
- Carbohydrates: 52
- Fiber: 2
- Protein: 6
Keywords: white forest cake, white chocolate cake, cherry cake, layer cake, homemade cake, easy cake recipe, birthday cake, celebration cake, whipped cream frosting, ganache, gluten-free option