Introduction
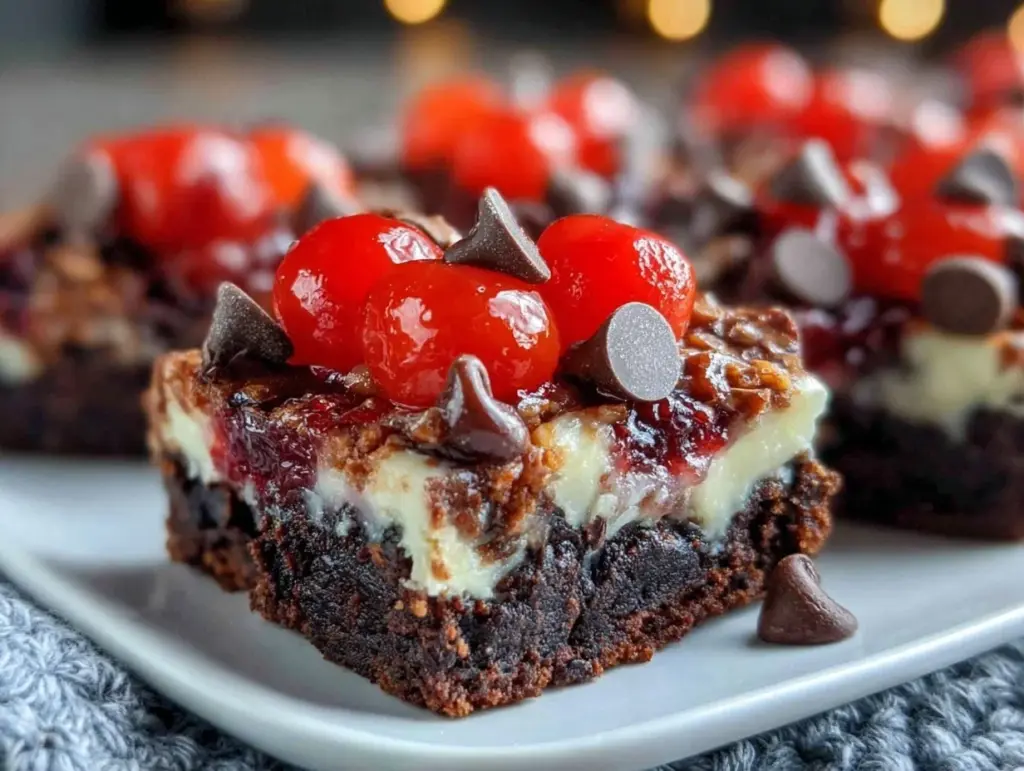
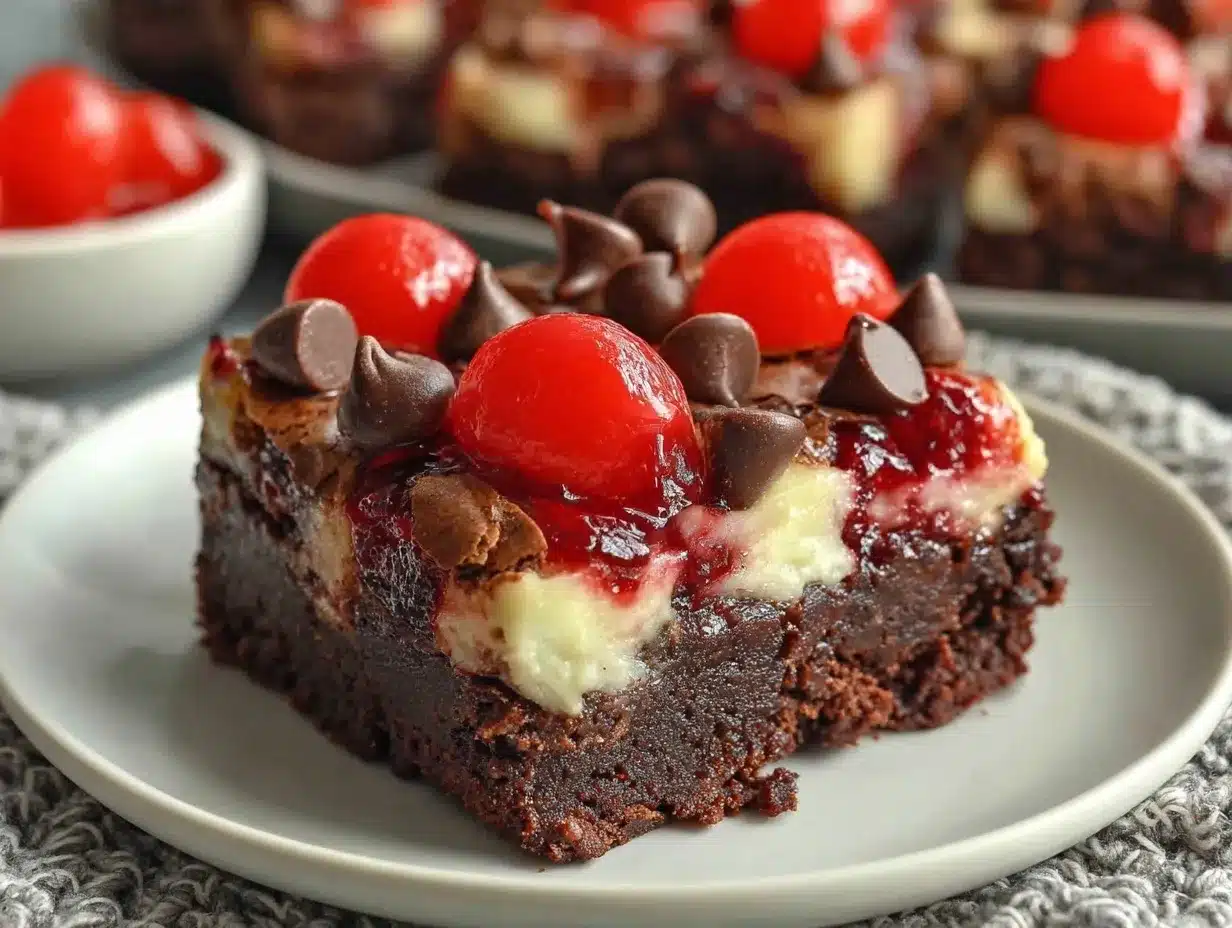
Let me tell you, the scent of rich chocolate and tangy cherries mingling in my kitchen is downright dangerous (in the best possible way). There’s something magical about the moment when fudgy brownies meet creamy cheesecake—especially when a cherry glaze comes into play. The first time I made these Black Forest Cheesecake Brownie Bars, it was a gloomy Saturday, and I needed a pick-me-up. One bite, and I was instantly hooked. It’s the kind of moment where you pause, take a deep breath, and just smile because you know you’re onto something truly special.
My grandma used to make Black Forest cake for birthdays when I was knee-high to a grasshopper. Those flavors stuck with me—so when I stumbled upon a cherry sale at the market years ago, I got the wild idea to combine all that nostalgic comfort into bar form. (Honestly, I wish I’d discovered this shortcut sooner.) The fudgy base, cheesecake layer, and glossy cherry glaze are pure comfort, with a twist that feels fancy enough for company but simple enough for a lazy weekend.
My family couldn’t stop sneaking slices off the cooling rack. I can’t really blame them. These bars have become a staple for gifting, potlucks, and those “just because” dessert cravings. The kids ask for them on snow days; my husband claims they’re his favorite midnight snack. I’ve tested this recipe more times than I care to admit—in the name of research, of course! If you’re looking for a Pinterest-worthy dessert that feels like a warm hug, you’re going to want to bookmark these Black Forest Cheesecake Brownie Bars.
Why You’ll Love This Recipe
Honestly, these Black Forest Cheesecake Brownie Bars are so much more than the sum of their parts. Years of tweaking and tasting have made me a true believer in the magic of this easy cherry dessert recipe. Here’s why you’ll be reaching for this one again and again:
- Quick & Easy: No need to spend all day in the kitchen—these come together in under 1 hour. Perfect for last-minute cravings or surprise guests.
- Simple Ingredients: Nothing fancy here. You probably have most of what you need already (chocolate, cream cheese, eggs, cherries). A few pantry staples, and you’re golden.
- Perfect for Any Occasion: Whether it’s a birthday, potluck, holiday morning, or just a Tuesday night, these bars fit right in. They look impressive but are fuss-free.
- Crowd-Pleaser: Kids love the fudgy brownie base, adults swoon for the tangy cheesecake, and everyone fights over the cherry glaze. It’s a hit every single time.
- Unbelievably Delicious: The combination of rich cocoa, creamy cheesecake, and sweet-tart cherry glaze is an absolute dream. Each bite is pure, nostalgic comfort.
Let’s face it—there are a ton of brownie and cheesecake recipes out there. But blending the two, plus a homemade cherry glaze, takes things to a whole new level. I experimented with blending cottage cheese into the cheesecake layer for a super-smooth texture, and swapping in almond flour for a gluten-free twist. Both worked like a charm!
This recipe isn’t just dessert—it’s the kind that makes you close your eyes after the first bite. It’s comfort food with a playful, cherry-filled twist. You’ll impress guests without breaking a sweat, and turn any ordinary meal into something memorable. If you love chocolate, cherries, and creamy cheesecake, this is the bar you’ve been dreaming of.
What Ingredients You Will Need
This recipe uses simple, wholesome ingredients to deliver bold flavor and satisfying texture without the fuss. Most items are pantry staples, and a few fresh ingredients tie it all together. Here’s what you’ll need for these Black Forest Cheesecake Brownie Bars with Cherry Glaze:
- For the Brownie Base:
- 1/2 cup (115g) unsalted butter, melted (adds richness)
- 3/4 cup (150g) granulated sugar
- 2 large eggs, room temperature
- 1 teaspoon vanilla extract
- 1/2 cup (60g) all-purpose flour (or almond flour for gluten-free)
- 1/3 cup (35g) unsweetened cocoa powder
- 1/4 teaspoon salt
- For the Cheesecake Layer:
- 8 oz (225g) cream cheese, softened (full fat for best texture)
- 1/4 cup (60g) cottage cheese, blended (optional, for extra creaminess)
- 1/4 cup (50g) granulated sugar
- 1 large egg
- 1/2 teaspoon vanilla extract
- For the Cherry Glaze:
- 1 cup (150g) fresh or frozen cherries, pitted and halved
- 3 tablespoons (40g) granulated sugar
- 1 tablespoon (15ml) lemon juice
- 1 tablespoon (15ml) water
- 1 teaspoon cornstarch (mixed with a little cold water)
- Optional Toppings:
- Dark chocolate shavings or chips
- Extra cherries for garnish
- Whipped cream (for serving, if you’re feeling fancy)
A few tips: For best results, use high-quality cocoa powder (I love Ghirardelli or Valrhona). If cherries aren’t in season, frozen ones work great—just thaw and drain before using. You can swap cottage cheese out for extra cream cheese if you prefer. To make these bars gluten-free, almond flour is a seamless substitute. Dairy-free? Try using vegan cream cheese and coconut yogurt.
This recipe is pretty forgiving, so don’t stress if you need to make a swap or two. The flavors come together beautifully, and you’ll love how the cherry glaze brings everything to life.
Equipment Needed
You won’t need any fancy gadgets for these Black Forest Cheesecake Brownie Bars—just a few trusty kitchen tools and maybe a couple of handy alternatives:
- 8×8-inch (20x20cm) baking pan (lined with parchment paper for easy removal)
- Mixing bowls (two medium, one small)
- Hand mixer or stand mixer (or a sturdy whisk and some elbow grease)
- Blender or food processor (for cottage cheese, if using)
- Small saucepan (for cherry glaze)
- Rubber spatula (for scraping every last bit of batter)
- Measuring cups and spoons (accuracy matters in baking!)
If you don’t have an 8×8 pan, a 9×9 works—just check for doneness a few minutes early. I’ve used a glass dish and a metal pan, and both work fine (though metal gives a slightly chewier edge). For the glaze, a regular saucepan is perfect, but a nonstick pan helps with easy cleanup.
Pro tip: If you’re using a hand mixer, scrape down the bowl frequently. And for budget-friendly options, you don’t need top-of-the-line gear—my thrift-store mixer has lasted years. Just keep your tools clean and dry for best results.
Preparation Method
Ready to whip up these Black Forest Cheesecake Brownie Bars? Here’s how to make your easy cherry dessert recipe step-by-step:
- Preheat & Prep:
Preheat your oven to 350°F (175°C). Line your 8×8-inch baking pan with parchment paper, leaving an overhang for easy removal. - Make the Brownie Base:
In a medium bowl, whisk together 1/2 cup melted butter and 3/4 cup sugar until smooth and glossy. Beat in 2 eggs and 1 teaspoon vanilla extract.
Add 1/2 cup flour, 1/3 cup cocoa powder, and 1/4 teaspoon salt. Stir gently until just combined—don’t overmix, or the brownies will be tough.
Spread the batter evenly into your prepared pan. It’ll be thick, but that’s what you want for a fudgy base. - Prepare the Cheesecake Layer:
In another bowl, beat 8 oz cream cheese until smooth. Add 1/4 cup blended cottage cheese (if using), 1/4 cup sugar, 1 egg, and 1/2 teaspoon vanilla extract.
Mix until silky and lump-free. If you see any lumps, keep mixing (patience pays off here).
Gently spread the cheesecake mixture over the brownie layer. Smooth with a spatula. - Bake:
Bake for 32-35 minutes, or until the edges are set and the center is just slightly jiggly. The cheesecake should be pale but not browned.
If you’re unsure, insert a toothpick—it should come out with a few moist crumbs, not wet batter.
Let the bars cool completely in the pan—don’t rush this! Warm bars are messy to slice. - Make the Cherry Glaze:
While the bars cool, combine 1 cup cherries, 3 tablespoons sugar, 1 tablespoon lemon juice, and 1 tablespoon water in a small saucepan.
Simmer over medium heat, stirring gently, until cherries break down and the mixture thickens (about 8-10 minutes).
Mix 1 teaspoon cornstarch with a splash of cold water and stir into the cherry mixture. Cook for another 1-2 minutes until glossy and thick.
Remove from heat and let cool to room temperature. - Assemble & Glaze:
Once bars are cool, lift them out using the parchment overhang. Slice into squares (I usually get 16 bars).
Drizzle each bar generously with cherry glaze. If you’re feeling extra, add chocolate shavings and fresh cherries on top. - Serve & Enjoy:
Serve chilled or at room temperature. The flavors meld even more after a few hours in the fridge.
Troubleshooting: If the cheesecake layer cracks, don’t worry—cherry glaze covers everything! Bars too gooey? Chill longer before slicing. If your glaze is runny, cook it a minute longer. My favorite tip: Use a hot knife to slice for cleaner edges.
Efficiency hack: While the brownies bake, make the glaze and clean up. You’ll feel like a kitchen ninja!
Cooking Tips & Techniques
Over the years, I’ve picked up a few tricks to guarantee brownie bar success. Here’s what works, what doesn’t, and how you can avoid rookie mistakes:
- Room Temperature Ingredients: Always use room temp eggs and cream cheese—your cheesecake layer will be much smoother. Cold ingredients cause lumps (been there, done that!).
- Don’t Overmix: Stir the brownie batter just until combined. Overmixing makes brownies dense and tough instead of fudgy.
- Layering Matters: Spread your cheesecake gently. If you press too hard, the layers can mix, but honestly, a little swirl looks pretty cool!
- Baking Time: Check at 32 minutes. Ovens vary, and cheesecake can go from creamy to dry in a flash. Err on the side of slightly underbaked; it will set as it cools.
- Glaze Consistency: If your cherry glaze is too thin, add a bit more cornstarch. Too thick? Stir in a splash of water. It should coat the back of a spoon.
- Clean Cuts: Chill bars completely and use a hot, damp knife. Wipe between slices for those Pinterest-perfect edges.
- Multitasking: Prep the glaze while the brownies bake, and wash up as you go. Less cleanup later means more time to enjoy dessert!
- Personal Lesson: The first time I made these, I forgot to line the pan. Getting them out was a struggle, so don’t skip the parchment!
For consistent results, measure everything carefully and follow the order of steps. If you’re baking for a crowd, double the recipe and use a 9×13-inch pan—just add 5 minutes to the baking time. Trust your senses: the smell of cocoa and cherries is a great sign you’re on the right track!
Variations & Adaptations
These Black Forest Cheesecake Brownie Bars are endlessly customizable. Here are some tried-and-true twists you’ll love:
- Gluten-Free: Swap all-purpose flour for almond flour in the brownie base. I’ve done this for a friend with celiac, and honestly, the bars were still fudgy and delicious.
- Dairy-Free: Use vegan cream cheese and coconut yogurt instead of cottage cheese in the cheesecake layer. Substitute coconut oil for butter in the brownie base.
- Berry Swap: Not a cherry fan? Try raspberries or blueberries for the glaze. In summer, fresh berries are amazing; in winter, frozen works just fine.
- Double Chocolate: Stir 1/2 cup chocolate chips into the brownie batter. It amps up the chocolate factor for those who want maximum decadence.
- Nutty Crunch: Add 1/3 cup chopped walnuts or pecans to the brownie base for texture.
For different cooking methods, you can bake these bars in a muffin tin for individual portions—just reduce baking time by about 8 minutes. If you prefer a thinner bar, use a larger pan and shorten bake time.
My favorite personal variation? Swapping the cherry glaze for a swirl of raspberry jam on top of the cheesecake layer before baking. It’s a simple twist, but wow, the flavor is next-level!
No matter your dietary needs or flavor preferences, these bars adapt beautifully. Just don’t forget the glaze—it’s what really sets off the Black Forest vibe.
Serving & Storage Suggestions
These Black Forest Cheesecake Brownie Bars shine at room temperature, but they’re extra dreamy when chilled. Serve them on a pretty platter or stacked on a cake stand for Pinterest-worthy presentation.
Pair with a cup of coffee, a glass of milk, or even a scoop of vanilla ice cream for a knockout dessert combo. If you want to get fancy, add a swirl of whipped cream and a sprinkle of chocolate shavings.
To store, place bars in an airtight container in the refrigerator for up to 5 days. They actually taste even better on day two as the flavors meld. For longer storage, freeze bars (unglazed) for up to 2 months. Thaw overnight in the fridge, then glaze before serving.
Reheat briefly in the microwave if you like them warm, but I’m partial to enjoying them straight from the fridge. The cherry glaze stays glossy, and the cheesecake layer stays creamy. If you’re prepping ahead for a party, bars hold up beautifully overnight.
One last tip—if you’re gifting these, wrap them in parchment and tie with twine. They make the sweetest homemade treat!
Nutritional Information & Benefits
Each Black Forest Cheesecake Brownie Bar (based on 16 bars) is approximately:
- Calories: 170
- Fat: 9g
- Carbs: 21g
- Protein: 3g
- Sugar: 16g
Cherries are loaded with antioxidants and vitamin C, which support immunity and heart health. Cocoa provides a little boost of magnesium and fiber, and the cream cheese adds satisfying protein. If you go almond flour or dairy-free, you can tweak these bars for lower carbs and different fat profiles.
Potential allergens: Dairy, eggs, gluten (unless you use substitutions). If you’re sensitive to nuts, avoid almond flour or nuts in the base. Personally, I love how these bars hit the sweet spot—decadent but not overwhelming, and easy to adapt for wellness goals.
Conclusion
If you’re craving a dessert that’s rich, nostalgic, and “dangerously easy” to make, these Black Forest Cheesecake Brownie Bars are the ticket. They combine everything we love about classic Black Forest cake—fudgy chocolate, creamy cheesecake, and sweet-tart cherry glaze—into a bar that’s perfect for sharing, gifting, or hoarding all to yourself.
Don’t be afraid to tweak the recipe to fit your own style (or what’s in your pantry). Whether you go gluten-free, dairy-free, or swap in your favorite berry, the results are always delicious. I keep coming back to this recipe for family gatherings and cozy nights in—honestly, it’s just that good.
Give these easy cherry dessert bars a try, and let me know how you customize them. Drop a comment below, share your photos, or tell me about your favorite twist—let’s swap baking stories! Happy snacking, and may your kitchen always smell like chocolate and cherries.
FAQs about Black Forest Cheesecake Brownie Bars
Can I use canned cherry pie filling instead of making the glaze?
Absolutely! If you’re short on time, canned cherry pie filling works in a pinch. The homemade glaze is a bit brighter and fresher, but the pie filling will still taste great.
Can I double the recipe for a crowd?
You sure can! Just use a 9×13-inch pan and increase baking time by about 5-7 minutes. Keep an eye on the cheesecake layer so it doesn’t overbake.
What’s the best way to get clean slices?
Chill the bars completely, then use a hot, damp knife. Wipe the blade between each cut for those perfect edges you see on Pinterest.
Can I make these bars ahead of time?
Yes, these bars are even better the next day. Make them a day ahead and store in the fridge. Add the cherry glaze right before serving for maximum freshness.
How do I make these gluten-free?
Just swap the all-purpose flour for almond flour in the brownie base. Everything else stays the same, and you’ll get fudgy, delicious results.
Pin This Recipe!
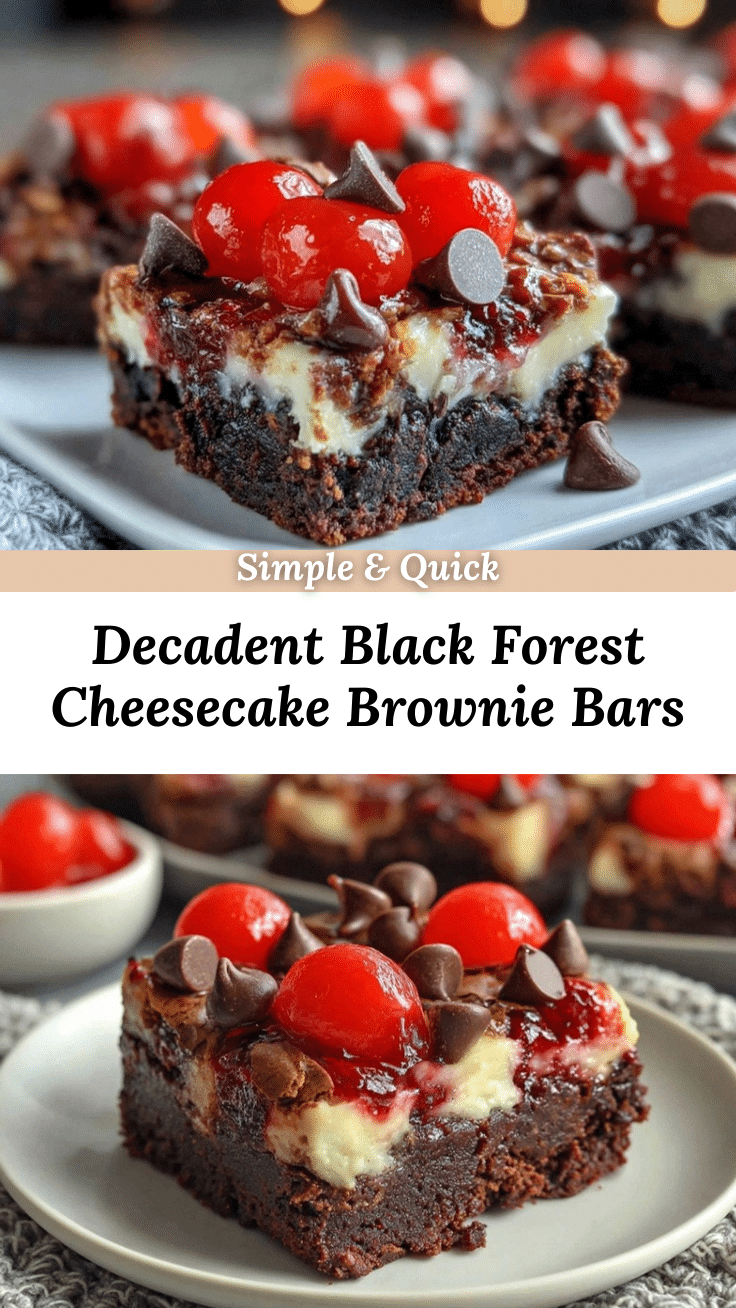
Black Forest Cheesecake Brownie Bars
These Black Forest Cheesecake Brownie Bars combine a fudgy chocolate brownie base, creamy cheesecake layer, and a sweet-tart cherry glaze for a nostalgic, crowd-pleasing dessert. Easy to make and endlessly customizable, they’re perfect for gifting, potlucks, or cozy nights in.
- Prep Time: 20 minutes
- Cook Time: 35 minutes
- Total Time: 55 minutes
- Yield: 16 bars 1x
- Category: Dessert
- Cuisine: American
Ingredients
- 1/2 cup unsalted butter, melted
- 3/4 cup granulated sugar
- 2 large eggs, room temperature
- 1 teaspoon vanilla extract
- 1/2 cup all-purpose flour (or almond flour for gluten-free)
- 1/3 cup unsweetened cocoa powder
- 1/4 teaspoon salt
- 8 oz cream cheese, softened
- 1/4 cup cottage cheese, blended (optional)
- 1/4 cup granulated sugar
- 1 large egg
- 1/2 teaspoon vanilla extract
- 1 cup fresh or frozen cherries, pitted and halved
- 3 tablespoons granulated sugar
- 1 tablespoon lemon juice
- 1 tablespoon water
- 1 teaspoon cornstarch (mixed with a little cold water)
- Dark chocolate shavings or chips (optional topping)
- Extra cherries for garnish (optional)
- Whipped cream (optional, for serving)
Instructions
- Preheat oven to 350°F (175°C). Line an 8×8-inch baking pan with parchment paper, leaving an overhang for easy removal.
- In a medium bowl, whisk together melted butter and sugar until smooth and glossy. Beat in eggs and vanilla extract.
- Add flour, cocoa powder, and salt. Stir gently until just combined. Spread the batter evenly into the prepared pan.
- In another bowl, beat cream cheese until smooth. Add blended cottage cheese (if using), sugar, egg, and vanilla extract. Mix until silky and lump-free.
- Gently spread the cheesecake mixture over the brownie layer and smooth with a spatula.
- Bake for 32-35 minutes, or until edges are set and center is slightly jiggly. Let bars cool completely in the pan.
- While bars cool, combine cherries, sugar, lemon juice, and water in a small saucepan. Simmer over medium heat until cherries break down and mixture thickens (about 8-10 minutes).
- Mix cornstarch with a splash of cold water and stir into the cherry mixture. Cook for another 1-2 minutes until glossy and thick. Remove from heat and let cool to room temperature.
- Once bars are cool, lift them out using the parchment overhang. Slice into squares (about 16 bars).
- Drizzle each bar with cherry glaze. Add chocolate shavings and fresh cherries on top if desired.
- Serve chilled or at room temperature. Flavors meld even more after a few hours in the fridge.
Notes
For gluten-free bars, use almond flour instead of all-purpose flour. Dairy-free options include vegan cream cheese and coconut yogurt. Frozen cherries work well if fresh aren’t available. Chill bars completely before slicing for clean edges. Cherry glaze can be replaced with canned cherry pie filling in a pinch. Bars taste even better the next day as flavors meld.
Nutrition
- Serving Size: 1 bar
- Calories: 170
- Sugar: 16
- Sodium: 120
- Fat: 9
- Saturated Fat: 5
- Carbohydrates: 21
- Fiber: 2
- Protein: 3
Keywords: black forest, cheesecake brownies, cherry dessert, easy brownies, chocolate cherry bars, potluck dessert, gluten-free option, crowd-pleaser, homemade glaze


