“Hey, can you bring dessert to the party?” That text popped up just as I was wrapping up a chaotic week. Honestly, I was halfway convinced I’d have to swing by the store for something pre-made. But then, I remembered a tiny victory from last summer when I whipped up these creamy mini cheesecake cups out of sheer desperation (and a fridge full of cream cheese). They’re these perfect little handheld desserts that somehow feel fancy but are shockingly easy to throw together.
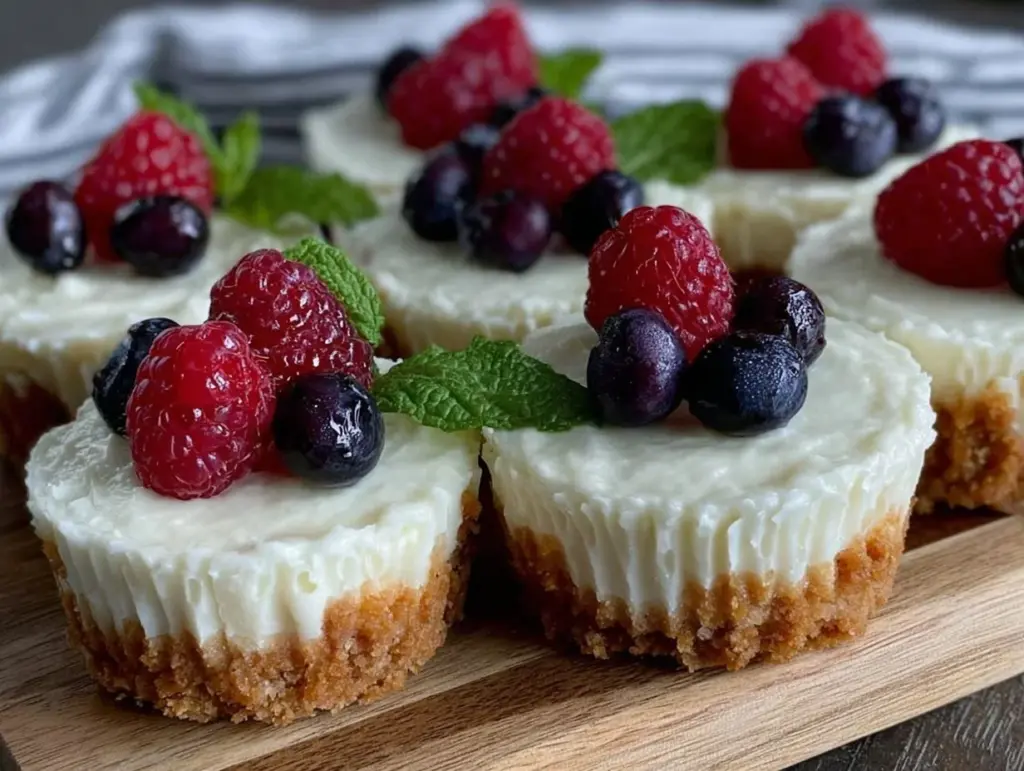
Graduation parties are buzzing events — lots of people, endless chatter, and the kind of energy that makes hosting feel both exciting and a little overwhelming. These mini cheesecakes came through for me as a simple, crowd-pleasing dessert that also impresses without the fuss. The texture is dreamy — smooth, velvety cream cheese filling swirled into buttery, crunchy crusts, all in bite-sized portions that vanish fast. Honestly, it felt like a secret weapon for party success.
I remember the subtle vanilla scent filling the kitchen as I mixed the batter, while the kids hovered nearby, sneaking tastes when they thought I wasn’t looking. It ended up being the kind of sweet that made everyone pause, even for a second, in the middle of all the noise — a quiet moment of pure indulgence. That’s why this recipe sticks with me: it’s not just a dessert, but a little celebration in a cup, perfect for marking milestones like graduations.
So if you’re juggling invitations, decorations, and last-minute cravings, these creamy mini cheesecake cups for graduation parties might just become your go-to dessert too. They’re simple, sweet, and downright satisfying, ready to make the day a little sweeter for everyone.
Why You’ll Love This Recipe
From my experience, this recipe is a reliable choice when you need something that’s both simple and special. I’ve tested and tweaked it several times, and it always delivers that classic cheesecake feel without the long bake times or complicated steps. Here’s why it’s a winner:
- Quick & Easy: Ready in under 45 minutes, including prep and baking — perfect for those last-minute party plans.
- Simple Ingredients: You probably already have everything in your pantry and fridge — cream cheese, graham crackers, sugar, and a few basics.
- Perfect for Graduation Parties: These mini cups are easy to serve, no slicing or plating needed, making mingling and celebration effortless.
- Crowd-Pleaser: Both kids and adults keep coming back for more — they’re just that good.
- Unbelievably Delicious: The creamy filling pairs perfectly with a crunchy crust, and a hint of vanilla brings it all together.
What sets this cheesecake recipe apart is the balance between creamy, tangy filling and buttery, crunchy crust — plus the ease of making them in individual portions. You don’t have to worry about slicing a big cheesecake or dealing with messy plates. Plus, the texture is just right; not too dense, not too light, with a touch of sweetness that feels homemade in the best way.
Honestly, every time I make these, it feels like a little treat that reminds me why cheesecake is a classic for celebrations. If you want a dessert that feels thoughtful but doesn’t eat up your entire afternoon, this is it.
What Ingredients You Will Need
This recipe calls for straightforward, wholesome ingredients that come together to create a rich, creamy dessert without fuss. Most of these are pantry staples, and substitutions are easy if needed.
- For the crust:
- 1 ½ cups graham cracker crumbs (about 10 full sheets) – I like using Honey Maid for its perfect texture and flavor
- ⅓ cup unsalted butter, melted (adds richness and helps bind the crust)
- 2 tablespoons granulated sugar (balances the buttery crust)
- For the filling:
- 16 oz (450 g) cream cheese, softened (use full-fat for best creaminess)
- ⅔ cup granulated sugar (adds sweetness without overpowering)
- 2 large eggs, room temperature (helps with smooth texture)
- 1 teaspoon pure vanilla extract (brings warmth and depth)
- ¼ cup sour cream (for tang and silkiness; can swap with Greek yogurt if preferred)
- Optional toppings:
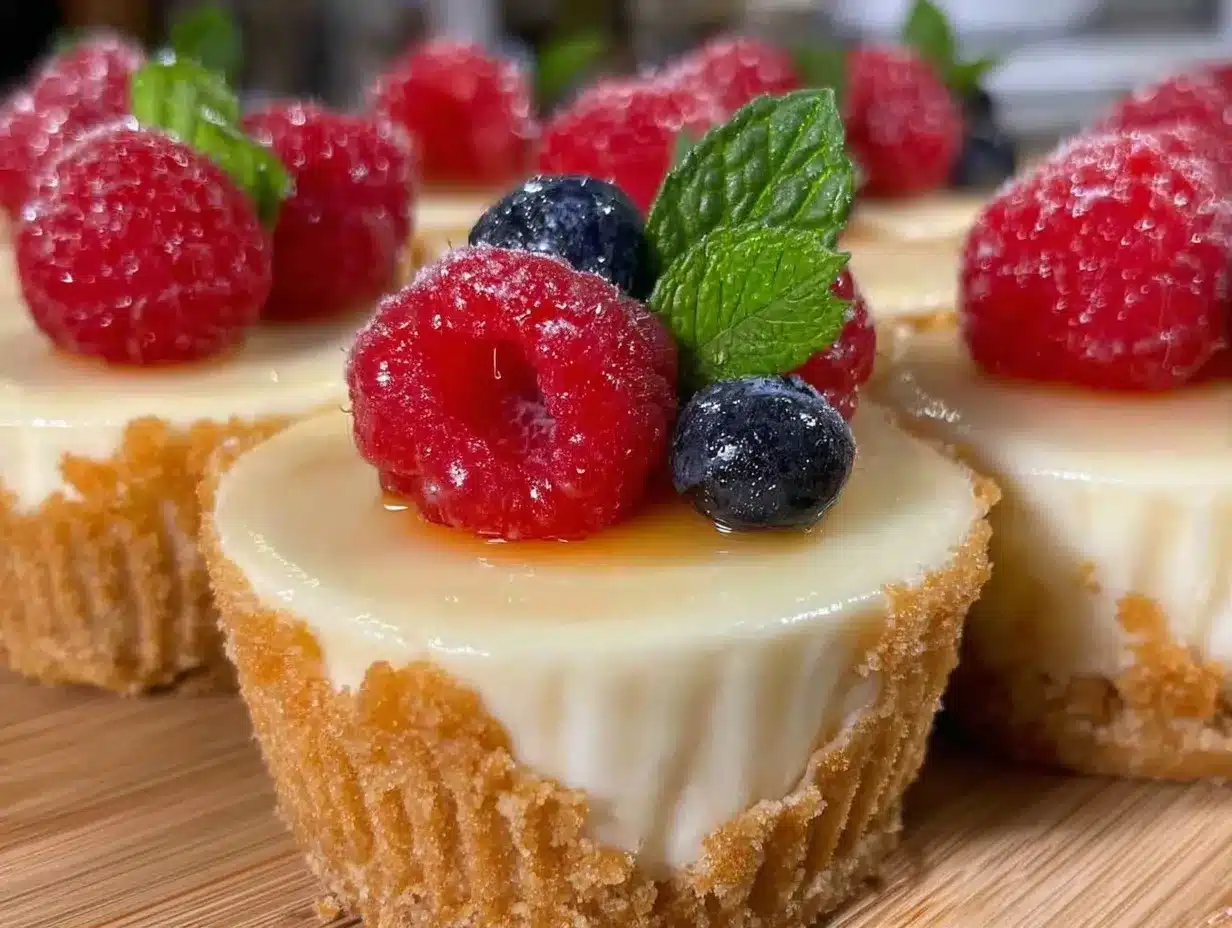
- Fresh berries (strawberries, blueberries, raspberries) – great for a pop of color and freshness
- Mini chocolate chips or shaved chocolate (adds a touch of indulgence)
- Fruit preserves or a drizzle of honey (for extra sweetness)
If you want to make a gluten-free version, almond flour crust works wonderfully and adds a nice nutty flavor. I’ve also swapped sour cream with coconut yogurt to keep these dairy-free for a friend’s party, and they turned out just as creamy and delightful.
Equipment Needed
- Mini muffin tin or silicone mini cheesecake molds: I highly recommend silicone molds if you have them because the cheesecakes pop out easily without cracking. If you only have a metal muffin tin, line it with paper liners for easier removal.
- Mixing bowls: One large for the filling, one for the crust ingredients.
- Electric hand mixer or stand mixer: This makes the cream cheese mixture ultra-smooth and lump-free. A handheld whisk works in a pinch but expect more elbow grease.
- Measuring cups and spoons: Precision matters here for texture and sweetness.
- Rubber spatula: To scrape down the sides and fold ingredients smoothly.
- Cooling rack: For letting the cheesecakes cool completely before chilling.
For budget-friendly options, silicone molds can often be found at reasonable prices online or at discount stores, and they last forever if cared for properly. I’ve had mine for years and still use them for other treats like fudgy brownie bites.
Preparation Method
- Preheat your oven to 325°F (163°C). This temperature is key to baking the cheesecakes gently without cracking.
- Prepare the crust: In a medium bowl, combine 1 ½ cups graham cracker crumbs, ⅓ cup melted unsalted butter, and 2 tablespoons sugar. Stir until the mixture resembles wet sand.
- Press the crust mixture: Evenly divide the crust into 16 mini muffin cups, pressing firmly with the back of a spoon or your fingers to create a compact base. This usually takes about 2 minutes.
- Bake the crust: Place the muffin tin in the oven and bake for 8 minutes. This pre-baking step prevents soggy bottoms. Remove from oven and allow to cool slightly while you make the filling.
- Make the filling: In a large bowl, beat 16 oz softened cream cheese using an electric mixer on medium speed until smooth and creamy, about 2 minutes. Scrape down the sides to avoid lumps.
- Add sugar and eggs: Gradually add ⅔ cup sugar while mixing, then add eggs one at a time, mixing well after each addition. The mixture should be silky and slightly glossy.
- Mix in vanilla and sour cream: Add 1 teaspoon vanilla extract and ¼ cup sour cream, mixing just until combined. Avoid overmixing to keep the filling light.
- Fill the crust cups: Spoon the filling over the pre-baked crusts, filling each cup nearly to the top (about 2 tablespoons per cup). Smooth the tops gently with the back of a spoon.
- Bake the mini cheesecakes: Bake at 325°F (163°C) for 18-20 minutes. The centers should be slightly jiggly but not liquidy—this ensures a creamy texture.
- Cool and chill: Remove from oven and let cool to room temperature on a cooling rack for about 30 minutes. Then, refrigerate for at least 2 hours or overnight for best results.
- Add toppings and serve: Just before serving, add fresh berries, chocolate chips, or a drizzle of fruit preserves if desired. These little touches make the dessert feel extra festive.
If you notice cracks forming, don’t panic. They’re normal and won’t affect taste. For a smoother top, try baking with a water bath next time, or reduce oven temperature slightly.
Cooking Tips & Techniques
Getting these mini cheesecakes just right is mostly about gentle handling and timing. Here are a few lessons I’ve learned over countless batches:
- Room temperature ingredients: Make sure your cream cheese and eggs are at room temp — it helps everything blend smoothly without lumps.
- Don’t overmix: Once you add eggs, mix just till combined. Overmixing traps air and can cause cracks or a cakey texture.
- Press crust firmly: A well-packed crust holds together better and gives that satisfying crunch contrast to the creamy filling.
- Baking time matters: The center should wobble slightly when you jiggle the pan, like a set custard. Overbaking dries out the filling.
- Chill thoroughly: The refrigeration time lets the cheesecake firm up and develop its signature creamy texture.
- Use a silicone spatula: Scraping down the bowl helps avoid lumps and ensures even mixing.
Once, I forgot to pre-bake the crust and ended up with soggy bottoms that nobody wanted to touch. Lesson learned: that step is non-negotiable. Also, multitasking works well here—you can prepare the crust while the oven heats up, then whip the filling while the crust bakes.
Variations & Adaptations
- Fruit Swirls: Before baking, add a teaspoon of raspberry or blueberry preserves to the filling and swirl gently for a fruity twist.
- Chocolate Crust: Mix crushed chocolate sandwich cookies with melted butter instead of graham crackers for a richer base.
- Vegan/Dairy-Free: Use vegan cream cheese and coconut yogurt in place of cream cheese and sour cream. Use almond flour crust to keep it gluten-free as well.
- Flavor Boosters: Try adding a teaspoon of lemon zest or a splash of espresso powder to the filling for subtle but delightful flavor changes.
- Seasonal Toppings: For a summer party, top with fresh peaches or nectarines. In fall, chopped toasted pecans and a drizzle of maple syrup make these cups feel cozy.
One time, I experimented with adding a pinch of cinnamon and nutmeg to the crust — it gave a warm, spiced edge that paired beautifully with fresh strawberries on top. It’s fun to make these your own.
Serving & Storage Suggestions
These mini cheesecakes shine best chilled, fresh from the fridge. Serve them straight from their cups for easy handling at parties, no plates or forks required (though a small dessert spoon can be handy).
Pair them with a light beverage, like a sparkling lemonade or a mint mojito mocktail, to balance the richness — I often serve these alongside the mint mojito mocktail for a refreshing combo.
To store, cover the mini cheesecakes tightly with plastic wrap or transfer them to an airtight container. They keep beautifully in the fridge for up to 4 days. For longer storage, freeze them uncovered on a baking sheet until firm, then wrap individually and freeze up to 2 months. Thaw overnight in the fridge before serving.
Flavors deepen after a day or two, making them even tastier. If reheating slightly, a few seconds in the microwave softens them without ruining texture, but I personally prefer them cold.
Nutritional Information & Benefits
Each mini cheesecake cup contains approximately 180-220 calories, depending on toppings and crust variations. They provide a good source of calcium and protein from the cream cheese and eggs, making them a satisfying treat.
Using real cream cheese and minimal added sugars keeps things straightforward and wholesome. For those watching carbs, swapping the crust for almond flour can reduce net carbs while adding healthy fats.
This recipe is gluten-free adaptable and can also be made dairy-free with suitable substitutes. Just watch out for allergens like eggs and dairy if serving to sensitive guests.
From a wellness perspective, these mini cheesecakes offer a balanced indulgence — rich and creamy but portion-controlled, perfect for celebrating without overdoing it.
Conclusion
These creamy mini cheesecake cups for graduation parties have become my go-to when I want a dessert that’s fuss-free but still feels special. They’re easy enough to whip up on a busy day yet delicious enough to impress a crowd.
Feel free to tweak the toppings and crust to match your personal taste or dietary needs — that’s part of the fun. For me, these little cups represent celebration in every bite: simple, sweet, and just right.
If you make them, I’d love to hear how you customize your mini cheesecakes or how they went over at your party. Sharing those moments is what makes cooking so rewarding.
Here’s to making your next graduation party (or any gathering) a little sweeter and a lot more memorable.
Frequently Asked Questions
Can I make these mini cheesecakes ahead of time?
Absolutely! They taste even better after chilling overnight. Just cover and refrigerate until ready to serve.
What if I don’t have a mini muffin tin?
You can use silicone mini cheesecake molds or even small ramekins. Just adjust baking time slightly and watch for that slight jiggle.
How do I prevent cracks on the cheesecake surface?
Don’t overmix the batter and bake at a moderate temperature. Also, avoid rapid cooling; let them cool gradually before chilling.
Can I freeze the mini cheesecake cups?
Yes, freeze them uncovered on a tray until firm, then wrap individually. Thaw in the fridge overnight before serving.
Are these suitable for a gluten-free diet?
Definitely! Swap the graham cracker crust with almond flour or gluten-free graham crumbs for a safe, tasty crust.
Pin This Recipe!
Creamy Mini Cheesecake Cups

These creamy mini cheesecake cups are a simple, crowd-pleasing dessert perfect for graduation parties. They feature a smooth, velvety cream cheese filling with a buttery, crunchy crust in bite-sized portions.
- Prep Time: 15 minutes
- Cook Time: 28 minutes
- Total Time: 2 hours 43 minutes
- Yield: 16 mini cheesecakes 1x
- Category: Dessert
- Cuisine: American
Ingredients
- 1 ½ cups graham cracker crumbs (about 10 full sheets)
- ⅓ cup unsalted butter, melted
- 2 tablespoons granulated sugar
- 16 oz (450 g) cream cheese, softened
- ⅔ cup granulated sugar
- 2 large eggs, room temperature
- 1 teaspoon pure vanilla extract
- ¼ cup sour cream
- Optional toppings: fresh berries (strawberries, blueberries, raspberries), mini chocolate chips or shaved chocolate, fruit preserves or a drizzle of honey
Instructions
- Preheat your oven to 325°F (163°C).
- In a medium bowl, combine 1 ½ cups graham cracker crumbs, ⅓ cup melted unsalted butter, and 2 tablespoons sugar. Stir until the mixture resembles wet sand.
- Evenly divide the crust into 16 mini muffin cups, pressing firmly with the back of a spoon or your fingers to create a compact base.
- Bake the crust for 8 minutes. Remove from oven and allow to cool slightly.
- In a large bowl, beat 16 oz softened cream cheese using an electric mixer on medium speed until smooth and creamy, about 2 minutes. Scrape down the sides.
- Gradually add ⅔ cup sugar while mixing, then add eggs one at a time, mixing well after each addition.
- Add 1 teaspoon vanilla extract and ¼ cup sour cream, mixing just until combined.
- Spoon the filling over the pre-baked crusts, filling each cup nearly to the top (about 2 tablespoons per cup). Smooth the tops gently.
- Bake at 325°F (163°C) for 18-20 minutes until centers are slightly jiggly but not liquidy.
- Remove from oven and let cool to room temperature on a cooling rack for about 30 minutes.
- Refrigerate for at least 2 hours or overnight for best results.
- Add optional toppings just before serving.
Notes
Use room temperature cream cheese and eggs for smooth batter. Do not overmix after adding eggs to avoid cracks. Pre-bake crust to prevent soggy bottoms. Chill thoroughly for best texture. Silicone molds recommended for easy removal. For gluten-free, substitute graham cracker crumbs with almond flour. For dairy-free, use vegan cream cheese and coconut yogurt.
Nutrition
- Serving Size: 1 mini cheesecake cu
- Calories: 200
- Sugar: 13
- Sodium: 150
- Fat: 13
- Saturated Fat: 7
- Carbohydrates: 18
- Fiber: 0.5
- Protein: 4
Keywords: mini cheesecake, graduation party dessert, creamy cheesecake cups, easy cheesecake recipe, handheld dessert, crowd-pleaser


