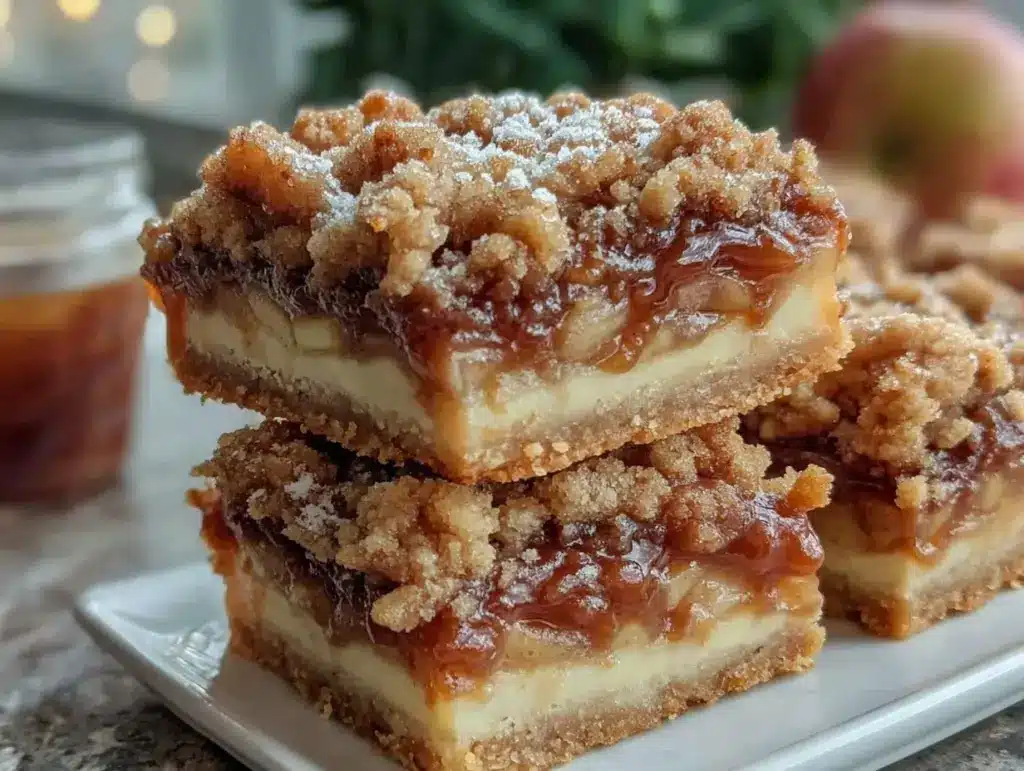
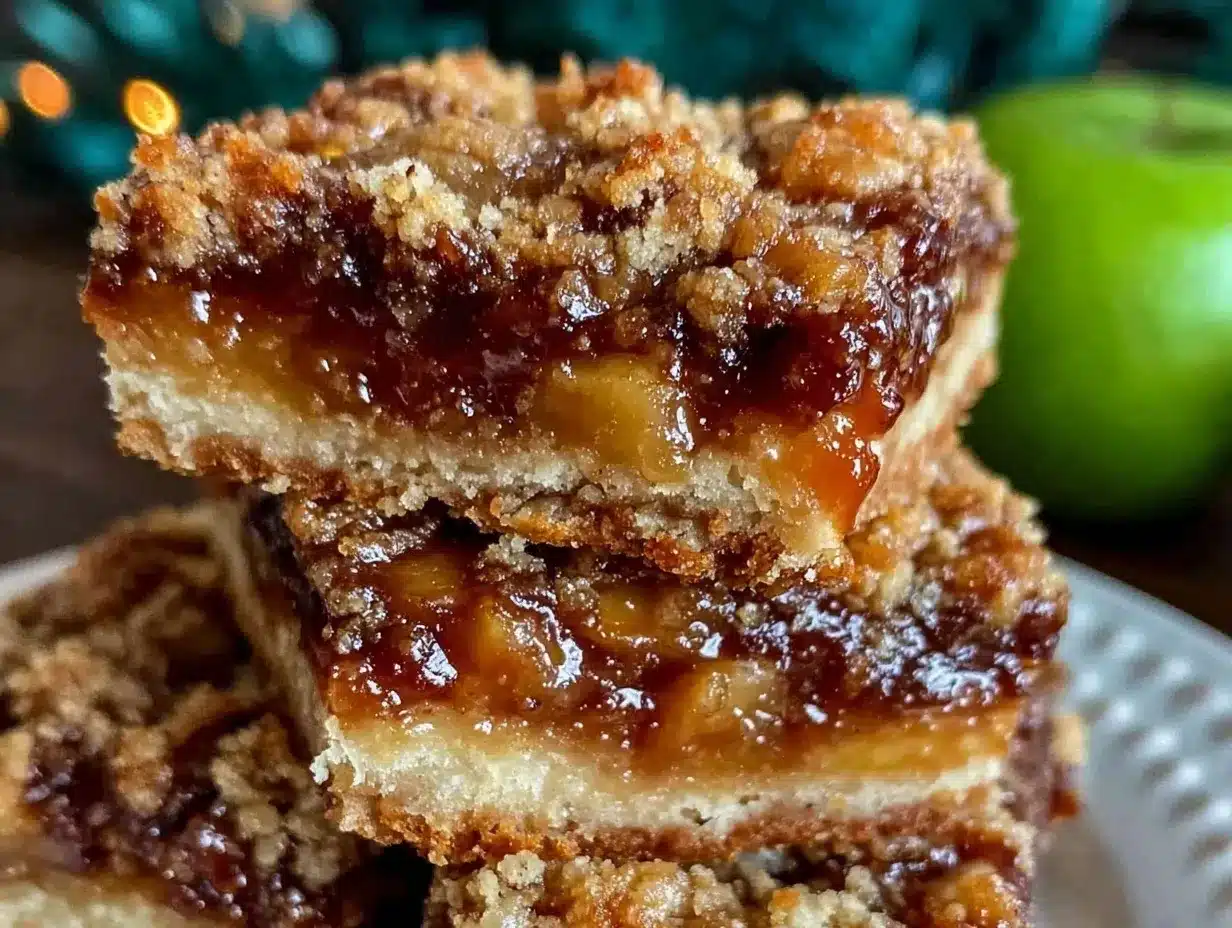
Let me set the scene: the aroma of baked apples, cinnamon, and buttery oats curling through your kitchen, wrapping you in that unmistakable fall warmth. You know, that scent that instantly makes you want to grab a sweater and cozy up with something sweet. The first time I pulled a batch of these crispy apple crisp bars out of my oven, I just stood there, transfixed by the golden, bubbling topping and the soft scent of apples mingling with brown sugar. It was the kind of moment where you pause, take a deep breath, and just smile because you know you’re onto something truly special.
Years ago, when I was knee-high to a grasshopper, my grandma used to make apple crisp every Sunday in the fall. I remember sneaking extra bites of that crunchy topping when she wasn’t looking (she always pretended not to notice). Fast-forward a couple decades and a few failed pie attempts later, and I found myself determined to recreate that nostalgic comfort—only as bars, because let’s face it: bars are easier to share, tote to potlucks, and sneak from the fridge late at night. I stumbled onto this apple crisp bars recipe during a rainy weekend, trying to use up a bounty of apples from the local orchard. Honestly, I wish I’d discovered this trick years ago!
My family couldn’t stop sneaking them off the cooling rack (I usually have to hide a few if I want any left for dessert). These bars have become a staple for family gatherings, gifting, and those “just because it’s fall” moments. They’re dangerously easy, provide pure, nostalgic comfort, and are perfect for potlucks, classroom treats, or to brighten up your Pinterest dessert board. After testing these crispy apple crisp bars more times than I’ll admit (in the name of research, of course), I can say with certainty—they feel like a warm hug in bar form, and you’re going to want to bookmark this one for every autumn!
Why You’ll Love This Crispy Apple Crisp Bars Recipe
When you’ve baked as many apple desserts as I have, you start to notice what works and what just… doesn’t. These crispy apple crisp bars are the kind of treat that brings together all the best bits of a classic apple crisp and makes them wonderfully portable. Here’s why you’ll find yourself making them again and again:
- Quick & Easy: Comes together in under 1 hour, perfect for busy weeknights or last-minute cravings.
- Simple Ingredients: No fancy grocery trips needed; you likely already have everything in your kitchen—apples, oats, flour, sugar, and butter.
- Perfect for Fall Occasions: Great for brunch, potlucks, cozy dinners, holiday mornings, or just a solo treat while binge-watching your favorite show.
- Crowd-Pleaser: Always gets rave reviews from kids and adults alike (even my picky nephew eats two at a time!).
- Unbelievably Delicious: The contrast between the crisp topping, gooey apple layer, and sturdy base makes each bite next-level comfort food.
What sets these apple crisp bars apart is the ultra-crunchy oat topping (thanks to a secret double-bake method) and the perfectly balanced spice blend. I’ve tried dozens of apple bar recipes over the years, but most are either too soggy or too sweet. Here, you get a firm base that holds up, a juicy filling that doesn’t run all over the place, and a topping that stays crisp for days.
This isn’t just another apple bar recipe—it’s my best version, with a few tricks learned from chef friends and plenty of taste tests. Each bite is pure comfort food, but with a little added structure (so you can eat them with your hands, no fork required!). Whether you’re impressing guests without stress, packing lunchbox treats, or just craving something sweet, these bars deliver that soul-soothing satisfaction every single time.
What Ingredients You Will Need for Crispy Apple Crisp Bars
This recipe uses simple, wholesome ingredients to deliver bold flavor and satisfying texture without the fuss. Most of these are pantry staples, and you can easily swap a few things if needed. Here’s what you’ll need:
For the Base:
- 1 1/2 cups (190g) all-purpose flour
- 1/2 cup (100g) packed light brown sugar
- 1/4 teaspoon salt
- 1/2 cup (115g) unsalted butter, melted (use dairy-free margarine for a vegan option)
- 1/2 teaspoon cinnamon (optional, for extra autumn flavor)
For the Apple Filling:
- 4 cups (about 500g) apples, peeled and diced (Granny Smith for tang, Honeycrisp for sweetness)
- 2 tablespoons (15g) all-purpose flour
- 1/3 cup (65g) granulated sugar
- 1 teaspoon ground cinnamon
- 1/4 teaspoon ground nutmeg
- 1 tablespoon (15ml) lemon juice (brightens the apple flavor)
For the Crispy Oat Topping:
- 1 cup (100g) old-fashioned rolled oats (avoid quick oats for best crunch)
- 1/2 cup (65g) all-purpose flour
- 1/2 cup (100g) packed light brown sugar
- 1/2 cup (115g) unsalted butter, cold and cubed
- 1/2 teaspoon ground cinnamon
- Pinch of salt
- Optional: 1/2 cup (60g) chopped walnuts or pecans (for extra crunch)
Ingredient Notes & Substitutions:
- Apples: I recommend Granny Smith or Honeycrisp, but honestly, any firm apple works. If using softer apples, just reduce baking time by a few minutes.
- Butter: Use plant-based butter for dairy-free bars. I’ve had good results with Earth Balance.
- Flour: Substitute gluten-free all-purpose blend if needed (King Arthur’s works well).
- Oats: Rolled oats give the best texture—quick oats get mushy, so skip those if you can.
- Nuts: Totally optional, but they add a lovely crunch and nutty flavor.
- Spices: Feel free to adjust the cinnamon and nutmeg to suit your taste. Sometimes I add a pinch of cardamom for something special.
Most ingredients are easy to find, and you can swap or omit nuts for allergies. In summer, I’ve even swapped apples for fresh peaches—works like a charm! Just keep those ratios about the same and you’ll be golden.
Equipment Needed
- 9×13-inch (23x33cm) baking pan: Glass or metal both work, but I prefer metal for crispier edges.
- Mixing bowls: At least two—one for the base and one for the filling/topping.
- Whisk and spatula: For mixing wet and dry ingredients (sometimes I just use a wooden spoon for nostalgia’s sake).
- Apple peeler and corer: Handy but not required—a sharp paring knife does the job.
- Pastry cutter or fork: For blending butter into the topping (or just use your fingers if you like getting hands-on).
- Measuring cups and spoons: Precision matters for a good base and crispy topping.
If you don’t have a pastry cutter, I’ve found two forks or even clean hands work just as well. For budget-conscious bakers, any sturdy pan and basic utensils will do—no need for fancy gear. Just make sure your baking pan isn’t too shallow, or the filling may bubble over (I learned that the hard way). I always line the pan with parchment for easier cleanup and lifting the bars out neatly.
Preparation Method for Crispy Apple Crisp Bars
- Preheat the Oven
Heat your oven to 350°F (175°C). Line a 9×13-inch (23x33cm) baking pan with parchment paper, leaving an overhang for easy removal. - Prepare the Base
In a large mixing bowl, combine 1 1/2 cups (190g) flour, 1/2 cup (100g) brown sugar, 1/4 tsp salt, and 1/2 tsp cinnamon. Stir in the melted butter (1/2 cup/115g) until a crumbly dough forms. Press evenly into the bottom of your pan. Bake for 12 minutes, just until lightly golden. The base should smell buttery and look set—don’t overbake! - Make the Apple Filling
While the base bakes, toss together 4 cups (500g) diced apples, 2 tbsp (15g) flour, 1/3 cup (65g) sugar, 1 tsp cinnamon, 1/4 tsp nutmeg, and 1 tbsp (15ml) lemon juice in a medium bowl. The apples should look evenly coated and slightly glossy. - Mix the Crispy Oat Topping
In another bowl, stir together 1 cup (100g) oats, 1/2 cup (65g) flour, 1/2 cup (100g) brown sugar, 1/2 tsp cinnamon, pinch of salt, and optional nuts. Cut in the cold butter (1/2 cup/115g) using a pastry cutter, fork, or your fingers until the mixture forms pea-sized crumbs. It should feel a little sandy but hold together when squeezed. - Layer and Bake
Spread the apple filling evenly over the baked base. Sprinkle the oat topping over the apples, covering completely. Bake for 35-40 minutes, until the topping is golden brown and the apples are bubbling around the edges. The kitchen will smell amazing—seriously, you’ll want to hang around just for that. - Cool and Slice
Let the bars cool completely in the pan—this helps them firm up and makes slicing much easier. For best results, chill in the fridge for 1 hour before cutting. Use the parchment overhang to lift out, then slice into squares (about 16 bars). - Troubleshooting Notes
If your topping seems too dry before baking, add 1-2 tbsp cold water. If the bars look too soft after cooling, chill longer—they’ll firm up. If the apples are too juicy, add another tablespoon of flour to the filling.
Honestly, the hardest part is waiting for these bars to cool before digging in. I’ve cut into them early and ended up with a (still delicious) mess, so patience pays off. For even crispier topping, you can bake the bars for an extra 5 minutes—just watch closely so nothing burns!
Cooking Tips & Techniques for Apple Crisp Bars
After years of baking (and a few memorable disasters), I’ve picked up some tricks that make these crispy apple crisp bars practically foolproof. Here’s what works, what doesn’t, and how to get the best results every time:
- Chill the Butter: Cold butter in the topping is key for crumbles that stay crisp. Don’t let it soften—pop it in the freezer for 10 minutes if your kitchen is warm.
- Don’t Overmix the Base: Mix just until the dough comes together. Overworking can make it tough (learned that after one batch turned out more like shortbread than a bar).
- Uniform Apple Chunks: Dice apples into similar-sized pieces so they cook evenly. Too-big chunks can stay crunchy, while tiny ones get mushy.
- Double-Bake for Extra Crunch: Bake the base first, then again with the filling and topping. This prevents soggy bottoms and gives you that signature crispy texture.
- Watch for Bubbling: When the edges bubble and the topping is golden, you’re good. Overbaking dries out the apples, so keep an eye after 35 minutes.
- Multitasking Tip: Prep the filling and topping while the base bakes. Keeps things moving, and you’ll get bars in the oven faster.
- Consistency Matters: If you’re making ahead, chill bars completely before slicing. This sets the layers and makes serving way easier.
One time, I tried adding extra apples for “more fruit”—big mistake, things got soupy. Stick to the recipe ratios and you’ll dodge soggy bar syndrome. And if your topping isn’t browning, just pop on the broiler for 1-2 minutes (but don’t walk away—burnt oat topping is a sad fate!).
Variations & Adaptations
There’s no one-size-fits-all when it comes to apple desserts. Here are some fun ways to make these crispy apple crisp bars your own:
- Gluten-Free Version: Use your favorite gluten-free flour blend and certified gluten-free oats. I’ve tried Bob’s Red Mill and King Arthur—both work great.
- Vegan Adaptation: Swap in dairy-free butter and make sure your sugar is vegan-friendly (some brands are processed with bone char). The bars turn out just as crispy and delicious.
- Seasonal Fruit Swap: In summer, replace apples with diced peaches or pears. In winter, try half apples and half cranberries for a tangy twist.
- Flavor Customization: Add a dash of cardamom or ginger to the filling for added warmth. Stir in a handful of raisins or dried cranberries for extra texture.
- Nut-Free Option: Simply omit walnuts or pecans—bars are still deliciously crunchy thanks to the oats.
- Different Cooking Methods: I’ve baked these in a toaster oven for small batches. Just reduce cooking time by 5-10 minutes.
My personal favorite variation? Mixing in a spoonful of caramel sauce with the apples for caramel apple crisp bars—total game changer. The caramel bubbles up and makes the bars taste even more decadent!
Serving & Storage Suggestions
These crispy apple crisp bars are best served slightly chilled or at room temperature. I love arranging them on a rustic wooden board with a dusting of powdered sugar—makes them Pinterest-perfect and irresistible to guests.
- Serving: Serve plain, with whipped cream, or a scoop of vanilla ice cream for extra indulgence. Pair with hot apple cider or coffee for the ultimate fall treat.
- Storage: Store bars in an airtight container at room temperature for up to 2 days. For longer storage, refrigerate for up to 5 days (the topping stays crispy!).
- Freezing: Wrap individual bars tightly in plastic wrap and freeze for up to 2 months. Thaw in the fridge overnight and reheat gently in a low oven if you want them warm.
- Reheating: For best results, pop bars in the oven at 300°F (150°C) for 5-10 minutes. The topping regains its crunch and the filling gets gooey again.
Honestly, the flavors deepen as the bars sit—a day or two later, the spices really come through. If you’re planning for a party, make them ahead and let them chill. They travel well and are easy to pack for potlucks or picnics.
Nutritional Information & Benefits
Each crispy apple crisp bar contains approximately:
- Calories: 160
- Fat: 7g
- Carbohydrates: 24g
- Fiber: 2g
- Protein: 2g
Apples provide dietary fiber, vitamin C, and antioxidants, while oats offer heart-healthy whole grains. Using walnuts or pecans adds healthy fats and a little protein. These bars can be made gluten-free and dairy-free with simple swaps. Potential allergens include wheat, dairy, and nuts—always check your ingredients if serving to guests.
From a wellness perspective, I love that these bars have sensible portions and use real fruit. They’re sweet, but not overwhelmingly so, and you can adjust the sugar to taste. For a lighter version, cut the butter a bit and add more apples—still delicious!
Conclusion
If you’re searching for a fall dessert that’s easy, nostalgic, and totally crave-worthy, these crispy apple crisp bars tick every box. They’re simple to make, always a hit, and endlessly customizable. Honestly, I make these more than any other apple dessert because they just never disappoint.
Don’t be afraid to tweak the spices, swap the fruit, or make them gluten-free or vegan. That’s the beauty of a good apple bar recipe—make it your own! Personally, I love sharing these with friends and family (but I always save a few for myself). If you give them a try, let me know your favorite variation, or tag me if you share them on Pinterest—your kitchen will smell amazing, and your dessert table will look incredible!
Go ahead, bake a batch, and bring a little autumn magic to your next gathering. I can’t wait to hear how your crispy apple crisp bars turn out!
Frequently Asked Questions About Crispy Apple Crisp Bars
Can I use any type of apple for these bars?
Absolutely! Firm apples like Granny Smith, Honeycrisp, or Fuji work best. Softer apples may get mushy, but the bars will still taste great.
How do I keep the oat topping crispy?
Use cold butter and don’t overmix. Chill the bars after baking and store them uncovered for a few hours before sealing to keep the topping crisp.
Can I make these bars ahead of time?
Yes, they keep well for up to 5 days in the fridge. Flavors actually improve after a night in the fridge, and the texture stays great.
Are these apple crisp bars gluten-free?
They can be! Just swap in gluten-free flour and oats. Double-check your oats to make sure they’re certified gluten-free.
What’s the best way to slice apple crisp bars without them falling apart?
Cool completely, then chill in the fridge for an hour. Use a sharp knife and clean between cuts for neat squares.
Pin This Recipe!
Crispy Apple Crisp Bars
These easy homemade apple crisp bars combine a buttery base, gooey apple filling, and a crispy oat topping for the ultimate fall dessert. Perfect for potlucks, family gatherings, or cozy nights in, they deliver nostalgic comfort and are endlessly customizable.
- Prep Time: 20 minutes
- Cook Time: 50 minutes
- Total Time: 1 hour 10 minutes
- Yield: 16 bars 1x
- Category: Dessert
- Cuisine: American
Ingredients
- 1 1/2 cups all-purpose flour
- 1/2 cup packed light brown sugar
- 1/4 teaspoon salt
- 1/2 cup unsalted butter, melted (or dairy-free margarine for vegan option)
- 1/2 teaspoon cinnamon (optional)
- 4 cups apples, peeled and diced (Granny Smith or Honeycrisp recommended)
- 2 tablespoons all-purpose flour
- 1/3 cup granulated sugar
- 1 teaspoon ground cinnamon
- 1/4 teaspoon ground nutmeg
- 1 tablespoon lemon juice
- 1 cup old-fashioned rolled oats
- 1/2 cup all-purpose flour
- 1/2 cup packed light brown sugar
- 1/2 cup unsalted butter, cold and cubed
- 1/2 teaspoon ground cinnamon
- Pinch of salt
- Optional: 1/2 cup chopped walnuts or pecans
Instructions
- Preheat oven to 350°F (175°C). Line a 9×13-inch baking pan with parchment paper, leaving an overhang for easy removal.
- In a large mixing bowl, combine 1 1/2 cups flour, 1/2 cup brown sugar, 1/4 teaspoon salt, and 1/2 teaspoon cinnamon. Stir in melted butter until a crumbly dough forms. Press evenly into the bottom of the pan. Bake for 12 minutes until lightly golden.
- While the base bakes, toss together 4 cups diced apples, 2 tablespoons flour, 1/3 cup sugar, 1 teaspoon cinnamon, 1/4 teaspoon nutmeg, and 1 tablespoon lemon juice in a medium bowl.
- In another bowl, stir together 1 cup oats, 1/2 cup flour, 1/2 cup brown sugar, 1/2 teaspoon cinnamon, pinch of salt, and optional nuts. Cut in cold butter using a pastry cutter, fork, or fingers until pea-sized crumbs form.
- Spread apple filling evenly over the baked base. Sprinkle oat topping over apples, covering completely.
- Bake for 35-40 minutes, until topping is golden brown and apples are bubbling around the edges.
- Let bars cool completely in the pan. For best results, chill in the fridge for 1 hour before cutting. Use parchment overhang to lift out, then slice into squares (about 16 bars).
- If topping seems too dry before baking, add 1-2 tablespoons cold water. If bars look too soft after cooling, chill longer. If apples are too juicy, add another tablespoon of flour to the filling.
Notes
For gluten-free bars, use gluten-free flour and oats. For vegan bars, use dairy-free butter. Chill bars before slicing for neat squares. Add nuts for extra crunch or omit for nut-free. Swap apples for peaches or pears for seasonal variation. For even crispier topping, bake an extra 5 minutes, watching closely.
Nutrition
- Serving Size: 1 bar
- Calories: 160
- Sugar: 13
- Sodium: 60
- Fat: 7
- Saturated Fat: 4
- Carbohydrates: 24
- Fiber: 2
- Protein: 2
Keywords: apple crisp bars, fall dessert, apple bars, oat topping, easy apple dessert, potluck dessert, homemade apple bars, autumn baking


