Early September mornings, and the only thing I want is a quiet moment with a warm cookie in hand. The kitchen still holds the last whispers of overnight coolness, and sunlight sneaks in slow through the curtains. There’s something about these Easy Chewy Back-to-School Monster Cookies that fits this exact hour — soft, a little messy, and honest. They don’t require hours of waiting or a fridge-time ritual, which feels like a small victory in the chaos of school mornings. Honestly, the first time I made these, the dough barely had time to rest before the kids were already hovering, drawn in by that familiar sweet smell.
These cookies aren’t just a recipe; they’re a quiet ritual that punctuates busy days with a simple pleasure. No chilling means no extra waiting, so you get chewy, colorful cookies that still have that homemade soul. The mix of oats, peanut butter, and those classic candy-coated chocolates brings a nostalgic comfort without fuss. They’re the kind of cookies that make you pause and realize that back-to-school chaos can still have soft, chewy moments tucked in between.
They stuck with me because they’re forgiving — the dough is easy to handle, and the texture is reliably perfect every time. Plus, it’s a chance to sneak in some wholesome oats, which feels like a small win on hectic days. So, if you need a no-fuss treat that feels like a warm handshake on a busy morning, these monster cookies are your answer. They have that gentle charm, the kind that makes you trust the recipe without question.
Why You’ll Love This Recipe
After testing many cookie recipes over the years — some too crisp, others too cakey — this Easy Chewy Back-to-School Monster Cookies recipe quickly became a favorite in my kitchen. It’s not just about the taste; it’s the ease and reliability that make it stand out. Here’s why this recipe earns a permanent spot in the rotation:
- Quick & Easy: Comes together in under 20 minutes, no chilling required, perfect for last-minute snack cravings or school lunch prep.
- Simple Ingredients: Uses pantry staples like oats, peanut butter, and candy-coated chocolates — no specialty items needed.
- Perfect for Back-to-School: Ideal for lunchboxes, after-school snacks, or even a quick breakfast treat when mornings are rushed.
- Crowd-Pleaser: Kids love the colorful candies and chewy texture, while adults appreciate the hearty oats and peanut butter flavor.
- Unbelievably Delicious: The texture is chewy, soft, and just the right amount of sweet — it’s comfort food you can feel good about.
What makes this recipe different? The magic is in skipping the chill time, which usually feels like a must for chewy cookies. Instead, the combination of quick oats and peanut butter creates a dough that bakes up soft and chewy every time. Plus, I like using a little brown sugar with white sugar to balance moisture and texture. It’s a small detail but makes a noticeable difference. And swapping in classic candy-coated chocolates adds that nostalgic, monster-cookie vibe, but feel free to mix in your favorite add-ins.
These cookies aren’t just a sweet bite; they’re like a soft exhale in the whirlwind of school days. They remind me that even when mornings don’t pause, a homemade treat can still feel like a quiet moment of care.
What Ingredients You Will Need
This recipe uses simple, wholesome ingredients to deliver bold flavor and that perfect chewy texture without fuss. Most of these are pantry staples you probably have on hand, and they come together without any special prep or chill time.
- All-purpose flour – 1 1/4 cups (160 g), the base for structure
- Old-fashioned rolled oats – 1 cup (90 g), adds chewiness and heartiness
- Baking soda – 1/2 teaspoon, helps the cookies rise just right
- Salt – 1/4 teaspoon, balances sweetness
- Unsalted butter – 1/2 cup (115 g), softened, for richness and tenderness
- Granulated sugar – 1/2 cup (100 g), adds crispness and sweetness
- Light brown sugar – 1/2 cup (110 g), packed, for moisture and depth
- Large egg – 1, room temperature, binds everything together
- Natural creamy peanut butter – 1/2 cup (125 g), for chewy texture and flavor (I prefer Skippy for smoothness)
- Vanilla extract – 1 teaspoon, enhances flavor
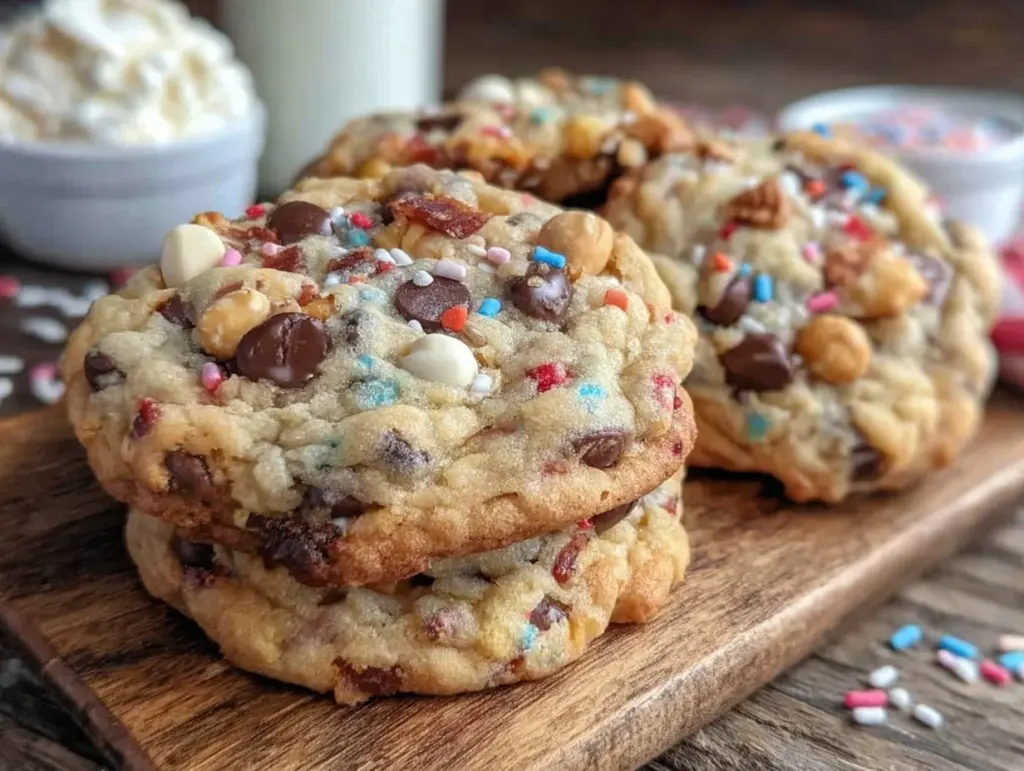
- Mini candy-coated chocolates – 3/4 cup (135 g), classic monster cookie touch (M&M’s or similar, any brand works)
- Optional mix-ins: chopped walnuts or pecans (1/2 cup, toasted), or raisins for a twist
For a gluten-free version, swap the all-purpose flour with a 1:1 gluten-free baking flour blend. If peanut allergies are a concern, sunflower seed butter works well here too, though it changes the flavor slightly. I’ve also tried these cookies with dairy-free butter alternatives and coconut oil — both worked fine but shifted the texture a bit. For seasonal variations, during fall I sometimes add a pinch of cinnamon and swap candy-coated chocolates for dried cranberries or pumpkin seeds.
Equipment Needed
- Mixing bowls: One large bowl for dry ingredients, one medium for wet ingredients
- Electric mixer or hand whisk: An electric hand mixer makes creaming butter and sugars easy, but a sturdy whisk works if you don’t mind a bit of arm work
- Measuring cups and spoons: Accurate measurement helps with consistent results
- Baking sheet: A rimmed baking sheet lined with parchment paper or a silicone mat for easy cleanup and even baking
- Spoon or cookie scoop: A medium cookie scoop (about 1.5 tablespoons) helps portion dough evenly, but a spoon works just fine
- Cooling rack: To let the cookies cool evenly and retain chewiness
If you’re on a budget or short on tools, no worries. You can mix by hand, and if you don’t have a cooling rack, just spread a clean kitchen towel on the counter and set the cookies there. I’ve also used my favorite baking sheet for even heat distribution, which helps cookies bake uniformly. Keeping your butter softened but not melted is key — I learned that the hard way when my dough turned too greasy once.
Preparation Method

- Preheat your oven to 350°F (175°C) and line a baking sheet with parchment paper or a silicone baking mat. This step sets the stage — no surprises later.
- In a medium bowl, whisk together the dry ingredients: 1 1/4 cups all-purpose flour, 1 cup rolled oats, 1/2 teaspoon baking soda, and 1/4 teaspoon salt. This ensures even distribution of rising agents and salt, so your cookies bake consistently.
- In a large bowl, cream the softened butter, granulated sugar, and light brown sugar with an electric mixer on medium speed until light and fluffy — about 2-3 minutes. This process traps air for a better cookie texture.
- Add the egg, peanut butter, and vanilla extract to the creamed butter and sugar. Beat until the mixture is smooth and well combined, scraping down the sides if needed.
- Gradually add the dry ingredients to the wet mixture, mixing on low speed until just combined. Avoid overmixing here to keep the cookies tender.
- Fold in the mini candy-coated chocolates (and optional nuts or raisins if using) by hand with a spatula. This keeps the candies intact and evenly distributed.
- Use a cookie scoop or spoon to drop 1.5-tablespoon-sized mounds of dough onto the prepared baking sheet, spaced about 2 inches apart. The dough will spread slightly but not too much.
- Bake in the preheated oven for 9-11 minutes, until the edges are set but the centers still look soft. They’ll firm up as they cool.
- Let the cookies cool on the baking sheet for 5 minutes, then transfer to a wire rack to cool completely. This step helps maintain their chewy texture.
Some tips from experience: If your kitchen is warm, the dough can get sticky fast — just pop it in the fridge for 10 minutes if needed, but don’t stress if you skip chilling. Also, don’t overbake; those last couple minutes make a big difference between chewy and dry. The smell when they come out — a soft peanut butter hug with sweet candy bursts — is the best reward.
Cooking Tips & Techniques
Getting chewy cookies without chilling was a bit of trial and error for me. Here’s what I learned that made all the difference:
- Butter temperature is key: Use softened (not melted) butter to trap air during creaming, which leads to a lighter, chewier cookie.
- Brown sugar matters: The mix of granulated and brown sugar balances moisture and chewiness. Brown sugar adds moisture and that slight caramel note.
- Don’t overmix: Once the flour and oats go in, stir just until combined. Overmixing can develop gluten and make cookies tough.
- Oats give structure: Rolled oats add chewiness and a rustic texture. Quick oats tend to make them cakier, so stick with old-fashioned oats.
- Watch the baking time: Pull them out right before edges brown fully; centers should look soft but not wet. They firm up as they cool.
- Multitasking tip: While cookies bake, clean up your mixing bowls and prep the next batch if doubling. It keeps the kitchen manageable and you ready to bake again.
One time, I ignored the softened butter rule and ended up with flat, greasy cookies — lesson learned. Also, swapping peanut butter for almond butter works fine but changes the flavor profile, so stick to what you love. I’ve found that using mini candy-coated chocolates rather than larger ones ensures every bite has a bit of that crunch and color.
Variations & Adaptations
This Easy Chewy Back-to-School Monster Cookies recipe is wonderfully flexible, so you can tweak it to suit your pantry, dietary needs, or flavor preferences:
- Gluten-Free: Replace all-purpose flour with a 1:1 gluten-free baking blend. The oats are naturally gluten-free if you pick certified ones. The texture stays chewy and satisfying.
- Nut-Free: Swap peanut butter for sunflower seed butter or soy nut butter to keep the chew and flavor balanced without peanuts.
- Mix-in swaps: Try dried cherries, raisins, or chopped nuts instead of candy-coated chocolates for a less sweet or more natural twist.
- Flavor twists: Add a pinch of cinnamon or pumpkin pie spice for a fall vibe, or a few dark chocolate chunks for richer bites.
- Baking method: For a softer cookie, reduce baking time to 8-9 minutes; for slightly crispier edges, add an extra minute or two.
Personally, I once tried swapping in sunflower seed butter and added toasted coconut flakes — the result was a tropical, chewy treat that disappeared fast. Feel free to get creative; the base recipe is forgiving and always turns out tasty.
Serving & Storage Suggestions
These monster cookies are best enjoyed fresh and slightly warm, when the centers are still soft and the candy shells have that slight crunch. I like to serve them with a cold glass of milk or a cup of herbal tea for a quiet afternoon pause. They also make a perfect addition to a school lunchbox or an after-school snack plate alongside fruit or a savory dip like the fresh patriotic layered hummus dip for a balanced snack spread.
To store, keep cookies in an airtight container at room temperature for up to 4 days. If you want to keep them longer, they freeze well — just layer with parchment paper between cookies to prevent sticking. When ready to eat, thaw at room temperature or gently warm in a 300°F (150°C) oven for 5-7 minutes to regain that fresh-baked softness.
Over time, flavors mellow, and the peanut butter deepens, making leftovers even better the next day. Just don’t expect many to stick around that long — they’re too good!
Nutritional Information & Benefits
Each cookie (based on 20 cookies per batch) roughly contains:
| Calories | 160 kcal |
|---|---|
| Fat | 8 g |
| Carbohydrates | 20 g |
| Protein | 3 g |
| Fiber | 2 g |
The oats provide heart-healthy fiber and steady energy, while peanut butter contributes protein and healthy fats to keep hunger at bay. Using natural peanut butter without added sugars or hydrogenated oils is a healthier choice. The candy-coated chocolates add sweetness but keep portion control in mind for a balanced treat.
This recipe can fit into gluten-free and nut-free diets with simple swaps, and it’s a better-for-you alternative to store-bought cookies loaded with preservatives. For busy parents, it’s a way to offer a homemade snack that feels indulgent but is made with straightforward ingredients.
Conclusion
These Easy Chewy Back-to-School Monster Cookies have a quiet magic — they’re quick to make, soft and chewy, and colorful without being fussy. I love how they fit seamlessly into the busy rhythm of mornings and afternoons, offering a simple, homemade treat that feels thoughtful without taking extra time. They’re a reliable recipe I come back to when I want that soft, peanut buttery cookie with a nostalgic candy crunch, but no waiting around.
Play around with the mix-ins or swap peanut butter for your favorite nut or seed butter to make them your own. And if you find yourself craving more homemade snacks, I’ve found the savory buffalo chicken dip with blue cheese crumbles is an excellent party treat that contrasts nicely with these sweet cookies. Or for a quick, wholesome meal, the honey balsamic chicken pasta salad is a personal favorite.
Feel free to share your own twists or questions below — I’d love to hear how your batch of monster cookies turns out. Here’s to sweet, chewy moments in the middle of the busy school days ahead.
FAQs
Can I make these cookies dairy-free?
Yes! Use a dairy-free butter substitute or coconut oil in place of butter. The texture might be slightly different but still delicious and chewy.
Do I have to use candy-coated chocolates?
No, you can swap them for chocolate chips, raisins, nuts, or any mix-ins you prefer. The candy adds color and crunch but isn’t essential.
Why don’t these cookies need chilling?
The oats and peanut butter create a dough that holds together well without chilling. This saves time and still produces a chewy texture.
Can I freeze the cookie dough or baked cookies?
Both! You can freeze shaped dough balls for up to 3 months or freeze baked cookies layered with parchment paper. Thaw before baking or serving.
How do I keep the cookies chewy longer?
Store them in an airtight container with a slice of bread to help retain moisture, and avoid overbaking. Reheating slightly also softens them up.
Pin This Recipe!

Easy Chewy Back-to-School Monster Cookies No Chill Recipe for Perfect Snacks

These soft, chewy monster cookies combine oats, peanut butter, and candy-coated chocolates for a quick, no-chill treat perfect for busy school mornings and snacks.
- Prep Time: 15 minutes
- Cook Time: 10 minutes
- Total Time: 25 minutes
- Yield: 20 cookies 1x
- Category: Snack
- Cuisine: American
Ingredients
- 1 1/4 cups all-purpose flour (160 g)
- 1 cup old-fashioned rolled oats (90 g)
- 1/2 teaspoon baking soda
- 1/4 teaspoon salt
- 1/2 cup unsalted butter, softened (115 g)
- 1/2 cup granulated sugar (100 g)
- 1/2 cup light brown sugar, packed (110 g)
- 1 large egg, room temperature
- 1/2 cup natural creamy peanut butter (125 g)
- 1 teaspoon vanilla extract
- 3/4 cup mini candy-coated chocolates (135 g)
- Optional: 1/2 cup chopped walnuts or pecans, toasted, or raisins
Instructions
- Preheat your oven to 350°F (175°C) and line a baking sheet with parchment paper or a silicone baking mat.
- In a medium bowl, whisk together the dry ingredients: all-purpose flour, rolled oats, baking soda, and salt.
- In a large bowl, cream the softened butter, granulated sugar, and light brown sugar with an electric mixer on medium speed until light and fluffy, about 2-3 minutes.
- Add the egg, peanut butter, and vanilla extract to the creamed butter and sugar. Beat until smooth and well combined, scraping down the sides if needed.
- Gradually add the dry ingredients to the wet mixture, mixing on low speed until just combined. Avoid overmixing.
- Fold in the mini candy-coated chocolates and optional nuts or raisins by hand with a spatula.
- Use a cookie scoop or spoon to drop 1.5-tablespoon-sized mounds of dough onto the prepared baking sheet, spaced about 2 inches apart.
- Bake in the preheated oven for 9-11 minutes, until the edges are set but the centers still look soft.
- Let the cookies cool on the baking sheet for 5 minutes, then transfer to a wire rack to cool completely.
Notes
Use softened but not melted butter to trap air for a lighter, chewier cookie. Avoid overmixing once flour and oats are added to keep cookies tender. If dough gets sticky, chill for 10 minutes but chilling is not required. Baking time affects texture: 8-9 minutes for softer cookies, 10-11 minutes for slightly crispier edges. Store cookies in an airtight container with a slice of bread to retain moisture. Freeze dough balls or baked cookies for longer storage.
Nutrition
- Serving Size: 1 cookie
- Calories: 160
- Fat: 8
- Carbohydrates: 20
- Fiber: 2
- Protein: 3
Keywords: monster cookies, chewy cookies, no chill cookies, back to school snacks, peanut butter cookies, oatmeal cookies, easy cookies, quick cookies


