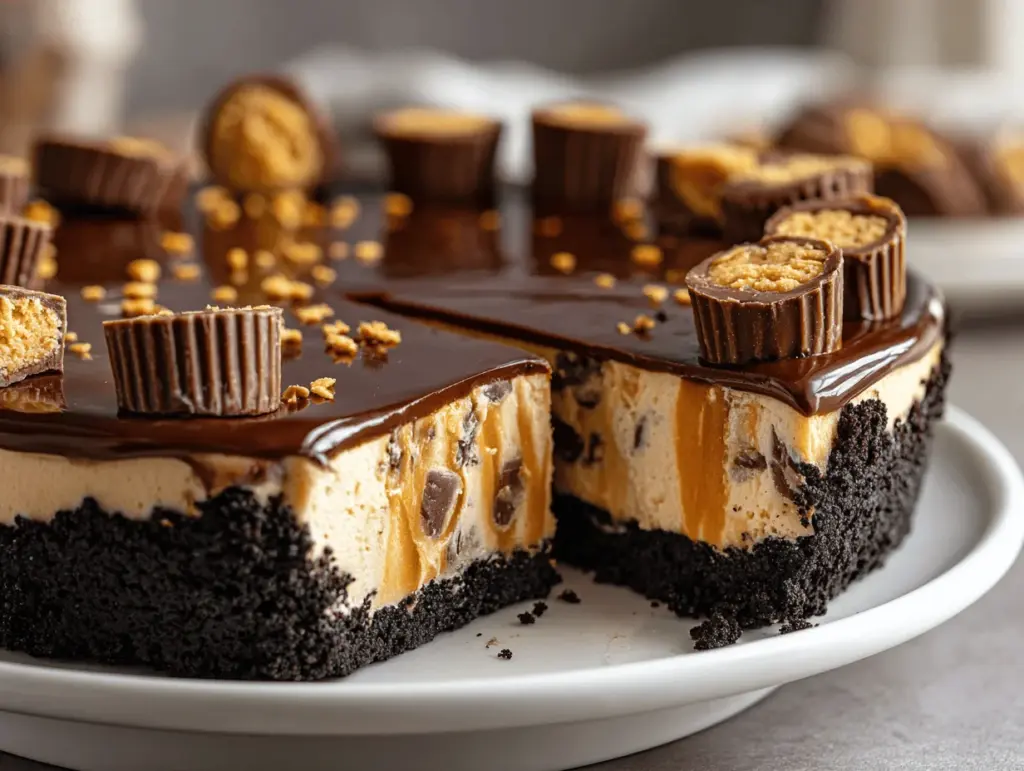
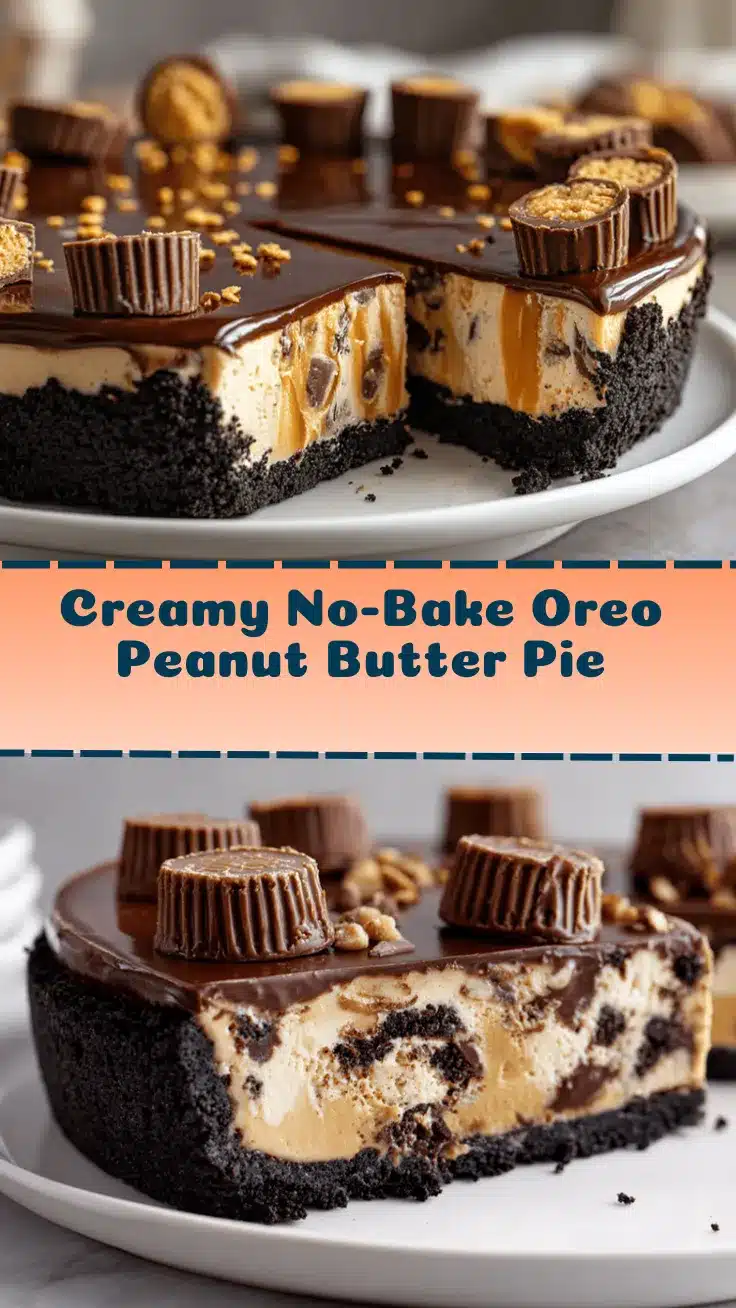
Crack open a sleeve of Oreos and the world instantly smells a little sweeter. That’s exactly how I felt the first time I made this No-Bake Oreo Peanut Butter Cup Pie recipe—it’s like every birthday party and after-school snack memory rolled into one thick, creamy slice. The combination of silky peanut butter, crunchy Oreo crust, and those melting bits of peanut butter cups is seriously next-level. If you’re searching for a dessert that stops people in their tracks (and makes them ask for seconds), you’ve got to try this pie.
Honestly, I stumbled upon this recipe during a summer heatwave when turning on the oven felt like a crime. I wanted something decadent but effortless, something that looked fancy but was secretly foolproof. That’s when the idea for this no-bake Oreo peanut butter cup pie hit me—why not blend two of my family’s favorite sweets into one chilled masterpiece? Ever since, it’s become my go-to for potlucks, birthdays, and those nights when you crave something cold, rich, and a little bit nostalgic.
I’ve tested this pie more times than I can count. I’ve shared it with neighbors, brought it to book club, and even made mini versions for holiday trays. It’s always a hit. The best part? No oven, no fuss, and no fancy ingredients. Just layers of creamy, dreamy goodness that’ll have you licking the spoon—and maybe even the plate. If you want an easy, show-stopping dessert that everyone will rave about, this No-Bake Oreo Peanut Butter Cup Pie is about to become your new obsession.
Why You’ll Love This Recipe
- Quick & Easy: This No-Bake Oreo Peanut Butter Cup Pie comes together in about 20 minutes (plus chill time). Perfect for last-minute gatherings or when you just can’t wait for dessert!
- Simple Ingredients: No obscure ingredients or complicated steps—just classic pantry staples and a couple of irresistible treats.
- Perfect for Any Occasion: Whether it’s a birthday, a family BBQ, or a random Tuesday night, this pie fits right in. I’ve even made it as a birthday “cake” for my peanut butter-obsessed nephew.
- Crowd-Pleaser: Kids and adults both light up when they see this pie on the table. I’ve yet to meet someone who doesn’t ask for the recipe!
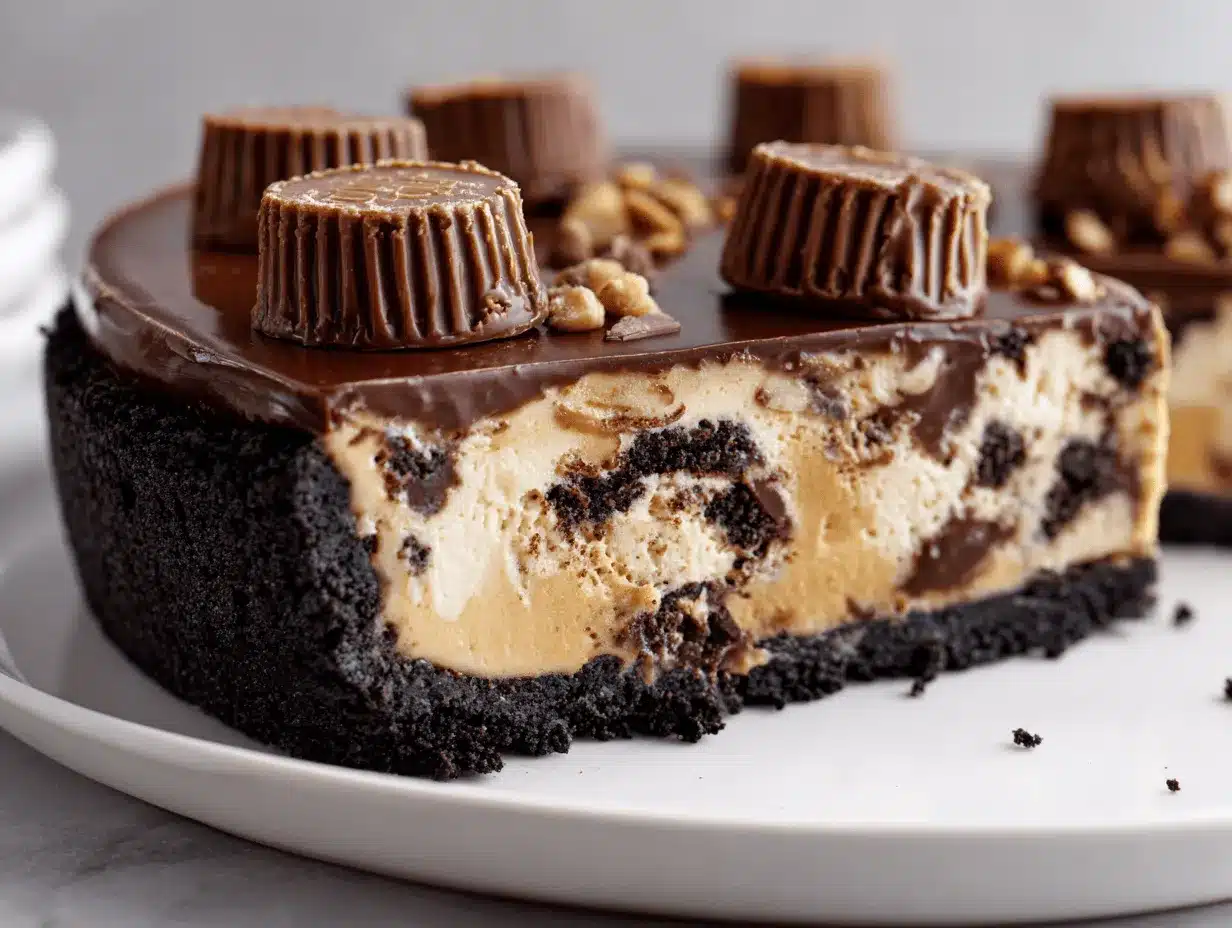
- Unbelievably Delicious: The crunchy Oreo crust, creamy peanut butter filling, and chunks of peanut butter cups hit every craving. It’s the perfect blend of sweet, salty, and chocolatey.
What really sets this recipe apart is the balance. I don’t just blitz some Oreos and spread peanut butter on top—nope, there’s a method to this madness. I blend the crust until it’s just the right consistency (not too fine, not too chunky), and I whip the filling until it’s fluffy like mousse. Even the peanut butter cups get a little love—they’re chopped into perfect bite-sized pieces for that surprise crunch with every forkful.
And honestly, there’s something comforting about a dessert that doesn’t need to be baked. The hardest part is waiting for it to set in the fridge, but that just means you get to sneak a taste of the filling while you work (chef’s privilege, right?). This pie brings back memories of summer picnics and holiday potlucks, but it’s also the kind of treat you can whip up on a random weeknight just because. It’s indulgent, nostalgic, and guaranteed to leave everyone smiling.
What Ingredients You Will Need
This recipe uses simple, familiar ingredients that pack a serious punch when it comes to flavor and texture. Most of them are probably already in your kitchen, but I’ll share my favorite brands and swap ideas, too. Here’s what you’ll need:
- For the Oreo Crust:
- 24 Oreo cookies (regular, not double-stuffed; about 240g) – I prefer the classic, but you can use any chocolate sandwich cookie.
- 5 tablespoons (70g) unsalted butter, melted – Salted works in a pinch and adds a little extra flavor.
- For the Peanut Butter Filling:
- 1 cup (240g) creamy peanut butter – Use shelf-stable peanut butter like Jif or Skippy for the silkiest texture. Natural peanut butter can separate, but you can stir it really well if that’s what you have.
- 8 ounces (225g) cream cheese, softened – Full-fat gives the creamiest results. Let it come to room temp for easy mixing.
- 1 cup (120g) powdered sugar – Sifted, if you want the smoothest filling.
- 1 teaspoon pure vanilla extract – I love using real vanilla, but imitation works in a pinch.
- 1 ½ cups (360ml) heavy whipping cream – Cold! This helps the filling whip up light and fluffy.
- For the Topping:
- 8-10 mini peanut butter cups, chopped (or 4-5 regular-sized cups) – Reese’s are my go-to; chop as chunky or fine as you like.
- Extra crushed Oreos (optional) – For sprinkling on top.
- Chocolate syrup or melted chocolate (optional) – For a drizzle that looks as good as it tastes.
Substitution Tips: For a gluten-free version, use gluten-free chocolate sandwich cookies. Craving more chocolate? Swap in a chocolate whipped topping or add mini chocolate chips to the filling. If you want to make it dairy-free, use vegan butter, dairy-free cream cheese, and coconut whipped cream (the texture will be a little softer, but still delicious). For peanut allergies, try almond butter cups and your favorite seed butter instead. The recipe is super forgiving, so don’t stress if you need to make a swap!
Equipment Needed
- 9-inch (23cm) pie pan or springform pan: I like using a glass pie dish for easy slicing, but a springform pan makes for dramatic, bakery-style presentation.
- Food processor or high-powered blender: For crushing Oreos. No processor? A sturdy zip-top bag and a rolling pin work in a pinch (it’s oddly therapeutic to smash them by hand!).
- Large mixing bowls: You’ll want at least two—one for the crust, one for the filling.
- Electric mixer (handheld or stand): Whipping the filling by hand is possible, but a mixer saves time and effort. I’ve used both and trust me, the mixer wins.
- Rubber spatula: For scraping every last bit of creamy filling.
- Measuring cups and spoons: Accurate measurements mean a consistent pie every time.
- Knife and cutting board: For chopping peanut butter cups. A small serrated knife works best for those sticky candies!
If you’re short on tools, don’t worry. I’ve made the crust with a bag and rolling pin, and whipped cream with a sturdy whisk and some muscle power. Just give your arms a break if you’re going old-school. For easy cleanup, line your pie pan with parchment before pressing in the crust. And if you invest in one specialty tool, let it be an offset spatula—it spreads filling like a dream and makes the pie look bakery-perfect.
Preparation Method
-
Prepare the Oreo Crust (10 minutes):
Add 24 Oreo cookies to a food processor or high-powered blender. Pulse until you have fine crumbs—think beach sand, not gravel. (If you don’t have a processor, place cookies in a zip-top bag and crush with a rolling pin.) Pour in 5 tablespoons (70g) melted butter and pulse until the mixture looks like wet sand.
Tip: If it feels too dry, add another tablespoon of melted butter. Too wet? Add one more crushed cookie. -
Press the Crust:
Pour the crust mixture into a 9-inch (23cm) pie pan or springform pan. Use the bottom of a glass or measuring cup to press the crumbs firmly across the bottom and up the sides. You want a tight, even layer so the filling doesn’t leak.
Note: If your crust keeps sticking, spray the cup lightly with nonstick spray.
Chill the crust in the freezer while you prep the filling (about 10 minutes). -
Make the Peanut Butter Filling (10 minutes):
In a large bowl, beat 1 cup (240g) creamy peanut butter and 8 ounces (225g) softened cream cheese together until smooth and fluffy (about 2 minutes on medium speed). Add 1 cup (120g) powdered sugar and 1 teaspoon vanilla extract. Beat again until combined.
Tip: Scrape down the bowl once or twice—there’s always a sneaky spot of cream cheese hiding at the bottom. -
Whip the Cream:
In a separate chilled bowl, beat 1 ½ cups (360ml) heavy whipping cream until stiff peaks form (about 3-4 minutes). You want the cream to hold its shape when you lift the beaters, but don’t over-whip or it’ll turn grainy.
If you overdo it, just add a splash of cream and beat gently to smooth it out. -
Combine the Filling:
Gently fold the whipped cream into the peanut butter mixture, a third at a time. Use a spatula and a light hand—this keeps the filling fluffy. If you mix too vigorously, it can deflate.
The finished filling should be smooth, airy, and just a little bit glossy. -
Fill the Crust:
Remove the crust from the freezer. Spoon the peanut butter filling into the crust and smooth the top with a spatula or the back of a spoon.
For a bakery-style finish, swirl the top or make little peaks with your spatula. -
Add the Toppings:
Sprinkle 8-10 chopped mini peanut butter cups over the pie. Add extra crushed Oreos if you like, and drizzle with chocolate syrup or melted chocolate for a dramatic touch.
If you want to get fancy, pipe whipped cream rosettes around the edge before topping with candies. -
Chill the Pie (at least 4 hours):
Cover the pie loosely with plastic wrap and refrigerate for at least 4 hours (overnight is even better). This helps the filling set and makes slicing easier.
Impatient? Pop it in the freezer for 1-2 hours for a firmer, icebox-cake vibe. Just let it soften a bit before serving.
Slice with a sharp knife dipped in hot water for clean pieces. Store leftovers in the fridge (if you have any!).
Cooking Tips & Techniques
- Crust Consistency: Don’t pulverize the Oreos into flour—leave a little texture for crunch. If your crust feels too crumbly, add another splash of melted butter and mix again.
- Softening Cream Cheese: Let the cream cheese sit at room temp for 30 minutes before mixing. Cold cream cheese creates lumpy filling, and nobody wants that.
- Folding vs. Mixing: Be gentle when folding in whipped cream. Over-mixing can make the filling dense instead of airy. I learned this the hard way during my first go—don’t rush this step!
- Chilling is Key: I know it’s tempting to dig in right away, but chilling helps the flavors meld and the pie to slice neatly. If you’re short on time, stick it in the freezer for a bit, but don’t let it freeze solid unless you want an ice cream pie.
- Perfect Slices: For those picture-perfect slices, always use a sharp knife and wipe it clean between cuts. Run it under hot water and dry before slicing—it works like a charm.
One thing I learned early on: don’t overthink the decorations. Even if the toppings look a little chaotic, it’s all part of the charm. If you forget to chill the pie long enough, just serve it in bowls—people will still love every bite. And don’t be afraid to experiment with layers—sometimes I add a thin layer of melted chocolate between the crust and filling for that extra wow factor.
Variations & Adaptations
- Gluten-Free Pie: Use gluten-free chocolate sandwich cookies for the crust. Everything else in the recipe is naturally gluten-free—just double-check your peanut butter cups.
- Dairy-Free Version: Swap in vegan butter, dairy-free cream cheese, and coconut whipped topping. The filling will be a bit softer, but the flavor still shines.
- Flavor Twists: Try swapping peanut butter for almond butter or cashew butter. Or mix in chopped chocolate chips or pretzels for a sweet-and-salty crunch. I once tossed in a handful of mini marshmallows for a s’mores twist—total hit!
- Individual Mini Pies: Press crust into muffin tins (lined with paper cups) and fill with peanut butter filling. Perfect for parties or bake sales.
- Nut-Free Adaptation: Use sunflower seed butter and nut-free chocolate cups for allergies. The pie is just as creamy and satisfying.
Honestly, my favorite variation is to use dark chocolate Oreos and dark chocolate peanut butter cups. The richer cocoa flavor balances the sweet filling and feels a little more grown-up (but kids still devour it). Play around with your favorites—this pie is endlessly customizable.
Serving & Storage Suggestions
For the ultimate experience, serve this No-Bake Oreo Peanut Butter Cup Pie chilled, straight from the fridge. I love adding a dollop of whipped cream and a drizzle of warm chocolate sauce for extra drama.
- Serving: Slice with a hot, sharp knife for clean edges. A pie server helps lift out sturdy slices, but a wide spatula does the trick, too.
- Pairings: Serve with a cold glass of milk, hot coffee, or a scoop of vanilla ice cream. This pie is rich, so a little goes a long way (unless you’re like me and go back for seconds).
- Storage: Cover leftovers tightly and refrigerate for up to 4 days. The crust may soften a bit over time, but the flavors will keep getting better. For longer storage, freeze individual slices wrapped in plastic—thaw in the fridge before serving.
- Reheating: No need! This pie is best served cold. If it’s frozen, let it sit at room temp for 10-15 minutes to soften slightly.
One thing I’ve noticed—the chocolate and peanut butter flavors meld together even more after a day or two in the fridge. It’s honestly irresistible, even as a sneaky midnight snack.
Nutritional Information & Benefits
Here’s a quick look at what you’re getting in each slice (based on 10 servings):
- Calories: ~420
- Fat: ~29g
- Saturated Fat: ~14g
- Carbohydrates: ~38g
- Protein: ~7g
- Sugar: ~26g
This pie is definitely a treat—rich in healthy fats and protein from the peanut butter, plus calcium from the cream cheese and cream. If you use a natural peanut butter and cut back on the sugar, you can lighten it up a bit. The dessert is naturally gluten-free if you use the right cookies, and it can be adapted for dairy-free or nut-free diets with a few simple swaps. Just a heads up: peanut butter cups and Oreos contain allergens, so check labels if you’re serving guests with sensitivities.
I believe dessert is part of a happy, balanced life—especially when it brings people together over something homemade and delicious.
Conclusion
If you’re looking for a show-stopping, no-fuss dessert that everyone will beg you to make again, this No-Bake Oreo Peanut Butter Cup Pie recipe is absolutely the one. It’s packed with flavor, easy to adapt, and honestly, it feels like a special occasion every time you slice into it. Whether you’re a chocolate lover, a peanut butter fanatic, or just someone with a sweet tooth, this pie is bound to become a family favorite.
Don’t be afraid to get creative—add your own spin, swap in new candies, or try a different crust. That’s half the fun! Personally, I love this recipe because it never lets me down, no matter the occasion or who’s at the table. It’s pure, simple comfort in every bite.
If you try this No-Bake Oreo Peanut Butter Cup Pie, let me know in the comments below! Share your photos, your twists, or your favorite way to serve it. I can’t wait to hear how this pie brightens up your dessert table. Happy (no) baking!
FAQs
Can I make this No-Bake Oreo Peanut Butter Cup Pie ahead of time?
Absolutely! This pie is perfect for making a day or even two in advance. Just keep it covered in the fridge until you’re ready to serve.
What can I use if I don’t have a food processor for the crust?
No problem—just place the Oreos in a sturdy zip-top bag and crush them with a rolling pin or heavy can. It’s a great way to get out some stress, too!
Can I freeze this pie?
Yes! Slice the pie, wrap the pieces in plastic wrap, and freeze for up to 1 month. Thaw in the fridge overnight or at room temperature for about 30 minutes before serving.
What’s the best peanut butter to use?
I recommend a creamy, shelf-stable brand like Jif or Skippy for the smoothest filling. Natural peanut butter works but can make the pie a little softer and sometimes a bit grainy.
How do I prevent the pie from sticking to the pan?
Press the crust firmly and, for extra insurance, line the bottom of the pan with parchment paper before adding the crust. A springform pan also makes for super easy removal and pretty slices.
Pin This Recipe!
No-Bake Oreo Peanut Butter Cup Pie

This No-Bake Oreo Peanut Butter Cup Pie is a decadent, crowd-pleasing dessert featuring a crunchy Oreo crust, creamy peanut butter filling, and chunks of peanut butter cups. It’s easy to make, requires no oven, and is perfect for any occasion.
- Prep Time: 20 minutes
- Cook Time: 0 minutes
- Total Time: 4 hours 20 minutes
- Yield: 10 servings 1x
- Category: Dessert
- Cuisine: American
Ingredients
- 24 Oreo cookies (regular, not double-stuffed; about 240g)
- 5 tablespoons (70g) unsalted butter, melted
- 1 cup (240g) creamy peanut butter
- 8 ounces (225g) cream cheese, softened
- 1 cup (120g) powdered sugar
- 1 teaspoon pure vanilla extract
- 1 1/2 cups (360ml) heavy whipping cream, cold
- 8–10 mini peanut butter cups, chopped (or 4–5 regular-sized cups)
- Extra crushed Oreos (optional, for topping)
- Chocolate syrup or melted chocolate (optional, for drizzle)
Instructions
- Add 24 Oreo cookies to a food processor or high-powered blender and pulse until you have fine crumbs. (Alternatively, crush cookies in a zip-top bag with a rolling pin.)
- Pour in 5 tablespoons melted butter and pulse until the mixture resembles wet sand.
- Press the crust mixture into a 9-inch pie pan or springform pan, pressing firmly across the bottom and up the sides. Chill the crust in the freezer for about 10 minutes.
- In a large bowl, beat together 1 cup creamy peanut butter and 8 ounces softened cream cheese until smooth and fluffy (about 2 minutes on medium speed).
- Add 1 cup powdered sugar and 1 teaspoon vanilla extract. Beat again until combined.
- In a separate chilled bowl, beat 1 1/2 cups heavy whipping cream until stiff peaks form (about 3-4 minutes).
- Gently fold the whipped cream into the peanut butter mixture in thirds, using a spatula and a light hand to keep the filling fluffy.
- Remove the crust from the freezer. Spoon the peanut butter filling into the crust and smooth the top with a spatula.
- Sprinkle chopped peanut butter cups over the pie. Add extra crushed Oreos and drizzle with chocolate syrup or melted chocolate if desired.
- Cover the pie loosely with plastic wrap and refrigerate for at least 4 hours (overnight is best) to set.
- Slice with a sharp knife dipped in hot water for clean pieces. Store leftovers in the fridge.
Notes
For a gluten-free version, use gluten-free chocolate sandwich cookies. To make it dairy-free, substitute vegan butter, dairy-free cream cheese, and coconut whipped cream. Chill the pie thoroughly for clean slices. For best results, use shelf-stable creamy peanut butter. Decorate with extra toppings as desired. Store leftovers covered in the fridge for up to 4 days or freeze individual slices for up to 1 month.
Nutrition
- Serving Size: 1 slice (1/10 of pie)
- Calories: 420
- Sugar: 26
- Fat: 29
- Saturated Fat: 14
- Carbohydrates: 38
- Protein: 7
Keywords: no-bake, Oreo pie, peanut butter cup pie, easy dessert, chocolate peanut butter, potluck dessert, summer dessert, creamy pie, kid-friendly, crowd-pleaser


