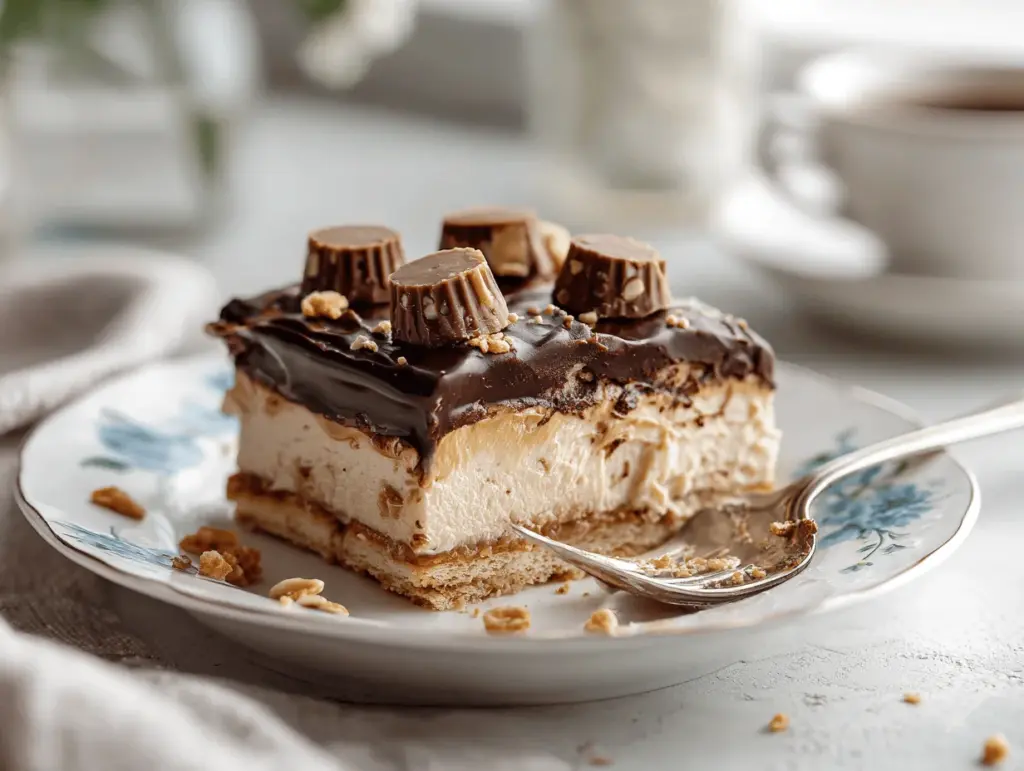
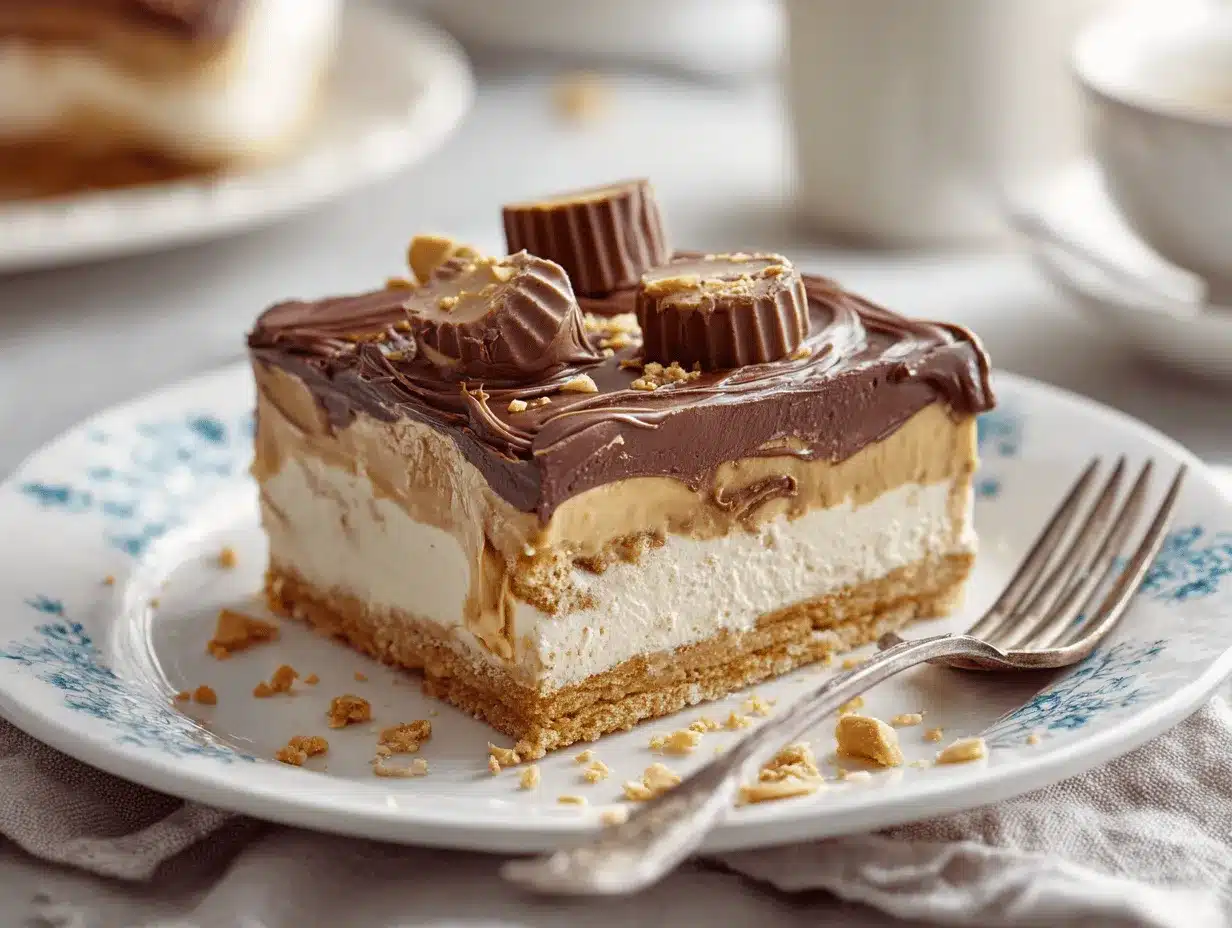
Imagine this: layers of fluffy whipped cream, silky peanut butter pudding, and crushed peanut butter cups all stacked between tender graham crackers, chilled until everything melds together into one heavenly, sliceable dessert. That’s exactly what you get with this no-bake peanut butter cup eclair cake. The first time I whipped this up, I was aiming for a crowd-pleaser that didn’t require turning on the oven—because honestly, who wants to bake when it’s already hot outside? The aroma of sweet peanut butter and chocolate drifting through the kitchen had my family hovering before it even hit the fridge.
I fell in love with eclair cakes years ago, but the classic chocolate-vanilla combo always left me wanting to put my own spin on it. Enter: peanut butter cups. They add that rich, nutty flavor and a little salty crunch that makes every bite unforgettable. This dreamy dessert is a hit at potlucks and birthday parties—there’s just something magical about the way the graham crackers soften into a cake-like texture against the creamy layers. And let’s face it, no-bake desserts are kind of a lifesaver for busy schedules, last-minute guests, or those days when you need a treat without the fuss.
Whether you’re a peanut butter fanatic or just looking for a show-stopper dessert that comes together in minutes, this no-bake peanut butter cup eclair cake has your name written all over it. I’ve tested this recipe more times than I can count, tweaked it for every occasion, and trust me—once you try it, you’ll be hooked. So grab your favorite mixing bowl, and let’s get layering!
Why You’ll Love This No-Bake Peanut Butter Cup Eclair Cake
- Quick & Easy: You can assemble this dreamy cake in under 30 minutes (plus chill time). Perfect for those “oops, I need dessert!” moments.
- No Oven Required: It’s a total game-changer in the summer—or any time you don’t want to heat up your kitchen.
- Simple Ingredients: Nothing fancy, mostly pantry and fridge staples. Odds are, you already have most of what you need.
- Perfect for Any Occasion: This cake is a hit at potlucks, birthdays, BBQs, or just a random Tuesday when you want something sweet.
- Crowd-Pleaser: Kids and adults both go wild for the peanut butter and chocolate combo. Seriously, it disappears fast—don’t expect leftovers!
- Unbelievably Delicious: The layers get soft and creamy, with little pops of peanut butter cup throughout. Every bite is pure comfort food bliss.
What sets this no-bake peanut butter cup eclair cake apart is the way the classic eclair cake method gets a flavor-packed upgrade—think silky peanut butter pudding, real whipped cream, and chopped Reese’s cups. I’ve played around with other versions, but this one has the perfect balance of salty-sweet, creamy, and crunchy. Blending the pudding with peanut butter makes it extra rich, and using real whipped topping means it stays light and fluffy without getting too dense.
This dessert isn’t just good—it’s the kind that makes people close their eyes and sigh after the first forkful. It’s comfort food, reimagined for peanut butter lovers, and it always brings a little extra happiness to the table. If you want to impress your friends or just treat yourself to something special with zero stress, this is the recipe you need in your back pocket.
What Ingredients You Will Need
This no-bake peanut butter cup eclair cake is all about simple, accessible ingredients working together for maximum flavor and texture. You’ll find most of these in any well-stocked kitchen—nothing fancy or hard to track down.
- For the Layers:
- Graham crackers (about 1 1/2 sleeves, 200g) – classic honey grahams work best, but you can use chocolate grahams for extra richness
- For the Peanut Butter Pudding:
- Instant vanilla pudding mix (2 packages, 3.4 oz/96g each) – choose a quality brand like Jell-O for reliable thickening
- Cold milk (3 cups / 720ml) – whole milk makes it extra creamy, but 2% works too
- Creamy peanut butter (3/4 cup / 180g) – use your favorite, but I love Skippy for its smooth texture
- For the Creamy Topping:
- Frozen whipped topping (1 container, 8 oz/227g, thawed) – Cool Whip or a store brand is fine, or swap in homemade whipped cream for a fresher taste
- For the Peanut Butter Cup Crunch:
- Mini peanut butter cups (about 1 1/2 cups / 180g, chopped) – Reese’s is classic, but use any brand you love
- For the Chocolate Ganache (Optional, but dreamy):
- Semisweet chocolate chips (3/4 cup / 130g)
- Heavy cream (1/2 cup / 120ml)
- Pinch of salt
Ingredient Tips & Swaps:
- For a gluten-free version, use gluten-free graham crackers (I like Schär brand, they hold up well).
- Want it dairy-free? Use almond milk for the pudding and a coconut-based whipped topping.
- If you only have regular-size peanut butter cups, just chop them up—no need to be precise.
- No vanilla pudding? Chocolate pudding is delicious for a double-chocolate twist.
I always recommend using fresh, unopened pudding mix for the best texture (old boxes sometimes don’t set right). For an extra salty-sweet kick, sprinkle a pinch of flaky salt over the top before serving. And if you’re making this with kids, let them help layer—the messier, the more fun!
Equipment Needed
- 9×13-inch (23x33cm) baking dish – Glass or ceramic both work. I’ve even used a deep casserole dish in a pinch.
- Mixing bowls (2-3) – One for the pudding, one for the whipped topping, and one for the ganache if you’re making it.
- Whisk or electric mixer – I prefer a hand mixer for super-smooth pudding, but a sturdy whisk gets the job done too.
- Rubber spatula – For folding the whipped topping and spreading layers evenly.
- Sharp knife – For chopping peanut butter cups (and sneaking a few bites, let’s be honest).
- Microwave-safe bowl – Needed if you make the chocolate ganache topping.
- Plastic wrap or foil – To cover the cake while it chills.
If you don’t have a 9×13 pan, use two loaf pans or assemble the cake in a large trifle bowl for a fun twist. I’ve even tried making mini versions in mason jars for portable treats—super cute for parties! Just make sure your mixing bowls are big enough for all that creamy goodness. And hey, if you only have a regular dinner knife for chopping, that works too. This recipe is forgiving, and the equipment doesn’t need to be fancy or expensive.
How to Make No-Bake Peanut Butter Cup Eclair Cake
-
Prepare the Peanut Butter Pudding:
- In a large mixing bowl, whisk together 2 packages (3.4 oz/96g each) instant vanilla pudding mix and 3 cups (720ml) cold milk for about 2 minutes, until thickened but pourable. (If using an electric mixer, medium speed works best.)
- Add 3/4 cup (180g) creamy peanut butter and whisk until smooth and fully combined. The pudding should be thick, creamy, and fragrant—if it’s too thick, add a splash more milk.
- Personal tip: Scrape down the sides of the bowl to catch any sneaky bits of peanut butter.
-
Fold in the Whipped Topping:
- Gently fold in 1 container (8 oz/227g) thawed whipped topping with a spatula until the mixture is light and airy. Be careful not to overmix—you want those fluffy clouds.
- Warning: Overmixing can deflate the mixture, so stop as soon as it looks smooth and uniform.
-
Layer the Graham Crackers:
- Arrange a single layer of graham crackers in the bottom of a 9×13-inch (23x33cm) dish. Break crackers as needed to fit—don’t worry about gaps, they’ll soften up just fine.
- The base should be fully covered, but it doesn’t need to be perfect.
-
Add the First Layer of Peanut Butter Filling:
- Spread half the peanut butter pudding mixture evenly over the graham crackers, smoothing with a spatula. Sprinkle 1/2 cup (60g) chopped peanut butter cups over this layer.
-
Repeat Layers:
- Add another layer of graham crackers, then the remaining pudding mixture, and another 1/2 cup (60g) of peanut butter cups.
- Finish with a final layer of graham crackers on top.
- Tip: Press the final cracker layer down gently so everything sticks together as it chills.
-
Make the Chocolate Ganache (Optional):
- Place 3/4 cup (130g) semisweet chocolate chips and 1/2 cup (120ml) heavy cream in a microwave-safe bowl. Heat for 30 seconds, stir, then heat in 15-second bursts until melted and glossy. Stir in a pinch of salt.
- Let cool for 5 minutes, then pour over the cake, smoothing to the edges.
- If skipping ganache: Simply sprinkle the remaining peanut butter cups over the top for a crunchier finish.
-
Chill:
- Cover tightly with plastic wrap or foil. Refrigerate for at least 4 hours, or overnight if you can wait—the longer it chills, the better the texture.
- Sensory cue: You’ll know it’s ready when the graham crackers are soft and the layers slice cleanly.
-
Serve:
- Slice with a sharp knife, wiping between cuts for clean edges. Garnish with extra peanut butter cups or a drizzle of melted peanut butter if you’re feeling fancy.
- Enjoy that first dreamy, creamy bite!
Troubleshooting: If your pudding is runny, double-check that you used instant (not cook-and-serve) and cold milk. If the layers look uneven, just smooth gently with a spatula. And if your ganache seizes (gets grainy), whisk in a splash more warm cream until it’s silky again. I always say—desserts like this are forgiving, and a little imperfection just makes them feel more homemade!
Cooking Tips & Techniques
- Use Cold Ingredients: The pudding sets best with cold milk, and the whipped topping should be thawed but still cool. Room-temperature ingredients can make the layers too soft or runny.
- Don’t Rush the Chill: The magic happens in the fridge. Four hours is the bare minimum, but overnight is even better. The graham crackers soften into a perfect “cake” texture, and the flavors meld so beautifully.
- Layer Evenly: Spreading the pudding mixture as evenly as possible keeps the cake stable and ensures every bite has a bit of everything. I use a small offset spatula for this (it’s my secret weapon for neat layers).
- Chop Peanut Butter Cups Right Before Using: If you chop them too far in advance, they can dry out or get a little sticky. I do it just before assembling for the best texture.
- Personal Oops: One time, I accidentally used cook-and-serve pudding and wondered why my cake was soup. Make sure you grab instant pudding mix!
- Multitasking: While the pudding thickens, chop your peanut butter cups and prep the pan. Efficient and saves you some precious minutes.
- Consistency Matters: If your pudding layer looks too thick, add a splash of milk. Too thin? Pop it in the fridge for 5 minutes to firm up before layering.
- Don’t Sweat the Details: If your layers aren’t perfect, don’t worry! The cake still tastes amazing, and a little messiness just proves it’s homemade.
Honestly, the biggest lesson I’ve learned from making this no-bake peanut butter cup eclair cake is not to overthink it. Sometimes my layers are a little wonky, or the top isn’t perfectly smooth, but it always gets rave reviews. Just have fun with it and trust the process!
Variations & Adaptations
- Gluten-Free Version: Swap the regular graham crackers for gluten-free ones (like Schär or Kinnikinnick). The rest of the recipe stays the same!
- Chocolate Lovers’ Dream: Use instant chocolate pudding instead of vanilla, and chocolate grahams for a double chocolate peanut butter twist. Top with extra chocolate chips for good measure.
- Seasonal Berry Eclair Cake: Skip the peanut butter cups and add a layer of sliced strawberries or raspberries between the pudding layers. It’s like a PB&J cake—super refreshing in summer.
- Dairy-Free Adaptation: Use almond milk (or another plant-based milk) for the pudding, coconut whipped topping, and dairy-free chocolate chips for the ganache.
- Nut-Free Version: For allergies, swap the peanut butter for sunflower seed butter and use allergy-friendly chocolate candies on top.
- Mini Trifle Jars: Assemble individual servings in small mason jars or cups—great for parties or picnics. Just layer as directed, and chill in their jars.
One of my favorite twists was adding a layer of sliced bananas for a peanut butter-banana-chocolate flavor bomb. It was so good, I almost didn’t share! Don’t be afraid to get creative—this no-bake eclair cake is basically a blank canvas for your dessert dreams.
Serving & Storage Suggestions
- Serving Temperature: Always serve chilled, straight from the fridge. The layers are firm but creamy, and the flavors really shine when cold.
- Presentation: For a Pinterest-worthy look, garnish with extra chopped peanut butter cups, a drizzle of melted peanut butter, or even a sprinkle of crushed graham crackers on top.
- Pairing Ideas: This cake is rich, so keep sides simple—think fresh berries or a scoop of vanilla ice cream. For drinks, coffee, cold milk, or even an iced latte are perfect companions.
- Storage: Cover tightly with plastic wrap or foil and refrigerate for up to 5 days. The crackers will keep softening, but the cake stays delicious.
- Freezing: You can freeze individual slices, wrapped well, for up to 1 month. Thaw overnight in the fridge before serving.
- Reheating: No need! Just serve straight from the fridge or let it sit out for 10 minutes if you like it a touch softer.
- Flavor Development: The flavors deepen after a day or two in the fridge—the peanut butter and chocolate get even dreamier together. It’s one of those desserts that’s almost better the next day!
If you need to travel with it, pop the cake in a cooler bag with an ice pack—no one wants melted whipped topping at the party. And don’t forget, this cake looks extra pretty when sliced with a sharp, hot knife (run it under hot water and wipe dry for the cleanest cuts).
Nutritional Information & Benefits
Estimated per serving (1/12 of the cake):
- Calories: 340
- Protein: 6g
- Carbs: 36g
- Fat: 18g
- Sugar: 23g
This no-bake peanut butter cup eclair cake might be a treat, but it does sneak in a little protein from the peanut butter and milk. The best part? You can adapt it to be gluten-free or dairy-free pretty easily, making it a fun option for different dietary needs. If you’re watching allergens, swap out the peanut butter and candy as needed. It’s definitely a dessert, but sometimes that’s exactly what you need for a little mood boost—especially when it’s homemade with love.
Conclusion
If you’re searching for a show-stopping, easy dessert that everyone will rave about, this no-bake peanut butter cup eclair cake is always a winner. It’s simple, ultra-creamy, and packed with peanut butter and chocolate goodness—what’s not to love? Whether you stick to the classic recipe or play around with your own twists, you really can’t go wrong.
I keep coming back to this cake whenever I want something sweet without the hassle of baking. Honestly, it never fails to impress—even the pickiest eaters go back for seconds! Give it a try, have fun making it your own, and don’t forget to share your tweaks in the comments below. I’d love to hear how you enjoyed it, or what creative versions you came up with.
So go ahead—grab your mixing bowl, layer up, and treat yourself to the dreamiest no-bake peanut butter cup eclair cake. You deserve it!
Frequently Asked Questions
Can I use homemade whipped cream instead of frozen whipped topping?
Absolutely! Use 2 cups (480ml) cold heavy cream, whipped with 2 tablespoons sugar until stiff peaks form. It gives a fresher, lighter taste—just fold it in gently.
How long does this no-bake peanut butter cup eclair cake need to chill?
At least 4 hours is recommended, but overnight is even better for the best texture and flavor. The longer it sits, the softer and more “cake-like” the graham crackers become.
Can I make this dessert ahead of time?
Yes! It’s perfect for making 1–2 days in advance. Just keep it covered in the fridge until you’re ready to serve.
Is it possible to make this peanut-free for allergies?
Definitely. Swap the peanut butter for sunflower seed butter and use allergy-friendly chocolate candies instead of peanut butter cups. Always double-check ingredient labels if allergies are a concern!
What’s the best way to cut clean slices?
Use a sharp knife dipped in hot water and wiped dry between cuts. This helps glide through the creamy layers and gives you those pretty, bakery-style pieces.
Pin This Recipe!

No-Bake Peanut Butter Cup Eclair Cake
This dreamy no-bake dessert features layers of fluffy whipped cream, silky peanut butter pudding, and chopped peanut butter cups between tender graham crackers. It’s a crowd-pleasing, easy-to-make treat that requires no oven and is perfect for any occasion.
- Prep Time: 25 minutes
- Cook Time: 0 minutes
- Total Time: 4 hours 25 minutes (includes chilling)
- Yield: 12 servings 1x
- Category: Dessert
- Cuisine: American
Ingredients
- 1 1/2 sleeves (about 7 oz) graham crackers (classic honey or chocolate)
- 2 packages (3.4 oz each) instant vanilla pudding mix
- 3 cups cold milk (whole or 2%)
- 3/4 cup creamy peanut butter
- 1 container (8 oz) frozen whipped topping, thawed (or 2 cups homemade whipped cream)
- 1 1/2 cups mini peanut butter cups, chopped (about 180g)
- Optional Chocolate Ganache:
- 3/4 cup semisweet chocolate chips
- 1/2 cup heavy cream
- Pinch of salt
Instructions
- In a large mixing bowl, whisk together instant vanilla pudding mix and cold milk for about 2 minutes until thickened but pourable.
- Add creamy peanut butter and whisk until smooth and fully combined. If too thick, add a splash more milk.
- Gently fold in thawed whipped topping with a spatula until the mixture is light and airy. Do not overmix.
- Arrange a single layer of graham crackers in the bottom of a 9×13-inch dish, breaking crackers as needed to fit.
- Spread half the peanut butter pudding mixture evenly over the graham crackers. Sprinkle 1/2 cup chopped peanut butter cups over this layer.
- Add another layer of graham crackers, then the remaining pudding mixture, and another 1/2 cup peanut butter cups.
- Finish with a final layer of graham crackers on top. Press down gently.
- Optional: For ganache, place chocolate chips and heavy cream in a microwave-safe bowl. Heat for 30 seconds, stir, then heat in 15-second bursts until melted and glossy. Stir in a pinch of salt. Let cool 5 minutes, then pour over the cake and smooth to the edges.
- If skipping ganache, sprinkle remaining peanut butter cups over the top.
- Cover tightly with plastic wrap or foil. Refrigerate for at least 4 hours, or overnight for best texture.
- Slice with a sharp knife, wiping between cuts for clean edges. Garnish with extra peanut butter cups or a drizzle of melted peanut butter if desired. Serve chilled.
Notes
For gluten-free, use gluten-free graham crackers. For dairy-free, use almond milk and coconut whipped topping. Chill at least 4 hours, but overnight is best for perfect texture. Use instant pudding, not cook-and-serve. For clean slices, use a sharp knife dipped in hot water and wiped dry between cuts. Cake can be made 1–2 days ahead and keeps well in the fridge for up to 5 days.
Nutrition
- Serving Size: 1/12 of cake
- Calories: 340
- Sugar: 23
- Sodium: 320
- Fat: 18
- Saturated Fat: 7
- Carbohydrates: 36
- Fiber: 2
- Protein: 6
Keywords: no-bake, peanut butter, eclair cake, dessert, easy, potluck, chocolate, whipped cream, summer, crowd-pleaser


