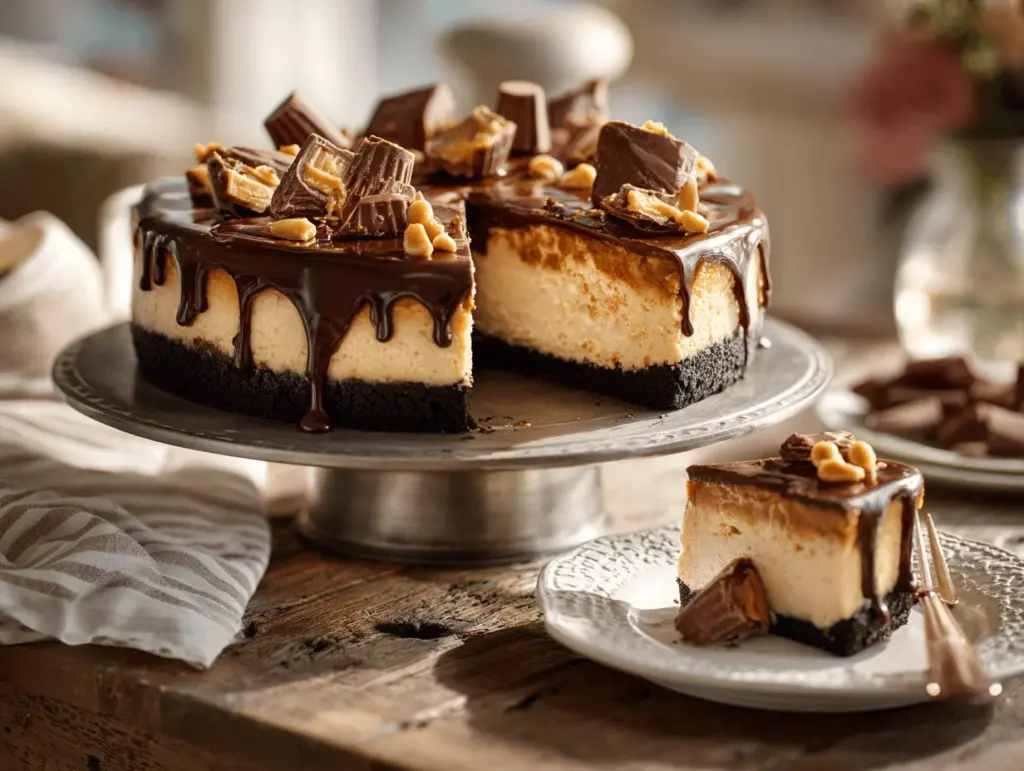
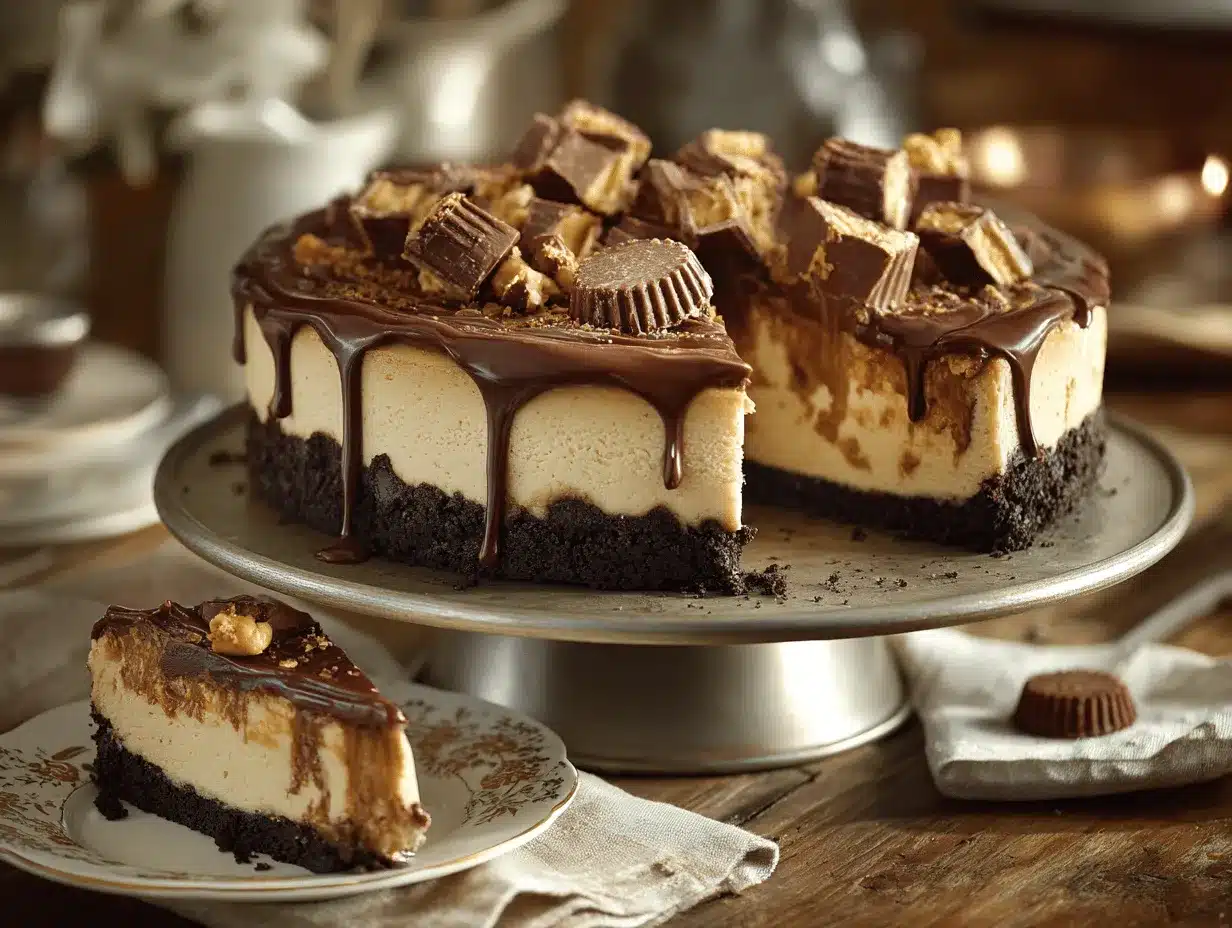
The first time I pressed my fork into this Peanut Butter Cup Millionaire’s Cheesecake, I swear the whole kitchen went silent. Creamy, chocolatey, peanut buttery decadence, all stacked up in glorious layers—no oven, no fuss, just pure dessert heaven. If you’re anything like me (chocoholic, peanut butter enthusiast, and cheesecake devotee), this recipe is about to become your go-to showstopper for birthdays, holidays, or honestly, just a random Tuesday when you crave something extraordinary.
I stumbled on the idea for this cheesecake during a summer heatwave. The oven was off-limits, but my craving for something rich and over-the-top was not. After a few kitchen experiments (and more than a few taste tests), this no-bake masterpiece was born. Each layer—crunchy cookie crust, velvety peanut butter cheesecake, silky chocolate ganache, and a shower of chopped peanut butter cups—comes together in a way that’s both jaw-dropping and drool-worthy. Friends, family, and even the occasional neighbor have all begged for the recipe after just one bite!
This Peanut Butter Cup Millionaire’s Cheesecake is perfect for busy bakers, sweet tooths, and anyone who wants to whip up a dessert that looks like it came straight out of a bakery window. I’ve tested this recipe at least a dozen times (quality control, you know), and it’s never failed me. Whether you’re new to no-bake cheesecakes or a seasoned pro, you’ll love how easy it is to create something so irresistible. Let’s dive into dessert bliss—trust me, you won’t regret it.
Why You’ll Love This Recipe
- No Bake Magic: Forget the oven entirely—this cheesecake sets beautifully in the fridge, making it a summer favorite or a year-round lifesaver for busy days.
- Simple Ingredients: No hunting down fancy ingredients. Everything is easy to find at any grocery store (and you probably have most on hand already).
- Perfect for Celebrations: Birthdays, potlucks, family dinners, or just a weekend treat—this cheesecake brings instant “wow” factor to any occasion.
- Crowd-Pleaser: Kids, teens, and adults all go wild for the peanut butter cup topping and creamy filling. I’ve never met anyone who could resist a second slice.
- Layered Indulgence: Every bite hits all the right notes—crunchy, creamy, chocolatey, and peanut buttery. It’s comfort food dessert at its absolute best.
What makes this Peanut Butter Cup Millionaire’s Cheesecake stand out from the crowd? Honestly, it’s the balance of flavors and textures. The cookie crust adds a salty-sweet crunch. The filling is lush but not heavy, thanks to a touch of whipped cream. And that chocolate ganache? It’s what dreams are made of. Plus, the chopped peanut butter cups on top make it look as good as it tastes (and it tastes amazing).
This isn’t just another no-bake cheesecake. It’s a recipe I’ve tweaked and perfected until it was absolutely irresistible. I even tried blending the peanut butter into the cheesecake mixture for extra smoothness—total game changer. Whether you’re baking with kids or looking to impress your in-laws, this dessert delivers big time. It’s the kind of treat that makes you close your eyes and savor every bite. You’ll feel like a million bucks (pun totally intended) after making—and eating—this cheesecake!
What Ingredients You Will Need
This Peanut Butter Cup Millionaire’s Cheesecake uses a handful of straightforward, pantry-friendly ingredients. Each one plays a key part in building those decadent layers and unbeatable flavors.
- For the Crust:
- Chocolate sandwich cookies (like Oreos), finely crushed (about 24 cookies / 250g)
- Unsalted butter, melted (6 tbsp / 85g) – helps the crust set and adds rich flavor
- Pinch of salt (optional, for extra balance)
- For the Cheesecake Filling:
- Cream cheese, softened to room temperature (16 oz / 450g) – use full-fat for best texture
- Powdered sugar (1 cup / 120g) – blends in smoothly for sweetness
- Peanut butter, creamy (3/4 cup / 180g) – I prefer Jif or Skippy, but natural works if well stirred
- Vanilla extract (2 tsp / 10ml)
- Heavy cream (1 cup / 240ml), whipped to soft peaks – fold in for a lighter, mousse-like texture
- For the Chocolate Ganache:
- Semi-sweet chocolate chips (1 cup / 170g)
- Heavy cream (1/2 cup / 120ml)
- For the Topping:
- Mini peanut butter cups, chopped (about 1 cup / 150g) – Reese’s brand is always a hit
- Extra chocolate chips or melted chocolate for drizzling (optional, for the “millionaire” look)
- Crushed salted peanuts (optional, for crunch and a hint of salt)
Ingredient Tips & Swaps:
- If you need a gluten-free crust, swap the cookies for gluten-free chocolate sandwich cookies.
- Dairy-free? Use vegan cream cheese and coconut cream for the filling; swap in plant-based butter for the crust.
- Don’t have mini peanut butter cups? Chop up full-size ones or use peanut butter-filled chocolate candies.
- Feel free to use crunchy peanut butter for added texture, or natural peanut butter for a less-sweet, wholesome vibe (just give it a good stir first so it’s smooth).
- Want to make this nut-free? Try sunflower seed butter and use nut-free chocolate candies for the topping.
You honestly can’t go wrong—this is a forgiving recipe, and a few ingredient tweaks won’t ruin the magic. Just don’t skimp on the peanut butter or the chocolate…those are non-negotiable for true indulgence!
Equipment Needed
- 9-inch (23cm) Springform Pan: Essential for easy release and that perfect cheesecake look. If you don’t have one, a deep pie dish works—just line with parchment for easier slicing.
- Food Processor or Blender: Makes crushing cookies a breeze. If you don’t have one, a sturdy zip-top bag and rolling pin do the trick (and it’s oddly satisfying to smash them by hand!).
- Mixing Bowls: At least two—one for the crust, one for the filling.
- Hand Mixer or Stand Mixer: For whipping the cream and blending the filling. A strong arm and a big whisk can work in a pinch, but it’s a workout.
- Rubber Spatula: Helps with scraping every last bit of creamy filling into the pan.
- Measuring Cups & Spoons: Accuracy is key for the perfect set and sweetness balance.
- Small Saucepan: For making the chocolate ganache.
- Sharp Knife: To chop those peanut butter cups and slice the finished cheesecake cleanly.
Personal Note: I’ve made this cheesecake in a pie dish when my springform was MIA, and it still turned out gorgeous—just a little more rustic. If you use a springform pan, keep the bottom lined with parchment for easy transfer to your cake stand (trust me, I learned the hard way!). For cleaning, soak your mixer beaters and bowls right after use so the sticky filling doesn’t set up like cement.
How to Make Peanut Butter Cup Millionaire’s Cheesecake
-
Prepare the Crust:
- Crush 24 chocolate sandwich cookies (about 250g) into fine crumbs using a food processor, blender, or by bashing in a zip-top bag with a rolling pin.
- Mix the cookie crumbs with 6 tbsp (85g) melted unsalted butter and a pinch of salt. The mixture should feel like wet sand and clump together when pressed.
- Press the crumb mixture firmly into the bottom of a 9-inch (23cm) springform pan. Use the bottom of a measuring cup or glass to compact it evenly. Chill in the fridge for at least 20 minutes while making the filling.
-
Make the Peanut Butter Cheesecake Filling:
- In a large mixing bowl, beat 16 oz (450g) softened cream cheese with 1 cup (120g) powdered sugar until completely smooth and fluffy—about 2-3 minutes with a hand mixer. Scrape down the sides often.
- Add 3/4 cup (180g) creamy peanut butter and 2 tsp (10ml) vanilla extract. Beat again until fully combined and creamy. The mixture should be thick and luscious.
- In a separate bowl, whip 1 cup (240ml) heavy cream to soft peaks. Don’t overwhip—just until it holds its shape but is still creamy.
- Gently fold the whipped cream into the peanut butter mixture using a spatula. Fold, don’t stir, to keep things airy. The filling should be light and mousse-like.
-
Assemble the Cheesecake:
- Spread the peanut butter cheesecake filling over the chilled crust. Smooth the top with a spatula, pushing filling to the edges for a clean finish.
- Chill in the fridge for at least 4 hours, or overnight for best results. (Overnight is my preference—the flavors meld and the texture sets perfectly.)
-
Make the Chocolate Ganache:
- Once the cheesecake is set, heat 1/2 cup (120ml) heavy cream in a small saucepan until just steaming (not boiling).
- Pour the hot cream over 1 cup (170g) semi-sweet chocolate chips in a bowl. Let sit for 2 minutes, then stir until smooth and glossy.
- Let the ganache cool for 10 minutes, then pour evenly over the chilled cheesecake. Tilt the pan gently to spread, or use a spatula for a smooth finish.
-
Top & Finish:
- Scatter chopped mini peanut butter cups (about 1 cup / 150g) over the ganache before it sets. Add a sprinkle of crushed salted peanuts or extra chocolate chips if you like.
- Chill for another 30 minutes to set the ganache.
-
Slice & Serve:
- Run a sharp knife around the edge of the pan, then release the springform.
- For clean slices, wipe your knife between cuts.
- Serve chilled. Prepare for wide eyes and recipe requests!
Troubleshooting Tips: If your crust feels crumbly, add another tablespoon of melted butter. If the filling isn’t setting, make sure you’re using full-fat cream cheese and that the whipped cream was folded in gently. And if your ganache is too thick, add a teaspoon of hot cream to loosen it up.
Cooking Tips & Techniques
- Cheesecake Crust Tricks: Always press the crust down firmly, especially around the edges. A loose crust leads to slices that fall apart (learned that one the messy way).
- Softening Cream Cheese: Let it come to room temperature for the creamiest filling. Cold cream cheese can leave lumps, even with the best mixer.
- Whipping Cream: Don’t overbeat. Soft peaks are perfect—stiff cream can make the filling grainy instead of silky.
- Layering: Chill the crust before adding the filling. Chill the assembled cheesecake before adding ganache. Patience pays off with those clean, bakery-style layers.
- Perfect Ganache: Use good-quality chocolate chips for the glossiest finish. If your ganache splits, whisk in a splash of hot cream to bring it back together.
- Multitasking: While the crust chills, make the filling. While the cheesecake sets, chop your toppings. Staggering your steps makes the whole process feel breezy.
- Personal Oops: Once, I tried to rush chilling and the filling oozed—lesson learned. Always give it enough fridge time!
For best results every time, use precise measurements and gentle folding. The real secret? Don’t stress—this recipe is forgiving, and even minor imperfections taste delicious. And if you want that clean “slice and lift” look, run a knife under hot water between each cut. It’s a little trick but makes a world of difference when showing off your Peanut Butter Cup Millionaire’s Cheesecake at a party or on Pinterest!
Variations & Adaptations
- Gluten-Free Version: Swap the sandwich cookies for gluten-free chocolate cookies. All other ingredients are naturally gluten-free—just check your labels to be sure.
- Vegan/Dairy-Free Option: Use vegan cream cheese, coconut cream (in place of heavy cream), and plant-based butter. Opt for dairy-free chocolate chips and vegan-friendly peanut butter cups for the topping.
- Flavor Twists: Try using almond or cashew butter in the filling for a different nutty vibe. Or sprinkle toffee bits on top for a real “millionaire” feel.
- Seasonal Adaptations: In the fall, swirl a little caramel sauce into the ganache layer before topping. For summer, add a layer of sliced bananas or fresh berries under the ganache.
- Nut-Free: Use sunflower seed butter in the filling and top with nut-free chocolate candies instead of peanut butter cups.
- Personal Spin: I’ve tried folding mini chocolate chips right into the peanut butter filling for extra texture—so fun and tasty!
Don’t be afraid to make this dessert your own. The base recipe can handle all sorts of creative spins, so go wild with your favorite candy, nut butters, or toppings. It’s honestly a canvas for your sweet tooth!
Serving & Storage Suggestions
Serving: This cheesecake is best served chilled, straight from the fridge. For a pretty presentation, scatter extra chopped peanut butter cups or a drizzle of warm chocolate sauce right before serving. I love pairing it with a tall glass of cold milk or hot coffee—classic combo, right?
Complementary Dishes: Serve alongside fresh berries or a scoop of vanilla ice cream for a playful twist. For parties, a platter of salty pretzels or salted caramel popcorn balances the richness perfectly.
Storage: Store leftovers tightly covered in the fridge for up to 5 days. The flavors actually deepen after a day or two—if you can wait that long. For longer storage, wrap slices individually and freeze for up to 2 months. Thaw in the fridge overnight before serving.
Reheating: No reheating needed, but if you like your cheesecake a touch softer, let it rest at room temp for 10-15 minutes before slicing. Just don’t let it sit out too long or the layers may soften too much, especially on hot days.
This dessert travels well too—just keep it chilled in a cooler if you’re taking it to a picnic or potluck. Trust me, people will follow you to the dessert table!
Nutritional Information & Benefits
Estimated per serving (1/12 of cheesecake):
- Calories: 540
- Fat: 38g
- Carbs: 44g
- Protein: 9g
- Sugar: 32g
This Peanut Butter Cup Millionaire’s Cheesecake is a treat, no doubt, but it does have a few redeeming qualities! Peanut butter adds protein and healthy fats, while dark chocolate brings antioxidants. Using a gluten-free or dairy-free variation can fit special diets. But heads up: it contains dairy, peanuts, and gluten (unless you swap those ingredients).
From a wellness perspective, I’m all about balance—enjoying a truly decadent dessert now and then makes healthy eating sustainable (and way more fun). So don’t stress the numbers; just savor every bite!
Conclusion
If you’re searching for a dessert that’s showy, outrageously delicious, and surprisingly simple, Peanut Butter Cup Millionaire’s Cheesecake is your answer. Each creamy, crunchy, chocolatey bite feels like a celebration—no oven required! I love how this dessert always brings people together, ignites conversation, and disappears faster than any other treat on the table.
Feel free to customize it based on your cravings or dietary needs. Whether you go classic, gluten-free, or dairy-free, you’ll still get that wow-factor. Personally, this recipe is a reminder that dessert can be both easy and unforgettable, and I hope you love it as much as I do.
If you make this cheesecake (or try a fun variation!), drop a comment below, tag me on social, or share your own twist. I can’t wait to see your creations. Happy no-baking and enjoy every decadent bite!
Frequently Asked Questions
Can I make Peanut Butter Cup Millionaire’s Cheesecake ahead of time?
Yes—this cheesecake is actually better when made a day ahead. The flavors meld and the texture sets perfectly overnight in the fridge.
Do I have to use a springform pan?
Nope! A deep pie dish or an 8×8-inch baking pan works too. Just line it with parchment so you can lift out slices more easily.
Can I use crunchy peanut butter instead of creamy?
Absolutely! Crunchy peanut butter adds extra texture to the filling. Just make sure it’s stirred well so it blends in smoothly.
How do I get clean slices of cheesecake?
Run a sharp knife under hot water, wipe it dry, and slice. Clean the knife between each cut for those perfect edges (and major Pinterest appeal!).
Can I freeze leftover cheesecake?
Yes! Wrap slices tightly and freeze for up to 2 months. Thaw overnight in the fridge before serving—just as delicious as fresh.
Pin This Recipe!

Peanut Butter Cup Millionaire’s Cheesecake Easy No Bake Dessert

This no-bake Peanut Butter Cup Millionaire’s Cheesecake is a decadent, layered dessert featuring a chocolate cookie crust, creamy peanut butter cheesecake filling, silky chocolate ganache, and a topping of chopped peanut butter cups. It’s easy to make, requires no oven, and is guaranteed to impress at any celebration or gathering.
- Prep Time: 30 minutes
- Cook Time: 0 minutes
- Total Time: 4 hours 50 minutes
- Yield: 12 servings 1x
- Category: Dessert
- Cuisine: American
Ingredients
- 24 chocolate sandwich cookies (like Oreos), finely crushed (about 250g)
- 6 tbsp unsalted butter, melted (85g)
- Pinch of salt (optional)
- 16 oz cream cheese, softened to room temperature (450g)
- 1 cup powdered sugar (120g)
- 3/4 cup creamy peanut butter (180g)
- 2 tsp vanilla extract (10ml)
- 1 cup heavy cream, whipped to soft peaks (240ml)
- 1 cup semi-sweet chocolate chips (170g)
- 1/2 cup heavy cream (120ml)
- 1 cup mini peanut butter cups, chopped (150g)
- Extra chocolate chips or melted chocolate for drizzling (optional)
- Crushed salted peanuts (optional)
Instructions
- Crush 24 chocolate sandwich cookies into fine crumbs using a food processor, blender, or by bashing in a zip-top bag with a rolling pin.
- Mix the cookie crumbs with 6 tbsp melted unsalted butter and a pinch of salt until the mixture resembles wet sand.
- Press the crumb mixture firmly into the bottom of a 9-inch springform pan. Chill in the fridge for at least 20 minutes.
- In a large mixing bowl, beat softened cream cheese with powdered sugar until smooth and fluffy (about 2-3 minutes).
- Add creamy peanut butter and vanilla extract. Beat again until fully combined and creamy.
- In a separate bowl, whip 1 cup heavy cream to soft peaks.
- Gently fold the whipped cream into the peanut butter mixture using a spatula until light and mousse-like.
- Spread the peanut butter cheesecake filling over the chilled crust and smooth the top. Chill in the fridge for at least 4 hours, or overnight for best results.
- For the ganache, heat 1/2 cup heavy cream in a small saucepan until just steaming (not boiling).
- Pour the hot cream over 1 cup semi-sweet chocolate chips in a bowl. Let sit for 2 minutes, then stir until smooth and glossy.
- Let the ganache cool for 10 minutes, then pour evenly over the chilled cheesecake. Spread with a spatula for a smooth finish.
- Scatter chopped mini peanut butter cups over the ganache before it sets. Add a sprinkle of crushed salted peanuts or extra chocolate chips if desired.
- Chill for another 30 minutes to set the ganache.
- Run a sharp knife around the edge of the pan, then release the springform. For clean slices, wipe your knife between cuts.
- Serve chilled and enjoy!
Notes
For best results, use full-fat cream cheese and chill the cheesecake overnight for perfect texture. Press the crust firmly for clean slices, and always fold the whipped cream gently into the filling. For gluten-free or dairy-free adaptations, swap in appropriate cookies, cream cheese, and cream. Clean your knife between slices for a bakery-style presentation.
Nutrition
- Serving Size: 1/12 of cheesecake
- Calories: 540
- Sugar: 32
- Sodium: 320
- Fat: 38
- Saturated Fat: 18
- Carbohydrates: 44
- Fiber: 2
- Protein: 9
Keywords: no bake cheesecake, peanut butter cup cheesecake, millionaire’s cheesecake, chocolate peanut butter dessert, easy cheesecake, party dessert, holiday dessert, summer dessert, no oven dessert, layered cheesecake


