
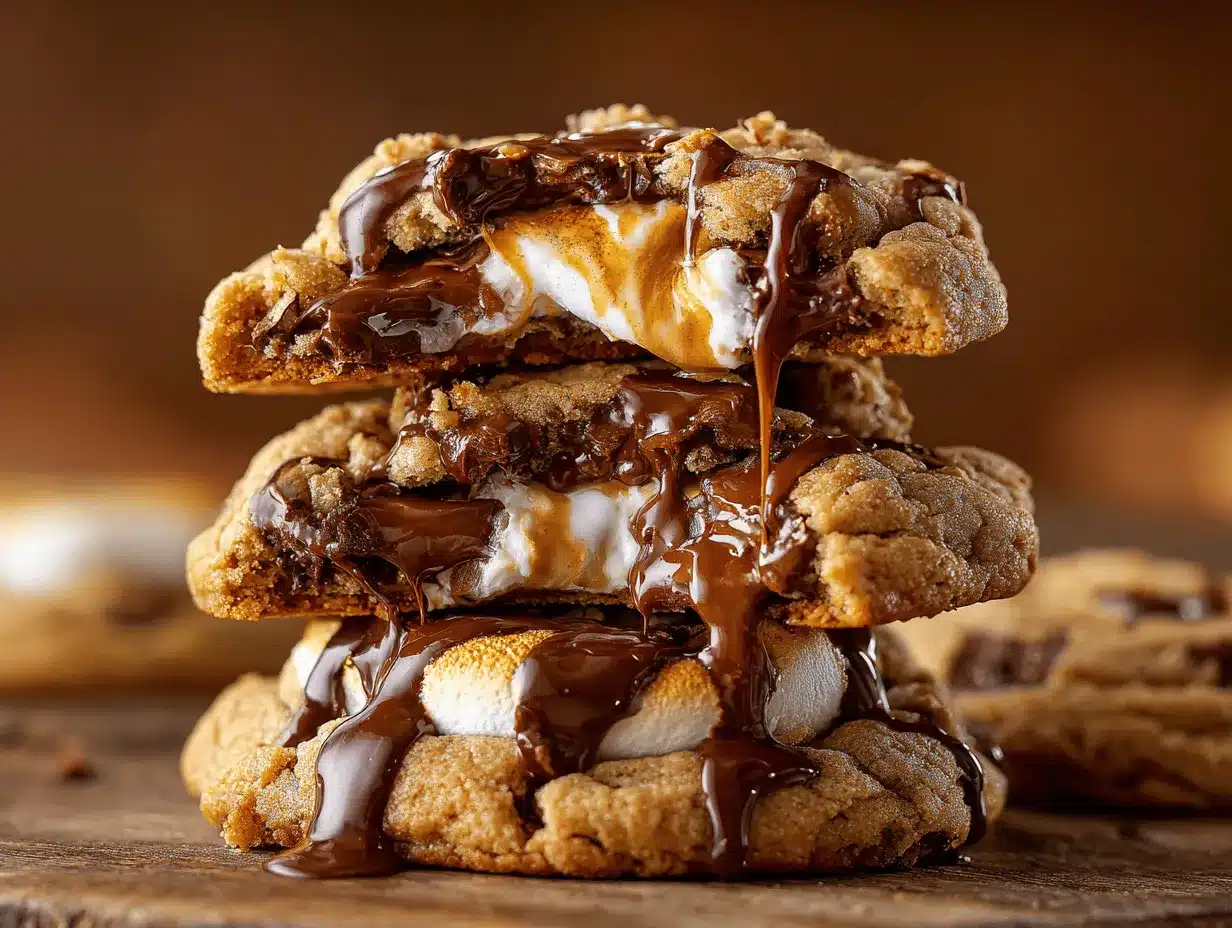
Sticky, gooey chocolate and peanut butter, melty marshmallow, and warm, golden cookies all in one bite—can you picture it? The first time I made these Peanut Butter Cup S’mores Cookies, my kitchen smelled like a campfire dream collided with my favorite bakery. I’ve always loved s’mores, but let’s be honest: making them over a fire isn’t always practical (especially when it’s raining or, you know, 10 degrees outside). That’s where these cookies come in. They’re my go-to comfort treat when I want all the nostalgia of s’mores with the rich flavor of peanut butter cups—no campfire required!
I originally whipped up this recipe for a family movie night. My nephew, who is basically a s’mores connoisseur, declared these cookies “better than the real thing.” After several rounds of testing (and lots of sticky fingers), I knew I’d landed on something special. These peanut butter cup s’mores cookies are the kind of dessert that makes you pause after the first bite, close your eyes, and just smile. They’re perfect for anyone who loves gooey chocolate, that classic marshmallow pull, and a salty-sweet peanut butter twist.
Whether you’re making them for a crowd, treating yourself after a long week, or looking for a bake sale showstopper, these cookies are the answer. Plus, if you’re a fan of easy desserts that taste like they took way more effort than they actually did, you’re in for a treat. Let’s dig into the magic of Peanut Butter Cup S’mores Cookies—you might just find yourself making them on repeat!
Why You’ll Love These Peanut Butter Cup S’mores Cookies
- Quick & Easy: No need for fancy equipment or complicated steps—just mix, scoop, and bake. You can have these cookies ready in under 30 minutes, so they’re perfect for last-minute dessert cravings or impromptu get-togethers.
- Simple Ingredients: Everything you need is probably already in your pantry. Classic peanut butter, chocolate chips, mini marshmallows, and a sleeve of graham crackers—plus those irresistible peanut butter cups, of course.
- Perfect for Any Occasion: These cookies are a hit at parties, potlucks, summer BBQs, and cozy nights in. They even make a fun treat for school bake sales or holiday cookie swaps (trust me, they’ll disappear fast!).
- Crowd-Pleaser: Kids love them, adults sneak seconds, and picky eaters always ask for the recipe. The combination of gooey marshmallow, melty chocolate, and salty peanut butter is pure bliss.
- Unbelievably Delicious: Each bite is loaded with rich peanut butter flavor, bits of chocolate, and that classic s’mores crunch. The texture is soft and chewy with pockets of gooey marshmallow that stretch with every bite. It’s basically the dessert of your dreams.
What really sets these cookies apart is the peanut butter cup in the center—seriously, it’s a game changer. I’ve tried a lot of s’mores-inspired treats, but this mashup is my absolute favorite. The secret is blending graham cracker crumbs right into the dough, so you get that classic s’mores flavor in every bite (no crumbly toppings falling off everywhere). And by using mini marshmallows and chopped peanut butter cups, you get gooey, melty pockets that make every cookie a surprise.
This recipe isn’t just another variation—it’s my best version, perfected over countless batches. It’s the kind of cookie that makes you want to bake a double batch… just in case. And in my experience, these cookies have a magical way of bringing people together—there’s something about s’mores that just makes everyone happy. If you need a little pick-me-up or want to impress your friends with minimal effort, these peanut butter cup s’mores cookies are the answer. Honestly, you might never look at regular cookies the same way again.
What Ingredients You Will Need
This recipe uses simple, tried-and-true ingredients that come together for that ooey-gooey, classic s’mores flavor—plus a peanut butter twist. Most of these are pantry staples, and you can swap a few things if needed. Here’s what you’ll need:
- For the Cookie Dough:
- Unsalted butter, softened (1/2 cup / 113g) – Softened just so it blends smoothly into the dough. I love using Kerrygold for extra richness, but any good butter works.
- Creamy peanut butter (1/2 cup / 130g) – Go for classic, not the natural kind that separates. Jif or Skippy both give that nostalgic peanut butter cookie flavor.
- Light brown sugar (1/2 cup / 100g) – Adds a deep, caramel-y sweetness and keeps the cookies soft.
- Granulated sugar (1/4 cup / 50g) – Balances the brown sugar for the perfect chew.
- Large egg (1) – Room temperature is best for even mixing.
- Vanilla extract (1 tsp / 5ml) – I’m partial to Nielsen-Massey for its pure flavor, but any real vanilla works.
- All-purpose flour (1 cup / 125g) – The base of your dough. For a gluten-free option, sub in your favorite 1:1 gluten-free flour blend.
- Graham cracker crumbs (3/4 cup / 80g) – Crush about 6-7 graham crackers in a zip bag with a rolling pin. Adds that classic s’mores taste right in the dough.
- Baking soda (1/2 tsp / 2g)
- Salt (1/4 tsp / 1g) – Just a pinch brings out all the flavors.
- For the Add-Ins:
- Mini marshmallows (1 cup / 50g) – These melt into gooey pockets. If you only have big marshmallows, just snip them into smaller bits.
- Semisweet chocolate chips (3/4 cup / 130g) – Brings extra chocolatey goodness. Milk or dark chocolate chips work, too.
- Mini peanut butter cups, chopped (1 cup / 170g) – I like Reese’s Minis, but you can use any brand or even chop up regular peanut butter cups.
- Extra graham cracker pieces (for topping, optional) – For extra crunch and a bakery-style look.
Ingredient Tips: If you want to get fancy, try swapping the chocolate chips for chopped dark chocolate bars. Or, if you’re feeling extra, stuff a whole mini peanut butter cup in the center of each cookie for a molten surprise (I’ve done it, and it’s incredible). For allergies, sunflower seed butter works in place of peanut butter, and dairy-free chocolate makes these cookies vegan-friendly if you use a flax egg.
Equipment Needed
- Mixing bowls: At least one large and one medium bowl. I’ve used everything from glass to metal—whatever you have is fine.
- Electric mixer (handheld or stand): Not required, but it makes creaming the butter and sugar much easier. If you’re mixing by hand, just use a sturdy wooden spoon and some elbow grease.
- Baking sheets: Standard half-sheet pans work great. Line them with parchment paper for easy cleanup (and to prevent sticking).
- Measuring cups and spoons: For accuracy—baking is a bit of a science, after all. If you have a kitchen scale, even better (less mess, more precision).
- Cookie scoop or tablespoon: A medium cookie scoop (about 1.5 tablespoons) gives uniform cookies, but two spoons do the trick if you don’t have one.
- Cooling rack: For cooling your cookies evenly and quickly. If you don’t have one, just let them cool on the baking sheet (they’ll be a little softer, which is honestly not a bad thing here).
- Optional: Rolling pin and zip-top bag for crushing graham crackers. You can also use a food processor, but I kind of like smashing them the old-school way—it’s weirdly satisfying.
Tip: If your cookie sheets are old and tend to warp, double up two sheets for even baking. And keep those parchment sheets handy—they make cleanup so much easier, especially with sticky marshmallow bits. For budget-friendly options, dollar store measuring cups and thrifted bowls work just as well as the fancy stuff—trust me, I’ve baked with both!
Preparation Method
- Preheat and Prep: Preheat your oven to 350°F (175°C). Line two baking sheets with parchment paper. This helps prevent sticking—especially with all that gooey marshmallow.
- Cream Butter, Peanut Butter, and Sugars: In a large mixing bowl, beat together 1/2 cup (113g) unsalted butter and 1/2 cup (130g) creamy peanut butter until smooth and fluffy (about 2-3 minutes). Add 1/2 cup (100g) light brown sugar and 1/4 cup (50g) granulated sugar. Beat again until light and creamy, scraping down the sides as needed. You want everything well combined, no streaks left.
- Add Egg and Vanilla: Mix in 1 large egg and 1 tsp (5ml) vanilla extract. Beat on medium speed until fully incorporated (about 30 seconds). The dough will look silky and a bit lighter in color.
- Mix Dry Ingredients: In a separate bowl, whisk together 1 cup (125g) all-purpose flour, 3/4 cup (80g) graham cracker crumbs, 1/2 tsp (2g) baking soda, and 1/4 tsp (1g) salt. Make sure there are no lumps—this helps the cookies bake evenly.
- Combine Wet and Dry: Gradually add the dry ingredients to the wet mixture, mixing on low speed or by hand just until combined. Don’t overmix—the dough should be soft but not sticky. If it feels too dry, add a splash of milk (about 1 tablespoon) to bring it together.
- Fold in Add-Ins: Gently stir in 1 cup (50g) mini marshmallows, 3/4 cup (130g) semisweet chocolate chips, and 1 cup (170g) chopped mini peanut butter cups. Make sure they’re evenly distributed—sometimes I use my hands for this part. If your dough gets sticky, chill it for 10 minutes.
- Scoop and Shape: Using a medium cookie scoop or spoon, drop heaping tablespoons of dough onto the prepared baking sheets, spacing them about 2 inches (5cm) apart. For extra gooey centers, press a few extra marshmallows or chocolate chips on top. You can also press a small piece of graham cracker into each cookie for a bakery-style finish.
- Bake: Bake in the preheated oven for 8-10 minutes, until the edges are lightly golden but the centers still look soft and slightly underbaked. Baking note: Marshmallows puff up and caramelize, so some spreading is normal. (If you like crispier edges, bake for 1-2 extra minutes.)
- Cool: Let the cookies cool on the pan for 5 minutes. They’ll be super soft, so don’t rush this part. Then, use a spatula to transfer them to a cooling rack. The cookies will firm up as they cool, but the centers stay gooey and soft.
- Troubleshooting: If your cookies spread too much, chill the dough for 20 minutes before baking. If marshmallows melt out, just nudge them back in with a spoon while the cookies are still warm. If you want perfectly round cookies, use a round cookie cutter to nudge the edges into shape right after baking (it’s a little trick I picked up from a pastry chef friend).
Efficiency Tip: Measure and prep all your ingredients before you start—makes the process go way faster. And if you’re baking with kids, let them help crush the graham crackers and press in the peanut butter cups. It’s messy, but it’s seriously fun.
Cooking Tips & Techniques
I’ve learned a few things (sometimes the hard way) after baking dozens of batches of these peanut butter cup s’mores cookies. Here are my best tips for cookie perfection:
- Room Temperature Ingredients: Make sure your butter and egg are at room temp. Cold ingredients won’t cream properly and can make the dough dry or dense.
- Don’t Overmix: Once you add the dry ingredients, mix just until you see no more flour streaks. Overmixing = tough cookies (learned that one the hard way!).
- Chill for Thicker Cookies: If you want a thicker, bakery-style cookie, chill the dough for at least 30 minutes before baking. This keeps the cookies from spreading too much and gives you those gorgeous gooey centers.
- Watch the Marshmallows: Marshmallows will brown and sometimes ooze out. Don’t worry—it’s part of the charm! If you want less mess, tuck the marshmallows into the center of the dough balls as best you can.
- Rotate the Pan: For even baking, rotate your baking sheet halfway through. Some ovens have hot spots, and this helps every cookie bake up the same.
- Bake One Sheet at a Time: Unless you have a convection oven, bake one tray at a time in the center of the oven. This gives the most even results and perfect browning.
- Finishing Touch: Right after baking, sprinkle a pinch of flaky sea salt on top for a sweet-salty kick. It really amps up all the flavors!
And here’s a personal confession: I once tried to speed through this recipe by melting the butter. The cookies ended up super flat and kind of greasy—not the gooey, thick treats I wanted. So, don’t rush the creaming step. Take your time, and you’ll get the best results every time.
Variations & Adaptations
There’s a ton of room to make these peanut butter cup s’mores cookies your own! Here are a few of my favorite twists:
- Gluten-Free: Use a 1:1 gluten-free flour blend and swap the graham crackers for gluten-free graham-style cookies (like Pamela’s). You won’t even notice the difference—promise!
- Nut-Free: Substitute sunflower seed butter for the peanut butter and use nut-free chocolate cups (like SunButter cups). Great for school-friendly treats or anyone with allergies.
- Double Chocolate: Use chocolate graham crackers and add 2 tablespoons of cocoa powder to the dough for an ultra-chocolatey version. My brother-in-law swears by this one.
- Seasonal Swaps: Try adding a sprinkle of cinnamon in fall, or stir in chopped peppermint patties instead of peanut butter cups for a winter holiday vibe.
- Different Cooking Methods: If you want to try these in an air fryer, scoop smaller balls and bake at 325°F (160°C) for 6-7 minutes. Watch closely—they cook fast!
- Personal Favorite: I once mixed in a handful of mini pretzels for extra crunch and a salty kick—honestly, it was next-level good.
Don’t be afraid to play around. If you love caramel, drizzle some on top before serving. Or, if you’re a dark chocolate lover, swap the chips and cups for your favorite 70% bar. That’s the beauty of this recipe—you can tweak it to fit your cravings or pantry stash!
Serving & Storage Suggestions
These peanut butter cup s’mores cookies are best served warm, fresh from the oven, when the marshmallows are gooey and the chocolate is melty. If you want to go all out, top each cookie with an extra mini marshmallow and a piece of peanut butter cup right before serving—people go wild for that bakery-style look.
Pair them with a cold glass of milk, hot cocoa, or even a scoop of vanilla ice cream for a decadent dessert. For parties, stack them on a rustic wood board or plate them with extra graham cracker crumbs for a Pinterest-worthy presentation.
To store, let the cookies cool completely, then keep them in an airtight container at room temperature for up to 4 days. I like to separate layers with parchment paper to keep the marshmallows from sticking. For longer storage, freeze baked cookies in a zip-top bag for up to 2 months—just reheat in the microwave for 10-15 seconds to bring back that gooey magic. The flavors get even more delicious after a day or two, as the cookies soften and meld together. Trust me, if you manage to have leftovers, you’re in for a treat later!
Nutritional Information & Benefits
Each peanut butter cup s’mores cookie (based on a batch of 18) contains roughly 180 calories, 9g fat, 24g carbohydrates, and 3g protein. They’re a sweet treat, for sure, but with the protein from peanut butter and the option for whole grain graham crackers, there’s a bit of staying power, too.
Key Benefits: Peanut butter adds healthy fats and a little protein, while the antioxidants in dark chocolate chips bring some heart-healthy perks. If you go for the gluten-free or dairy-free swaps, you can fit these into lots of special diets. Just a heads-up: these contain peanuts, eggs, wheat, and dairy, so be mindful of allergies.
From a wellness perspective, I’m all about balance. These cookies are meant to be a joyful treat—one that satisfies your sweet tooth and brings a little nostalgia with every bite. Enjoy them mindfully, and they fit perfectly into a happy, healthy lifestyle!
Conclusion
If you’re looking for the ultimate gooey, chocolatey, peanut buttery treat, these peanut butter cup s’mores cookies are it. They’re quick to whip up, use simple ingredients, and deliver all the comfort of s’mores (with a bakery-worthy twist). Every time I make these, I’m reminded how food brings people together—there’s just something about s’mores that makes everyone smile.
Don’t be afraid to switch things up with your favorite add-ins or make mini versions for sharing. Honestly, I love these cookies because they’re fun, nostalgic, and always a hit—plus, they make my kitchen smell like heaven.
Give this recipe a try, and let me know how it goes! Share your cookie creations in the comments, tell me about your favorite twists, or tag me if you post them online. I can’t wait to see all the delicious ways you make these peanut butter cup s’mores cookies your own. Happy baking, and don’t forget to enjoy every gooey, melty bite!
Frequently Asked Questions
Can I make these peanut butter cup s’mores cookies gluten-free?
Yes! Just swap in a 1:1 gluten-free flour blend for the all-purpose flour and use gluten-free graham crackers. The cookies turn out just as delicious.
What’s the best way to keep marshmallows from melting out?
Tuck the marshmallows inside the dough balls before baking. If some still ooze out, you can gently push them back in with a spoon right after baking—they’ll stay soft and gooey.
Can I use crunchy peanut butter instead of creamy?
Absolutely! Crunchy peanut butter adds a fun texture. Just be sure to avoid natural peanut butters that separate, as they can make the dough greasy.
How do I store leftover cookies?
Keep them in an airtight container at room temperature for up to 4 days, or freeze for up to 2 months. Microwave for a few seconds to make them gooey again!
Can I make the dough ahead of time?
Yes, you can chill the dough in the fridge for up to 48 hours before baking. Just let it sit at room temperature for 10-15 minutes before scooping and baking.
Pin This Recipe!

Peanut Butter Cup S’mores Cookies
These Peanut Butter Cup S’mores Cookies combine gooey chocolate, melty marshmallow, and a salty-sweet peanut butter twist in a soft, chewy cookie. They deliver all the nostalgia of classic s’mores with the rich flavor of peanut butter cups—no campfire required!
- Prep Time: 15 minutes
- Cook Time: 10 minutes
- Total Time: 25 minutes
- Yield: 18 cookies 1x
- Category: Dessert
- Cuisine: American
Ingredients
- 1/2 cup (113g) unsalted butter, softened
- 1/2 cup (130g) creamy peanut butter (not natural)
- 1/2 cup (100g) light brown sugar
- 1/4 cup (50g) granulated sugar
- 1 large egg, room temperature
- 1 teaspoon (5ml) vanilla extract
- 1 cup (125g) all-purpose flour
- 3/4 cup (80g) graham cracker crumbs (about 6–7 crackers, crushed)
- 1/2 teaspoon (2g) baking soda
- 1/4 teaspoon (1g) salt
- 1 cup (50g) mini marshmallows
- 3/4 cup (130g) semisweet chocolate chips
- 1 cup (170g) mini peanut butter cups, chopped
- Extra graham cracker pieces, for topping (optional)
Instructions
- Preheat your oven to 350°F (175°C). Line two baking sheets with parchment paper.
- In a large mixing bowl, beat together the butter and peanut butter until smooth and fluffy (about 2-3 minutes).
- Add the brown sugar and granulated sugar. Beat again until light and creamy, scraping down the sides as needed.
- Mix in the egg and vanilla extract. Beat on medium speed until fully incorporated (about 30 seconds).
- In a separate bowl, whisk together the flour, graham cracker crumbs, baking soda, and salt.
- Gradually add the dry ingredients to the wet mixture, mixing on low speed or by hand just until combined. If the dough feels too dry, add a splash of milk (about 1 tablespoon).
- Gently stir in the mini marshmallows, chocolate chips, and chopped mini peanut butter cups until evenly distributed.
- Using a medium cookie scoop or spoon, drop heaping tablespoons of dough onto the prepared baking sheets, spacing them about 2 inches apart. Press extra marshmallows, chocolate chips, or graham cracker pieces on top if desired.
- Bake for 8-10 minutes, until the edges are lightly golden but the centers still look soft and slightly underbaked.
- Let the cookies cool on the pan for 5 minutes, then transfer to a cooling rack to finish cooling. The cookies will firm up as they cool but remain gooey in the center.
Notes
For thicker cookies, chill the dough for at least 30 minutes before baking. Tuck marshmallows into the center of the dough balls to minimize oozing. Sprinkle flaky sea salt on top after baking for a sweet-salty finish. Store in an airtight container for up to 4 days or freeze for up to 2 months. For gluten-free, use a 1:1 gluten-free flour blend and gluten-free graham crackers.
Nutrition
- Serving Size: 1 cookie
- Calories: 180
- Sugar: 14
- Sodium: 90
- Fat: 9
- Saturated Fat: 4
- Carbohydrates: 24
- Fiber: 1
- Protein: 3
Keywords: peanut butter cup s'mores cookies, s'mores cookies, peanut butter cookies, easy dessert, gooey cookies, chocolate marshmallow cookies, bake sale cookies, summer dessert, American cookies, peanut butter cup recipes


