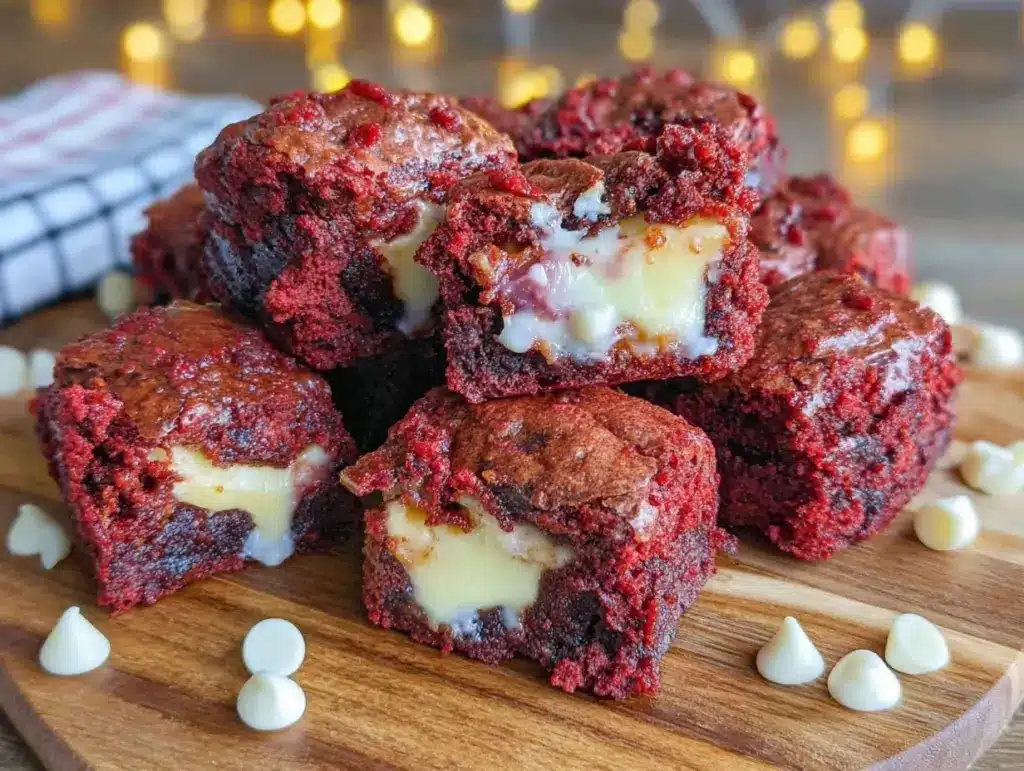
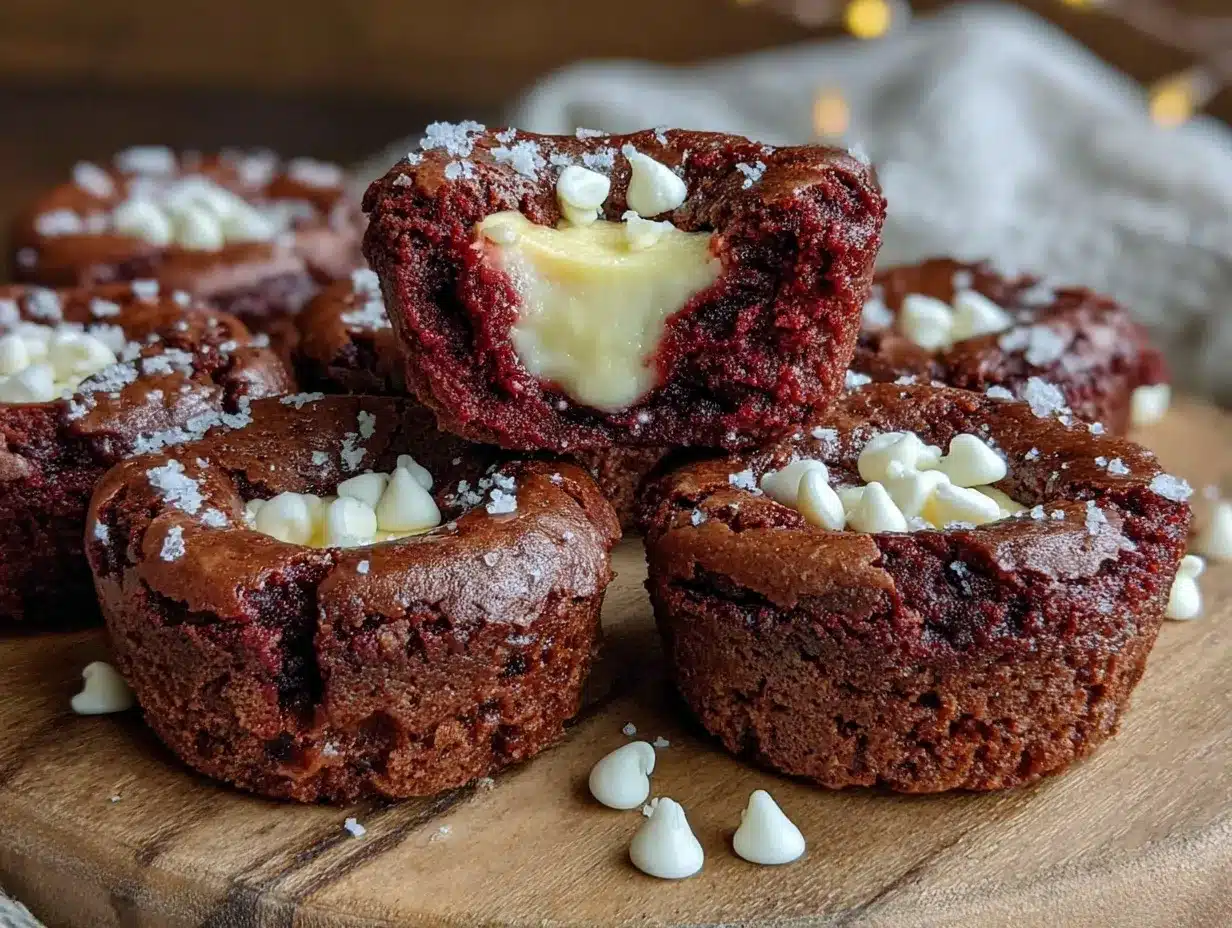
Velvety, plush, and just a little bit squishy — that’s the whole point of these Red Velvet Cheesecake Brownie Bombs. The moment you look at one, you notice the rich, crimson crumb hugging a creamy, dreamy cheesecake center that seems to promise a tender, moist bite with just the right amount of give. I made these because the texture obsessed part of me wanted something that felt as indulgent to touch as it tastes on the tongue.
There’s something about that soft, almost pillowy crumb contrasted against the cheesecake’s smooth silkiness that keeps pulling me back to this recipe. It’s not just another dessert; it’s a tactile experience. When I first baked them, I remember poking one with a fork to see if it held together, and it did — but only just enough to feel like a little treasure held in my hand, not a crumbly mess. Honestly, if you’re someone who judges food by how it feels before you even taste it, you’ll get what I’m saying.
These little brownie bombs are perfect for those moments when you want a dessert that’s as fun to hold as to eat. They’ve stuck with me because they’re reliable — even on a rushed weekday evening when I’m craving something sweet but don’t want to fuss with a cake or pie. Plus, the vibrant red velvet hue is a feast for the eyes too, making them a showstopper at any gathering without the fuss of fancy decoration.
There’s a quiet satisfaction in knowing you made something that melts just right, with that velvety crumb wrapping around cheesecake like a cozy blanket. This recipe has become my go-to when I want dessert to feel like a comforting hug — without being heavy or dry. Trust me, once you meet these Red Velvet Cheesecake Brownie Bombs, you’ll understand why I keep coming back for more.
Why You’ll Love This Recipe
- Quick & Easy: Ready in just about 45 minutes from start to finish, making it perfect for last-minute dessert emergencies or casual weekend baking.
- Simple Ingredients: No need for exotic or hard-to-find items; most are pantry staples, so you can whip these up anytime.
- Perfect for Celebrations: Whether it’s Valentine’s Day, a birthday, or just a sweet midweek treat, these bombs bring the festive feel effortlessly.
- Crowd-Pleaser: These get rave reviews from kids and adults alike — the cheesecake surprise inside is always a hit.
- Unbelievably Delicious: The rich red velvet flavor balances beautifully with the tangy, creamy cheesecake center — it’s a texture and flavor combo that’s downright addictive.
This isn’t your average brownie. The magic happens in the layering and the balance of textures — the cheesecake batter is blended until ultra-smooth to avoid lumps, which keeps the center silky and luxurious. The red velvet brownie part uses buttermilk and cocoa powder for that classic tang and depth, but with a twist: a slight extra touch of vanilla to round it out perfectly. I’ve tried a few versions, but this one consistently nails the moist crumb and cheesecake ratio, every single time.
Honestly, this recipe is the kind of dessert that makes you close your eyes after the first bite — not because it’s overly sweet, but because it’s just that satisfying. It’s a little indulgent, a little elegant, and a whole lot of fun to make. Plus, if you enjoy party appetizers like the BBQ pulled pork sliders, these Red Velvet Cheesecake Brownie Bombs make a perfect sweet balance to your festive menu.
What Ingredients You Will Need
This recipe uses straightforward ingredients that work together to create bold flavor and that signature moist, tender texture without a lot of fuss. Most are pantry staples, and there’s room for easy swaps if needed.
- For the Red Velvet Brownie Batter:
- All-purpose flour — 1 cup (125g)
- Cocoa powder (unsweetened) — 2 tablespoons (use a quality brand like Ghirardelli for best flavor)
- Baking powder — 1/2 teaspoon
- Salt — 1/4 teaspoon
- Unsalted butter — 6 tablespoons (85g), melted and slightly cooled
- Granulated sugar — 3/4 cup (150g)
- Large egg — 1, room temperature
- Buttermilk — 1/4 cup (60ml) (adds tang and moisture; can substitute with milk plus 1 tsp vinegar)
- Vanilla extract — 1 teaspoon
- Red food coloring — 2 tablespoons (gel type preferred for vibrant color without adding liquid)
- For the Cheesecake Filling:
- Cream cheese — 8 oz (225g), softened (I prefer Philadelphia brand for smooth texture)
- Granulated sugar — 1/4 cup (50g)
- Large egg yolk — 1 (room temperature)
- Vanilla extract — 1/2 teaspoon
- All-purpose flour — 1 tablespoon (to help stabilize the filling)
If you want to make these gluten-free, swap the all-purpose flour with a gluten-free baking blend. For a dairy-free version, try coconut cream cheese and a non-dairy milk option instead of buttermilk. And just a heads-up — fresh cream cheese at room temperature is key for that ultra-smooth filling I love so much.
Equipment Needed
- Mixing bowls — a medium and a large bowl
- Electric hand mixer or stand mixer — for smooth cheesecake filling and brownie batter mixing
- Measuring cups and spoons — accuracy matters for texture
- Mini muffin pan or silicone molds — these help shape the brownie bombs perfectly (I’ve also used a regular muffin pan with liners)
- Spatula — for folding and scraping the bowls clean
- Cooling rack — to let your brownie bombs cool evenly
If you don’t have a stand mixer, the hand mixer works just fine. Silicone molds make cleanup easier, but traditional muffin tins with parchment liners will do. I’ve found that lightly greasing the pan or using liners prevents sticking without affecting texture. Also, keeping your cream cheese at room temperature makes mixing so much easier — no lumps!
Preparation Method
- Prepare the Cheesecake Filling (10 minutes): In a medium bowl, beat the softened cream cheese with sugar until very smooth and creamy, about 2-3 minutes. Add the egg yolk, vanilla extract, and flour. Beat again until fully incorporated and silky. Set this aside in the fridge while you prepare the brownie batter — chilling helps it firm up slightly for easier scooping later.
- Make the Red Velvet Brownie Batter (15 minutes): In a large bowl, whisk together the flour, cocoa powder, baking powder, and salt. In a separate bowl, mix the melted butter and sugar until combined but not grainy. Add the egg, buttermilk, vanilla extract, and red food coloring to the butter mixture, stirring well. Gradually add the dry ingredients to the wet ingredients, folding gently until just combined. Don’t overmix — the batter should be smooth but slightly thick.
- Preheat and Prepare Baking Pan (5 minutes): Preheat your oven to 350°F (175°C). Grease your mini muffin pan or silicone molds lightly with butter or nonstick spray. This helps the brownie bombs release easily later.
- Assemble the Brownie Bombs (10 minutes): Spoon a small amount of red velvet brownie batter (about 1 teaspoon) into each muffin cup to form a base layer. Then, drop about 1 teaspoon of the chilled cheesecake filling into the center of each. Finally, cover with another teaspoon of brownie batter to seal the cheesecake inside. Use the back of a spoon or your fingers to gently smooth the tops so they’re fairly even.
- Bake and Cool (20 minutes + 15 minutes cooling): Bake the brownie bombs for 18-20 minutes, or until the tops spring back slightly when touched and a toothpick inserted near the edge comes out with a few moist crumbs but no wet batter. Avoid overbaking to keep them tender and fudgy. Let them cool in the pan for 10 minutes, then transfer to a wire rack to cool completely. For best texture, chill them for at least 30 minutes before serving — this helps the cheesecake set beautifully inside.
If you notice the cheesecake filling oozing out during baking, try chilling it longer next time or using slightly less filling per bomb. The batter’s thickness can vary by flour brand, so adjust gently if it feels too runny or stiff. The vibrant red color will deepen after baking, so don’t worry if the raw batter looks a bit brighter.
Cooking Tips & Techniques
Getting the texture right is key here. I’ve learned that the key to these irresistible Red Velvet Cheesecake Brownie Bombs is balancing moisture in both components. Too much flour in the brownie batter can dry them out, so measure carefully.
Mix the cheesecake filling just enough to get it smooth — overbeating can add too much air, causing cracks or bubbles when baking. Also, chilling the cheesecake filling before assembly helps it hold its shape, preventing it from melting into the brownie too much.
When assembling, gently pressing the brownie batter over the cheesecake filling is crucial. If you press too hard, the filling might squish out; too little and the bombs might crack on top. Practice makes perfect here, honestly.
Timing is everything, too. I always set a timer and start checking the bombs a couple of minutes before the suggested bake time. Ovens vary, and these are delicate — underbaking keeps them moist, but don’t go too far or they’ll be gooey messes.
Lastly, chilling after baking isn’t just for taste — it helps the cheesecake center firm up so your brownie bombs slice or bite cleanly without crumbling apart.
Variations & Adaptations
- For a Nutty Crunch: Add finely chopped pecans or walnuts into the brownie batter for texture contrast. Toast them lightly first to bring out deeper flavor.
- Chocolate Lovers’ Twist: Fold mini chocolate chips into the brownie batter or sprinkle them on top before baking for an extra melty surprise.
- Seasonal Flavor Swap: Around the holidays, swap the cheesecake filling for pumpkin-spiced cream cheese mixture for a festive vibe.
- Gluten-Free Option: Use a 1:1 gluten-free flour blend to accommodate dietary needs without sacrificing texture.
- Dairy-Free Version: Try coconut cream cheese and plant-based butter alternatives; just be mindful of slight texture changes.
I once tried swirling raspberry jam into the cheesecake filling before baking, which gave a lovely tart note and a pretty marbled look. It didn’t change the texture much but added complexity — definitely worth a try if you like fruity surprises.
Serving & Storage Suggestions
These Red Velvet Cheesecake Brownie Bombs taste best slightly chilled or at room temperature. I usually serve them after a 30-minute chill in the fridge, which firms up the cheesecake center and makes them easier to handle.
They make a fantastic finger food dessert for parties, especially paired with a dollop of whipped cream or a dusting of powdered sugar. For a beverage pairing, try a cup of rich coffee or a fruity red wine to complement the sweetness.
Store leftover brownie bombs in an airtight container in the refrigerator for up to 4 days. They freeze well too — just pop them in a freezer-safe bag for up to 2 months. Thaw in the fridge overnight and bring to room temperature before serving.
Flavors actually deepen after a day or two, so if you can wait, the texture becomes even more luscious. Just be aware the cheesecake center firms up a bit, which some people prefer.
Nutritional Information & Benefits
Each Red Velvet Cheesecake Brownie Bomb contains approximately 180-220 calories, depending on size. They offer a moderate amount of protein thanks to the cream cheese and eggs, alongside indulgent fats from butter and cream cheese.
The buttermilk adds a slight tang and aids digestion, while cocoa powder provides antioxidants. This dessert isn’t exactly health food, but the portion control and balanced ingredients make it a satisfying treat without going overboard.
For those mindful of allergens, these contain dairy, eggs, and gluten unless modifications are made. Swapping in gluten-free flour or dairy-free alternatives can help accommodate most dietary needs.
I personally enjoy these as an occasional indulgence that satisfies my sweet tooth and texture cravings without feeling overly heavy or cloying — a nice balance for comfort and enjoyment.
Conclusion
These Red Velvet Cheesecake Brownie Bombs are a perfect blend of textures and flavors that stick with you long after the last bite. They bring a cozy, indulgent feel to any dessert table but come together with surprisingly little fuss.
Whether you keep it classic or try one of the variations, this recipe invites you to make it your own — adjusting sweetness, texture, or flavors to suit your mood. I love these because they remind me that dessert can be fun, tactile, and just a little bit fancy without needing hours in the kitchen.
If you give these a try, I’d love to hear how you make them yours. Share your twists or moments enjoying these with friends — it’s a recipe that’s meant to be shared and savored.
Frequently Asked Questions
Can I make these brownie bombs ahead of time?
Absolutely! They store well in the fridge for up to 4 days and freeze nicely for up to 2 months. Just thaw in the fridge before serving.
What’s the best way to prevent the cheesecake filling from leaking?
Make sure your cream cheese is well chilled before assembling, and don’t overfill each brownie bomb. Gently seal the batter over the filling and chill again if needed before baking.
Can I use regular milk instead of buttermilk?
Yes, just add 1 teaspoon of vinegar or lemon juice to 1/4 cup of milk and let it sit for 5 minutes to mimic buttermilk’s tang and acidity.
How do I get the red color so vibrant?
Using gel food coloring helps achieve a bright, rich red without watering down the batter. Liquid food coloring works, but you may need more to get the same intensity.
Can I double the recipe for a larger batch?
Yes, just double all ingredients and bake in batches or use a larger pan. Baking times might increase slightly, so keep an eye on them and test with a toothpick.
Pin This Recipe!
Red Velvet Cheesecake Brownie Bombs
Velvety, plush, and just a little bit squishy, these Red Velvet Cheesecake Brownie Bombs feature a rich crimson crumb hugging a creamy cheesecake center, offering a tender, moist bite with a perfect balance of textures and flavors.
- Prep Time: 25 minutes
- Cook Time: 20 minutes
- Total Time: 45 minutes
- Yield: 24 brownie bombs 1x
- Category: Dessert
- Cuisine: American
Ingredients
- 1 cup all-purpose flour (125g)
- 2 tablespoons unsweetened cocoa powder
- 1/2 teaspoon baking powder
- 1/4 teaspoon salt
- 6 tablespoons unsalted butter (85g), melted and slightly cooled
- 3/4 cup granulated sugar (150g)
- 1 large egg, room temperature
- 1/4 cup buttermilk (60ml) (or substitute with 1/4 cup milk plus 1 teaspoon vinegar)
- 1 teaspoon vanilla extract
- 2 tablespoons red gel food coloring
- 8 oz cream cheese (225g), softened
- 1/4 cup granulated sugar (50g)
- 1 large egg yolk, room temperature
- 1/2 teaspoon vanilla extract
- 1 tablespoon all-purpose flour
Instructions
- Prepare the Cheesecake Filling: In a medium bowl, beat the softened cream cheese with sugar until very smooth and creamy, about 2-3 minutes. Add the egg yolk, vanilla extract, and flour. Beat again until fully incorporated and silky. Set aside in the fridge to chill.
- Make the Red Velvet Brownie Batter: In a large bowl, whisk together flour, cocoa powder, baking powder, and salt. In a separate bowl, mix melted butter and sugar until combined but not grainy. Add egg, buttermilk, vanilla extract, and red food coloring to the butter mixture and stir well. Gradually fold dry ingredients into wet ingredients until just combined. Do not overmix.
- Preheat oven to 350°F (175°C). Lightly grease mini muffin pan or silicone molds with butter or nonstick spray.
- Assemble the Brownie Bombs: Spoon about 1 teaspoon of brownie batter into each muffin cup to form a base layer. Drop about 1 teaspoon of chilled cheesecake filling into the center of each. Cover with another teaspoon of brownie batter to seal the cheesecake inside. Smooth the tops gently.
- Bake for 18-20 minutes until tops spring back slightly and a toothpick inserted near the edge comes out with a few moist crumbs but no wet batter. Let cool in pan for 10 minutes, then transfer to a wire rack to cool completely. Chill for at least 30 minutes before serving.
Notes
Use gel food coloring for vibrant red color without adding liquid. Keep cream cheese at room temperature for smooth filling. Chill cheesecake filling before assembly to prevent leaking. Avoid overbaking to keep brownie bombs moist and fudgy. Chill after baking to firm up cheesecake center for clean slicing or biting.
Nutrition
- Serving Size: 1 brownie bomb
- Calories: 200
- Sugar: 16
- Sodium: 120
- Fat: 12
- Saturated Fat: 7
- Carbohydrates: 22
- Fiber: 1
- Protein: 3
Keywords: red velvet, cheesecake, brownie bombs, dessert, easy recipe, party dessert, quick dessert, indulgent, moist brownies


