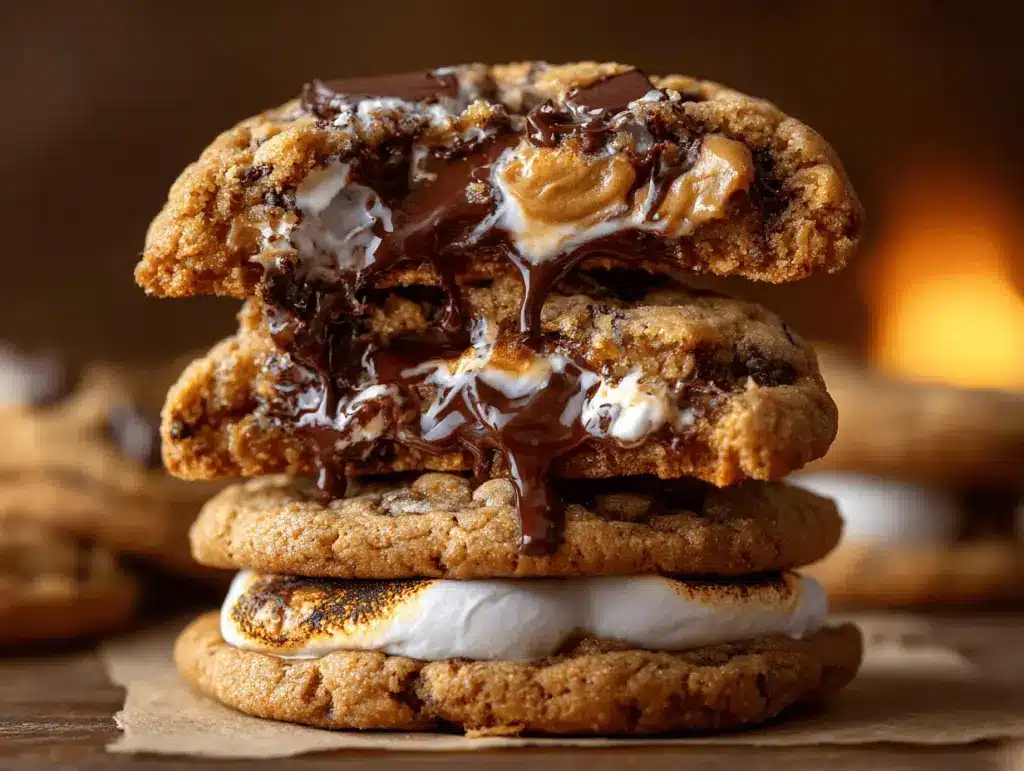
The first time I bit into a warm, stuffed peanut butter s’mores cookie, I genuinely thought I’d found dessert heaven. Picture this: melty chocolate, gooey marshmallow, and creamy peanut butter—all wrapped up in a chewy cookie crust. The smell alone—roasty marshmallow, nutty peanut butter, and a hint of brown sugar—makes my kitchen feel like a cozy summer campfire. Honestly, these cookies are pure nostalgia with a little grown-up twist.
I stumbled on this recipe during a late-night baking spree with my kids. We loved classic s’mores but wanted something less messy and more portable. After a few (okay, a dozen) test batches—trust me, my family didn’t complain—I finally landed on this stuffed peanut butter s’mores cookies recipe. It’s now our go-to for movie nights, bake sales, and whenever we crave a little extra comfort.
What makes these cookies special? They’re not your average chocolate chip or peanut butter cookie. These are thick, soft, and bursting with gooey surprises in every bite. You get the best of all worlds: the nutty depth of peanut butter, the sweet crunch of graham cracker, and that classic s’mores combo of chocolate and marshmallow. Plus, they’re surprisingly easy to make—no fancy tools, no complicated steps. Just simple, honest baking that delivers big on flavor and fun.
If you’ve ever wished you could pack the magic of a campfire treat into a cookie, this recipe is for you. It’s perfect for families, peanut butter lovers, and anyone who believes dessert should be a little messy and a lot of fun. After baking these more times than I can count, I can say with total confidence: stuffed peanut butter s’mores cookies are my ultimate homemade bliss.
Why You’ll Love This Stuffed Peanut Butter S’mores Cookies Recipe
- Quick & Easy: These cookies come together in under an hour, dough and all—no chilling, no waiting for magic to happen overnight. Perfect for spontaneous cravings or last-minute guests.
- Simple Ingredients: Nothing fancy here—everything you need is probably already in your pantry. No hunting for specialty flours or rare gadgets!
- Ultimate Party Cookie: These cookies are show-stoppers at potlucks, BBQs, or holiday cookie trays. People always grab seconds (and ask for the recipe).
- Kid-Approved & Adult-Adored: My kids are obsessed, but honestly, so are my friends. There’s a playful, campfire nostalgia that makes everyone smile.
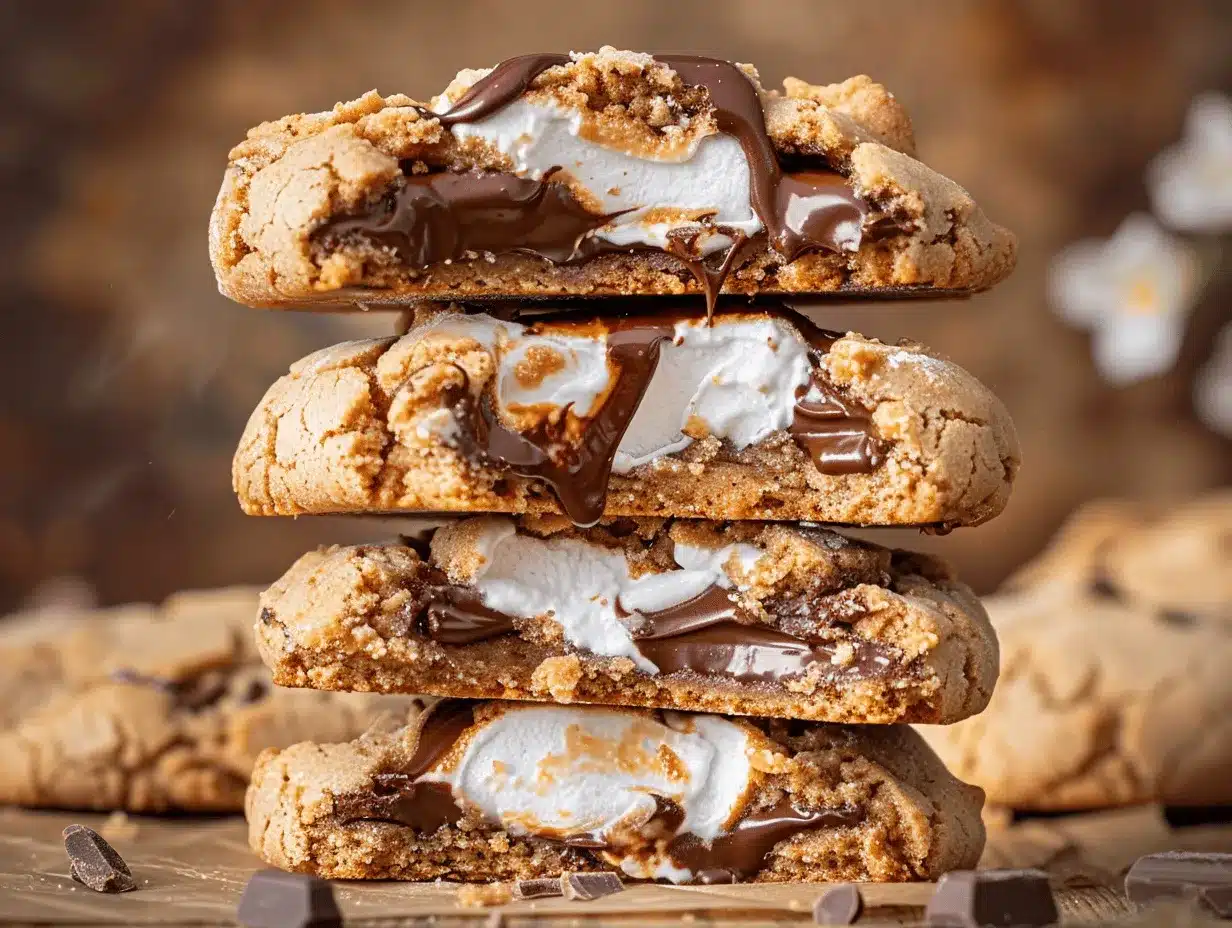
- Next-Level Flavor & Texture: Gooey marshmallow, melty chocolate, nutty peanut butter, and that subtle graham crunch. Each bite is soft, rich, and a little messy—kind of perfect.
What sets this stuffed peanut butter s’mores cookies recipe apart is the clever layering. I use mini marshmallows and chocolate bars stuffed inside the dough, so when you break one open, the inside is molten and irresistible. No dry, crumbly cookies here—the peanut butter keeps everything soft, while the graham crackers add just enough crunch. I’ve tried s’mores cookies before, but this version really nails that gooey, stick-to-your-fingers bliss.
Honestly, these cookies are about more than just taste. They’re about slowing down, getting a little messy, and savoring the moment. Whether you’re baking with kids, treating yourself after a long week, or looking to impress a crowd, stuffed peanut butter s’mores cookies are a guaranteed win. They’re a little bit of summer, a lot of comfort, and every bit as fun to eat as they are to make.
What Ingredients You Will Need
This recipe uses simple, wholesome ingredients to deliver bold flavor and that ooey-gooey texture we all crave. Most of these are pantry staples, but a couple may surprise you (in a good way). Here’s what you’ll need for your stuffed peanut butter s’mores cookies:
-
For the Cookie Dough:
- 1/2 cup (113g) unsalted butter, softened (adds richness and helps create a tender cookie)
- 3/4 cup (150g) light brown sugar, packed (for that deep, caramel flavor)
- 1/4 cup (50g) granulated sugar (balances the brown sugar and gives just the right sweetness)
- 1 large egg, room temperature (holds everything together and gives lift)
- 1 tsp pure vanilla extract (adds warmth—use real vanilla if you can!)
- 1/2 cup (130g) creamy peanut butter (I recommend Skippy or Jif for best texture; natural works, but the dough will be softer)
- 1 1/2 cups (188g) all-purpose flour (King Arthur or Gold Medal are both great)
- 1/2 tsp baking soda (for that perfect rise—don’t skip it!)
- 1/4 tsp salt (balances out the sweetness)
- 3/4 cup (75g) graham cracker crumbs (about 6 full-size crackers, crushed—adds classic s’mores flavor)
-
For the Filling:
- 12 large marshmallows, halved (or 1 cup mini marshmallows—mini is less messy inside the dough)
- 4 oz (113g) milk chocolate bars, broken into squares (I like Hershey’s for the classic taste; you can use chocolate chips in a pinch)
-
Optional Toppings:
- Extra graham cracker crumbs (for sprinkling on top before baking)
- Mini chocolate chips (for that bakery-style look)
- Flaky sea salt (just a pinch—trust me, it’s magic!)
If you need to make this stuffed peanut butter s’mores cookies recipe gluten-free, swap the all-purpose flour for a 1:1 gluten-free baking flour and use gluten-free graham crackers. For a dairy-free version, use a plant-based butter and dairy-free chocolate.
Ingredient tips from my kitchen: Don’t use natural peanut butter unless you’re okay with slightly flatter cookies (it’s oilier). If you love dark chocolate, swap it for the milk chocolate bars. In the summer, I sometimes use peanut butter cups instead of plain chocolate for an over-the-top treat!
Equipment Needed
- Mixing Bowls: You’ll need at least two—one for wet ingredients, one for dry. I use glass bowls because they’re easy to clean, but any will do.
- Hand Mixer or Stand Mixer: A hand mixer works perfectly fine for creaming butter and sugar. If you have a stand mixer, that’s even faster!
- Baking Sheets: Go for heavy-duty, rimmed baking sheets—they help the cookies bake evenly. I’ve used both nonstick and regular; just use parchment paper either way.
- Parchment Paper: Saves you from sticky messes and makes cleanup a breeze. Silicone baking mats also work well.
- Cookie Scoop (2 tbsp size): Not strictly required, but it keeps your cookies uniform and helps with stuffing the centers. An ice cream scoop works in a pinch.
- Spatula: For scraping down the bowl and transferring cookies.
- Measuring Cups & Spoons: Accuracy matters here! I always double-check my flour with a kitchen scale (if you have one).
No stand mixer? No problem—you can totally cream the butter and sugar by hand with some elbow grease. And if you don’t have a cookie scoop, two spoons will do the trick. For maintenance, I always rinse my mixer beaters right away (marshmallow is sticky stuff!), and parchment paper makes the post-baking cleanup basically effortless. Budget tip: Dollar store measuring cups work just as well as fancy ones—just check for clear measurements.
How to Make Stuffed Peanut Butter S’mores Cookies
- Prep the Oven & Baking Sheets: Preheat your oven to 350°F (175°C). Line two baking sheets with parchment paper and set aside. (A hot oven is key for the gooey centers!)
- Cream the Butter, Sugars & Peanut Butter: In a large bowl, beat together 1/2 cup unsalted butter, 3/4 cup brown sugar, and 1/4 cup granulated sugar until light and fluffy (about 2-3 minutes with a hand mixer on medium speed). Add 1/2 cup creamy peanut butter and beat until smooth and combined. The mixture should look pale and creamy—scrape the bowl as needed.
- Add Wet Ingredients: Beat in 1 egg and 1 tsp vanilla extract until fully incorporated. The dough might look a bit sticky at this point—that’s perfect.
- Mix Dry Ingredients: In a separate bowl, whisk together 1 1/2 cups all-purpose flour, 1/2 tsp baking soda, 1/4 tsp salt, and 3/4 cup graham cracker crumbs. (Pro tip: Sift your flour if it’s clumpy!)
- Combine Wet & Dry: Add the dry mixture to the wet ingredients in two parts, mixing on low or by hand until just combined. Don’t overmix—the dough should be soft but not sticky. If it’s too sticky, add a tablespoon of flour at a time until it’s workable.
- Shape & Stuff the Cookies: Scoop up about 2 tablespoons of dough and gently flatten it into a disk. Place a marshmallow half (or a few mini marshmallows) and a square of chocolate in the center. Top with another small disk of dough and pinch the edges to seal, rolling gently into a ball. (Don’t worry if some marshmallow peeks out—it gets extra gooey!)
- Place on Baking Sheet: Arrange the stuffed dough balls 2 inches apart on your prepared sheets. If desired, press a few mini chocolate chips or extra graham cracker crumbs on top for that bakery look.
- Bake: Bake for 10-12 minutes, or until the edges are set and lightly golden. The centers may look a little undercooked—that’s how you get gooey s’mores magic. (Every oven is different—mine are usually perfect at 11 minutes.)
- Cool: Allow cookies to cool on the baking sheet for 5 minutes before transferring to a wire rack. The marshmallow inside will be molten at first, so handle with care!
- Troubleshooting: If your cookies spread too much, chill the stuffed dough balls for 20 minutes before baking. If the marshmallow leaks out a bit, don’t stress—it tastes just as good (some might say better!).
Personal tip: I like to make a test cookie first, just to see how my oven is behaving that day. Also, don’t be afraid to get a little messy—sticky fingers are part of the fun! The smell when these come out of the oven…well, you’ll see.
Cooking Tips & Techniques
- Don’t Overmix: Once the flour goes in, mix just until combined. Overmixing can make cookies tough instead of chewy. Learned that one the hard way after years of flat cookies!
- Stuffing Technique: If you’re struggling to seal the dough around the marshmallow and chocolate, dampen your fingers lightly—it stops sticking and makes a nice seal.
- Chill for Thicker Cookies: For thick, bakery-style cookies, chill the stuffed dough balls for 20-30 minutes before baking. This helps prevent too much spreading (especially if your kitchen is warm).
- Watch Your Bake Time: Pull the cookies when they look just set on the edges but still soft in the middle. They’ll continue to cook on the hot pan—if you wait until they look fully done, they’ll end up dry.
- Use Parchment Paper: Marshmallow is sticky! Parchment saves you from a mess and keeps the cookies from sticking to the pan.
- Test & Adjust: Ovens vary—if your first batch spreads too much or marshmallow escapes, adjust by chilling the dough or using smaller marshmallow pieces.
- Multitask Smart: While one sheet bakes, prep the next batch of dough balls. Have the fillings prepped and ready so you can keep things moving (especially helpful with kids!).
I’ve definitely burned a few marshmallows in my day, so don’t wander too far while these are baking. And if you end up with a few “ugly” cookies—those are the baker’s treat! Consistency comes with practice, and honestly, every batch tastes amazing, even if some are a little wild looking.
Variations & Adaptations
- Gluten-Free Version: Use a 1:1 gluten-free flour blend and gluten-free graham crackers. The texture is almost identical—just keep an eye on the bake time (sometimes they’re done a minute sooner).
- Dairy-Free Swap: Choose plant-based butter and a dairy-free chocolate bar. Marshmallows are usually dairy-free, but do a quick label check if allergies are a concern.
- Flavor Twists: Try dark chocolate instead of milk for a more grown-up twist, or use peanut butter cups as the filling for extra decadence.
- Seasonal Change-Up: In the fall, add a sprinkle of cinnamon to the dough. For a winter holiday vibe, use peppermint chocolate or add a pinch of crushed candy cane to the filling.
- Nut-Free Option: Use sunflower seed butter in place of peanut butter. It’s not exactly the same, but it works for peanut allergies and still pairs well with the s’mores flavors.
I’ve made these with almond butter and a bit of chopped dried fruit for a “trail mix” riff—super fun for road trips. Honestly, you can play around with the fillings as much as you like. Just keep the dough thick enough to hold in all the gooey goodness.
Serving & Storage Suggestions
For maximum gooeyness, serve these stuffed peanut butter s’mores cookies slightly warm, just a few minutes out of the oven. The chocolate and marshmallow will be perfectly melty—totally irresistible!
These cookies pair beautifully with a cold glass of milk, hot cocoa, or even a scoop of vanilla ice cream if you’re feeling fancy. For parties, arrange them on a rustic wooden tray with extra marshmallows and chocolate pieces scattered around for that Pinterest-worthy look.
To store, let cookies cool completely and keep in an airtight container at room temperature for up to 4 days. If you want to freeze them, wrap individually in plastic wrap and pop into a freezer bag—they’ll last for up to 2 months. To reheat, microwave a cookie for 10-15 seconds to bring back that gooey center. If you love a crispier texture, warm them in a 300°F (150°C) oven for 3-4 minutes.
Fun tip: The flavor actually deepens after a day or two—the peanut butter and graham get even cozier together. Not that they ever last that long in my house!
Nutritional Information & Benefits
Each stuffed peanut butter s’mores cookie (based on a batch of 16) has approximately:
- Calories: 210
- Fat: 10g
- Carbohydrates: 27g
- Protein: 4g
- Sugar: 14g
Peanut butter brings a boost of protein and healthy fats, helping you stay fuller a bit longer. Marshmallows and chocolate are pure treat territory—just the thing for an energy lift or a sweet finish to a meal. If you use gluten-free or dairy-free swaps, these cookies can fit a variety of dietary needs. The main allergens are peanuts, dairy, wheat, and eggs—so keep that in mind for sensitive eaters.
For me, these cookies hit the sweet spot between indulgence and feel-good nostalgia. Sometimes, a little homemade treat is exactly what the doctor ordered.
Conclusion
If you’re looking for a cookie that’s as fun to make as it is to eat, stuffed peanut butter s’mores cookies are the way to go. They bring together everything I love—gooey centers, bold flavors, and just the right amount of nostalgic joy. Whether you’re baking for a crowd or just yourself, these cookies are a guaranteed mood-lifter.
Feel free to tweak the recipe to suit your tastes—try new chocolates, change up the nut butter, or add a pinch of spice. That’s the real magic of homemade cookies: they’re yours to play with. Personally, I’ll never get tired of the classic combo, but I’d love to hear how you make them your own!
If you try this recipe, please leave a comment, share a photo, or let me know your favorite variation. Every batch tells a story, and I can’t wait to hear yours. Happy baking, and don’t forget—the gooier, the better!
Frequently Asked Questions
Can I use crunchy peanut butter instead of creamy?
Absolutely! Crunchy peanut butter adds extra texture and a little nutty surprise. Just know the dough might be a bit thicker—don’t worry, it still bakes up great.
What’s the best way to stuff the cookies without making a mess?
Flatten the dough, place your filling in the center, then carefully fold the edges up and pinch to seal. If your hands get sticky, a little water helps. And honestly, a bit of mess is part of the fun!
Can I make the dough ahead of time?
Yes! You can prepare the dough and keep it covered in the fridge for up to 48 hours. Stuff and bake when you’re ready—just add a minute or two to the bake time if the dough is cold.
What if I don’t have graham crackers?
You can use digestive biscuits, vanilla wafers, or even leave them out for a classic peanut butter-chocolate combo. The cookies will still be delicious—promise!
How do I keep the marshmallow from leaking out?
Seal the dough tightly around the filling, and use mini marshmallows if you want less mess. A little leakage is normal and adds to the gooey appeal. Chilling the stuffed dough balls before baking also helps keep everything inside.
Pin This Recipe!
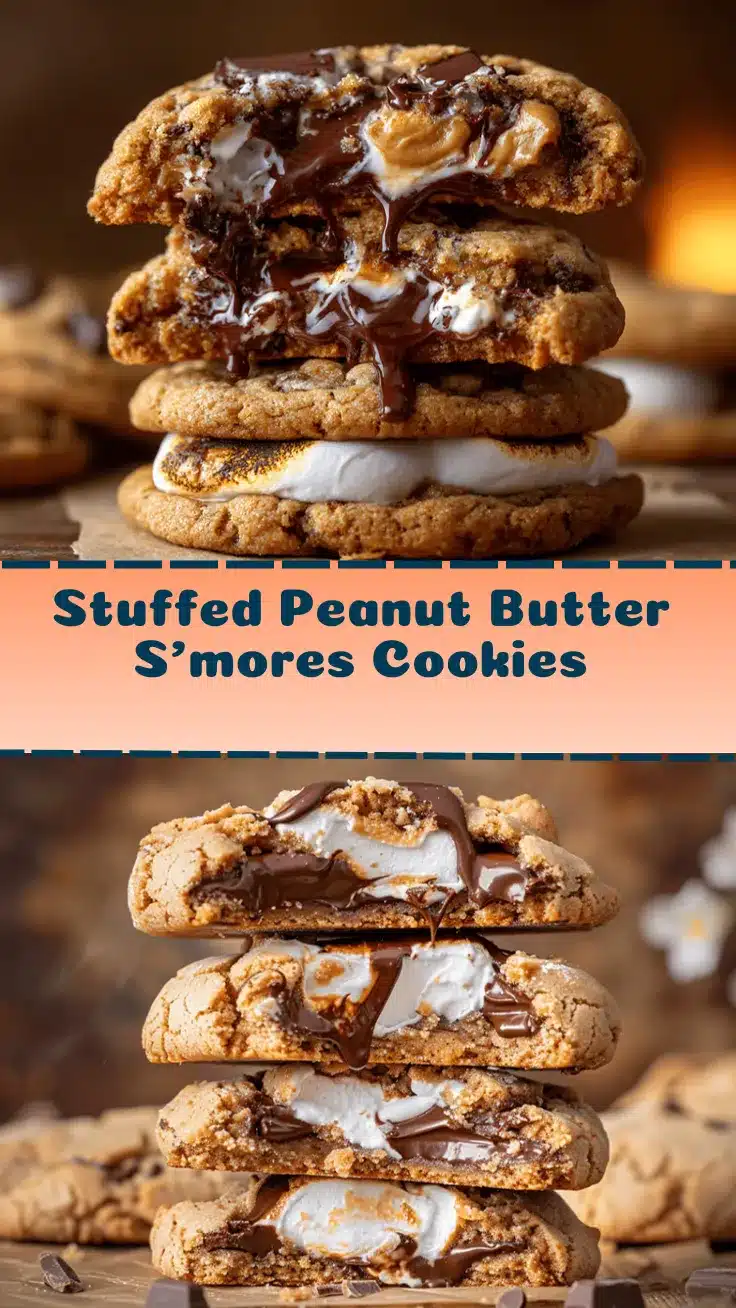
Stuffed Peanut Butter S’mores Cookies
These thick, gooey cookies combine creamy peanut butter, melty chocolate, and marshmallow, all wrapped in a chewy cookie crust with graham cracker crunch. They’re easy to make and bring nostalgic campfire flavors to your kitchen.
- Prep Time: 20 minutes
- Cook Time: 12 minutes
- Total Time: 32 minutes
- Yield: 16 cookies 1x
- Category: Dessert
- Cuisine: American
Ingredients
- 1/2 cup (113g) unsalted butter, softened
- 3/4 cup (150g) light brown sugar, packed
- 1/4 cup (50g) granulated sugar
- 1 large egg, room temperature
- 1 tsp pure vanilla extract
- 1/2 cup (130g) creamy peanut butter
- 1 1/2 cups (188g) all-purpose flour
- 1/2 tsp baking soda
- 1/4 tsp salt
- 3/4 cup (75g) graham cracker crumbs (about 6 full-size crackers, crushed)
- 12 large marshmallows, halved (or 1 cup mini marshmallows)
- 4 oz (113g) milk chocolate bars, broken into squares
- Extra graham cracker crumbs (optional, for topping)
- Mini chocolate chips (optional, for topping)
- Flaky sea salt (optional, for topping)
Instructions
- Preheat oven to 350°F (175°C). Line two baking sheets with parchment paper.
- In a large bowl, beat together butter, brown sugar, and granulated sugar until light and fluffy (2-3 minutes). Add peanut butter and beat until smooth.
- Beat in egg and vanilla extract until fully incorporated.
- In a separate bowl, whisk together flour, baking soda, salt, and graham cracker crumbs.
- Add dry ingredients to wet ingredients in two parts, mixing until just combined. If dough is too sticky, add flour 1 tablespoon at a time.
- Scoop about 2 tablespoons of dough, flatten into a disk. Place a marshmallow half (or mini marshmallows) and a square of chocolate in the center. Top with another disk of dough, pinch edges to seal, and roll gently into a ball.
- Arrange stuffed dough balls 2 inches apart on prepared sheets. Top with mini chocolate chips or graham cracker crumbs if desired.
- Bake for 10-12 minutes, until edges are set and lightly golden. Centers may look undercooked for gooey texture.
- Cool cookies on baking sheet for 5 minutes, then transfer to a wire rack.
- If cookies spread too much, chill stuffed dough balls for 20 minutes before baking. Handle gently as marshmallow inside will be hot.
Notes
For thicker cookies, chill stuffed dough balls before baking. Use mini marshmallows for less mess. Substitute gluten-free flour and graham crackers for gluten-free version, or plant-based butter and dairy-free chocolate for dairy-free. Seal dough tightly around filling to minimize marshmallow leakage. Cookies are best served slightly warm for maximum gooeyness.
Nutrition
- Serving Size: 1 cookie
- Calories: 210
- Sugar: 14
- Sodium: 90
- Fat: 10
- Saturated Fat: 4
- Carbohydrates: 27
- Fiber: 1
- Protein: 4
Keywords: s'mores cookies, peanut butter cookies, stuffed cookies, campfire dessert, easy cookie recipe, gooey cookies, chocolate marshmallow cookies


