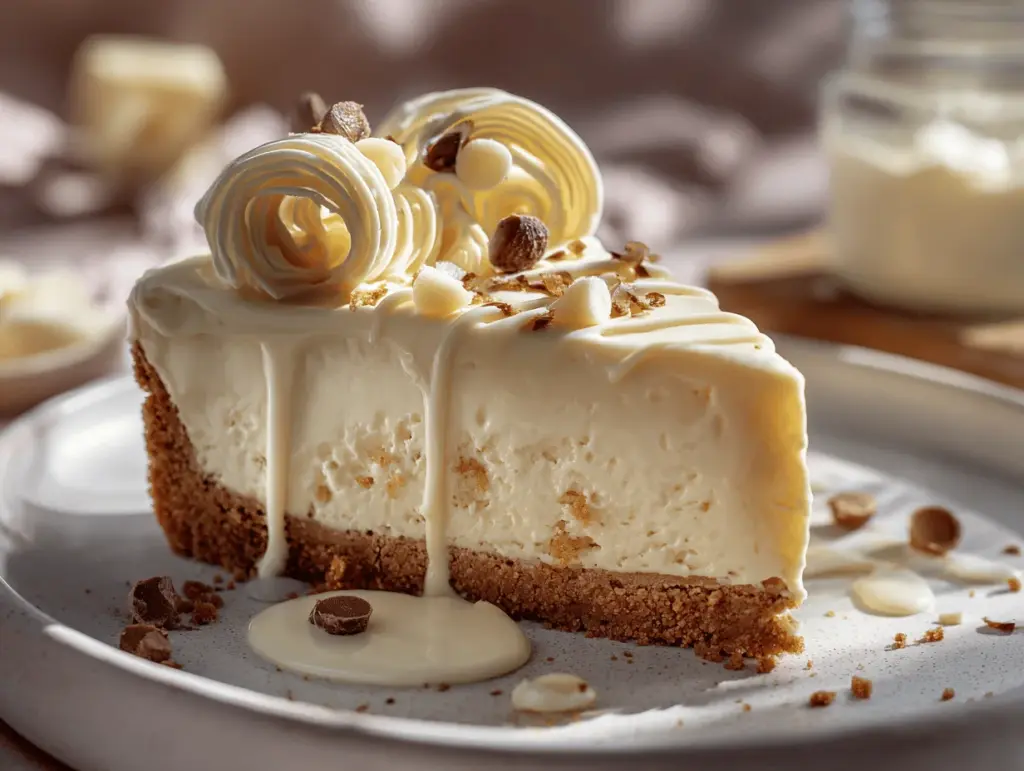
Let’s be honest—when you hear “white chocolate mud pie,” your taste buds probably start cheering. The first time I made this, the kitchen filled with the buttery aroma of a golden cookie crust and creamy white chocolate—my family hovered nearby, impatiently waiting for the first slice. This dessert isn’t just another pie; it’s a celebration in every bite. The blend of smooth white chocolate, a hint of vanilla, and a luscious, slightly gooey center makes this pie the showstopper at any gathering. Whether you’re planning a birthday bash, a potluck, or a cozy night in, this white chocolate mud pie recipe always brings people together (even the ones who claim they don’t have a sweet tooth—yeah, right).
I stumbled upon this gem during a hunt for something unique for my sister’s bridal shower. The classic chocolate mud pie is delicious, but there’s something about swapping in white chocolate that feels a little fancy without being fussy. You don’t need any special equipment or rare ingredients—just a little patience and a lot of love. I’ve tweaked and tested this recipe more times than I can count, and every single time it delivers that wow factor. It’s perfect for busy bakers (I see you!), white chocolate lovers, and anyone looking to serve up a homemade dessert that feels both nostalgic and a little bit decadent.
So, if you’re after a dessert that’s as easy to make as it is impressive, this white chocolate mud pie recipe is for you. It’s become a family favorite and a go-to treat for celebrations—or honestly, just because. You’ll love how simple it is to whip up, and how every creamy, dreamy slice disappears before you can blink.
Why You’ll Love This White Chocolate Mud Pie Recipe
After years of recipe testing, kitchen mishaps, and plenty of pie-induced joy, I can confidently say this white chocolate mud pie recipe is in a league of its own. Here’s why it’s a keeper:
- Quick & Easy: You can go from pantry to pie in under 30 minutes of hands-on time. Perfect for last-minute party invites or when you need a sweet pick-me-up after a long day.
- Simple Ingredients: No need to hunt down specialty items. Everything you need is likely already in your kitchen—or at your corner grocery store.
- Perfect for Gatherings: This pie shines at parties, potlucks, holiday feasts, and casual get-togethers. It’s the kind of dessert people remember (and ask for the recipe).
- Crowd-Pleaser: Kids adore its creamy texture, and adults can’t resist the decadent flavor. It’s been dubbed “dangerously good” more than once at my table.
- Unbelievably Delicious: Each bite is silky, sweet, and comforting, with just enough white chocolate flavor to keep you going back for seconds (or thirds—no judgment).
This isn’t just another white chocolate pie. Blending the white chocolate into the filling (instead of just sprinkling on top) creates a rich, velvety texture that holds together beautifully. The cookie crust adds a nice crunch, and a touch of sea salt balances the sweetness—trust me, don’t skip it.
There’s something about this pie that brings out smiles, laughter, and maybe a few “oohs” and “aahs” when it’s sliced at the table. For me, it’s also a reminder that you don’t have to overcomplicate dessert to make something memorable. If you want a showstopper with minimum stress, this white chocolate mud pie recipe is the answer.
What Ingredients You Will Need
This white chocolate mud pie uses a handful of classic ingredients—nothing fancy, just pure, comforting goodness. Each one plays its part, so here’s a breakdown to make shopping (and prepping) even easier:
- For the Crust:
- Graham cracker crumbs (200g / about 2 cups) – Adds a toasty, crunchy base. I like Honey Maid or store brand.
- Unsalted butter, melted (115g / 1/2 cup) – Holds the crust together and adds richness.
- Granulated sugar (25g / 2 tbsp) – Just a bit for sweetness.
- Pinch of sea salt – Balances the flavors (trust me, it makes a difference).
- For the White Chocolate Filling:
- White chocolate, chopped (225g / 8 oz) – Use the best quality you can find (Ghirardelli or Lindt are great!).
- Heavy cream (240ml / 1 cup) – For that dreamy, creamy filling.
- Cream cheese, softened (226g / 8 oz) – Brings tang and structure.
- Powdered sugar (60g / 1/2 cup) – Sweetens and smooths the filling.
- Large eggs, room temperature (2) – Binds the filling and gives that classic mud pie set.
- Pure vanilla extract (5ml / 1 tsp) – Rounds out the flavors.
- Pinch of sea salt – Enhances the white chocolate, keeps things from getting too sweet.
- Optional Toppings:
- White chocolate shavings or curls – For a gorgeous finish.
- Fresh berries (raspberries, strawberries, or blueberries) – Adds a pop of color and tartness.
- Whipped cream – A dollop on top never hurts!
- Drizzle of caramel or chocolate sauce – Go wild if you’re feeling extra indulgent.
Ingredient Notes & Substitutions:
- No graham crackers? Swap in digestive biscuits or even chocolate wafer cookies.
- Dairy-free? Use vegan white chocolate and coconut cream instead of heavy cream. Vegan cream cheese works too.
- Gluten-free? Grab gluten-free graham crackers or make a nut-based crust with ground almonds and a touch of honey.
- Can’t find heavy cream? Full-fat coconut milk is a decent stand-in, though the flavor will be a bit different (still tasty!).
Really, the best part is how flexible this pie is—whether you’re working with pantry staples, farmer’s market finds, or whatever’s left in the fridge, you can make it work.
Equipment Needed
You don’t need a commercial kitchen to whip up this white chocolate mud pie recipe. Here’s what I use (plus a few honest tips):
- 9-inch (23cm) Pie Pan: Glass, ceramic, or metal all work. I prefer a glass pie dish so you can peek at the crust color as it bakes. A springform pan can also be used for easy slicing.
- Mixing Bowls: At least two—one for the crust, one for the filling. Stainless steel, glass, or sturdy plastic all do the trick.
- Electric Mixer or Hand Mixer: Makes blending the filling a breeze. You can do it by hand, but your arm might protest!
- Heatproof Bowl: For melting white chocolate over a saucepan.
- Whisk & Spatula: A silicone spatula is great for scraping every last bit of filling.
- Measuring Cups & Spoons: For accuracy—especially with baking!
- Small Saucepan: If you’re melting chocolate on the stove.
Personal Experience: I’ve used everything from bargain pie tins to fancy ceramic dishes. If you use nonstick or metal pans, check your crust a minute or two early as they can brown faster. And don’t stress if you only have a hand whisk—the filling might not be quite as fluffy, but the flavor will still wow.
Preparation Method
-
Prep the Pie Crust:
- Preheat your oven to 350°F (175°C). Grease your 9-inch pie dish lightly with butter or a little cooking spray.
- In a medium bowl, mix 2 cups (200g) graham cracker crumbs, 1/2 cup (115g) melted butter, 2 tablespoons (25g) granulated sugar, and a pinch of sea salt until the mixture looks like damp sand.
- Press the crumb mixture firmly into the bottom and up the sides of your pie dish. Use the back of a measuring cup for an even layer.
- Bake for 8-10 minutes, until the crust is lightly golden and smells toasty. Let it cool while you prep the filling.
-
Melt the White Chocolate:
- Combine 8 oz (225g) chopped white chocolate and 1 cup (240ml) heavy cream in a heatproof bowl.
- Set over a saucepan of simmering water (double boiler method) and stir gently until smooth and glossy. Take it off the heat and let it cool for 10 minutes.
- Troubleshooting tip: If the chocolate seizes or looks grainy, add a splash of extra cream and whisk until smooth. White chocolate can be fussy, but patience wins!
-
Make the Filling:
- In a large bowl, beat 8 oz (226g) softened cream cheese and 1/2 cup (60g) powdered sugar with an electric mixer until creamy and lump-free (about 2-3 minutes).
- Beat in 2 large eggs, one at a time, mixing just until combined (don’t overmix or the filling can get dense).
- Add 1 teaspoon (5ml) pure vanilla extract and a pinch of sea salt, then mix again.
- Slowly pour the cooled white chocolate mixture into the cream cheese mixture, mixing on low speed until smooth and even.
- Prep note: Scrape the bowl sides so there are no streaks of white chocolate hiding out!
-
Assemble and Bake:
- Pour the filling into the cooled graham cracker crust. Tap the pie on the counter a couple of times to release air bubbles.
- Bake at 350°F (175°C) for 25-30 minutes. The edges should look set, but the center will be just a little wobbly (like cheesecake).
- If it browns too quickly, tent with foil for the last 10 minutes.
- Sensory cue: The pie should puff slightly and smell rich and sweet, with a hint of vanilla.
-
Cool and Chill:
- Let the pie cool at room temperature for 1 hour, then refrigerate for at least 3 hours (overnight is even better).
- This step helps it set perfectly—don’t rush it! Slicing too soon leads to a messy pie (learned that the hard way).
-
Decorate and Serve:
- Top with white chocolate curls, whipped cream, fresh berries, or a drizzle of caramel if you like.
- Slice with a warm, sharp knife for clean edges. Wipe the blade between cuts for picture-perfect slices.
And there you have it—a white chocolate mud pie that’s as easy as it is irresistible!
Cooking Tips & Techniques
Making the perfect white chocolate mud pie recipe is part art, part science—and a little bit of “feel.” Here are my best tips from years of baking (and a few flops along the way):
- Quality Counts: Use real white chocolate bars, not chips or candy melts. The higher the cocoa butter content, the smoother your filling.
- Melt Gently: White chocolate is sensitive to heat—overheating leads to graininess. Always melt slowly over low heat and stir often.
- Room Temperature Ingredients: Cream cheese and eggs blend better when not cold. Take them out 30 minutes before starting to avoid lumps.
- Don’t Overbake: The center should jiggle slightly when you pull it out of the oven. It sets up as it cools—overbaking = dry texture.
- Chill Well: That three-hour chill in the fridge isn’t a suggestion—it’s what makes the filling sliceable and creamy. Overnight is even better if you can wait!
- Crust Troubles: If your crust crumbles, you might need a touch more butter. If it feels greasy, scale the butter back a smidge next time.
- Batch Testing: I’ve baked this pie in glass, ceramic, and metal pans. Ceramic gives the most even bake; glass lets you monitor browning. Metal is quickest but check early.
- Decorating: A potato peeler makes perfect white chocolate curls for the top. I also love using a star piping tip for whipped cream—makes it extra pretty for parties.
- Efficiency Tip: Prep your crust while the oven preheats, and melt your chocolate while the crust bakes. Multitasking keeps things moving!
Most of all, remember: it’s okay if your pie isn’t bakery-perfect. A few cracks or a slightly wonky swirl of whipped cream just make it look homemade—and that’s half the charm.
Variations & Adaptations
One of my favorite things about this white chocolate mud pie recipe is how easy it is to tweak. Here are some of my go-to variations (plus a few I’ve tried for fun):
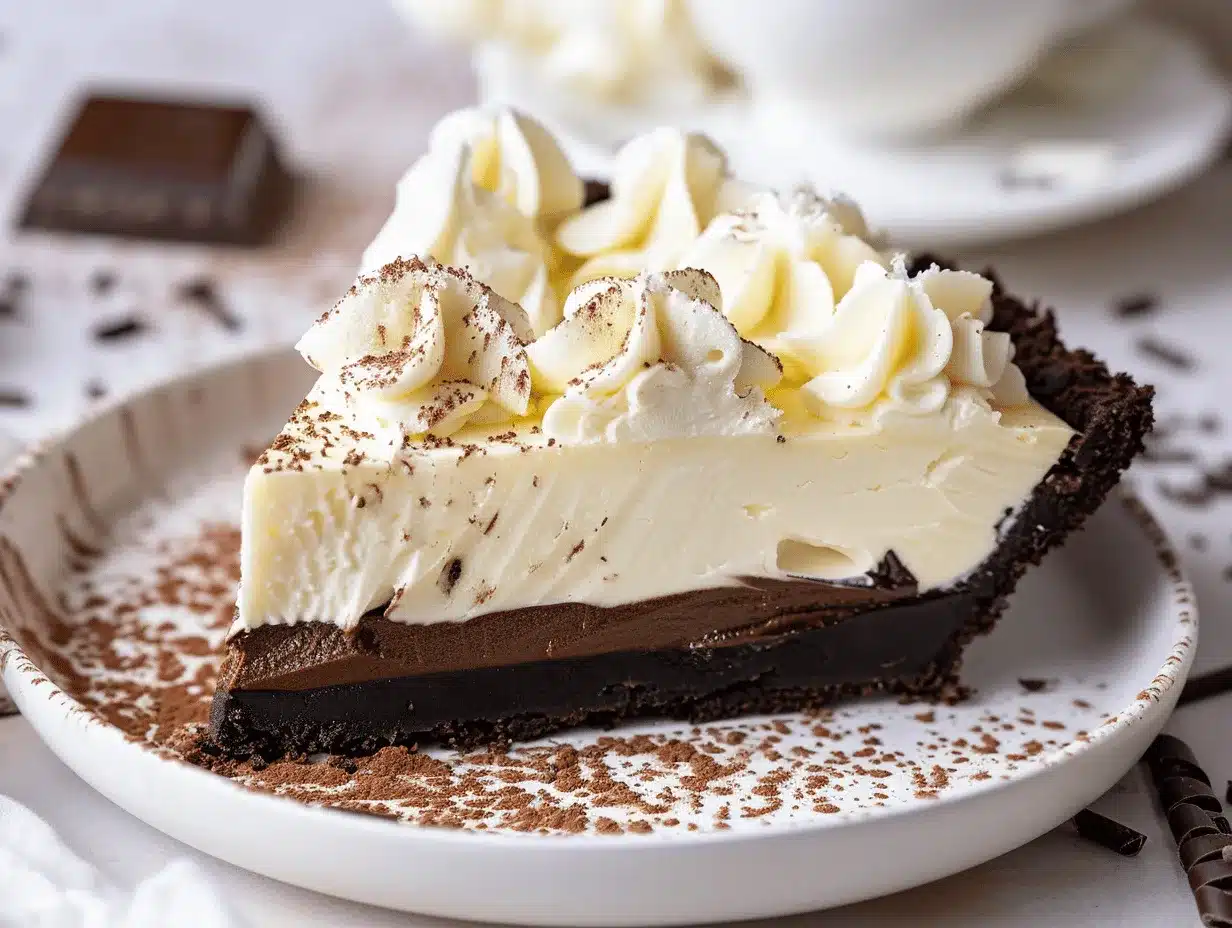
- Dark Chocolate Mud Pie: Swap half the white chocolate for semi-sweet or dark chocolate. The result is a marbled, double-chocolate masterpiece.
- Berry Swirl Mud Pie: Dollop a few spoonfuls of raspberry or strawberry jam on top before baking. Swirl gently with a knife for a pretty marbled effect and a burst of tartness.
- Peppermint White Chocolate Pie: Add 1/2 teaspoon peppermint extract to the filling and sprinkle with crushed peppermint candies for a festive holiday twist.
- Nut-Free Version: Use plain graham crackers for the crust and double-check your white chocolate is made in a nut-free facility. (Always check labels if allergies are a concern!)
- Gluten-Free Crust: Swap in gluten-free graham crackers or try a blend of ground almonds and gluten-free oats, mixed with butter and pressed into the pan.
- Dairy-Free/ Vegan: Use dairy-free white chocolate, coconut cream, and vegan cream cheese. The filling will be a bit softer but still delicious—chill overnight for best texture.
Personally, I love making a berry swirl version in the summer, using homemade raspberry preserves. The sweet-tart combo is always a hit! Don’t be afraid to get creative—this recipe is super forgiving.
Serving & Storage Suggestions
This white chocolate mud pie recipe is best served chilled, straight from the fridge. The texture is creamy and rich—plus, the flavors really pop when it’s cold.
- Serving: Slice with a sharp knife (run it under hot water for extra clean cuts). I like to garnish each slice with a dollop of whipped cream, a sprinkle of white chocolate curls, and a few berries on the side.
- Beverage Pairings: Try it with coffee, black tea, or a crisp glass of sparkling wine. Even a tall glass of cold milk works wonders.
- Storage: Cover the pie tightly with plastic wrap or store in an airtight container in the fridge. It stays fresh for up to 4 days (honestly, it rarely lasts that long at my house).
- Freezing: Wrap individual slices in parchment and freeze in a zip-top bag for up to 1 month. Thaw overnight in the fridge for best results.
- Reheating: This pie is meant to be served cold, but if you prefer it slightly warm, pop a slice in the microwave for 10-15 seconds—just enough to soften, not melt.
- Flavor Develops: The white chocolate flavor deepens after a day, so it’s a perfect make-ahead dessert for parties.
Nutritional Information & Benefits
While this white chocolate mud pie recipe is definitely a treat, it does pack in some interesting nutritional tidbits:
- Estimated per slice (1/10th of pie): 400 calories, 29g fat, 32g carbs, 5g protein.
- Key Ingredients: White chocolate contains calcium and a little iron; cream cheese adds protein and vitamin A; eggs add more protein and B vitamins.
- Dietary Notes: This recipe is naturally nut-free (if you use a nut-free crust), and can be adapted for gluten-free or dairy-free diets as noted above.
- Potential Allergens: Contains dairy, eggs, and gluten (unless adapted).
Like all desserts, moderation is key. Personally, I love balancing a slice of this pie with a long walk or a big salad for lunch. You get the joy of an indulgent treat—with a little white chocolate magic in every bite.
Conclusion
If you’re searching for a dessert that’s easy to make, deeply satisfying, and guaranteed to impress, look no further than this white chocolate mud pie recipe. I’ve made it for birthdays, holidays, and even “just because” afternoons—and it always disappears faster than I can blink. It’s the kind of recipe that brings everyone to the kitchen, forks in hand, ready for a second slice.
Don’t be afraid to make it your own: swap the crust, switch up the toppings, or add a swirl of your favorite jam. The best recipes are the ones that fit your style and taste! Personally, I love how this pie brings back memories of laughter and family gatherings. It’s more than just dessert; it’s a sweet moment shared.
If you try this recipe, I’d love to hear how it turned out! Leave a comment, share a photo, or tell me about your favorite twist. Here’s to delicious memories, easy baking, and plenty of white chocolate bliss—happy pie-making!
Frequently Asked Questions
Can I make this white chocolate mud pie recipe ahead of time?
Absolutely! This pie actually tastes best when made a day in advance. The flavors deepen and the texture sets up beautifully overnight in the fridge.
How do I prevent my white chocolate from seizing when melting?
Melt it gently over low heat and don’t let any water get into the bowl. If it starts to seize, add a splash of cream and whisk until smooth.
What’s the best way to get clean slices?
Use a sharp knife dipped in hot water, and wipe the blade clean between cuts. It makes a world of difference for neat presentation!
Can I use a store-bought crust to save time?
Definitely. A premade graham cracker or cookie crust works in a pinch—just fill and bake as directed.
Is this recipe suitable for gluten-free or dairy-free diets?
Yes! Use gluten-free crackers for the crust and swap in dairy-free white chocolate, coconut cream, and vegan cream cheese for a completely dairy-free version. Check labels for allergens just to be safe.
Pin This Recipe!
White Chocolate Mud Pie

This easy homemade white chocolate mud pie features a buttery graham cracker crust and a creamy, decadent white chocolate filling. It’s a crowd-pleasing dessert perfect for parties, celebrations, or cozy nights in.
- Prep Time: 20 minutes
- Cook Time: 35 minutes
- Total Time: 4 hours 5 minutes
- Yield: 10 servings 1x
- Category: Dessert
- Cuisine: American
Ingredients
- 2 cups graham cracker crumbs (about 200g)
- 1/2 cup unsalted butter, melted (115g)
- 2 tablespoons granulated sugar (25g)
- Pinch of sea salt
- 8 oz white chocolate, chopped (225g)
- 1 cup heavy cream (240ml)
- 8 oz cream cheese, softened (226g)
- 1/2 cup powdered sugar (60g)
- 2 large eggs, room temperature
- 1 teaspoon pure vanilla extract (5ml)
- Pinch of sea salt
- Optional toppings: white chocolate shavings or curls, fresh berries (raspberries, strawberries, or blueberries), whipped cream, drizzle of caramel or chocolate sauce
Instructions
- Preheat oven to 350°F (175°C). Lightly grease a 9-inch pie dish with butter or cooking spray.
- In a medium bowl, mix graham cracker crumbs, melted butter, granulated sugar, and a pinch of sea salt until the mixture resembles damp sand.
- Press the crumb mixture firmly into the bottom and up the sides of the pie dish. Use the back of a measuring cup for an even layer.
- Bake the crust for 8-10 minutes, until lightly golden and fragrant. Let cool while preparing the filling.
- Combine chopped white chocolate and heavy cream in a heatproof bowl. Set over a saucepan of simmering water (double boiler) and stir gently until smooth and glossy. Remove from heat and let cool for 10 minutes.
- In a large bowl, beat softened cream cheese and powdered sugar with an electric mixer until creamy and lump-free (about 2-3 minutes).
- Beat in eggs, one at a time, mixing just until combined. Add vanilla extract and a pinch of sea salt, then mix again.
- Slowly pour the cooled white chocolate mixture into the cream cheese mixture, mixing on low speed until smooth and even. Scrape the bowl sides to ensure everything is incorporated.
- Pour the filling into the cooled graham cracker crust. Tap the pie on the counter to release air bubbles.
- Bake at 350°F (175°C) for 25-30 minutes. The edges should look set, but the center will be slightly wobbly. Tent with foil if browning too quickly.
- Let the pie cool at room temperature for 1 hour, then refrigerate for at least 3 hours (overnight is best) to set.
- Top with white chocolate curls, whipped cream, fresh berries, or caramel drizzle as desired. Slice with a warm, sharp knife for clean edges.
Notes
Use high-quality white chocolate bars for best texture. Melt chocolate gently to avoid graininess. Room temperature ingredients blend more smoothly. Chill pie thoroughly before slicing for clean cuts. Adapt crust and filling for gluten-free or dairy-free diets as needed. Pie can be made a day ahead for deeper flavor.
Nutrition
- Serving Size: 1 slice (1/10th of pie)
- Calories: 400
- Sugar: 24
- Sodium: 220
- Fat: 29
- Saturated Fat: 18
- Carbohydrates: 32
- Fiber: 1
- Protein: 5
Keywords: white chocolate mud pie, easy dessert, party pie, homemade pie, creamy pie, graham cracker crust, chocolate pie, celebration dessert


