
Let me tell you, the scent of crushed Biscoff cookies and sweet cream cheese swirling together in my kitchen is basically the definition of holiday magic. There’s something about that spiced, caramel-y aroma that just makes you want to cozy up by the fire—even if you’re actually standing at your kitchen counter with your sleeves dusted in cookie crumbs. The first time I rolled these creamy no-bake Biscoff truffles, I had one of those “hold on, this is way too good” moments, where all you can do is pause, take a deep breath, and grin because you know you’ve stumbled onto something special.
Years ago, when I was knee-high to a grasshopper, the holidays meant endless trays of homemade treats—some were fancy, some were humble, but the best always had that dreamy, melt-in-your-mouth texture. I wanted to recreate that nostalgic comfort with a modern twist (and, honestly, a little less fuss), so when I discovered Biscoff spread at a bake sale, I knew I had to experiment. Now, this recipe is what I wish I’d had all those years ago—dangerously easy, wildly addictive, and pure bliss in every bite.
My family can’t stop sneaking these off the tray, and I can’t blame them! Last Christmas, I barely got them onto the serving plate before half had vanished (they’re just that irresistible). Whether you’re looking for a sweet treat for your kids, a crowd-pleasing potluck star, or something to brighten up your Pinterest dessert board, these truffles deliver every time. Honestly, they’re now a staple for gift tins, cookie swaps, and those “I just need something amazing” nights. I’ve tested every batch in the name of research, of course, and I can say with my whole heart—these creamy no-bake Biscoff truffles feel like a warm hug. Bookmark this one, because you’ll come back to it every holiday season.
Why You’ll Love This Recipe
If you’re like me and you crave festive treats that are both impressive and easy, you’re in for a real treat. Over the years, I’ve tried every truffle recipe under the sun, and I keep coming back to these creamy no-bake Biscoff truffles. Here’s why:
- Quick & Easy: You can whip these up in under thirty minutes—no oven, no stress, just a few bowls and some chill time.
- Simple Ingredients: Every ingredient is a pantry staple. No need to hunt for specialty items or make a last-minute grocery dash.
- Perfect for Holiday Parties: These truffles are always the first to disappear at potlucks, cookie swaps, and family gatherings. They look fancy but require zero pastry chef skills.
- Crowd-Pleaser: Kids, adults, even the picky eaters—everyone asks for seconds. Plus, they’re bite-sized, so nobody feels guilty sneaking a few.
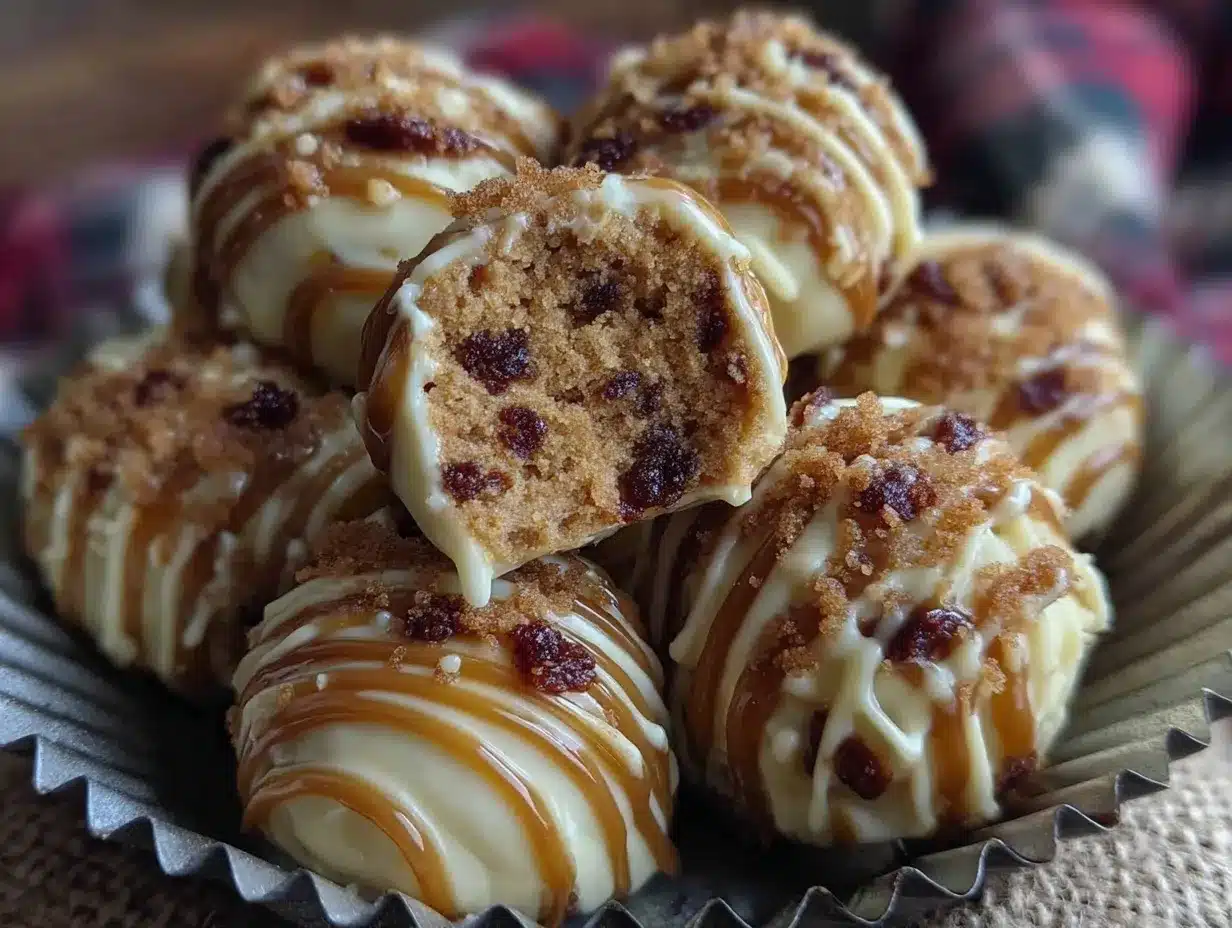
- Unbelievably Delicious: The creamy, spiced Biscoff base is rich and smooth, while the chocolate shell brings a little crunch and glossy finish. It’s comfort food, but in dessert form.
What sets these apart? The secret is blending the Biscoff cookies and spread with tangy cream cheese, then rolling them in a silky chocolate shell. It’s that perfect balance of sweet, spice, and rich creaminess—no bland, dry truffles here. I’ve tweaked the ratios, tested different brands, and can safely say this version is my best yet.
Honestly, these creamy no-bake Biscoff truffles aren’t just a dessert—they’re a little bit of holiday magic. They’re the kind that make you close your eyes after the first bite and just sigh with happiness. Whether you’re impressing guests, gifting a homemade treat, or sneaking one after the kids go to bed, you’ll be glad you tried this recipe. It’s holiday comfort, reimagined for busy folks who still want something special.
What Ingredients You Will Need
This recipe uses simple, wholesome ingredients to deliver bold flavor and that dreamy, creamy texture—without any complicated steps. You’ll probably have most of these in your pantry already, and if not, they’re easy to find (plus, I’ll share a few trusty brand recommendations for the best results).
- Biscoff cookies, crushed (about 200g / 7 oz) – These are the key to that signature spiced caramel flavor. I usually grab the Lotus brand, but any speculoos cookie works.
- Cream cheese, softened (115g / 4 oz) – I like Philadelphia for the best texture. Make sure it’s room temperature so it blends smoothly.
- Biscoff spread (smooth or crunchy, 100g / 1/3 cup) – Adds creaminess and amps up the flavor. The crunchy kind gives a little extra texture, but either works.
- Powdered sugar (60g / 1/2 cup) – Just enough to sweeten and help with binding.
- Salt (a pinch) – Balances the sweetness and brings out the cookie flavors.
- Vanilla extract (1/2 tsp) – Optional, but I love the extra depth it adds.
- Chocolate chips (200g / 7 oz) – For melting and coating. I use semi-sweet, but milk or dark chocolate work too.
- Coconut oil (1 tbsp) – Helps the chocolate melt smoothly and gives a glossy finish.
- Optional toppings:
- Extra crushed Biscoff cookies (for sprinkling)
- Melted white chocolate (drizzle for contrast)
- Festive sprinkles (for a holiday touch)
Substitution Tips:
- If you need these gluten-free, swap the Biscoff cookies for a gluten-free speculoos brand.
- For dairy-free, use vegan cream cheese and dairy-free chocolate chips (I’ve had good luck with Violife and Enjoy Life brands).
- Out of Biscoff spread? Creamy peanut butter or cookie butter works in a pinch, but the flavor will change a bit.
Trust me, the quality of your cookies and cream cheese makes a big difference, so use your favorites. In summer, you can even swap in fresh berries as a drizzle or topping for a fruity twist. These ingredients come together for a treat that’s simple, festive, and totally crave-worthy.
Equipment Needed
- Food processor or blender – For crushing the Biscoff cookies super fine. If you don’t have one, a sturdy zip-top bag and rolling pin works too (just a little more elbow grease!).
- Mixing bowls – At least two. I use one for the truffle base and another for melting chocolate.
- Hand mixer or spatula – To blend the cream cheese and Biscoff spread smoothly. If you use a stand mixer, the paddle attachment is perfect.
- Cookie scoop or tablespoon – For portioning out the truffles evenly (makes things way less messy).
- Baking sheet – Lined with parchment paper for chilling and setting the truffles.
- Microwave-safe bowl or double boiler – For melting the chocolate. I usually use the microwave in short bursts, but a double boiler gives you more control.
- Fork or dipping tool – For rolling and coating the truffles in melted chocolate.
- Parchment paper – Helps the truffles release easily after chilling.
If you don’t have a food processor, crushing the cookies by hand works fine (I’ve done it plenty of times when my blender went on strike). For melting chocolate, a simple glass bowl over a pot of simmering water is just as good as fancy equipment. Maintenance tip: always wipe your tools clean quickly after working with melted chocolate—sticky bowls are a pain if you let them sit. Honestly, you don’t need anything fancy for these truffles, and budget-friendly tools work just as well as high-end gadgets.
Preparation Method
-
Crush the Biscoff cookies.
Place 200g (7 oz) of Biscoff cookies in a food processor or blender. Pulse until you get fine crumbs (if using a bag and rolling pin, just keep rolling until you can’t see any large chunks). The crumbs should feel sandy and smell sweetly spiced. -
Blend the filling.
In a large mixing bowl, combine 115g (4 oz) softened cream cheese, 100g (1/3 cup) Biscoff spread, 60g (1/2 cup) powdered sugar, 1/2 tsp vanilla extract, and a pinch of salt. Mix with a hand mixer or spatula until smooth and creamy (it’ll look a little fluffy). My tip: start slow so the sugar doesn’t fly everywhere. -
Add cookie crumbs.
Pour the crushed cookies into the cream cheese mixture. Stir until everything is well combined and forms a thick, soft dough. If it seems too sticky, add a few more cookie crumbs. The texture should be scoopable but hold its shape. -
Shape the truffles.
Use a cookie scoop or tablespoon to portion out the dough (about 1-inch balls, roughly 20g each). Roll between your palms until smooth. Place each on a parchment-lined baking sheet. You’ll get about 16-18 truffles. -
Chill the truffles.
Refrigerate the balls for at least 30 minutes to firm up. If you’re in a rush, pop them in the freezer for 10-15 minutes. This helps them hold together when dipping in chocolate. -
Melt the chocolate.
In a microwave-safe bowl, combine 200g (7 oz) chocolate chips and 1 tbsp coconut oil. Microwave in 20-second bursts, stirring each time, until smooth. Or melt over a double boiler if you prefer. Watch for scorching—chocolate burns fast! -
Coat the truffles.
Drop a chilled truffle into the melted chocolate, roll gently with a fork, then lift and let excess drip off. Place back on the parchment paper. If you want extra crunch, sprinkle crushed Biscoff cookies or festive sprinkles on top before the chocolate sets. -
Set and serve.
Let the chocolate set at room temperature, or refrigerate for 10 minutes to speed things up. The shell should be firm and glossy, the inside creamy and rich. Store in an airtight container until ready to serve.
Troubleshooting: If your truffles are too soft, chill them a little longer. If the chocolate seizes, add a bit more coconut oil. If you see cracks, try dipping the truffles while still slightly chilled instead of frozen. Sensory cues: the dough should smell sweet and spicy, and the chocolate shell should have a gentle snap when you bite in. Efficiency tip: line up your dipping station before you start, so you can move quickly and keep the chocolate smooth.
Cooking Tips & Techniques
After making dozens (okay, maybe hundreds) of creamy no-bake Biscoff truffles over the years, I’ve picked up a few tricks that guarantee perfect results every time. Here’s what I’ve learned:
- Room Temperature Ingredients: Make sure your cream cheese is truly softened—cold cream cheese will make the filling lumpy.
- Chill Before Dipping: If the truffle balls aren’t firm enough, they’ll melt into the chocolate pool. Chilling is key!
- Chocolate Melting: Don’t walk away from melting chocolate, not even for a second (I’ve scorched more than one batch by getting distracted). Stir frequently and use coconut oil for a glossy finish.
- Cookie Crumb Texture: Finer crumbs = smoother truffles. If you want a little crunch, leave a few larger bits in.
- Dipping Tools: Using a fork or special dipping tool helps the excess chocolate drip off, so you get a thin, even coating.
- Work in Batches: Only dip a few truffles at a time so the others stay chilled. This keeps the process smooth and mess-free.
- Skip the Perfection: Honestly, not every truffle will look Pinterest-perfect, and that’s okay! Homemade means a little character.
Common mistakes: Over-chilling makes truffles hard to coat, while under-chilling makes them fall apart. If your chocolate is too thick, add coconut oil in small increments. Timing tip: I set up a little assembly line and multitask—roll, chill, dip, sprinkle toppings. If you’re making a double batch, recruit a buddy for the dipping step (it’s more fun and twice as fast!). These little tweaks make all the difference for creamy, consistent truffles that look and taste amazing.
Variations & Adaptations
One of my favorite things about creamy no-bake Biscoff truffles is how easy they are to customize. Over the years, I’ve played with a bunch of different versions—some out of necessity, some just for fun. Here are a few tried-and-true adaptations:
- Gluten-Free: Use gluten-free speculoos cookies and check your chocolate chips for gluten. The flavor is just as good, and nobody will notice the swap.
- Dairy-Free: Substitute vegan cream cheese and dairy-free chocolate (I’ve made these with coconut yogurt instead of cream cheese, and they still turned out creamy).
- Flavor Twists: Mix in a little orange zest or espresso powder to the filling for a citrus or mocha kick. A pinch of cinnamon or nutmeg amps up the holiday vibe.
- White Chocolate Shell: Coat the truffles in melted white chocolate for a sweeter finish and pretty contrast (great for gifting or holiday parties).
- Nutty Crunch: Roll the finished truffles in finely chopped toasted hazelnuts or pecans. Adds texture and an extra layer of flavor.
Cooking method adaptations: If you don’t want to dip in chocolate, roll the chilled truffles in cocoa powder or powdered sugar for a rustic look. For a frozen treat, pop them in the freezer and serve cold. Personally, I love adding a drizzle of salted caramel over the chocolate shell—it’s messy, but so worth it. Allergens: Always check your cookie and chocolate brands for allergy info, and swap out as needed. The best part? You can honestly make these your own, every single time.
Serving & Storage Suggestions
When it comes to serving creamy no-bake Biscoff truffles, I like to keep things simple but festive. Serve them chilled or at room temperature on a pretty platter lined with parchment or a holiday napkin. If you’re gifting, tuck them into mini cupcake liners and arrange in a gift box or tin—they look absolutely adorable and travel well.
These truffles pair perfectly with coffee, hot chocolate, or a glass of cold milk (my kids think they’re the ultimate after-dinner snack). For parties, serve alongside other holiday desserts like gingerbread cookies or chocolate bark for a full dessert spread.
Storage: Keep the truffles in an airtight container in the fridge for up to one week. They’ll stay fresh and creamy, though the chocolate shell may get a little softer over time (still delicious!). For longer storage, freeze the truffles in a single layer, then transfer to a freezer-safe bag—just thaw in the fridge before serving. Reheat? Nope! These are best cold or at room temp. Pro tip: the flavors deepen after a day or two, so making ahead is never a bad idea.
Nutritional Information & Benefits
Here’s a quick look at what’s inside each truffle (approximate values per truffle):
- Calories: 120
- Fat: 7g
- Sugar: 9g
- Protein: 1g
- Carbs: 14g
Biscoff cookies and spread bring a dose of iron and a hint of fiber, while cream cheese adds a touch of protein and calcium. If you swap for dairy-free or gluten-free options, you’ll shave off a little fat and calories. These truffles are indulgent, but portion-controlled and great for sharing. Allergens: contains wheat, dairy, and soy (in most chocolate chips) unless you substitute. From a wellness perspective, I love that these are homemade, so you can control the sweetness and skip any artificial stuff. It’s a treat, sure, but a mindful one.
Conclusion
To sum it up, these creamy no-bake Biscoff truffles are everything I love about holiday desserts—easy, festive, and totally comforting. Whether you’re making them for a party, gifting to friends, or just sneaking one after dinner, they’re worth every minute. Don’t be afraid to customize with your favorite toppings and flavors; that’s half the fun.
Personally, I adore these truffles because they remind me of family gatherings, nostalgia, and the simple joy of sharing something homemade. Give them a try, let me know your favorite twist, and be sure to bookmark this recipe for every holiday season. If you make them, drop a comment below or tag me with your gorgeous creations. Here’s to cozy kitchens, sweet treats, and happy holidays!
Frequently Asked Questions
Can I make these creamy no-bake Biscoff truffles ahead of time?
Absolutely! These truffles actually taste better after a day or two in the fridge, so feel free to make them up to a week ahead. Just store in an airtight container.
Do I have to use Biscoff cookies, or can I substitute something else?
While Biscoff cookies give that signature flavor, you can substitute with any speculoos or spiced cookie. For gluten-free, use a certified gluten-free cookie.
Can I freeze Biscoff truffles?
Yes, these freeze beautifully. Arrange in a single layer, freeze, then store in a freezer bag. Thaw in the fridge before serving for best texture.
What if my truffle filling is too sticky?
Add a few more crushed cookies until the dough is easier to roll. Chilling the mixture for 10-15 minutes also helps firm it up.
How do I get a smooth chocolate coating?
Melt chocolate with a little coconut oil and dip the chilled truffles using a fork or dipping tool. Let excess chocolate drip off before setting on parchment paper for a glossy, even finish.
Pin This Recipe!

Creamy No-Bake Biscoff Truffles

These creamy no-bake Biscoff truffles combine spiced caramel cookies, tangy cream cheese, and a glossy chocolate shell for a festive, melt-in-your-mouth holiday treat. Quick to make and endlessly customizable, they’re perfect for parties, gifting, or cozy nights in.
- Prep Time: 20 minutes
- Cook Time: 10 minutes (chilling and melting)
- Total Time: 30 minutes
- Yield: 16-18 truffles 1x
- Category: Dessert
- Cuisine: American
Ingredients
- 7 oz (about 28) Biscoff cookies, crushed
- 4 oz (1/2 cup) cream cheese, softened
- 1/3 cup (3.5 oz) Biscoff spread (smooth or crunchy)
- 1/2 cup (2 oz) powdered sugar
- Pinch of salt
- 1/2 teaspoon vanilla extract (optional)
- 7 oz (1 cup) chocolate chips (semi-sweet, milk, or dark)
- 1 tablespoon coconut oil
- Optional toppings: extra crushed Biscoff cookies, melted white chocolate, festive sprinkles
Instructions
- Place Biscoff cookies in a food processor or blender and pulse until finely crushed. Alternatively, use a zip-top bag and rolling pin.
- In a large mixing bowl, blend softened cream cheese, Biscoff spread, powdered sugar, vanilla extract, and salt until smooth and creamy.
- Add the crushed cookies to the cream cheese mixture and stir until a thick, soft dough forms. Add more cookie crumbs if too sticky.
- Portion dough into 1-inch balls (about 20g each) using a cookie scoop or tablespoon. Roll smooth and place on a parchment-lined baking sheet.
- Chill truffle balls in the refrigerator for at least 30 minutes, or freeze for 10-15 minutes until firm.
- Melt chocolate chips and coconut oil together in a microwave-safe bowl in 20-second bursts, stirring each time, or use a double boiler.
- Dip chilled truffles into melted chocolate using a fork, letting excess drip off. Place back on parchment paper and sprinkle with toppings if desired.
- Let chocolate set at room temperature or refrigerate for 10 minutes until firm. Store in an airtight container until ready to serve.
Notes
For gluten-free, use certified gluten-free speculoos cookies and check chocolate chips. For dairy-free, substitute vegan cream cheese and dairy-free chocolate. Chill truffles well before dipping for best results. Customize with orange zest, espresso powder, or nutty coatings. Truffles taste even better after a day or two in the fridge.
Nutrition
- Serving Size: 1 truffle (about 20g
- Calories: 120
- Sugar: 9
- Sodium: 60
- Fat: 7
- Saturated Fat: 4
- Carbohydrates: 14
- Fiber: 0.5
- Protein: 1
Keywords: Biscoff truffles, no-bake dessert, holiday treat, cookie truffles, easy truffles, chocolate truffles, party dessert, giftable sweets


