Let me tell you, the moment you open the fridge and catch a whiff of these creepy creamy graveyard dirt cups, you’re instantly transported to a spooky Halloween night filled with laughter and sweet mischief. The rich scent of chocolate pudding mingling with crushed cookies is enough to make anyone’s mouth water. The first time I made these, I was instantly hooked—the kind of moment where you pause, take a deep breath, and just smile because you know you’re onto something truly special. It was years ago, during a Halloween party when I was knee-high to a grasshopper, and ever since, these dirt cups have been a staple for every spooky celebration.
Honestly, this recipe feels like a warm hug on a chilly October evening. My family couldn’t stop sneaking them off the serving platter (and I can’t really blame them). You know what’s great? They’re dangerously easy to make and bring a pure, nostalgic comfort that’s perfect for kids, adults, and anyone who loves a little Halloween fun. Whether you’re throwing a potluck, brightening up your Pinterest cookie board, or just craving a sweet treat, these graveyard dirt cups hit the spot. I’ve tested the recipe multiple times—in the name of research, of course—and it’s become a go-to for family gatherings and gifting alike. Trust me, you’re going to want to bookmark this one.
Why You’ll Love This Recipe
Having whipped up countless Halloween treats, I can say these graveyard dirt cups stand out for so many reasons. Here’s why you’ll love making (and eating) them:
- Quick & Easy: Comes together in under 20 minutes, perfect for last-minute Halloween party prep.
- Simple Ingredients: No fancy supermarket runs required—you probably have most of these in your pantry already.
- Perfect for Halloween: This recipe nails the spooky vibe while being kid-friendly and fun to assemble.
- Crowd-Pleaser: Both kids and adults rave about the creamy texture and crunchy cookie “dirt.”
- Unbelievably Delicious: The combo of silky pudding, crunchy Oreo crumbs, and gummy worms is next-level comfort food.
This isn’t just another chocolate pudding cup. The secret is in layering the pudding with finely crushed cookies and topping with gummy worms and tombstone cookies for that perfect creepy vibe. I like to blend the pudding just right for an ultra-smooth texture that contrasts with the crunchy “dirt.” It’s comfort food reimagined—simple, fun, and with just the right spooky twist.
It’s the kind of recipe that makes you close your eyes after the first spoonful and smile. Whether you want to impress guests without stress or just treat yourself, these graveyard dirt cups won’t disappoint.
What Ingredients You Will Need
This recipe uses simple, wholesome ingredients to deliver bold flavor and satisfying texture without the fuss. Most are pantry staples, so you can whip these up anytime Halloween calls.
- Instant Chocolate Pudding Mix: 1 package (3.9 oz / 110g) – I recommend Jell-O for best creaminess.
- Cold Milk: 2 cups (480 ml) – whole milk gives richer flavor, but any milk works.
- Oreos: About 20 cookies, finely crushed (reserve a few whole for decoration) – use classic or chocolate creme.
- Whipped Topping: 1 cup (240 ml) – store-bought or homemade for extra fluffiness.
- Gummy Worms: 1 cup (approx. 150g) – the perfect creepy crawly garnish.
- Mini Tombstone Cookies or Graham Crackers: For decoration – optional, but adds awesome spooky detail.
- Optional: Mini candy eyes, edible glitter, or colored sugar for extra fun touches.
If you want to make this dairy-free, swap milk with almond or oat milk and use coconut-based whipped topping. For gluten-free, choose gluten-free chocolate cookies. In summer, you could toss in fresh berries just for a different vibe, but honestly, the classic version is pure Halloween magic.
Equipment Needed
- Mixing Bowls: At least two—one for pudding and one for whipped topping.
- Whisk or Electric Mixer: To blend pudding mix smoothly.
- Measuring Cups and Spoons: For precise ingredient amounts.
- Food Processor or Zip-top Bag & Rolling Pin: For crushing Oreos into fine “dirt.”
- Serving Cups: Clear plastic or glass cups (8-12 oz / 240-350 ml) to show off layers.
- Spoons or Small Spatula: For layering and serving.
If you don’t have a food processor, no worries—a zip-top bag and rolling pin work just fine for cookie crushing. For the whipped topping, if you’re feeling fancy, a stand mixer makes it ultra-fluffy, but a hand whisk does the trick too. I’ve found clear cups really make the layers pop visually, which is great for parties or sharing on Pinterest.
Preparation Method
- Make the Pudding: In a medium bowl, whisk together the instant chocolate pudding mix and cold milk (2 cups / 480 ml) until smooth and thickened, about 2 minutes. Let it set in the fridge for 5 minutes to firm up.
- Prepare the “Dirt”: While pudding sets, crush the Oreos finely. Use a food processor or place cookies in a zip-top bag and crush with a rolling pin until you get coarse crumbs resembling dirt. Reserve a small handful for topping decoration.
- Fold in Whipped Topping: Gently fold 1 cup (240 ml) of whipped topping into the pudding until combined, creating a creamy, lighter texture. Be careful not to overmix—you want it fluffy!
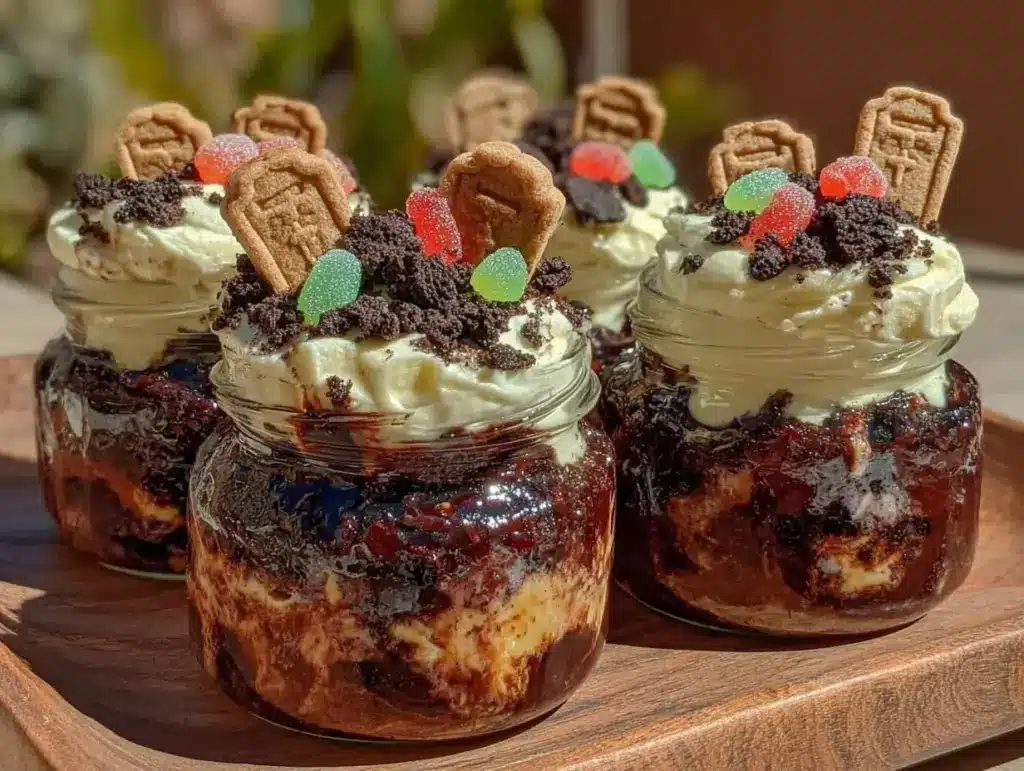
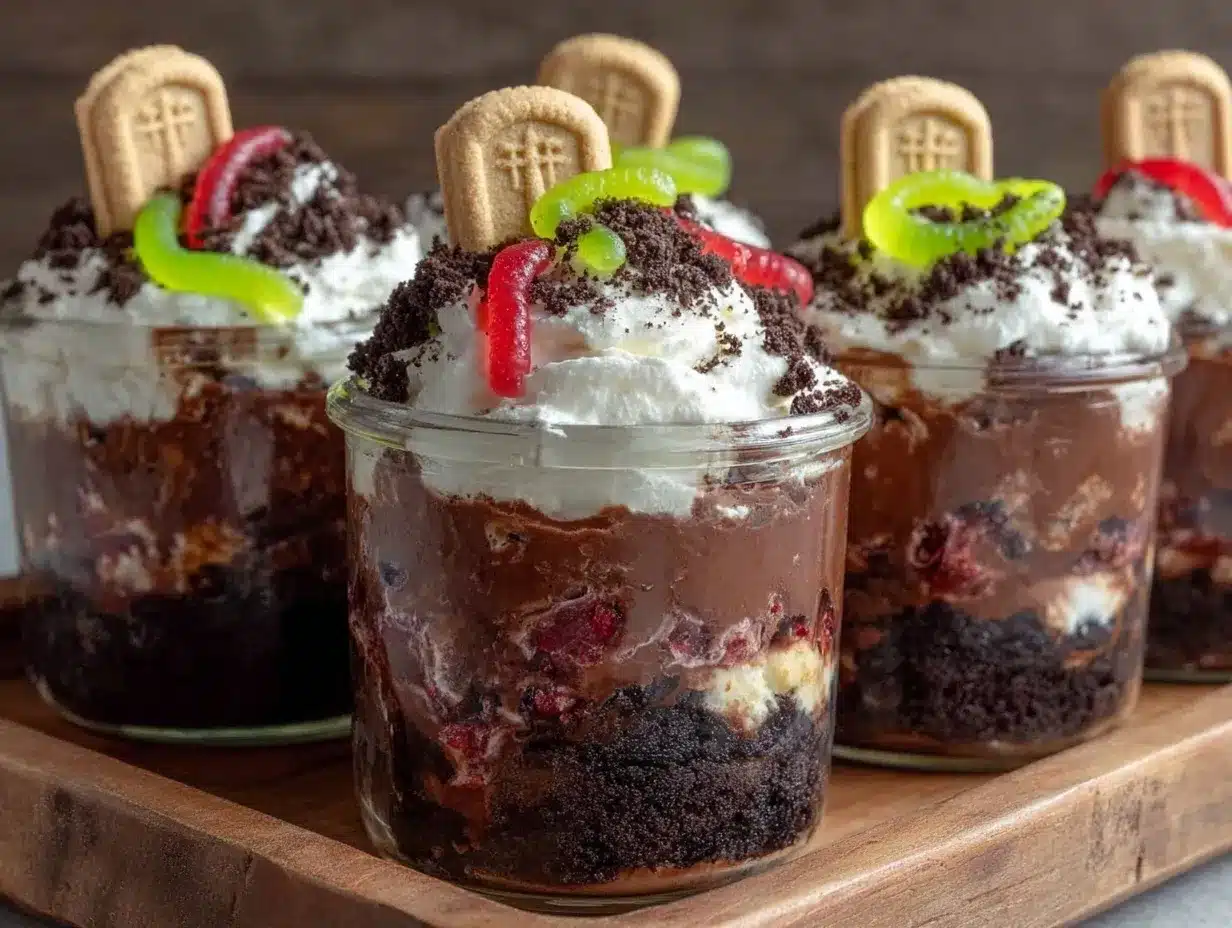
- Assemble the Cups: Start with a layer of crushed Oreos at the bottom of each cup (about 2 tablespoons / 15g). Spoon or pipe a layer of pudding mixture (about ¼ cup / 60 ml), then another Oreo layer, followed by more pudding. Finish with a generous Oreo “dirt” topping.
- Add the Creepy Details: Nestle gummy worms partially buried in the top “dirt.” Add mini tombstone cookies or graham crackers standing up for that spooky graveyard vibe. Optional candy eyes or edible glitter make it extra festive.
Pop the cups in the fridge for at least 30 minutes before serving to let flavors meld and pudding firm up. This chilling step is key—don’t skip it or the dirt cups won’t hold their shape as well. When you scoop, you should see creamy pudding against crumbly dirt and gummy worms peeking out. It’s a deliciously eerie sight!
Cooking Tips & Techniques
Making these graveyard dirt cups is pretty straightforward, but a few tricks make all the difference:
- Mix pudding thoroughly: Whisk the pudding mix with cold milk briskly to avoid lumps. A smooth base is the backbone of creamy texture.
- Don’t overmix when folding whipped topping: Too much stirring deflates the fluffiness, making the pudding dense.
- Crush cookies to the right texture: Aim for fine crumbs with a few small chunks for texture contrast. Too coarse and it feels gritty; too fine and it’s flat.
- Layer carefully: Use a spoon or piping bag for neat layers that look great in clear cups—you want that visual impact.
- Chill well: Let cups sit at least 30 minutes so pudding sets and flavors meld. You can prep them the day before for convenience.
I’ve learned the hard way that skipping chilling results in a sloppy mess and sad gummy worms. Also, gummy worms tend to stick together if left too long, so add them right before serving. Multitasking here—crushing cookies while pudding sets—saves time and keeps everything fresh.
Variations & Adaptations
Want to put your own spin on these graveyard dirt cups? Here are a few ideas I’ve tried and loved:
- Peanut Butter Graveyard: Mix peanut butter into the pudding for a nutty twist. Top with chopped Reese’s Pieces for extra crunch.
- Fruit-Infused Dirt Cups: Add a layer of fresh raspberries or sliced strawberries between pudding and cookie layers for a tangy surprise.
- Dairy-Free Version: Use coconut milk pudding mix and dairy-free whipped topping to suit dietary needs without losing flavor.
- Spooky Spice: Sprinkle a pinch of cinnamon or pumpkin pie spice into the pudding for a subtle fall flavor.
- Different Cookie Bases: Swap Oreos for gluten-free chocolate cookies or crushed chocolate graham crackers to cater to allergies or preferences.
I once tried adding crushed peppermint candies for a minty graveyard, which was surprisingly tasty! Feel free to get creative—these cups are forgiving and fun to customize.
Serving & Storage Suggestions
These dirt cups are best served chilled—cold pudding and crunchy cookie crumbs make the perfect combo. I like to serve them straight from the fridge for maximum freshness. For a festive touch, arrange them on a Halloween-themed tray or add little plastic spiders for an extra creepy vibe.
They pair wonderfully with hot apple cider or a rich cup of coffee to balance the sweetness. If you’re serving at a party, consider making mini spoons available for easy snacking.
Leftovers store well in airtight containers in the refrigerator for up to 3 days. If you want to freeze them, remove any gummy worms and toppings first, freeze pudding layers separately, then assemble after thawing to keep textures intact.
When reheating (if you dare!), warm gently in the microwave for just 10-15 seconds to soften pudding slightly without melting the cookie crumbs.
These cups actually taste better after a few hours in the fridge as the flavors deepen—so you can make them ahead and relax before the party.
Nutritional Information & Benefits
Each serving of these graveyard dirt cups comes in around 250-300 calories, depending on portion size and toppings. The main ingredients provide:
- Calcium and Vitamin D: From milk and pudding mix, supporting bone health.
- Antioxidants: Cocoa in chocolate pudding offers antioxidants which can help reduce inflammation.
- Energy Boost: Quick sugars from cookies and pudding give an instant energy lift—perfect for a Halloween sugar rush!
Note: Contains dairy, gluten (unless substituted), and possible nuts depending on toppings. Adjust ingredients for allergies accordingly.
From my wellness perspective, this treat works best as an occasional indulgence—a fun way to celebrate with family without going overboard. Making it at home means you control ingredients, so it’s often a better choice than store-bought Halloween snacks loaded with preservatives.
Conclusion
These creepy creamy graveyard dirt cups are a Halloween treat that’s as fun to make as it is to eat. They combine rich chocolate pudding, crunchy cookie crumbs, and playful gummy worms to create a dessert that’s simple, spooky, and downright delicious. I encourage you to tweak the layers and toppings to fit your style and impress your guests or family.
Personally, I love this recipe because it brings out the kid in all of us while feeling like a special seasonal indulgence. Plus, it’s so quick to put together—great for last-minute party plans or a cozy night in.
Try it out, share your tweaks in the comments, and don’t forget to pass along the fun by sharing this recipe with your friends. Here’s to a Halloween full of sweet memories and plenty of creepy creamy dirt cups!
FAQs About Creepy Creamy Graveyard Dirt Cups
Can I make these dirt cups ahead of time?
Yes! They can be made up to a day in advance. Just keep them covered in the fridge and add gummy worms and decorations right before serving.
What can I use instead of gummy worms?
If you want a less sweet option, try sour candy strips, fruit leather cut into strips, or even licorice strings for spooky decorations.
Can I use homemade pudding instead of instant mix?
Absolutely! Homemade chocolate pudding works great but might require longer chilling time to firm up properly.
Are these cups gluten-free?
Not with traditional Oreos, but you can substitute with gluten-free chocolate cookies to make them safe for gluten-sensitive friends.
What’s the best way to crush cookies if I don’t have a food processor?
Place cookies in a zip-top bag, seal it, and gently crush with a rolling pin or heavy pan until you get crumbly dirt-like texture.
Pin This Recipe!
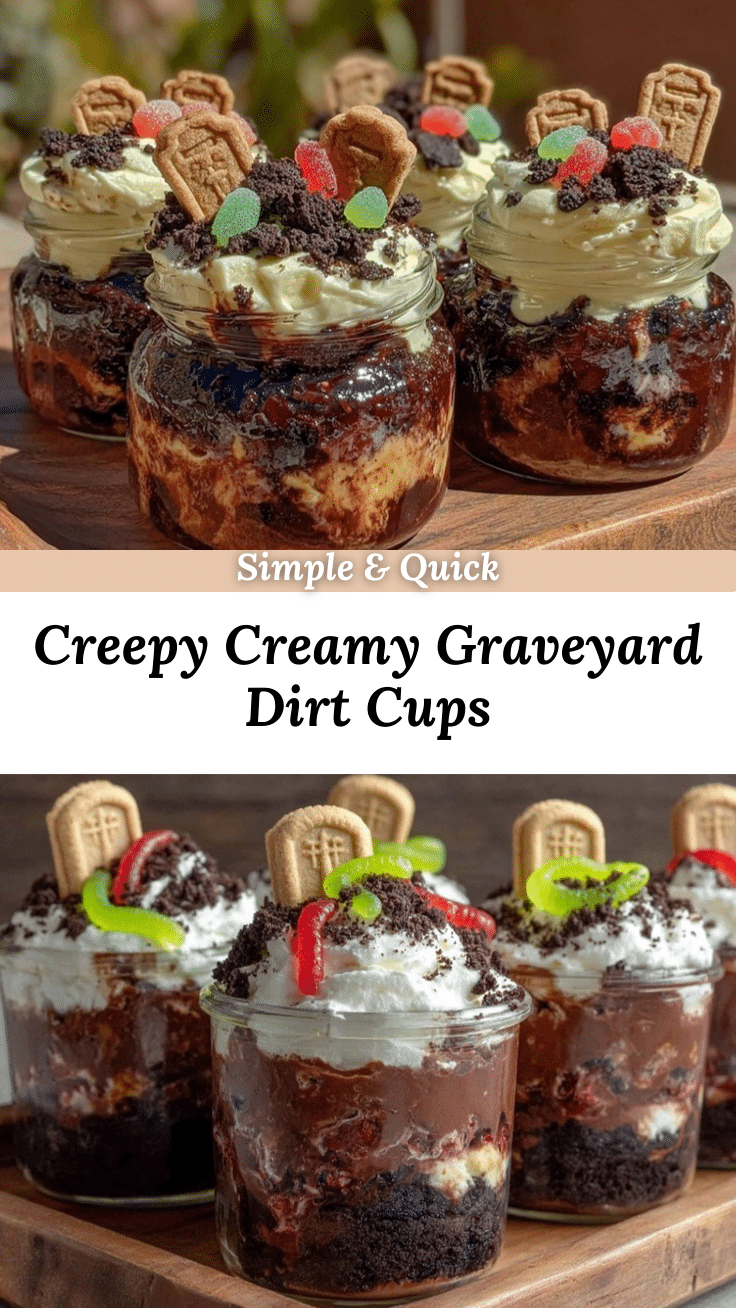
Creepy Creamy Graveyard Dirt Cups

A spooky and fun Halloween dessert featuring layers of creamy chocolate pudding, crushed Oreo cookies, and gummy worms, perfect for parties and family gatherings.
- Prep Time: 10 minutes
- Cook Time: 0 minutes
- Total Time: 40 minutes
- Yield: 8 servings 1x
- Category: Dessert
- Cuisine: American
Ingredients
- 1 package (3.9 oz / 110g) instant chocolate pudding mix (recommend Jell-O)
- 2 cups (480 ml) cold milk (whole milk preferred)
- About 20 Oreos, finely crushed (reserve a few whole for decoration)
- 1 cup (240 ml) whipped topping (store-bought or homemade)
- 1 cup (approx. 150g) gummy worms
- Mini tombstone cookies or graham crackers for decoration (optional)
- Optional: mini candy eyes, edible glitter, or colored sugar for extra decoration
Instructions
- In a medium bowl, whisk together the instant chocolate pudding mix and cold milk until smooth and thickened, about 2 minutes. Refrigerate for 5 minutes to set.
- While pudding sets, crush Oreos finely using a food processor or place cookies in a zip-top bag and crush with a rolling pin until coarse crumbs resembling dirt form. Reserve some crumbs for topping.
- Gently fold 1 cup of whipped topping into the pudding until combined and fluffy. Avoid overmixing.
- Assemble cups by layering about 2 tablespoons of crushed Oreos at the bottom, then spoon or pipe about 1/4 cup of pudding mixture, followed by another Oreo layer, more pudding, and finish with a generous Oreo crumb topping.
- Decorate with gummy worms partially buried in the top layer, mini tombstone cookies or graham crackers, and optional candy eyes or edible glitter.
- Chill the assembled cups in the refrigerator for at least 30 minutes before serving to let flavors meld and pudding firm up.
Notes
Chill cups for at least 30 minutes before serving to ensure pudding sets and flavors meld. Add gummy worms just before serving to prevent sticking. For dairy-free, use almond or oat milk and coconut-based whipped topping. For gluten-free, substitute gluten-free chocolate cookies. Clear cups enhance visual appeal.
Nutrition
- Serving Size: 1 cup (about 8-12 oz
- Calories: 275
- Sugar: 28
- Sodium: 180
- Fat: 12
- Saturated Fat: 7
- Carbohydrates: 38
- Fiber: 2
- Protein: 3
Keywords: Halloween dessert, dirt cups, chocolate pudding, Oreo dessert, spooky treats, gummy worms, easy Halloween recipe


