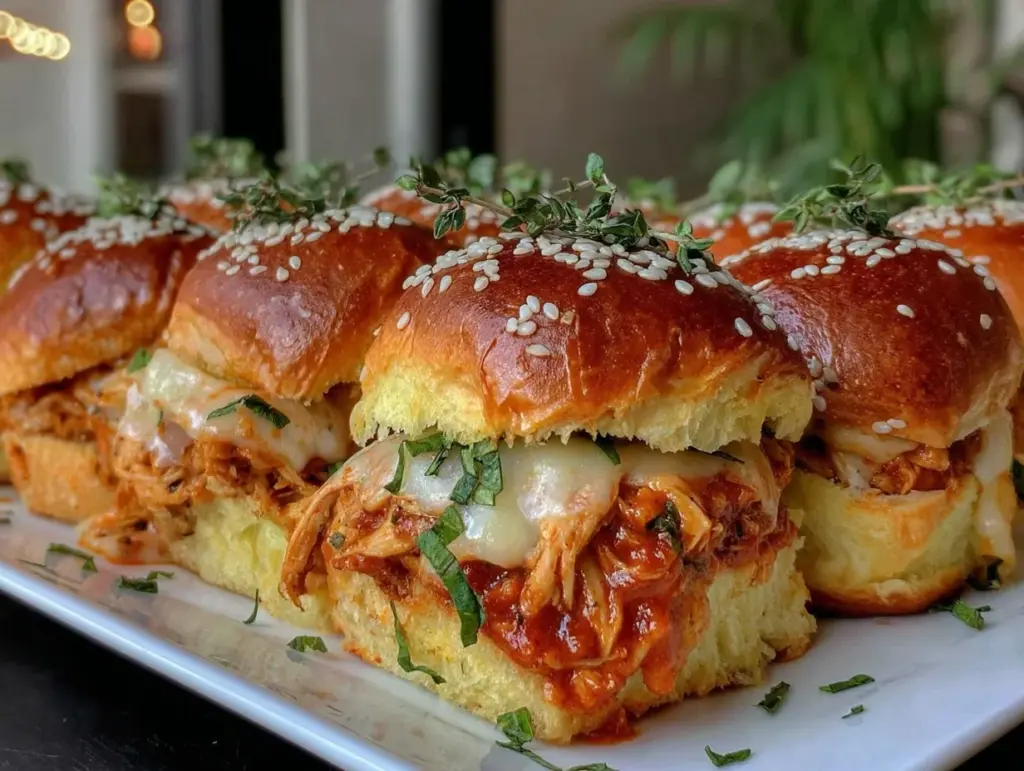
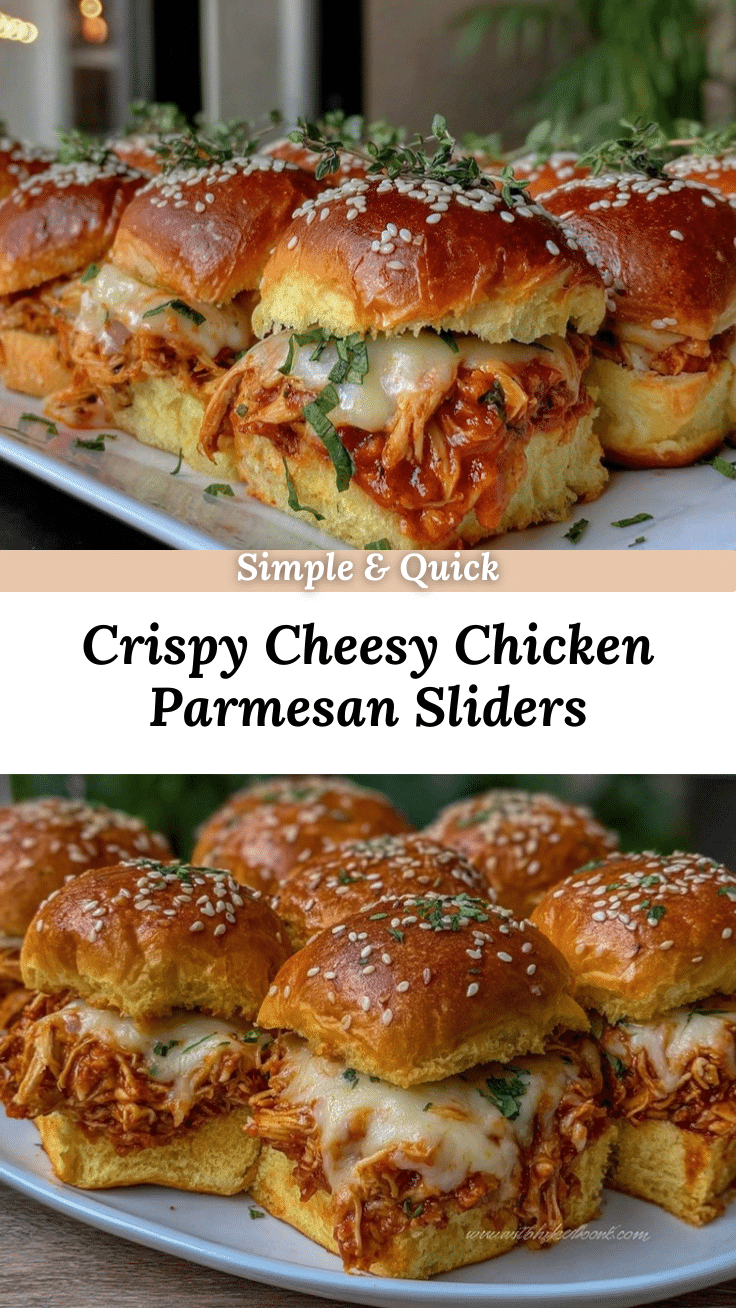
Picture this: you’re pulling a tray of golden, bubbling sliders from the oven and the scent of crispy chicken, tangy tomato sauce, and gooey melted mozzarella hits you square in the face. It’s one of those moments that makes everyone in the house rush to the kitchen—usually before you’ve even had a chance to grab your spatula! The crunch of the chicken, the stretchy cheese, and the soft, warm buns are a combo that’s honestly hard to resist. The first time I whipped up these crispy chicken Parmesan sliders, I was trying to jazz up a rainy Friday night for my family—let’s face it, regular sandwiches weren’t going to cut it. I still remember pausing, taking a deep breath after the first bite, and just smiling. It was the kind of pure, nostalgic comfort that makes you want to call your grandma and tell her you finally nailed it.
When I was knee-high to a grasshopper, Chicken Parmesan was a special treat reserved for birthdays and celebrations. Fast forward to today, and I’m tossing those same flavors into party-ready sliders that are perfect for potlucks, game day spreads, or a sweet treat for your kids after soccer practice. I stumbled on this slider idea when trying to recreate a bite-sized version for a bake sale—let me tell you, I wish I’d discovered these years ago. My family couldn’t stop sneaking them off the cooling rack (and I can’t really blame them). Even my picky eater was hooked, and that’s saying something!
Honestly, this recipe is dangerously easy and delivers pure comfort in every bite. Whether you’re looking to brighten up your Pinterest board, host a crowd, or just make weeknight dinner a little more exciting, these sliders have your back. I’ve tested them a dozen times (in the name of research, of course), and now they’re a staple for family gatherings, gifting, and even those lazy Sundays when you want something special. It feels like a warm hug wrapped in gooey cheese, and you’re going to want to bookmark this one for sure.
Why You’ll Love This Crispy Chicken Parmesan Sliders Recipe
Let’s talk about why these crispy chicken Parmesan sliders with melted mozzarella deserve a prime spot in your recipe rotation. After all my years of testing party bites, this one stands out for a bunch of reasons. From the first crunchy bite to the last melty morsel, these sliders deliver flavor, texture, and fun in every way. Here’s what makes them my go-to appetizer for parties, quick dinners, and even holiday brunches:
- Quick & Easy: These sliders come together in under 45 minutes, making them perfect for busy weeknights or last-minute party prep. No fuss, just fast results.
- Simple Ingredients: You don’t need fancy grocery runs. Most of what you need is probably already hanging out in your kitchen: chicken breasts, mozzarella, marinara, slider buns, and a few pantry staples.
- Perfect for Parties: These are a hit at potlucks, holiday gatherings, and game day. They’re small, shareable, and always disappear in minutes (seriously, watch them vanish!).
- Crowd-Pleaser: Kids love them, adults rave about them, and picky eaters don’t stand a chance. The crispy chicken and melty cheese win everyone over.
- Unbelievably Delicious: The contrast of crunchy chicken, velvety mozzarella, and tangy tomato sauce is pure comfort food, but with bite-sized fun.
What sets these sliders apart? The chicken is double-breaded for extra crispiness, and a buttery garlic glaze on the buns brings out all the classic Italian flavors. I experimented with a few techniques—like baking instead of frying, and using freshly shredded mozzarella for stretchiness—and honestly, it’s my best version yet. The seasoning in the breadcrumbs and the quick broil at the end mean you get that restaurant-level crunch and flavor, right from your home kitchen.
This recipe isn’t just good—it’s the kind that makes you close your eyes after the first bite and savor the flavors. It’s comfort food, but reimagined for busy days and hungry crowds. You can impress guests without breaking a sweat or turn a simple weeknight into something memorable. Trust me, once you make these, you’ll be hooked (and your friends will beg for the recipe)!
What Ingredients You Will Need
This crispy chicken Parmesan sliders recipe uses simple, wholesome ingredients to deliver bold flavor and satisfying texture without the fuss. Most are pantry staples or easy to grab at any grocery store, and you can swap a few things based on what you have. Here’s what you’ll need:
- For the Chicken:
- 2 large boneless, skinless chicken breasts (about 500g) – sliced into 12 slider-sized pieces
- 1 cup (120g) all-purpose flour – for dredging
- 2 large eggs – beaten (room temperature works best for coating)
- 1 1/2 cups (90g) panko breadcrumbs – adds extra crunch
- 1/2 cup (30g) grated Parmesan cheese – for flavor and crispiness
- 1 teaspoon garlic powder
- 1 teaspoon dried Italian seasoning
- 1/2 teaspoon salt and 1/4 teaspoon black pepper
- Vegetable oil (for frying or air frying – about 1/2 cup/120ml)
- For the Sliders:
- 12 slider buns or mini rolls (potato rolls or classic dinner rolls work great)
- 1 cup (250ml) marinara sauce (homemade or store-bought – I like Rao’s for taste and texture)
- 1 1/2 cups (170g) shredded mozzarella cheese (use fresh mozzarella if you want extra gooeyness)
- 2 tablespoons (30g) unsalted butter – melted, for bun glaze
- 1 garlic clove – finely minced for bun glaze
- 2 tablespoons (6g) chopped fresh parsley or basil (optional, for topping)
- 1/4 cup (25g) grated Parmesan – to sprinkle over the buns before baking
- Ingredient Tips & Substitutions:
- Chicken: Use boneless chicken tenders to save time on slicing.
- Buns: Brioche slider buns add richness, but any soft roll works.
- Breadcrumbs: Swap panko for gluten-free breadcrumbs if needed.
- Cheese: Dairy-free mozzarella works for allergies—just watch the melt factor.
- Sauce: Try spicy arrabbiata instead of marinara for a kick!
Trusted brands I use: I’m partial to Rao’s marinara and Belgioioso mozzarella for reliable results. For Parmesan, look for real Parmigiano-Reggiano if you can—it makes a difference! If you’re making these in summer, try fresh basil on top for a burst of flavor. Honestly, these ingredients are flexible but the combo is what really brings the crispy chicken Parmesan sliders to life.
Equipment Needed
- Baking Sheet: For baking the sliders and crisping the chicken—parchment paper helps with easy cleanup.
- Wire Rack: Optional, but great for keeping chicken crispy after frying.
- Large Skillet or Air Fryer: For frying the chicken pieces (I’ve used both, and honestly, air fryer is a breeze for less mess).
- Tongs & Spatula: For flipping and assembling the sliders without squishing them.
- Mixing Bowls: Three bowls for flour, egg, and breadcrumb mixtures.
- Measuring Cups and Spoons: Precision makes all the difference for seasonings.
- Oven: To melt the cheese and crisp the buns.
If you don’t have a wire rack, just use a paper towel-lined plate to drain the chicken. For the skillet, any heavy-bottomed pan works, but I’ve found cast iron gives the best crunch. Air fryer trays are easy to clean, and for the buns, a regular cookie sheet does the trick. Budget-friendly options? I’ve made these in a toaster oven and on a cheap nonstick pan—results are still great! Just keep your pans dry and store your wire racks in a drawer to avoid rust.
Preparation Method

- Slice the Chicken: Take 2 large chicken breasts and slice them into 12 even slider-sized pieces. Aim for about 1/2 inch (1.2cm) thick so they cook quickly and fit perfectly on the buns. If your chicken is uneven, gently pound with a meat mallet for consistent texture.
- Set Up Breading Stations: In three bowls, add flour (1 cup/120g), beaten eggs (2 large), and panko breadcrumb mixture (1 1/2 cups/90g panko, 1/2 cup/30g Parmesan, 1 tsp garlic powder, 1 tsp Italian seasoning, 1/2 tsp salt, 1/4 tsp pepper). This triple-layer breading is key for crunch. (Pro tip: Mix the seasoning into the breadcrumbs for even flavor.)
- Bread the Chicken: Dredge each piece in flour, shaking off excess. Dip in egg, then coat generously in the panko-Parmesan mix. Press crumbs in so they stick—this is where the crunch comes from. Lay breaded chicken on a plate or wire rack; let sit for 10 minutes to help coating adhere.
- Fry or Air Fry the Chicken: Heat 1/2 cup (120ml) vegetable oil in a large skillet over medium-high. Fry chicken pieces for 2-3 minutes per side, until golden brown and cooked through (internal temp 165°F/74°C). Or, air fry at 400°F/200°C for 8-10 minutes, flipping halfway. Drain on a wire rack or paper towels. (If oil gets too dark, swap for fresh.)
- Prepare the Slider Buns: Slice buns in half if needed and place bottoms on a parchment-lined baking sheet. Spoon 1 tablespoon (15ml) marinara sauce on each bottom half.
- Assemble the Sliders: Top each bun with a crispy chicken piece, add another spoonful of marinara, then sprinkle with shredded mozzarella (about 2 tablespoons/15g per slider). Place bun tops over cheese.
- Make Garlic Butter Glaze: Melt 2 tablespoons (30g) butter, stir in minced garlic (1 clove) and chopped parsley or basil (2 tbsp). Brush the tops of each slider generously. Sprinkle with extra grated Parmesan (1/4 cup/25g).
- Bake: Bake sliders at 375°F (190°C) for 10-12 minutes, until cheese is melted and buns are lightly toasted. For extra golden tops, broil for 1-2 minutes at the end—watch closely to prevent burning.
- Serve Warm: Pull sliders apart gently and serve hot! Sprinkle with more fresh herbs if you like. (If cheese isn’t melty enough, pop sliders back in the oven for a couple more minutes.)
Troubleshooting: Chicken soggy? Let breaded pieces rest before frying and use hot oil. Cheese not melting? Cover loosely with foil during baking. Buns burning? Check after 8 minutes—ovens vary! My personal tip: assemble sliders right before baking for ultimate crunch. If you’re prepping ahead, fry chicken, then bake to warm and melt cheese when ready to serve.
Cooking Tips & Techniques
Over the years, I’ve learned a few tricks to make crispy chicken Parmesan sliders with melted mozzarella turn out perfectly every time. Here are my top tips (and a few hard-learned lessons!):
- Double Breading Works Wonders: Press the panko firmly onto each piece of chicken. If it falls off, try letting the breaded chicken rest for 10 minutes before frying—it helps the coating stick.
- Oil Temperature is Key: Fry at 350°F (175°C) for crunch without burning. Too low and you’ll get greasy chicken; too high and the outside burns before the inside is cooked. Use a thermometer if you have one!
- Fresh Mozzarella = Best Stretch: Pre-shredded cheese melts fine, but if you want that classic cheese pull, go for fresh mozzarella and tear it into pieces. It melts slower but tastes amazing.
- Don’t Overcrowd the Pan: Fry chicken in batches. Crowding drops the oil temperature and makes the breading soggy. Learned that the hard way when my first batch turned out limp!
- Timing Helps: Prep chicken and buns while oil heats. Multitasking makes the whole process smoother. I set up my breading station while the oven preheats to save time.
- Broil for Extra Crunch: Those crispy tops are best achieved with a quick broil. But watch them like a hawk—the difference between “toasty” and “burnt” is about 30 seconds.
- Let Sliders Rest Before Serving: Give them 2 minutes out of the oven so the cheese sets and you don’t burn your fingers. Plus, flavors meld a bit more.
Honestly, the biggest mistake I made early on was skipping the wire rack after frying. The chicken would steam and lose crunch sitting directly on paper towels. Also, don’t forget to season your breadcrumbs—unseasoned chicken is just sad! These tips help guarantee your sliders are crispy, cheesy, and absolutely irresistible every time.
Variations & Adaptations
One of the best things about crispy chicken Parmesan sliders is how easy they are to tweak for different tastes, diets, and occasions. Here are some variations I’ve tried (and loved):
- Gluten-Free: Swap regular panko for gluten-free breadcrumbs and use gluten-free buns. The crunch is still fantastic!
- Spicy Kick: Add a pinch of red pepper flakes to the marinara or mix some hot sauce into the egg wash for fiery chicken.
- Vegetarian Twist: Use breaded eggplant rounds instead of chicken. They crisp up beautifully and pair perfectly with mozzarella and marinara.
- Low-Carb Version: Use almond flour instead of regular flour and serve on lettuce cups instead of buns (tried this for a keto-friendly lunch—surprisingly good!).
- Seasonal Flavors: In summer, top sliders with fresh basil and a slice of tomato. For holiday gatherings, sprinkle a little rosemary into the garlic butter.
- Cooking Methods: Air fry the chicken for less oil and easy cleanup. Or bake the breaded chicken on a rack at 425°F (220°C) for 15 minutes if you want to skip frying altogether.
- Cheese Variations: Swap mozzarella for provolone or fontina for a richer flavor. Dairy-free cheese works well too—just check meltability.
Personally, my favorite twist is adding a drizzle of balsamic glaze before serving for a sweet-savory punch. Feel free to get creative—these sliders are a canvas for your favorite flavors!
Serving & Storage Suggestions
Serve these crispy chicken Parmesan sliders hot and fresh for the best experience. I like to present them on a rustic wooden board, sprinkled with extra Parmesan and fresh basil. They’re perfect with a simple green salad, garlic fries, or even a bowl of minestrone soup. For drinks, Italian soda or a chilled glass of sangria pairs wonderfully.
If you have leftovers (rare, but possible!), store cooled sliders in an airtight container in the refrigerator for up to 3 days. Reheat in a 350°F (175°C) oven for about 10 minutes to regain crispiness—microwaving works in a pinch, but you’ll lose some crunch. You can freeze the fried chicken pieces for up to 2 months; assemble and bake fresh when you need sliders fast.
With time, the flavors meld and the buns soak up some sauce—still delicious, just a little less crunchy. Honestly, they’re best eaten within a few hours of baking, but I won’t judge if you sneak one cold from the fridge!
Nutritional Information & Benefits
Here’s a quick look at the nutrition for these crispy chicken Parmesan sliders (per slider):
- Calories: ~240
- Protein: 16g
- Carbs: 22g
- Fat: 10g
- Saturated Fat: 4g
- Sodium: 550mg
The chicken provides lean protein, while mozzarella adds calcium and a dose of comfort. Using panko breadcrumbs and baking helps cut down on oil compared to deep frying. You can easily make them gluten-free or lower-carb with a few swaps. Allergens to note: dairy (cheese, butter), eggs, gluten (breadcrumbs, buns). If you’re watching sodium, use low-salt marinara and cheese.
I love that these sliders bring indulgent flavor in a smaller, portion-controlled package—great for sharing at parties or enjoying as a lighter meal. My personal wellness tip: pair with veggies or a salad for balance!
Conclusion
Whether you’re hosting a crowd or just want to treat your family to something special, these crispy chicken Parmesan sliders with melted mozzarella are worth every minute in the kitchen. The crunchy chicken, stretchy cheese, and soft buns are a match made in comfort food heaven. You can customize them for any diet, occasion, or flavor craving—and honestly, they’re the kind of recipe you’ll find yourself making again and again.
I love these sliders because they bring people together. They’re easy enough for weeknight dinner, fancy enough for parties, and always get rave reviews. Give them a try, tweak them to your taste, and let me know how they turn out! Leave a comment, share your favorite variations, or tag me if you post on Pinterest. These sliders are a warm hug in appetizer form—don’t be surprised if they become your new go-to recipe. Happy cooking!
FAQs
Can I make crispy chicken Parmesan sliders ahead of time?
Yes! You can fry the chicken up to a day ahead and store in the fridge. Assemble and bake the sliders just before serving for best texture.
What’s the best way to reheat leftover sliders?
Pop them in a 350°F (175°C) oven for about 10 minutes. This keeps the chicken crispy and melts the cheese nicely.
Can I use store-bought breaded chicken?
Definitely. For a shortcut, use frozen breaded chicken tenders. Just bake them and assemble with the other ingredients.
How do I make these sliders gluten-free?
Swap out the regular breadcrumbs and buns for gluten-free options. The rest of the recipe stays the same!
What sides go well with crispy chicken Parmesan sliders?
Try garlic fries, salad, minestrone soup, or even roasted veggies. Italian soda or lemonade is a fun drink pairing too.
Pin This Recipe!
Crispy Chicken Parmesan Sliders

These crispy chicken Parmesan sliders feature double-breaded chicken, tangy marinara sauce, and gooey melted mozzarella on soft slider buns. Perfect as a party appetizer or a comforting weeknight dinner, they deliver classic Italian flavors in a fun, bite-sized package.
- Prep Time: 20 minutes
- Cook Time: 20 minutes
- Total Time: 40 minutes
- Yield: 12 sliders 1x
- Category: Appetizer
- Cuisine: Italian-American
Ingredients
- 2 large boneless, skinless chicken breasts (about 1 lb), sliced into 12 slider-sized pieces
- 1 cup all-purpose flour
- 2 large eggs, beaten
- 1 1/2 cups panko breadcrumbs
- 1/2 cup grated Parmesan cheese
- 1 teaspoon garlic powder
- 1 teaspoon dried Italian seasoning
- 1/2 teaspoon salt
- 1/4 teaspoon black pepper
- 1/2 cup vegetable oil (for frying or air frying)
- 12 slider buns or mini rolls
- 1 cup marinara sauce
- 1 1/2 cups shredded mozzarella cheese
- 2 tablespoons unsalted butter, melted
- 1 garlic clove, finely minced
- 2 tablespoons chopped fresh parsley or basil (optional)
- 1/4 cup grated Parmesan cheese (for topping)
Instructions
- Slice chicken breasts into 12 even slider-sized pieces, about 1/2 inch thick. Pound gently if needed for uniform thickness.
- Set up three breading stations: one bowl with flour, one with beaten eggs, and one with panko breadcrumbs mixed with Parmesan, garlic powder, Italian seasoning, salt, and pepper.
- Dredge each chicken piece in flour, then dip in egg, and coat in the panko-Parmesan mixture. Press crumbs in firmly and let rest for 10 minutes.
- Heat vegetable oil in a large skillet over medium-high. Fry chicken pieces for 2-3 minutes per side until golden brown and cooked through (internal temp 165°F). Alternatively, air fry at 400°F for 8-10 minutes, flipping halfway. Drain on wire rack or paper towels.
- Slice slider buns if needed and place bottoms on a parchment-lined baking sheet. Spoon 1 tablespoon marinara sauce on each bottom half.
- Top each bun with a crispy chicken piece, another spoonful of marinara, and about 2 tablespoons shredded mozzarella. Place bun tops over cheese.
- Mix melted butter with minced garlic and chopped parsley or basil. Brush tops of sliders generously and sprinkle with extra grated Parmesan.
- Bake sliders at 375°F for 10-12 minutes until cheese is melted and buns are lightly toasted. Broil for 1-2 minutes for extra golden tops if desired.
- Serve warm, garnished with more fresh herbs if desired.
Notes
For gluten-free sliders, use gluten-free breadcrumbs and buns. Air frying the chicken reduces oil and mess. Let breaded chicken rest before frying for maximum crunch. Broil sliders briefly for extra crispy tops, but watch closely to avoid burning. Store leftovers in an airtight container and reheat in the oven for best texture.
Nutrition
- Serving Size: 1 slider
- Calories: 240
- Sugar: 2
- Sodium: 550
- Fat: 10
- Saturated Fat: 4
- Carbohydrates: 22
- Fiber: 1
- Protein: 16
Keywords: chicken parmesan sliders, party appetizer, crispy chicken, mozzarella, Italian sliders, game day, comfort food, easy recipe


