
“You wouldn’t believe where I first stumbled upon this crispy pull-apart garlic bread recipe. It wasn’t in some fancy cookbook or a bustling kitchen, but rather scribbled on the back of a crinkled receipt from a tiny bakery on a sleepy Tuesday afternoon. I was waiting for my usual coffee at Marcy’s Café when the owner, an unassuming woman named Joan, leaned over and whispered about her secret to making garlic bread that’s impossible not to devour. Honestly, I was skeptical—garlic bread is garlic bread, right? But the way she described the crispy edges and the buttery, garlicky pull-apart middle hooked me.
That evening, with a cracked mixing bowl and a kitchen counter cluttered with flour bags, I gave her version a shot. I had forgotten the yeast at first and had to run back to the store, which turned into a mini adventure itself. When it finally came out of the oven, golden and irresistible, I realized this was no ordinary garlic bread. You know that feeling when you take a bite and suddenly the whole kitchen feels warmer? That’s the magic of this recipe. Maybe you’ve been there—caught between the crunch and the gooey middle, unable to stop pulling off piece after piece.
Since that day, this crispy pull-apart garlic bread has been my go-to when friends drop by unexpectedly or when I just want to treat myself without much fuss. It’s simple, honest, and downright satisfying. Let me tell you, this recipe stayed with me because it’s just one of those things that turns a regular dinner into something cozy and memorable.
Why You’ll Love This Recipe
After multiple trials (and a few messy kitchen moments), I can confidently say this crispy pull-apart garlic bread recipe hits all the right notes. Whether you’re a seasoned baker or just starting out, it’s designed to be straightforward yet impressive. Here’s why it’s worth your time:
- Quick & Easy: You can have this bread ready in about 2 hours, including rising time—perfect for a relaxed weekend or a spontaneous dinner.
- Simple Ingredients: No hunting for exotic spices or specialty flours; most are pantry staples you likely already own.
- Perfect for Gatherings: Whether it’s a casual movie night or a family potluck, this bread steals the show every time.
- Crowd-Pleaser: Kids, adults, garlic lovers, and even skeptics ask for seconds.
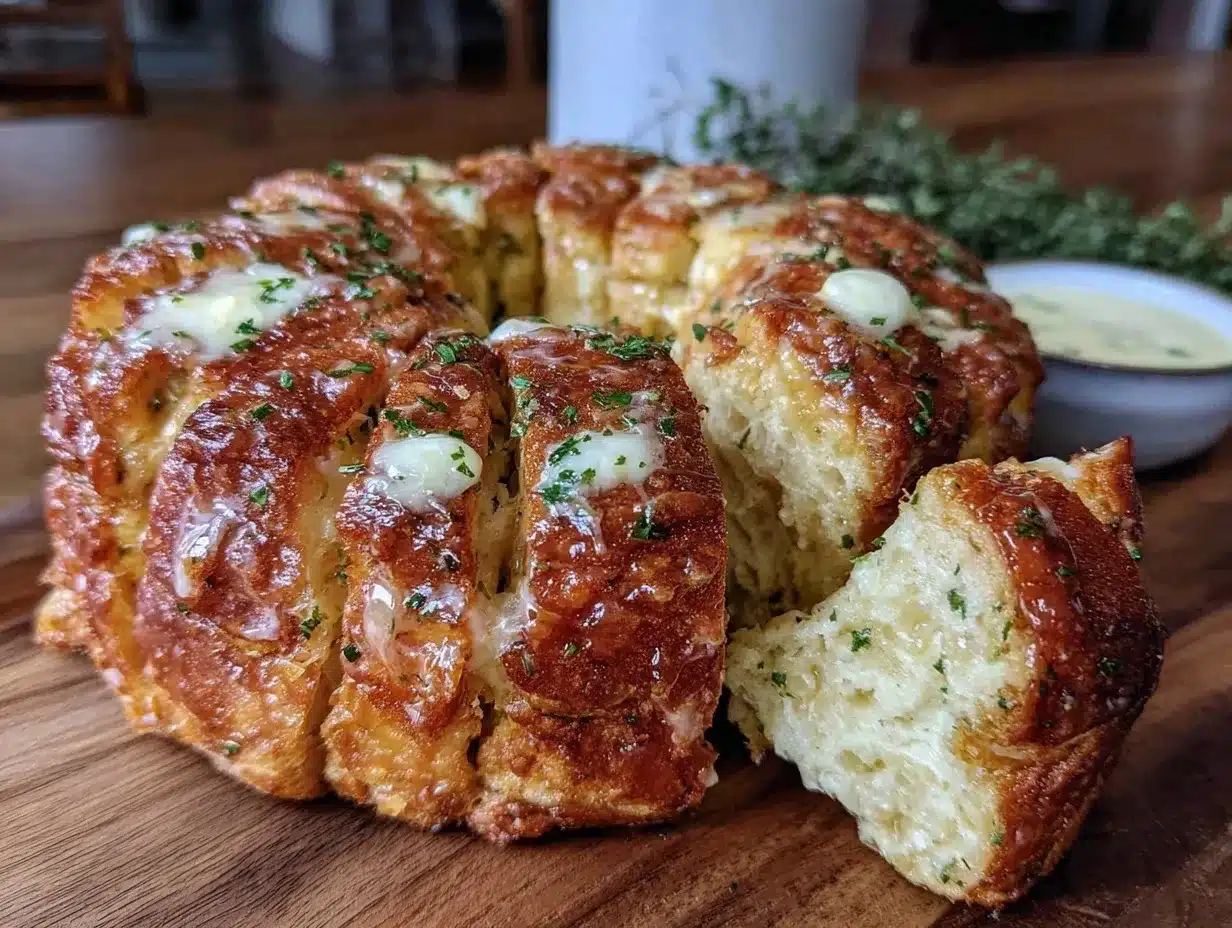
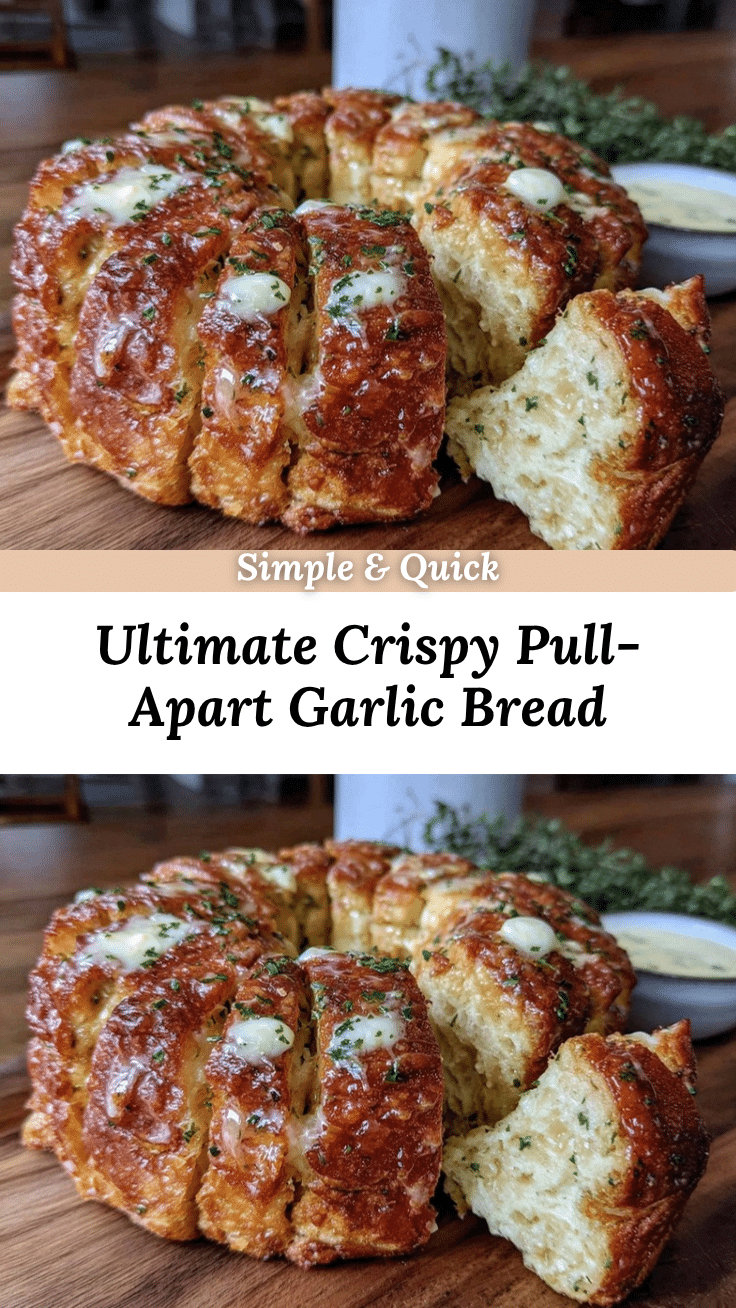
- Unbelievably Delicious: The combination of crisp crust, soft buttery layers, and fragrant garlic is pure comfort food.
What sets this recipe apart is the special method of layering the garlic butter between the dough segments—this creates those irresistible pull-apart sections with just the right balance of chewiness and crunch. Plus, blending fresh herbs into the butter adds a freshness that’s missing from most store-bought options. Honestly, it’s the kind of recipe that makes you close your eyes after the first bite and say, “Yep, this is exactly what I needed.”
What Ingredients You Will Need
This recipe relies on basic, wholesome ingredients that come together to make a flavorful, textured bread without fuss. Here’s the breakdown:
- For the Dough:
- All-purpose flour – 3 ½ cups (420g), sifted for lightness
- Active dry yeast – 2 ¼ teaspoons (1 packet)
- Warm water – 1 ¼ cups (300ml), around 110°F (43°C) to activate yeast
- Granulated sugar – 1 tablespoon (helps yeast bloom)
- Salt – 1 ½ teaspoons (balances flavor)
- Unsalted butter – 2 tablespoons (melted, for dough richness)
- For the Garlic Butter Filling:
- Unsalted butter – ½ cup (113g), softened (I prefer KerryGold for creaminess)
- Fresh garlic – 4 cloves, minced (the star of the show!)
- Fresh parsley – 2 tablespoons, finely chopped (adds color and freshness)
- Grated Parmesan cheese – 2 tablespoons (optional but highly recommended)
- Salt – a pinch
- Black pepper – freshly ground, to taste
Ingredient tips: Look for firm, fresh garlic cloves—avoid sprouted ones as they can taste bitter. If you want to make this vegan, swap the butter with a dairy-free spread and use nutritional yeast instead of Parmesan. For a gluten-free twist, almond flour can work for the topping, but the dough texture will be different.
Equipment Needed
This crispy pull-apart garlic bread doesn’t require fancy gadgets, but a few basics will make the process smoother:
- Large mixing bowl – for combining and proofing the dough
- Measuring cups and spoons – accurate measurements help the yeast work well
- Stand mixer with dough hook (optional) – handy if you want to save arm strength, but kneading by hand works fine
- Baking pan – a 9×5 inch loaf pan or a round cake pan works well to hold the shape
- Pastry brush – to spread the garlic butter evenly between dough layers
- Sharp knife or kitchen scissors – for slicing the dough into squares
- Clean kitchen towel or plastic wrap – to cover the dough during rising
If you don’t have a pastry brush, use the back of a spoon or your fingers to spread the butter. For budget-friendly baking, a simple metal loaf pan works just as well as non-stick options. Just lightly grease it to prevent sticking. I once forgot to cover my dough while rising, and it formed a skin—it’s a small mistake but worth mentioning so you don’t miss that soft texture!
Preparation Method
- Activate the Yeast: In a small bowl, combine warm water (110°F/43°C), sugar, and yeast. Stir gently and let it sit for 5-10 minutes until foamy. This step wakes the yeast up and guarantees a good rise.
- Make the Dough: In a large bowl, mix the sifted flour and salt. Pour in the melted butter and the yeast mixture. Stir with a wooden spoon until a shaggy dough forms.
- Knead the Dough: Transfer to a floured surface and knead for about 8-10 minutes until smooth and elastic. If using a stand mixer, knead with the dough hook on medium speed for 6-7 minutes.
- First Rise: Lightly oil the mixing bowl, place the dough inside, and cover with a damp towel or plastic wrap. Let it rise in a warm spot for 60-90 minutes or until doubled in size.
- Prepare Garlic Butter: While the dough rises, mix softened butter, minced garlic, parsley, Parmesan, salt, and pepper in a bowl. Taste and adjust seasoning—it should be garlicky but balanced.
- Shape the Bread: Once risen, punch down the dough gently and roll it out on a floured surface into a roughly 12×16 inch (30×40 cm) rectangle.
- Slice and Layer: Spread the garlic butter evenly over the dough. Using a sharp knife or scissors, cut the dough into 3-inch (7.5 cm) squares. Stack these squares in the greased baking pan, layering one on top of another, butter side facing up.
- Second Rise: Cover the pan loosely and let the dough rise again for 30-45 minutes until puffed.
- Bake: Preheat the oven to 375°F (190°C). Bake the bread for 25-30 minutes or until the top turns golden brown and crispy. The butter will bubble between the layers, making that fantastic pull-apart texture.
- Cool Slightly and Serve: Let the bread rest for 5-10 minutes before serving. This helps it hold together while you pull off those irresistible bites.
Pro tip: If the top browns too quickly, tent it with foil halfway through baking. Also, if you want extra crispiness, pop the bread under the broiler for 1-2 minutes at the end—just watch it carefully!
Cooking Tips & Techniques
Making this crispy pull-apart garlic bread from scratch is satisfying, but a few tricks make it even better:
- Yeast Activation: Water that’s too hot kills the yeast, too cold slows it down. Aim for that cozy 110°F (43°C) range—like a warm bath.
- Kneading: Don’t rush this step. Proper kneading develops gluten, which gives the bread that chewy texture.
- Butter Temperature: Use softened butter for the garlic spread—not melted. It spreads evenly and stays put between layers, creating pockets of flavor.
- Layering: Be gentle when stacking the dough squares; pressing too hard can squeeze out the garlic butter.
- Rising Environment: Yeast loves warmth and humidity. If your kitchen is cool, try placing the dough near a warm oven or inside the microwave with a cup of hot water.
- Watch the Bake Time: Ovens vary, so start checking at 25 minutes. The bread should sound hollow when tapped.
- Personal Fail: I once skipped the second rise, and the bread was dense—not the pull-apart magic I was after. Don’t skip this step!
Variations & Adaptations
Feel free to tweak this recipe to suit your taste or dietary needs:
- Cheesy Pull-Apart: Add shredded mozzarella or cheddar between the dough layers for a melty surprise.
- Herb Mix-Up: Swap parsley for fresh basil, oregano, or thyme to change the flavor profile.
- Spicy Kick: Mix in a pinch of red pepper flakes or a dash of smoked paprika to the garlic butter.
- Gluten-Free: Use a gluten-free all-purpose flour blend designed for bread baking, though expect a slightly different texture.
- Dairy-Free: Replace butter with coconut oil or a plant-based margarine and omit the Parmesan or use a vegan alternative.
Once, I tried adding sun-dried tomatoes chopped finely into the butter mix—unexpected but a tasty twist. The key is to keep the balance so the bread still pulls apart easily without becoming too soggy.
Serving & Storage Suggestions
This crispy pull-apart garlic bread is best served warm, straight from the oven, when the butter is melted and the crust is crisp. Serve it alongside pasta dishes, hearty soups, or even as a shareable appetizer with dips like marinara or spinach artichoke.
To store, wrap any leftovers tightly in foil or plastic wrap and keep them in the fridge for up to 3 days. Reheat in the oven at 350°F (175°C) for 10-15 minutes to regain that crispiness—microwaving tends to make it soggy, so I avoid that.
If you want to freeze it, wrap the cooled bread securely and freeze for up to 2 months. Thaw overnight in the fridge before reheating. The flavors actually deepen after resting, which is a happy bonus.
Nutritional Information & Benefits
Here’s a rough estimate per serving (1 slice, assuming 12 slices):
- Calories: 180
- Fat: 9g (mostly from butter)
- Carbohydrates: 22g
- Protein: 4g
- Fiber: 1g
Garlic is well-known for its immune-boosting properties and heart-healthy benefits, while fresh parsley adds antioxidants and vitamin C. Using real butter gives that rich texture, but you can reduce fat by using less or substituting with plant-based spreads. For those mindful of carbs, controlling portion size is key. This bread is a treat with some nutritional perks, especially when paired with veggies or lean protein.
Conclusion
This crispy pull-apart garlic bread recipe is one of those rare finds that’s both simple and spectacular. You get that golden, crunchy crust paired with a buttery, garlicky, soft inside that just begs for sharing. I love how easy it is to make from scratch—no weird ingredients, just honest baking that fills the kitchen with irresistible aromas.
Feel free to customize it with your favorite herbs, cheeses, or spices to make it your own. Honestly, once you try this, it might just become your new favorite way to enjoy garlic bread. If you do make it, please drop a comment or share your tweaks—I’d love to hear how it turns out for you!
So go on, grab your mixing bowl and give this recipe a whirl. You won’t regret it.
FAQs
Can I use store-bought garlic butter instead of making my own?
Sure, you can, but homemade garlic butter has fresher flavor and lets you control seasoning. Plus, mixing in fresh herbs and Parmesan makes a big difference.
How do I know if my yeast is still good?
Proof the yeast by dissolving it in warm water with a pinch of sugar. It should foam within 5-10 minutes. No foam means it’s time to get a new packet.
Can I prepare the dough the night before?
Yes! After the first rise, punch down the dough, cover tightly, and refrigerate overnight. Let it come to room temperature before shaping and baking.
What if I don’t have a loaf pan?
A round cake pan or even a cast-iron skillet works well. Just make sure it’s greased and can hold the stacked dough squares comfortably.
How do I get the bread extra crispy?
Bake until golden and bubbly, then broil for 1-2 minutes watching closely. Also, using high-quality butter and spreading it evenly helps create that perfect crust.
Pin This Recipe!
Crispy Pull-Apart Garlic Bread Recipe Easy Homemade from Scratch
This crispy pull-apart garlic bread features a golden, crunchy crust with a buttery, garlicky, soft inside. It’s simple to make from scratch and perfect for gatherings or a cozy treat.
- Prep Time: 20 minutes
- Cook Time: 30 minutes
- Total Time: 2 hours 15 minutes
- Yield: 12 servings 1x
- Category: Appetizer
- Cuisine: American
Ingredients
- 3 ½ cups (420g) all-purpose flour, sifted
- 2 ¼ teaspoons (1 packet) active dry yeast
- 1 ¼ cups (300ml) warm water (around 110°F / 43°C)
- 1 tablespoon granulated sugar
- 1 ½ teaspoons salt
- 2 tablespoons unsalted butter, melted (for dough)
- ½ cup (113g) unsalted butter, softened (for garlic butter filling)
- 4 cloves fresh garlic, minced
- 2 tablespoons fresh parsley, finely chopped
- 2 tablespoons grated Parmesan cheese (optional)
- Pinch of salt (for garlic butter filling)
- Freshly ground black pepper, to taste
Instructions
- Activate the Yeast: In a small bowl, combine warm water (110°F/43°C), sugar, and yeast. Stir gently and let it sit for 5-10 minutes until foamy.
- Make the Dough: In a large bowl, mix the sifted flour and salt. Pour in the melted butter and the yeast mixture. Stir with a wooden spoon until a shaggy dough forms.
- Knead the Dough: Transfer to a floured surface and knead for about 8-10 minutes until smooth and elastic. Alternatively, use a stand mixer with dough hook on medium speed for 6-7 minutes.
- First Rise: Lightly oil the mixing bowl, place the dough inside, and cover with a damp towel or plastic wrap. Let it rise in a warm spot for 60-90 minutes or until doubled in size.
- Prepare Garlic Butter: While the dough rises, mix softened butter, minced garlic, parsley, Parmesan, salt, and pepper in a bowl. Taste and adjust seasoning.
- Shape the Bread: Once risen, punch down the dough gently and roll it out on a floured surface into a roughly 12×16 inch (30×40 cm) rectangle.
- Slice and Layer: Spread the garlic butter evenly over the dough. Using a sharp knife or scissors, cut the dough into 3-inch (7.5 cm) squares. Stack these squares in the greased baking pan, layering one on top of another, butter side facing up.
- Second Rise: Cover the pan loosely and let the dough rise again for 30-45 minutes until puffed.
- Bake: Preheat the oven to 375°F (190°C). Bake the bread for 25-30 minutes or until the top turns golden brown and crispy.
- Cool Slightly and Serve: Let the bread rest for 5-10 minutes before serving.
Notes
If the top browns too quickly, tent with foil halfway through baking. For extra crispiness, broil for 1-2 minutes at the end, watching carefully. Use softened butter for garlic spread, not melted. Cover dough during rising to prevent skin formation. Water temperature for yeast activation should be around 110°F (43°C).
Nutrition
- Serving Size: 1 slice (1/12th of t
- Calories: 180
- Fat: 9
- Carbohydrates: 22
- Fiber: 1
- Protein: 4
Keywords: garlic bread, pull-apart bread, crispy garlic bread, homemade garlic bread, easy garlic bread recipe, garlic butter bread


