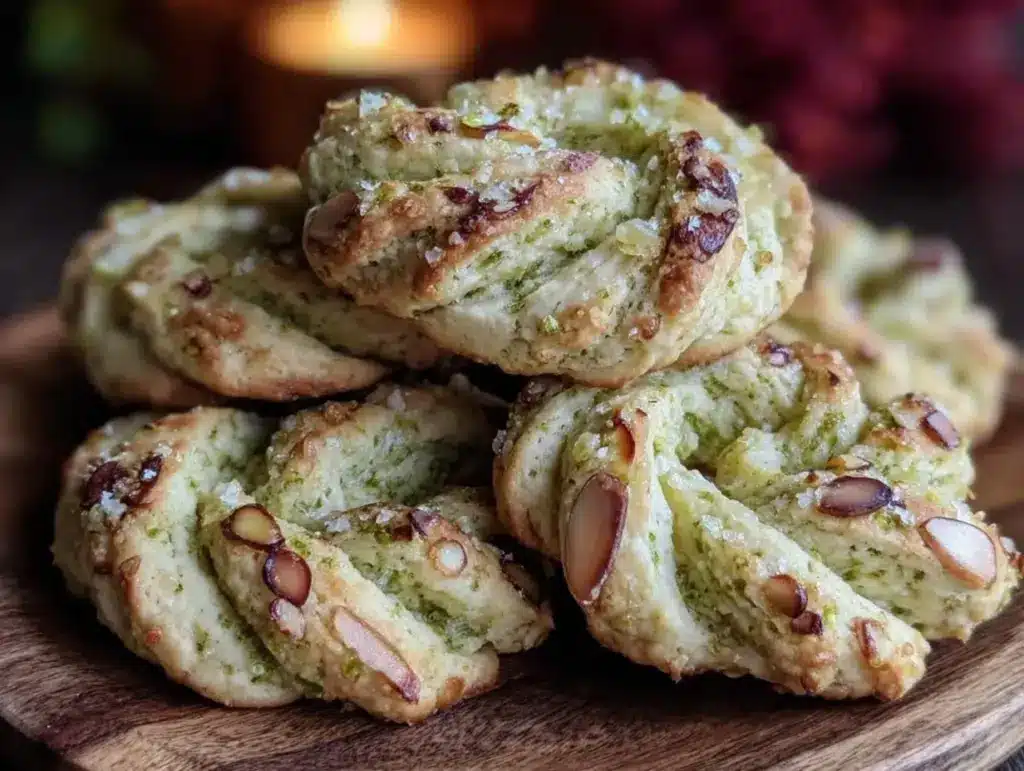
Let me tell you, the sight of these crispy witch finger cookies straight out of the oven is enough to give anyone the chills—in the best way possible! The snap of the golden-brown edges, the eerie almond “nails,” and that just-right crunch make these cookies dangerously addictive. The first time I baked these creepy little treats was years ago, on a blustery October afternoon when I was knee-high to a grasshopper. I stumbled upon the idea while trying to recreate a Halloween party snack I’d seen at a local bake sale. I was instantly hooked, the kind of moment where you pause, take a deep breath, and just smile because you know you’re onto something truly special.
Honestly, these crispy witch finger cookies have become a staple in my family’s Halloween traditions. My kids can’t stop sneaking them off the cooling rack (and I can’t really blame them). They’re perfect for potlucks, school treats, or just brightening up your Halloween cookie board with a little spooky flair. You know what? They’re also surprisingly easy to make—dangerously easy, in fact. I’ve tested this recipe multiple times in the name of research, of course, and each batch feels like a warm hug on a chilly fall evening. Trust me, you’re going to want to bookmark this one for every Halloween to come.
Why You’ll Love This Recipe
Here’s why these crispy witch finger cookies will quickly become your go-to spooky snack:
- Quick & Easy: Comes together in under 45 minutes, perfect for last-minute Halloween prep or a fun baking session with the kids.
- Simple Ingredients: You likely already have everything in your pantry—no fancy trips required.
- Perfect for Halloween: Adds that eerie, festive vibe to any party or trick-or-treat spread.
- Crowd-Pleaser: Kids and adults alike rave about the crunchy texture and slightly sweet, buttery flavor.
- Unbelievably Delicious: The secret? A perfect balance of crispiness with a hint of almond and just the right “bite” that keeps you coming back.
What sets this recipe apart? Instead of a typical soft cookie, these are crisp all the way through, giving you that satisfying snap with every bite. Plus, the way you shape the dough into finger-like forms, complete with almond slices for nails, makes it a fun, interactive baking experience. I love how this recipe brings out the spookiness without sacrificing flavor or texture. It’s Halloween comfort food reimagined—simple, festive, and seriously tasty.
What Ingredients You Will Need
This recipe uses simple, wholesome ingredients to deliver bold flavor and that perfectly crispy texture without the fuss. Most are pantry staples, and substitutions are easy if you need them.
- For the Cookie Dough:
- 1 cup (226g) unsalted butter, softened (adds richness and buttery flavor)
- 1 cup (200g) granulated sugar
- 1 large egg, room temperature
- 1 teaspoon almond extract (for that subtle spooky nutty note)
- 2 ½ cups (315g) all-purpose flour (I recommend King Arthur Flour for best texture)
- 1 teaspoon baking powder
- ½ teaspoon salt
- For Decoration:
- Whole almonds or almond slices (to make the “witch nails”)
- Red gel or jam (optional, for a bloody effect around the nails)
If you want a gluten-free version, swapping the all-purpose flour for a 1:1 gluten-free baking blend works beautifully. For a dairy-free twist, use a plant-based butter substitute, but keep in mind it might affect crispiness slightly. The almond extract is key for that authentic witchy vibe, but vanilla extract can be used if needed—though your cookies won’t be quite as spooky.
Equipment Needed
- Mixing bowls (a large one for dough mixing and a smaller one for wet ingredients)
- Electric mixer or sturdy wooden spoon (I prefer a hand mixer for ease, but a whisk and some elbow grease work too)
- Baking sheets lined with parchment paper or silicone mats (prevents sticking and helps with even baking)
- Measuring cups and spoons (accuracy is key for consistent cookie texture)
- Cooling rack (to let the cookies cool without becoming soggy)
- Optional: small knife or toothpick (for adding knuckle lines on the fingers)
If you don’t have an electric mixer, no worries—these cookies are forgiving. Just make sure your butter is soft enough to cream well with the sugar. Silicone mats are my favorite because they’re reusable and keep cookies from burning on the bottom, but parchment paper works just fine. I also like to have a sharp small knife handy to create those creepy knuckle dents that make the fingers come alive.
Preparation Method

- Cream the Butter and Sugar: In a large bowl, beat together 1 cup (226g) softened unsalted butter and 1 cup (200g) granulated sugar until light and fluffy, about 3-4 minutes. The mixture should look pale and airy—this is where the magic begins!
- Add Egg and Almond Extract: Crack in 1 large room-temperature egg and add 1 teaspoon almond extract. Beat until fully incorporated and smooth, about 1-2 minutes. If your dough looks curdled, don’t worry—it will come together once you add the dry ingredients.
- Mix Dry Ingredients: In a separate bowl, whisk 2 ½ cups (315g) all-purpose flour, 1 teaspoon baking powder, and ½ teaspoon salt. Gradually add the dry mix to the wet ingredients, stirring gently until a soft dough forms. If it seems too sticky, add a tablespoon more flour at a time, but be careful not to overdo it.
- Shape the Witch Fingers: Preheat your oven to 350°F (175°C). Scoop out tablespoon-sized portions of dough and roll them into finger-like shapes about 3 inches (7.5 cm) long. Taper the ends slightly to mimic fingertips. Press an almond slice or whole almond onto one end to create the “nail.” Use a small knife or toothpick to gently carve knuckle lines into the dough for that authentic creepy look.
- Bake and Add Finishing Touches: Place the shaped fingers on a parchment-lined baking sheet, about 2 inches (5 cm) apart. Bake for 15-18 minutes, or until the edges are golden and the cookies feel firm to the touch. Cool on the sheet for 5 minutes, then transfer to a wire rack. For an extra spooky effect, dab a little red gel or jam around the almond nails to resemble fresh “blood.”
Pro tip: If your cookies spread too much, chill the shaped dough in the fridge for 15 minutes before baking. The chilled dough holds its shape better and crisps up nicely. Also, keep an eye on the baking time—the difference between perfectly crispy and burnt is just a couple of minutes here.
Cooking Tips & Techniques
Let’s talk tricks for making these crispy witch finger cookies come out perfect every time. First off, don’t rush the creaming process of butter and sugar. That fluffy base traps air, helping your cookies rise just enough without losing their crisp.
Watch your oven temperature closely. Ovens vary, so if it tends to run hot, lower the temp by 10-15°F (5-8°C). A too-hot oven will brown the cookies unevenly and risk burning those delicate almond nails.
When shaping the fingers, use light hands—too much pressure can make them dense. The knuckle lines are optional but add major spooky points. I learned the hard way that skipping them makes the cookies look more like boring sticks than creepy fingers.
Speaking of almonds, press them gently but firmly into the dough so they don’t fall off during baking. If you want a more dramatic effect, brush the almonds with a touch of egg wash before baking to give them a shiny, almost eerie finish.
Lastly, multitask by chilling dough balls while your oven preheats, saving time and ensuring better shape retention. And remember: patience is key. Let the cookies cool completely before moving them to avoid breakage—trust me, those crispy fingers are fragile!
Variations & Adaptations
Feel like switching things up? Here are some fun ways to tweak this recipe to suit your spooky style or dietary needs:
- Chocolate Witch Fingers: Add ¼ cup (25g) cocoa powder to the flour mixture for a rich, dark twist. You can also dip the finished cookies in melted chocolate for an extra indulgence.
- Gluten-Free Version: Swap the all-purpose flour for a 1:1 gluten-free baking blend. I recommend Bob’s Red Mill for reliable results. You might need to chill the dough a bit longer before shaping.
- Vegan Adaptation: Use vegan butter and substitute the egg with a flaxseed “egg” (1 tablespoon ground flaxseed mixed with 3 tablespoons water, let sit for 5 minutes). The texture will be slightly softer but still delicious.
- Spiced Fingers: Add 1 teaspoon ground cinnamon and ½ teaspoon ground nutmeg to the dry ingredients for a cozy fall flavor.
- Alternative “Nails”: Use pumpkin seeds, pecan halves, or even candy corn for a playful twist on the classic almond nail.
One personal favorite is the chocolate version with almond nails dipped in red candy melts. It’s a big hit at my Halloween parties and gives the cookies an extra creepy vibe that’s hard to beat.
Serving & Storage Suggestions
Serve these crispy witch finger cookies at room temperature to keep their satisfying crunch. They look fantastic arranged on a platter with some fake spider webs and a few plastic spiders for that last spooky touch. Pair them with a cold glass of milk, hot apple cider, or even a steaming cup of pumpkin spice latte to complete the Halloween experience.
To store, place the cookies in an airtight container at room temperature for up to 5 days. If you want to keep them longer, freezing is your friend—just wrap them tightly in plastic wrap, then pop them in a freezer bag. They freeze well for up to 3 months. When you’re ready to enjoy, thaw at room temp and, if needed, pop them in a 300°F (150°C) oven for 3-5 minutes to refresh their crispiness.
These cookies also tend to develop deeper flavors after a day or two, so if you can resist, let them sit for a bit. The almond extract and buttery notes mellow out just enough to make each bite even more satisfying.
Nutritional Information & Benefits
Each crispy witch finger cookie contains approximately 120 calories, 7 grams of fat, 15 grams of carbohydrates, and 1 gram of protein. The almond extract and whole almonds add a touch of heart-healthy fats and a bit of protein, making these treats a slightly better option than your average sugary cookie.
While this recipe isn’t low-calorie, it uses wholesome ingredients with no artificial additives. You can easily adapt it to be gluten-free or vegan to meet dietary needs. Just a heads up, these cookies do contain nuts and dairy, so they’re not suitable for those with allergies.
From a wellness perspective, baking at home allows you to control sugar and fat levels, making these crispy witch finger cookies a fun treat you can feel good about sharing during the spooky season.
Conclusion
These crispy witch finger cookies are a must-try if you want to impress without stress this Halloween. They combine spooky fun with irresistibly crunchy, buttery flavor that feels like a little celebration in every bite. Customize them with your favorite flavors or decorations to make your Halloween spread uniquely yours.
I love this recipe because it brings out the kid in me every time I shape those fingers and press on the almond nails—it’s a perfect mix of playful and delicious. So, what are you waiting for? Grab your mixing bowl, summon your inner witch, and get baking! Don’t forget to share how your spooky creations turn out—I’d love to hear your stories and see your photos.
Frequently Asked Questions
Can I make the dough ahead of time?
Absolutely! You can refrigerate the dough for up to 24 hours before shaping and baking. This actually helps the cookies keep their shape better.
What if I don’t have almond extract?
Vanilla extract works as a substitute, but your cookies won’t have that classic nutty, eerie flavor. If possible, almond extract is worth the small splurge.
How do I make the cookies extra crispy?
Bake them a minute or two longer, but watch carefully so they don’t burn. Also, letting the cookies cool completely on a wire rack helps maintain crispness.
Can I use other nuts for the “nails”?
Yes! Pumpkin seeds, pecan halves, or even candy corn can be fun alternatives depending on your spooky style.
Are these cookies suitable for freezing?
They freeze very well! Just wrap tightly and freeze for up to 3 months. Thaw at room temperature before serving.
Pin This Recipe!
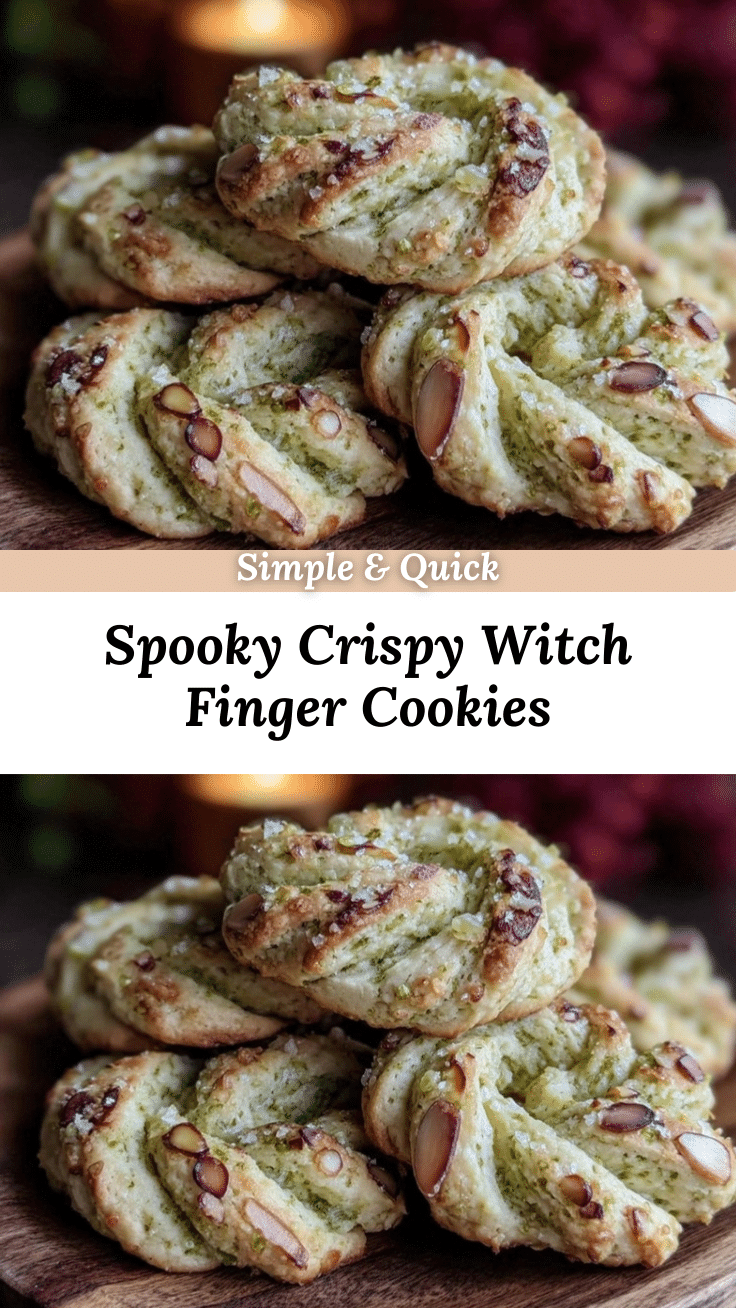
Crispy Witch Finger Cookies

These crispy witch finger cookies are a spooky, crunchy Halloween treat featuring buttery flavor and almond ‘nails’ for a fun, eerie look. Perfect for parties, potlucks, or festive cookie boards.
- Prep Time: 15 minutes
- Cook Time: 15-18 minutes
- Total Time: 35 minutes
- Yield: 24 cookies 1x
- Category: Dessert
- Cuisine: American
Ingredients
- 1 cup (226g) unsalted butter, softened
- 1 cup (200g) granulated sugar
- 1 large egg, room temperature
- 1 teaspoon almond extract
- 2 ½ cups (315g) all-purpose flour
- 1 teaspoon baking powder
- ½ teaspoon salt
- Whole almonds or almond slices (for decoration)
- Red gel or jam (optional, for a bloody effect around the nails)
Instructions
- Cream the butter and sugar together in a large bowl until light and fluffy, about 3-4 minutes.
- Add the egg and almond extract, beating until fully incorporated and smooth, about 1-2 minutes.
- In a separate bowl, whisk together the flour, baking powder, and salt. Gradually add the dry ingredients to the wet ingredients, stirring gently until a soft dough forms. Add more flour if too sticky.
- Preheat oven to 350°F (175°C). Scoop tablespoon-sized portions of dough and roll into 3-inch finger-like shapes, tapering the ends. Press an almond slice or whole almond onto one end to create the nail. Use a small knife or toothpick to carve knuckle lines.
- Place shaped fingers on parchment-lined baking sheets about 2 inches apart. Bake for 15-18 minutes until edges are golden and cookies feel firm. Cool on the sheet for 5 minutes, then transfer to a wire rack. Optionally, dab red gel or jam around the almond nails for a bloody effect.
Notes
Chill dough for 15 minutes before baking if cookies spread too much. Watch oven temperature closely to avoid burning. Let cookies cool completely on a wire rack to maintain crispness. For vegan adaptation, use vegan butter and flaxseed egg. For gluten-free, substitute with 1:1 gluten-free baking blend.
Nutrition
- Serving Size: 1 cookie
- Calories: 120
- Fat: 7
- Carbohydrates: 15
- Protein: 1
Keywords: Halloween cookies, witch finger cookies, spooky treats, crispy cookies, almond cookies, Halloween dessert


