“I never thought assembling a dessert could be so much fun,” my friend Lisa said that evening, eyes wide as she balanced a plate brimming with chocolate and berries. It was a chilly Friday, the kind of night when you want something sweet but not complicated. Honestly, I wasn’t planning on making a dessert charcuterie board at all. I grabbed a few leftover chocolates and some berries from the market, threw them together on a wooden board, and just like that, a party favorite was born.
You know that feeling when you’re craving something sweet but don’t want to slave away in the kitchen? That’s exactly where this delicious dessert charcuterie board with chocolate and berries fits in. It’s casual, inviting, and kind of beautiful in its simplicity. One moment I was fussing over recipes, the next I was chatting with Lisa while nibbling on dark chocolate and juicy raspberries, all without much effort. Maybe you’ve been there too, when an unplanned snack turns into an unexpected delight.
What I love about this dessert charcuterie board is how it feels special without trying too hard. It’s a mix of textures and flavors that somehow hits all the right notes, from the sweet to the tart, the creamy to the crunchy. Plus, the colors—those rich reds and deep browns—make it look like you spent hours crafting it. Funny thing: I actually forgot to grab the strawberries on my first run to the store and had to improvise with frozen ones thawed gently on the counter. It didn’t matter; the board still stole the show that night.
This recipe stayed with me because it’s perfect for those nights when you want to impress without stress, or just treat yourself with a little elegance. It’s the kind of dessert that invites sharing, conversation, and maybe a glass of wine or two. So if you’ve ever wanted to put together a dessert that’s both gorgeous and easy, stick around—I’ll walk you through making your own delicious dessert charcuterie board with chocolate and berries that’s bound to be a hit.
Why You’ll Love This Recipe
Having tested this dessert charcuterie board in countless gatherings—from quiet movie nights to lively potlucks—I can confidently say it’s a crowd-pleaser with zero fuss. Here’s why it quickly became my go-to treat:
- Quick & Easy: Comes together in under 20 minutes, perfect for last-minute plans or when you want something sweet without the mess.
- Simple Ingredients: Uses everyday items like fresh berries, various chocolates, and a few pantry staples—no fancy runs to specialty stores.
- Perfect for Parties: Whether it’s a casual get-together or a more elegant affair, this board fits right in, making your spread look thoughtful without extra work.
- Crowd-Pleaser: Kids, adults, chocoholics, and fruit lovers alike rave about the flavor combos and variety.
- Unbelievably Delicious: That balance of sweet, tart, smooth, and crunchy textures makes every bite memorable.
What sets this dessert charcuterie board apart from others is the little touches—like a sprinkle of flaky sea salt on dark chocolate to enhance richness or the inclusion of unexpected berries like blackberries or gooseberries when in season. Plus, I’ve found that layering textures by adding nuts or crunchy cookies adds a level of sophistication that makes it feel more like a curated tasting experience. You’re not just serving dessert; you’re offering a moment to savor.
And really, it’s about the joy of sharing. The way everyone reaches out, trying this or that, chatting about their favorites, makes the whole experience special. This isn’t just another sweet platter—it’s a simple celebration of flavor and togetherness.
What Ingredients You Will Need
This dessert charcuterie board is all about fresh, quality ingredients that come together effortlessly. Each element plays a role: the berries bring brightness and juiciness, the chocolates add richness and depth, and the extras like nuts or cookies provide texture and variety. Most of these items are pantry staples or easy to find at your local market.
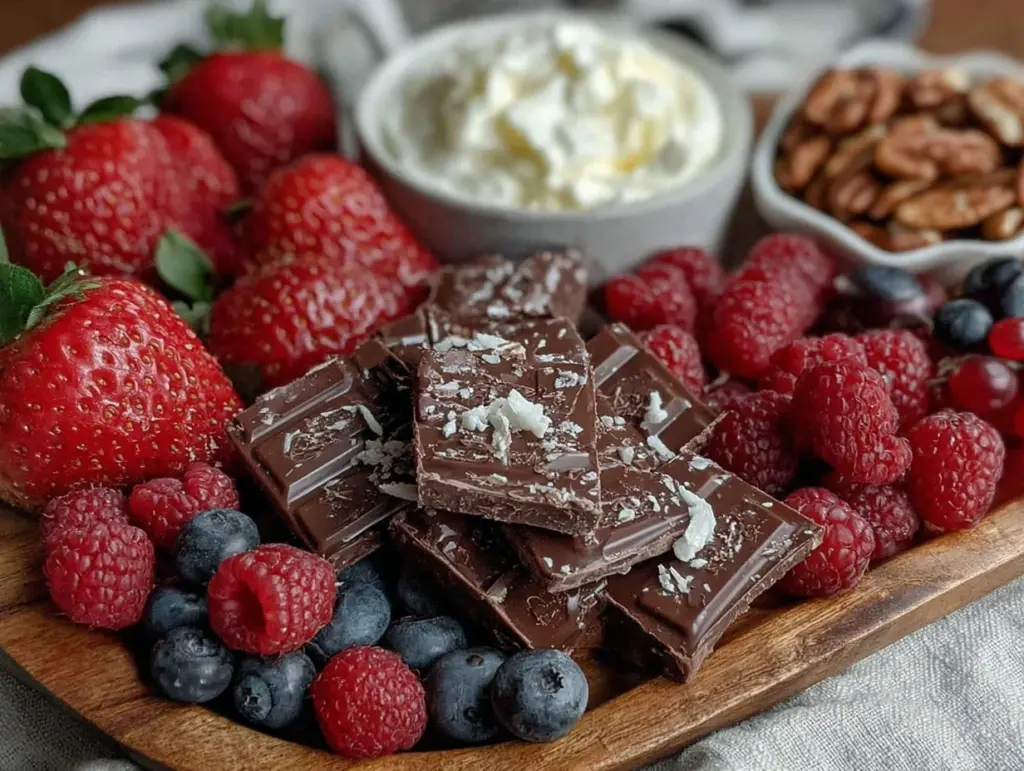
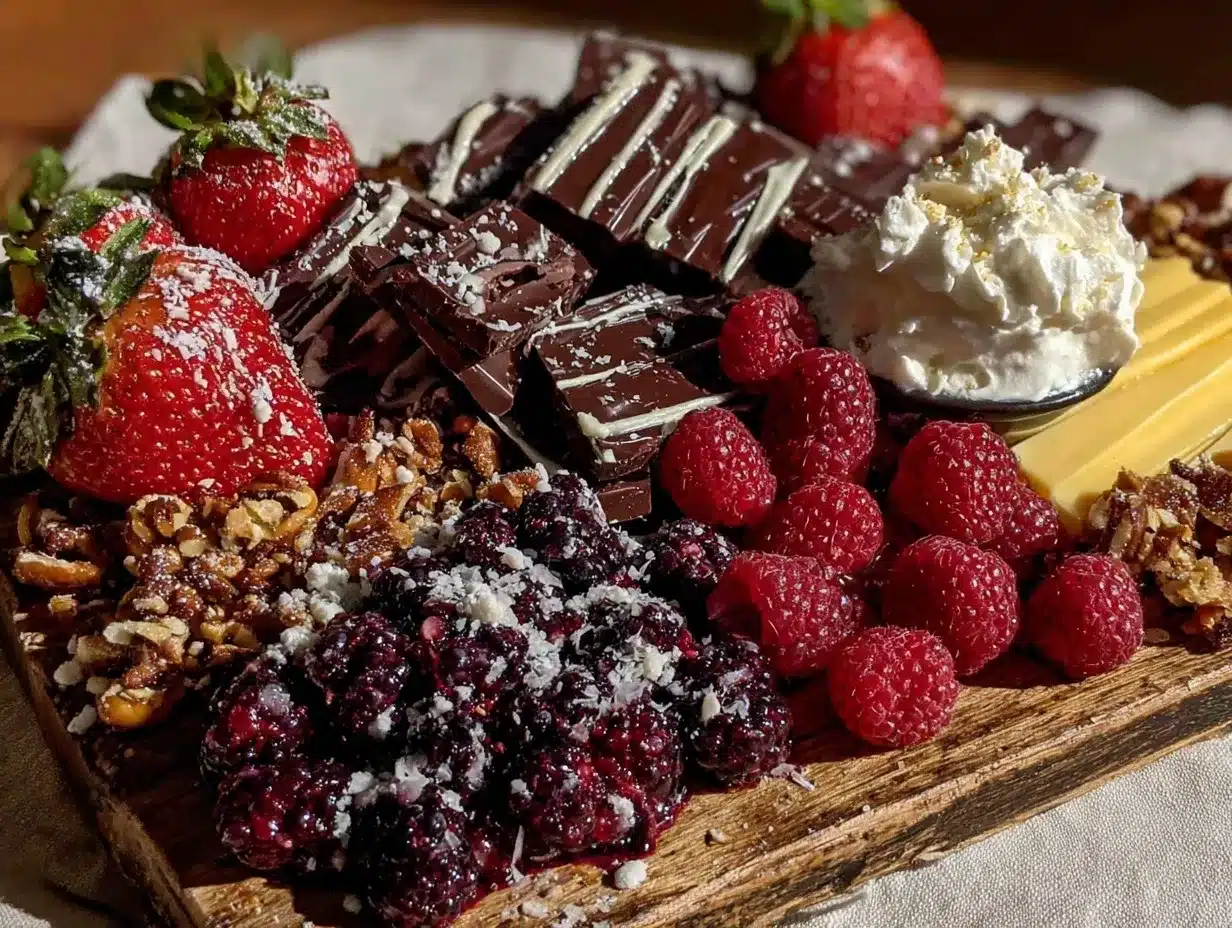
- Fresh Berries: Strawberries (hulled and halved), raspberries, blackberries, and blueberries. (Use fresh for best flavor; frozen can work if thawed gently.)
- Chocolate: A mix of dark chocolate chunks or bars (70% cocoa recommended for richness), milk chocolate pieces, and white chocolate chips or shards for contrast. I prefer Ghirardelli for smooth texture.
- Cookies & Biscuits: Thin butter cookies, shortbread fingers, or biscotti. (Adds crunch and pairs well with chocolate.)
- Nuts: Roasted almonds, pecans, or walnuts. (Lightly salted nuts work well.)
- Cheese (Optional): Soft cream cheese or mascarpone dollops can add creaminess if desired.
- Sweet Extras: Honey or berry jam for drizzling or dipping.
- Fresh Herbs (Optional): A few sprigs of mint or basil for a fresh aroma and pop of color.
If you want to swap ingredients, almond flour cookies work for a gluten-free option, and dairy-free chocolates are great for those avoiding dairy. In summer, I sometimes replace berries with stone fruits like peach slices or cherries for a seasonal twist.
Equipment Needed
Putting together this dessert charcuterie board requires minimal equipment—no fancy gadgets here.
- Wooden or Slate Serving Board: A medium to large size board works best for arranging all the components attractively. If you don’t have one, a large plate or platter will do.
- Small Bowls or Ramekins: For holding nuts, jam, or melted chocolate dips.
- Sharp Knife: For slicing strawberries or chocolate bars into chunks.
- Spreader or Small Spoon: Useful for dolloping cheese or drizzling honey.
- Tweezers or Tongs (Optional): For neat placement of smaller items, but your fingers work just fine—just be ready for a little mess!
I’ve found that a simple wooden board from my local market lasts for years and adds rustic charm. Just wipe it down with a damp cloth after use, and occasionally oil it with food-safe mineral oil to keep it looking fresh. No need for expensive tools to make this board shine.
Preparation Method
- Wash and Prep the Berries (10 minutes): Rinse all berries gently under cold water and pat dry with paper towels to avoid sogginess. Hull and halve the strawberries for easier picking and a nicer look.
- Cut the Chocolate (5 minutes): Use a sharp knife to break dark and milk chocolate bars into bite-sized chunks or shards. Leave white chocolate chips as-is or break them up slightly for variety.
- Arrange the Board Base (5 minutes): Lay out your board or platter on a flat surface. Place small bowls or ramekins for nuts, jam, or dips spaced evenly to anchor the arrangement.
- Add Large Items First (5 minutes): Position clusters of strawberries, blackberry bunches, and chocolate chunks around the board, balancing colors and shapes. Think about visual appeal—spread colors evenly.
- Fill in with Smaller Elements (5 minutes): Nestle in raspberries, blueberries, and nuts in the gaps, creating texture contrasts. Add cookies or biscuits stacked or fanned out for easy grabbing.
- Optional Cheese and Garnishes (3 minutes): Dollop cream cheese or mascarpone in small spoonfuls around the board. Place fresh mint or basil sprigs for a vibrant touch.
- Final Touches (2 minutes): Drizzle honey or scatter a few flakes of sea salt on chocolate pieces for a gourmet twist. Step back and adjust any uneven spots for balance.
Note: If any berries seem too juicy, place them on small paper towels to absorb moisture before arranging to keep the board fresh longer. If you’re prepping ahead, cover the board loosely with plastic wrap and refrigerate, but add fresh herbs just before serving.
When arranging, I like to keep a balance of colors and textures close at hand so guests can mix and match easily. One time, I accidentally knocked over the jam bowl mid-assembly—no harm done; it gave me a chance to add a few more berries in that corner. Just part of the charm!
Cooking Tips & Techniques
Although this dessert charcuterie board doesn’t involve cooking per se, there are a few tricks to make it shine every time.
- Choose Quality Ingredients: The better the chocolate and berries, the more impressive the board. I always pick fresh, ripe berries and a dark chocolate with at least 70% cocoa for a rich contrast.
- Keep It Cool: Assemble the board shortly before serving to prevent berries from sweating or chocolate from melting prematurely.
- Texture Matters: Mix creamy, crunchy, and juicy elements to keep each bite exciting. Nuts and cookies add crunch that contrasts beautifully with soft berries.
- Balance Flavors: Include a hint of salt (like salted nuts or a sprinkle on chocolate) to balance sweetness and heighten flavor complexity.
- Presentation Tips: Vary the heights and shapes—stack cookies, pile berries in clusters, and use small bowls to add dimension.
Common mistake? Overcrowding the board. Giving each ingredient some breathing room lets guests pick easily and keeps the presentation neat. Also, if your chocolate is too cold, it can snap unpleasantly—let it sit briefly at room temp before cutting.
Once, I left the board too long at room temperature and the chocolate started to sweat. Lesson learned: assemble close to serving time and keep the board in a cool spot.
Variations & Adaptations
This dessert charcuterie board is a great canvas to customize based on season, dietary needs, or flavor preferences.
- Seasonal Variation: Swap berries for stone fruits or tropical fruits like mango and kiwi when in season for a fresh twist.
- Dietary Adaptations: Use gluten-free cookies or nut crackers for gluten sensitivities; opt for dairy-free chocolates and vegan cream cheese to suit vegan diets.
- Flavor Twists: Add a sprinkle of cinnamon or chili powder on dark chocolate for a surprising kick, or drizzle caramel sauce instead of honey for a richer flavor.
- Cooking Method Alternative: Toast nuts lightly in a dry pan for a few minutes to boost their aroma and crunch before adding to the board.
- Personal Variation: I once added small cubes of goat cheese and paired them with honey and fresh figs—unexpected but delightful!
Serving & Storage Suggestions
This dessert charcuterie board is best served at room temperature so the chocolates and berries show their true flavors. Present it on a rustic wooden board or a sleek slate platter for a striking look.
Pair it with a chilled glass of rosé, a cup of rich coffee, or a sparkling water with a twist of lemon to balance sweetness.
To store leftovers, cover the board tightly with plastic wrap and refrigerate for up to 2 days. Keep fresh herbs and delicate berries separate to add fresh just before serving again. When reheating, gently warm chocolate pieces in a low-temperature oven (about 100°F / 38°C) or let them sit at room temp to avoid melting.
Flavors tend to meld nicely after a few hours, making this a great make-ahead option for parties. Just keep in mind, the fresher the berries, the better the experience.
Nutritional Information & Benefits
This dessert charcuterie board balances indulgence with wholesome ingredients. A typical serving (about 1/6 of the board) contains approximately:
| Nutrient | Amount |
|---|---|
| Calories | 250-300 kcal |
| Fat | 15-18 g (mostly healthy fats from nuts and dark chocolate) |
| Carbohydrates | 25-30 g (natural sugars from fruit and added sugars from chocolate) |
| Protein | 4-5 g (from nuts and optional cheese) |
| Fiber | 4-6 g (thanks to berries and nuts) |
Berries are rich in antioxidants and vitamins, particularly vitamin C, which supports immune health. Dark chocolate, when chosen with high cocoa content, contains flavonoids that may promote heart health. Nuts provide healthy fats and protein, making the board a satisfying treat that’s more than just empty calories.
This dessert can fit well into balanced diets, especially when enjoyed in moderation. For gluten- or dairy-sensitive eaters, easy swaps keep the recipe inclusive without sacrificing flavor.
Conclusion
There’s something truly joyful about this dessert charcuterie board with chocolate and berries. It’s simple, inviting, and manages to look effortlessly impressive, which makes it a favorite whenever I host or just want a special treat. The mix of fresh fruit, rich chocolate, and crunchy extras strikes a perfect balance that keeps me coming back for more.
Feel free to play around with your favorite chocolates, seasonal fruits, and add-ons to make it your own. Whether you’re feeding a crowd or indulging solo, this board brings a little celebration to any moment.
If you give this a try, leave a comment and share your favorite combinations or tweaks! I’d love to hear how you make this dessert charcuterie board your own. Remember, sometimes the simplest ideas turn into the most memorable treats—so have fun and enjoy every bite!
FAQs
Can I prepare the dessert charcuterie board ahead of time?
Yes! Assemble most components a few hours before serving, but add fresh herbs and delicate berries just before guests arrive to keep everything fresh.
What chocolates work best for this board?
Dark chocolate with 70% cocoa or higher offers rich flavor and pairs well with berries. Milk and white chocolates add sweetness and color contrast.
How do I keep berries from getting soggy?
Pat berries dry after washing and avoid stacking too tightly. Arrange them on paper towels briefly if very juicy, and serve soon after assembling.
Can I make this dessert board vegan?
Absolutely! Use dairy-free chocolate, vegan cookies, and substitute mascarpone or cream cheese with plant-based alternatives.
What are some good beverage pairings?
Try a light rosé, sparkling wine, coffee, or even a berry-infused iced tea for a refreshing complement to the sweet and fruity flavors.
Pin This Recipe!
Delicious Dessert Charcuterie Board with Chocolate and Berries
A simple, elegant dessert charcuterie board featuring a mix of fresh berries, various chocolates, nuts, and cookies, perfect for parties or casual gatherings.
- Prep Time: 15 minutes
- Cook Time: 0 minutes
- Total Time: 15 minutes
- Yield: 6 servings
- Category: Dessert
- Cuisine: American
Ingredients
- Strawberries (hulled and halved)
- Raspberries
- Blackberries
- Blueberries
- Dark chocolate chunks or bars (70% cocoa recommended)
- Milk chocolate pieces
- White chocolate chips or shards
- Thin butter cookies, shortbread fingers, or biscotti
- Roasted almonds, pecans, or walnuts (lightly salted)
- Soft cream cheese or mascarpone dollops (optional)
- Honey or berry jam for drizzling or dipping
- Fresh mint or basil sprigs (optional)
Instructions
- Wash and prep the berries by rinsing gently under cold water and patting dry with paper towels. Hull and halve the strawberries.
- Cut dark and milk chocolate bars into bite-sized chunks or shards using a sharp knife. Leave white chocolate chips as-is or break slightly for variety.
- Arrange the board or platter on a flat surface and place small bowls or ramekins for nuts, jam, or dips spaced evenly.
- Position clusters of strawberries, blackberry bunches, and chocolate chunks around the board, balancing colors and shapes.
- Nestle in raspberries, blueberries, and nuts in the gaps, creating texture contrasts. Add cookies or biscuits stacked or fanned out.
- Optionally, dollop cream cheese or mascarpone in small spoonfuls around the board and place fresh mint or basil sprigs for color.
- Drizzle honey or scatter flakes of sea salt on chocolate pieces for a gourmet touch. Adjust any uneven spots for balance.
Notes
Assemble the board shortly before serving to prevent berries from sweating or chocolate from melting. Pat berries dry to avoid sogginess. For gluten-free options, use almond flour cookies; for vegan, use dairy-free chocolates and plant-based cream cheese. Toast nuts lightly in a dry pan for extra aroma and crunch if desired. Store leftovers covered in the refrigerator for up to 2 days, adding fresh herbs and delicate berries just before serving.
Nutrition
- Serving Size: About 1/6 of the boa
- Calories: 275
- Sugar: 18
- Sodium: 80
- Fat: 16.5
- Saturated Fat: 7
- Carbohydrates: 27.5
- Fiber: 5
- Protein: 4.5
Keywords: dessert charcuterie board, chocolate and berries, easy dessert, party dessert, no bake dessert, berry dessert, chocolate dessert


