Let me tell you, the sweet aroma of buttery vanilla dough swirling through my kitchen as I roll out these cozy Fall Leaf Cut Out Cookies is pure autumn magic. It’s like a hug from the season itself—crisp, nostalgic, and a little bit whimsical. When the leaves outside start turning those fiery shades of gold and red, I can’t help but crave the simple act of baking these cookies. The first time I made them, it was a rainy November afternoon. I’d just come home from the pumpkin patch (muddy boots and all) and, honestly, I was looking for something to brighten up the day. I found an old leaf-shaped cookie cutter tucked in my grandma’s recipe box, and the rest is kind of history.
You know what? The moment I pulled the first tray out of the oven and saw those golden edges, I just stood there for a second, breathing in the smell—warm, sugary, and familiar. It was the kind of moment where you pause, take a deep breath, and just smile because you know you’re onto something truly special. These cookies instantly became a family tradition, especially around Thanksgiving. My little ones love helping with the sprinkles and colored sugar, and my husband still sneaks a few off the cooling rack (I can’t really blame him).
When I was knee-high to a grasshopper, my grandma always said, “If you want folks to feel at home, bake them something sweet!” These leaf-shaped treats are dangerously easy to make and bring pure, nostalgic comfort. Perfect for potlucks, holiday cookie swaps, or just brightening up your Pinterest cookie board. I’ve tested this recipe more times than I care to admit (in the name of research, of course), and now it’s a staple for family gatherings, gifting, and cozy afternoons. Honestly, if you’re looking for a fall baking project that feels like a warm hug, you’re going to want to bookmark this one.
Why You’ll Love This Recipe
There’s a reason these Fall Leaf Cut Out Cookies have earned their place on my Thanksgiving dessert table year after year. I’ve baked dozens of versions—some too crumbly, others too bland—but this recipe hits all the right notes. It’s chef-tested, family-approved, and just plain fun to make. Here’s why you’ll keep coming back for more:
- Quick & Easy: Comes together in under 40 minutes, perfect for busy weeknights or last-minute holiday prep.
- Simple Ingredients: No fancy grocery trips needed. Odds are you’ve got everything already in your pantry.
- Perfect for Thanksgiving & Autumn Gatherings: These cookies are a star at potlucks, cozy dinners, and festive brunches.
- Crowd-Pleaser: Kids and adults love decorating them. They disappear fast—don’t say I didn’t warn you!
- Unbelievably Delicious: The rich, buttery flavor and tender crumb make them next-level comfort food.
What sets these apart from other cut outs? Well, I use a special technique—chilling the dough twice—for extra crisp edges and easy rolling. The vanilla-almond combo gives a subtle warmth that just screams fall. My grandma’s trick? A pinch of cinnamon in the dough for that classic autumn vibe. And if you’re into healthy swaps, you can even use whole wheat flour without sacrificing taste.
This isn’t just another sugar cookie recipe. It’s the kind that makes you close your eyes after the first bite and think, “Yep, this is home.” It’s comfort food, but with a festive twist that makes your kitchen smell amazing and your heart a little fuller. Whether you want to impress your guests or just make memories with the kiddos, these cookies turn a simple baking session into something unforgettable.
What Ingredients You Will Need
This recipe uses simple, wholesome ingredients to deliver bold flavor and a satisfying texture without any fuss. Most of these are pantry staples—no need for a wild grocery run. Here’s what you’ll need to bake the best Fall Leaf Cut Out Cookies:
- For the Cookie Dough:
- 2 ½ cups (315g) all-purpose flour (King Arthur Flour is my go-to for consistent results)
- ¾ cup (170g) unsalted butter, softened (adds richness)
- 1 cup (200g) granulated sugar
- 1 large egg, room temperature
- 1 ½ teaspoons vanilla extract (use pure if you can—it makes a difference)
- ½ teaspoon almond extract (optional, but gives a lovely, nutty aroma)
- ¼ teaspoon ground cinnamon (for subtle autumn warmth)
- ½ teaspoon baking powder
- ¼ teaspoon salt
- For Decorating:
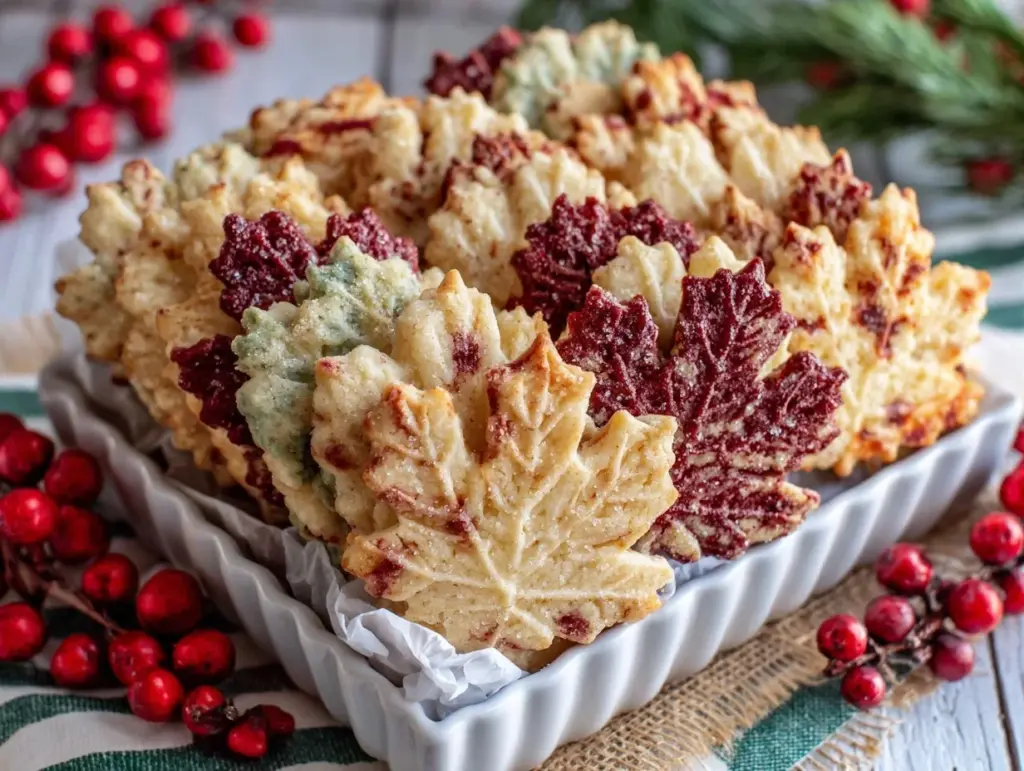
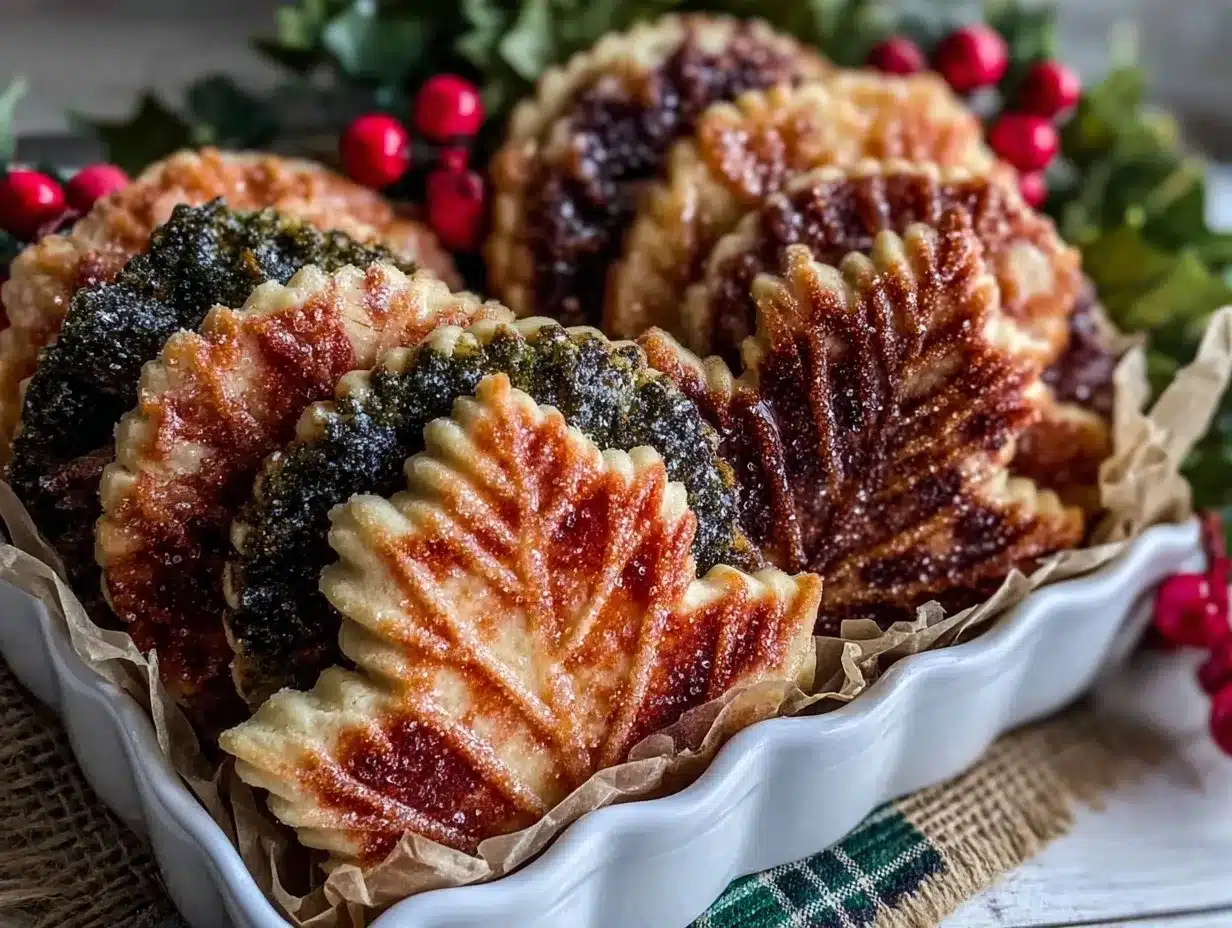
- Colored sugars (red, orange, yellow, gold—think fall leaves!)
- Royal icing or simple glaze (see notes below)
- Sprinkles, edible glitter (for extra pizzazz)
- Optional Variations:
- Whole wheat pastry flour (swap for half the all-purpose for a nuttier taste)
- Vegan butter (for dairy-free needs; Earth Balance works well)
- Gluten-free all-purpose flour blend (Bob’s Red Mill is reliable)
Ingredient tips: For the butter, make sure it’s truly softened—not melted—so your dough holds its shape. The almond extract is optional, but honestly, it adds a nostalgic bakery flavor. If you’re out of cinnamon, try pumpkin pie spice for a twist. For decorating, Wilton’s colored sugars stick well to the cookies, and homemade glaze is as easy as mixing powdered sugar with a splash of milk and vanilla.
If you want to get creative, you can use maple extract instead of almond for a cozy, woodsy vibe. And don’t worry—if you don’t have leaf-shaped cutters, hearts or rounds work fine. The magic is in the flavors and colors, not just the shape!
Equipment Needed
You don’t need a fancy kitchen setup for these cookies, which is a relief. Here’s the essential gear you’ll want nearby:
- Rolling pin (I use a wooden one—easy to clean and sturdy)
- Leaf-shaped cookie cutters (metal gives sharper edges, but plastic works too; you can even trace a template and cut by hand if you’re feeling crafty)
- Baking sheets (line with parchment for easy cleanup)
- Mixing bowls (one large, one small)
- Electric mixer or sturdy whisk (stand mixer makes it a breeze, but hand-mixing is totally doable)
- Wire cooling rack
- Spatula (offset spatula works wonders for transferring cookies)
- Parchment paper or silicone baking mat
- Small bowls for colored sugars and sprinkles
Don’t have leaf cutters? Use a knife to cut out leaf shapes from the dough—it’s a bit rustic, but it works in a pinch. If you’re short on baking sheets, rotate batches and reuse parchment. My grandma used to bake with just a fork and a rolling pin, and her cookies were legendary.
Maintenance tip: Wash cutters right after use so the dough doesn’t harden in the crevices. Budget-friendly note—Wilton and Nordic Ware both make affordable cutter sets, and silicone mats last for years. Honestly, you don’t need to break the bank to bake something beautiful.
Preparation Method
- Mix the Dough: In a large bowl, cream together ¾ cup (170g) unsalted butter and 1 cup (200g) granulated sugar until light and fluffy—about 2-3 minutes with a mixer. Add 1 large egg, 1 ½ teaspoons vanilla extract, and ½ teaspoon almond extract (if using). Beat until smooth. Stir in ¼ teaspoon ground cinnamon, ½ teaspoon baking powder, and ¼ teaspoon salt. Gradually add 2 ½ cups (315g) flour, mixing just until combined. Dough will be soft but not sticky.
- Chill the Dough: Shape dough into a flat disc, wrap in plastic wrap, and refrigerate for at least 30 minutes (or up to 24 hours). Chilling makes rolling easier and helps cookies hold their leaf shapes.
- Preheat & Prep: Preheat oven to 350°F (175°C). Line baking sheets with parchment paper or silicone mats.
- Roll Out & Cut: On a lightly floured surface, roll dough to ¼ inch (6mm) thickness. If dough cracks, let it warm up for a few minutes. Cut out leaf shapes using your cutters, dipping them in flour if the dough sticks.
- Decorate: Sprinkle cookies with colored sugars before baking for vibrant fall hues. If using royal icing or glaze, wait until cookies are cooled.
- Bake: Transfer cookies to prepared sheets, spacing about 1 inch (2.5cm) apart. Bake for 8-10 minutes, until edges are just turning golden. (Watch closely—overbaking means crunchy cookies!) The kitchen will smell amazing right about now.
- Cool: Let cookies rest on the baking sheet for 2 minutes, then move to wire racks. This helps set their tender texture.
- Glaze/Ice: If desired, mix 1 cup (120g) powdered sugar with 2-3 tablespoons milk and a drop of vanilla for a simple glaze. Drizzle or pipe onto cooled cookies, then add sprinkles or edible glitter.
Troubleshooting: Dough too sticky? Add a tablespoon of flour. Too dry? Knead in a teaspoon of milk. If cookies spread, chill shapes on the sheet for 10 minutes before baking. For super sharp edges, double-chill the dough—first before rolling, then after cutting shapes. Sensory cues: Dough should feel soft, not sticky. Cookies should be pale with just-golden edges when done.
Personal tip: Roll dough between two sheets of parchment to avoid sticking and keep the kitchen clean. If you want perfectly uniform cookies, use a ruler (no shame in precision!).
Cooking Tips & Techniques
Baking these Fall Leaf Cut Out Cookies is a blend of art and science, trust me. Over time, I’ve picked up a few tricks that make a world of difference:
- Chill, Chill, Chill: Chilling the dough twice—once before rolling and again after cutting shapes—keeps cookies from spreading and gives crisp, defined edges.
- Don’t Overwork: Mix just until the flour disappears. Overmixing makes tough cookies (learned that the hard way after a batch of hockey pucks).
- Rolling Consistency: Try to keep dough thickness even. Uneven dough means some cookies burn while others underbake. I use rolling pin rings for foolproof thickness.
- Color Power: For vibrant leaf cookies, sprinkle colored sugar before baking. If decorating with icing, let cookies cool completely—otherwise, the icing melts right off.
- Batch Baking: Use two trays and rotate halfway for even browning. Multitasking tip: While one batch bakes, roll and cut the next batch to keep things moving.
- Cleanup: Line everything with parchment—makes cleanup so much easier, and you won’t lose any cookies to stuck dough.
My biggest cookie fail? Rushing the process. Whenever I skip the chilling, the cookies come out wonky. Patience pays off here. Also, don’t skip the wire rack—cooling on the pan makes them soggy underneath. For consistent results, measure flour by weight if you can. And if you want super-shiny glaze, let cookies dry for a few hours before stacking.
Honestly, most mistakes happen when you rush or skip steps. Take your time, enjoy the process, and the cookies will reward you with flavor and beauty every time.
Variations & Adaptations
One of the best parts about these Fall Leaf Cut Out Cookies? They’re endlessly customizable! Here are some of my favorite ways to switch things up:
- Gluten-Free Option: Swap regular flour for a gluten-free all-purpose blend. Bob’s Red Mill works well—just add a pinch more baking powder for lift.
- Vegan Version: Use plant-based butter and replace the egg with 2 tablespoons unsweetened applesauce. The cookies stay tender and flavorful.
- Flavor Twists: Add ½ teaspoon maple extract for a super autumnal vibe, or stir in orange zest for a citrusy spin.
- Seasonal Shapes: Don’t limit yourself to leaves! Pumpkins, acorns, or even simple rounds decorated with fall colors look just as festive.
- Allergen Adaptations: For nut allergies, skip almond extract and stick to vanilla. For dairy-free, vegan butter is your friend.
Personal favorite? I’ve tried using half whole wheat pastry flour for extra nuttiness—it’s hearty and perfect for dunking in cider. If you want softer cookies, bake for 7 minutes and let cool completely. For crispier edges, go the full 10 minutes.
If you’re baking for a crowd, you can double the batch and freeze dough ahead of time. The decorating possibilities are endless—let the kids go wild with colors, or keep it classic for a grown-up table setting. Honestly, don’t be afraid to get creative. These cookies are forgiving and always come out beautiful.
Serving & Storage Suggestions
These cookies are best served fresh, at room temperature, with a mug of hot cider or cocoa nearby. For Thanksgiving, I like to arrange them on a rustic wooden platter, nestled among mini pumpkins and autumn leaves. They make a pretty centerpiece and double as sweet party favors.
Pair with warm drinks—spiced tea, coffee, or mulled wine—for a true autumn experience. If you’re making a dessert spread, these cookies look gorgeous next to pumpkin pie and apple crumble.
Storage is easy: Keep cookies in an airtight container at room temp for up to 5 days. If you want to make ahead, freeze unfrosted cookies (or dough) for up to 2 months—just thaw before decorating. For glazed or iced cookies, layer with parchment to prevent sticking.
To reheat, pop them in a low oven (about 275°F/135°C) for 2-3 minutes. Flavors deepen overnight, so don’t be surprised if they taste even better the next day. Honestly, these are the kind of cookies that stay tender and delicious, perfect for gifting or nibbling all week long.
Nutritional Information & Benefits
For a batch of about 24 cookies, each Fall Leaf Cut Out Cookie has roughly:
- Calories: 90
- Fat: 4g
- Carbohydrates: 13g
- Protein: 1g
- Sugar: 7g
These cookies are naturally nut-free (just skip the almond extract), and you can easily adapt them for gluten-free or vegan diets. The butter and egg provide a touch of protein and richness, while the cinnamon adds a dash of antioxidants. If you swap in whole wheat flour, you’ll get a little extra fiber, too.
Allergen note: Contains wheat, egg, and dairy (unless adapted). From a wellness perspective, these are treat cookies—meant for sharing, savoring, and celebrating. And you know what? That’s just fine by me.
Conclusion
If you’re searching for the ultimate Thanksgiving baking idea, these Fall Leaf Cut Out Cookies are honestly worth every minute. They’re easy enough for beginners, charming enough for Pinterest fans, and delicious enough for everyone at your table. I love the way the colors pop and how every bite feels like a little taste of autumn.
Don’t be afraid to tweak the flavors, shapes, or colors to match your style—these cookies are all about making memories. For me, baking these is a seasonal ritual, a way to slow down and soak up all those cozy vibes. I hope you’ll love them as much as my family does.
Ready to bake your own batch? Share your results in the comments below, pin your favorite designs, or tag me with your creative twists. Happy baking—and may your home always smell like cookies!
FAQs
Can I make the dough ahead of time?
Yes! You can refrigerate the dough for up to 24 hours or freeze it for up to 2 months. Just let it thaw before rolling and cutting.
What if I don’t have leaf-shaped cookie cutters?
No problem. Use any shape you like—pumpkins, hearts, or simple rounds work great. You can even cut shapes freehand with a knife.
How do I keep the cookies from spreading?
Chill the dough after cutting shapes and before baking. This helps the cookies hold their crisp edges and beautiful leaf design.
Can I decorate these cookies with icing?
Absolutely! Let the cookies cool completely, then add royal icing or a simple glaze. Sprinkle with colored sugar or edible glitter for extra fun.
Are these cookies suitable for gifting?
Definitely! Layer cookies between sheets of parchment in a tin, tie with a ribbon, and you’ve got a perfect homemade gift for the season.
Pin This Recipe!
Fall Leaf Cut Out Cookies: Easy Thanksgiving Baking Idea
These buttery vanilla cookies are shaped like autumn leaves and decorated with colored sugars or icing, making them a festive and nostalgic treat for Thanksgiving and fall gatherings. The dough is easy to work with and yields tender, crisp-edged cookies that are perfect for sharing and gifting.
- Prep Time: 15 minutes
- Cook Time: 8-10 minutes
- Total Time: 40 minutes
- Yield: 24 cookies 1x
- Category: Dessert
- Cuisine: American
Ingredients
- 2 1/2 cups all-purpose flour
- 3/4 cup unsalted butter, softened
- 1 cup granulated sugar
- 1 large egg, room temperature
- 1 1/2 teaspoons vanilla extract
- 1/2 teaspoon almond extract (optional)
- 1/4 teaspoon ground cinnamon
- 1/2 teaspoon baking powder
- 1/4 teaspoon salt
- Colored sugars (red, orange, yellow, gold)
- Royal icing or simple glaze (see notes)
- Sprinkles, edible glitter (optional)
Instructions
- In a large bowl, cream together butter and sugar until light and fluffy (2-3 minutes).
- Add egg, vanilla extract, and almond extract (if using); beat until smooth.
- Stir in cinnamon, baking powder, and salt.
- Gradually add flour, mixing just until combined. Dough will be soft but not sticky.
- Shape dough into a flat disc, wrap in plastic wrap, and refrigerate for at least 30 minutes (up to 24 hours).
- Preheat oven to 350°F (175°C). Line baking sheets with parchment paper or silicone mats.
- On a lightly floured surface, roll dough to 1/4 inch thickness. Cut out leaf shapes using cookie cutters.
- Sprinkle cookies with colored sugars before baking, or decorate with icing after baking.
- Transfer cookies to prepared sheets, spacing about 1 inch apart. Bake for 8-10 minutes, until edges are just turning golden.
- Let cookies rest on the baking sheet for 2 minutes, then move to wire racks to cool.
- If desired, mix 1 cup powdered sugar with 2-3 tablespoons milk and a drop of vanilla for a simple glaze. Drizzle or pipe onto cooled cookies, then add sprinkles or edible glitter.
Notes
Chill the dough twice for crisp edges and easy rolling. For gluten-free or vegan adaptations, use a suitable flour blend and vegan butter. Dough can be made ahead and refrigerated or frozen. Decorate with colored sugars before baking or with icing after cooling. For a simple glaze, mix powdered sugar with milk and vanilla.
Nutrition
- Serving Size: 1 cookie
- Calories: 90
- Sugar: 7
- Sodium: 30
- Fat: 4
- Saturated Fat: 2
- Carbohydrates: 13
- Protein: 1
Keywords: fall cookies, Thanksgiving cookies, leaf cut out cookies, sugar cookies, autumn baking, holiday dessert, easy cookie recipe, kid-friendly cookies, decorated cookies, cookie swap


