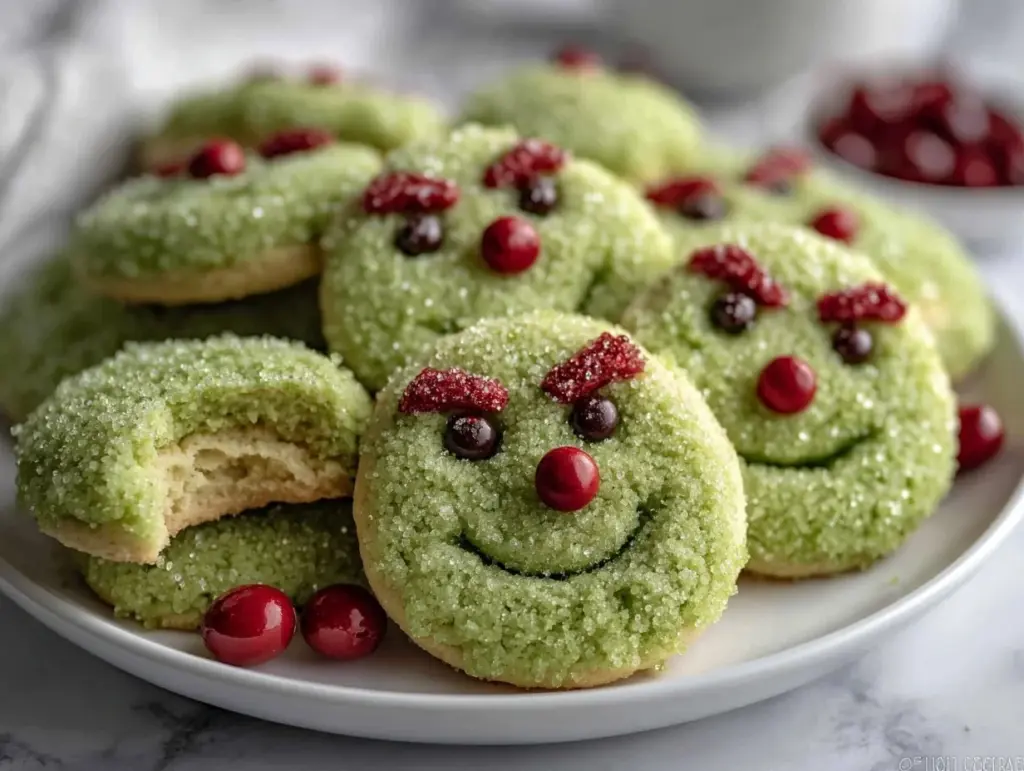
I’ll never forget the first time the scent of warm vanilla and sweet sugar wafted from my oven—those irresistible Grinch Sugar Cookies coming to life. The cheerful green hue, tiny red hearts, and buttery aroma filled my kitchen with pure Christmas magic. You know those moments when you’re knee-high to a grasshopper, sneaking bites of cookie dough when no one’s looking? That’s the kind of nostalgia these cookies bring back, every single batch.
The first time I baked these, it was a blustery December night, the kind where you can hear the wind rattling the windows and all you want is something cozy. I had stumbled upon a classic sugar cookie recipe and thought, “Why not give it a festive twist?” A dash of green gel coloring, a sprinkle of whimsy, and those iconic heart candies—suddenly, I was hooked. It was the kind of moment where you pause, take a deep breath, and just smile because you know you’re onto something truly special.
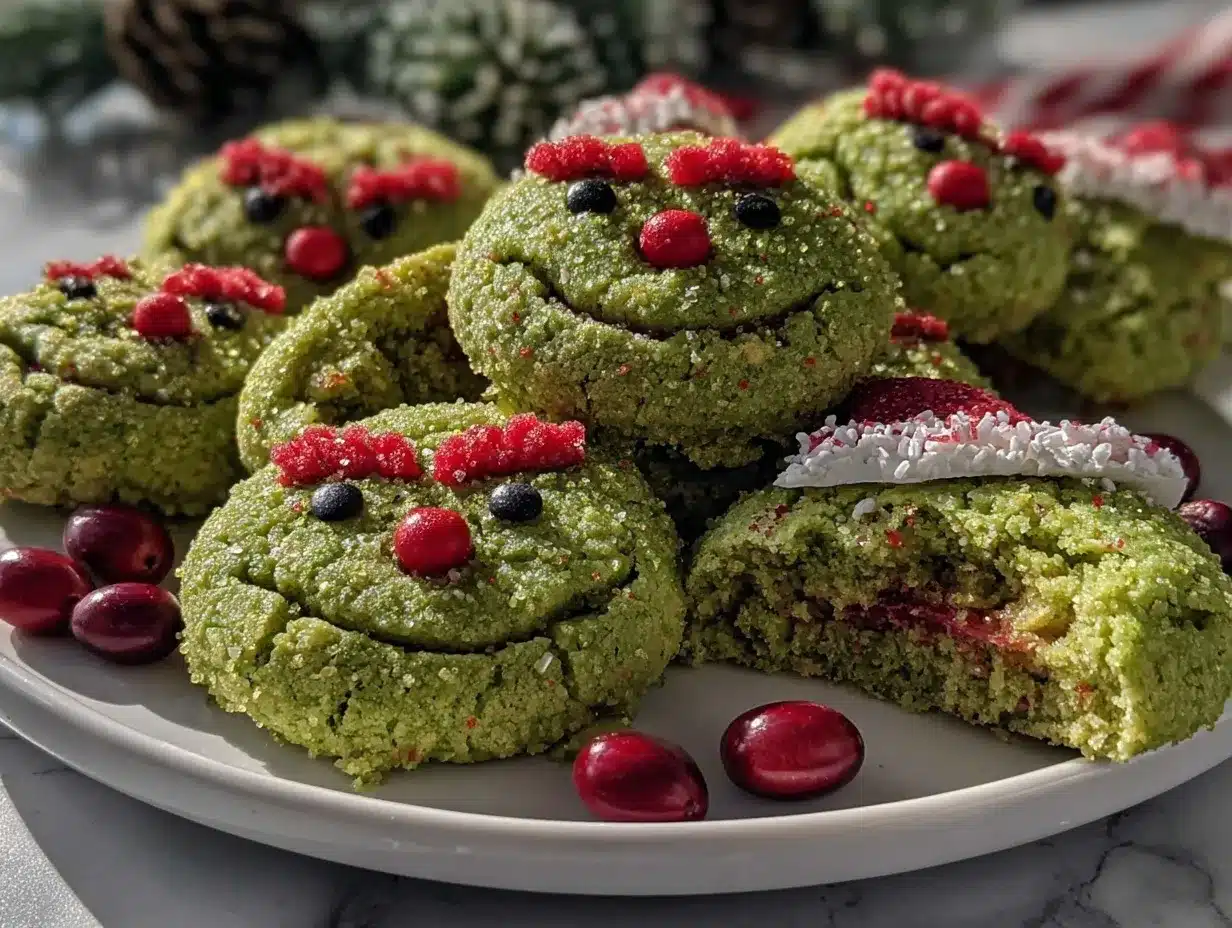
Honestly, my family couldn’t stop sneaking these Grinch Sugar Cookies off the cooling rack (and I can’t really blame them). I watched my kids giggle as they decorated, pressing little red hearts right in the center—each cookie seemed to make the whole house brighter. These treats are dangerously easy, dangerously delicious, and provide pure, nostalgic comfort. Whether you’re looking to brighten up your Pinterest cookie board, add a sweet treat to your Christmas party, or whip up a batch for your kids’ classroom exchange, these cookies fit perfectly. They’re the kind of recipe I wish I’d discovered years ago—a staple for family gatherings, gifting, and holiday movie nights. In the name of research, of course, I’ve tested these Grinch Sugar Cookies more times than I can count. Every time, it feels like a warm hug. Trust me, you’re going to want to bookmark this one for every Christmas celebration!
Why You’ll Love This Recipe
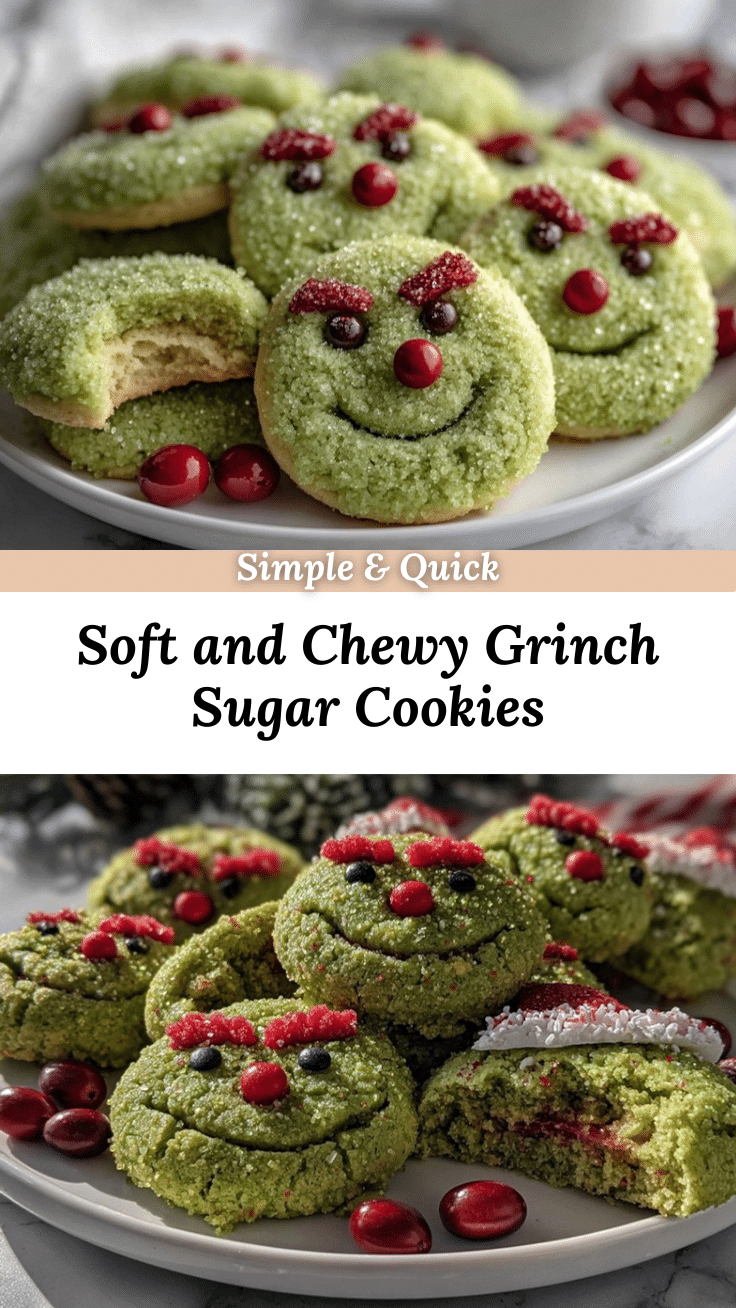
If you’re searching for the ultimate Christmas cookie, these Grinch Sugar Cookies are a total winner. I’ve baked more batches than I care to admit (in the name of perfecting them, you know)—and every single time, they come out tender, soft, and absolutely adorable. Here’s why you’ll love them as much as I do:
- Quick & Easy: These cookies come together in under 30 minutes (seriously, you can whip up a batch just before guests arrive or while the holiday movies are playing).
- Simple Ingredients: No need for fancy store runs—the ingredients are pantry staples. If you have flour, sugar, and butter, you’re halfway there.
- Perfect for Christmas Parties: Whether it’s a classroom exchange, a festive potluck, or a family baking day, these cookies are always the stars of the show.
- Crowd-Pleaser: I’ve watched kids and adults alike grab seconds (sometimes thirds). The soft texture and playful look make them irresistible.
- Unbelievably Delicious: The tender crumb and buttery flavor are pure comfort food. Add the cheerful green color and candy hearts, and you’ve got a cookie that’s as fun as it is tasty.
What sets this Grinch Sugar Cookies recipe apart? First, the dough is chilled just enough to keep the cookies ultra-soft but easy to roll and cut. Second, I use a touch of almond extract alongside vanilla—gives them a subtle holiday twist that’s not over-the-top. And yes, the green color is perfectly vibrant (thanks to gel coloring), so every cookie looks Pinterest-ready. The tiny red heart candies are the finishing touch, making each treat look like it jumped straight out of Whoville.
This isn’t just another sugar cookie recipe—it’s the one that makes you pause, close your eyes, and savor that first bite. It’s comfort food with a playful twist, perfect for impressing guests and making memories (without the stress). Whether you’re baking with little helpers or just want a batch of cheerful cookies for yourself, this recipe turns a simple treat into something truly memorable for Christmas.
What Ingredients You Will Need
This Grinch Sugar Cookies recipe uses simple, wholesome ingredients to deliver that soft, melt-in-your-mouth texture and festive flavor. Most of these are pantry staples, and you can easily make swaps if needed. I’ll break down what you’ll need below—plus a few personal tips for choosing the best options.
- All-purpose flour (2 3/4 cups / 345g) – Provides structure for the cookies. I like King Arthur for its consistent results.
- Baking powder (1 teaspoon / 4g) – Helps the cookies puff up just the right amount.
- Salt (1/2 teaspoon / 3g) – Balances the sweetness and brings out the flavors.
- Unsalted butter (1 cup / 227g, softened) – Gives a rich, buttery flavor. If you only have salted, just reduce the added salt a bit.
- Granulated sugar (1 cup / 200g) – Classic sweetness for sugar cookies.
- Large egg (1, room temperature) – Binds everything together and adds tenderness.
- Vanilla extract (1 teaspoon / 5ml) – For that classic sugar cookie flavor.
- Almond extract (1/2 teaspoon / 2ml, optional) – Adds a subtle festive note (I swear by it for holiday baking).
- Green gel food coloring (about 1/2 teaspoon, more as needed) – Gives that vibrant Grinch-inspired color. Use gel, not liquid, for best results (I use AmeriColor or Wilton gel).
- Red heart-shaped candy sprinkles (about 30-40 pieces) – The signature Grinch heart! You can find these at craft stores, online, or swap with red M&M’s if needed.
- Optional: Powdered sugar (for rolling) – Prevents sticking when shaping the cookies.
If you need a gluten-free version, swap the all-purpose flour for your favorite 1:1 gluten-free baking blend. Dairy-free? Plant-based butter works well here. For egg allergies, a flaxseed egg (1 tablespoon flaxseed meal + 2.5 tablespoons water) will do in a pinch, though texture may be slightly different.
During the holidays, when I’m short on time, I’ve even used pre-made dough and added the color and hearts—still adorable, still delicious. Honestly, these ingredients are so approachable, you’ll probably have most of them on hand (and if not, your local store will!).
Equipment Needed
You don’t need a fancy set-up to make Grinch Sugar Cookies, but a few trusty tools make the process a breeze. Here’s what you’ll want to have ready:
- Mixing bowls – At least one large and one medium. Glass or stainless steel work great.
- Electric mixer – Stand mixer or handheld. I’ve used both, and honestly, my hand mixer is my go-to for smaller batches.
- Measuring cups and spoons – Essential for getting the ratios just right.
- Rubber spatula – For scraping down the sides and gently folding in ingredients.
- Baking sheets – Nonstick or lined with parchment paper. If you only have one, just bake in batches.
- Parchment paper or silicone baking mat – Keeps cookies from sticking and makes clean-up a cinch.
- Cookie scoop or tablespoon – For evenly portioned cookies. I use a small scoop for perfect rounds.
- Wire cooling rack – Helps cookies cool evenly and keeps them from getting soggy.
- Small bowl – For rolling dough balls in powdered sugar, if desired.
If you don’t have a cookie scoop, a regular spoon works fine—just try to keep them the same size. For decorators, tweezers help place those tiny hearts (learned that after a few clumsy batches). Maintenance-wise, parchment paper saves wear and tear on your baking sheets, and a silicone mat is a budget-friendly investment. Honestly, these tools aren’t just helpful for Grinch Sugar Cookies—they’re useful for all your holiday baking adventures!
Preparation Method
Ready to bake up a batch of cheerful Grinch Sugar Cookies? Here’s my step-by-step guide—complete with time estimates, sensory cues, and troubleshooting learned from dozens of festive baking sessions.
- Prep your ingredients. Measure everything out first—makes the process smoother. Soften your butter (leave it out for 30 minutes, or microwave for 10 seconds if you’re impatient like me). Preheat the oven to 350°F (175°C). Line baking sheets with parchment paper or silicone mats.
- Mix the dry ingredients. In a medium bowl, whisk together 2 3/4 cups (345g) all-purpose flour, 1 teaspoon (4g) baking powder, and 1/2 teaspoon (3g) salt. Set aside.
- Cream the butter and sugar. Using a mixer, beat 1 cup (227g) unsalted butter and 1 cup (200g) granulated sugar together on medium speed for about 2-3 minutes, until light and fluffy. The mixture should look pale and airy.
- Add the egg and extracts. Beat in 1 large egg, 1 teaspoon (5ml) vanilla extract, and 1/2 teaspoon (2ml) almond extract (if using). Mix until fully incorporated—don’t rush this step for best texture.
- Color the dough. Add green gel food coloring (start with 1/2 teaspoon). Mix on low speed, scraping the bowl as needed, until the color is vibrant and evenly distributed. Add more color as desired. The dough should look like bright spring grass (no streaks!).
- Combine wet and dry. Gradually add the flour mixture to the wet ingredients, mixing on low speed. Scrape down the sides and bottom to make sure everything is well combined. The dough will be soft but not sticky—if it feels too sticky, add a tablespoon of flour.
- Chill the dough (optional but recommended). Cover the dough and chill in the refrigerator for 20-30 minutes. This keeps the cookies tender and helps them hold their shape. If you’re short on time, you can skip this, but know the cookies may spread a bit more.
- Shape the cookies. Scoop tablespoon-sized portions of dough (about 1-inch balls, 20g each). Roll each ball between your palms until smooth. If desired, roll them lightly in powdered sugar for a frosted look.
- Place on baking sheets. Arrange cookie dough balls 2 inches apart on prepared sheets. Press a single red heart candy gently into the center of each ball (don’t push too hard or it’ll sink!).
- Bake. Bake for 8-10 minutes, until the edges are set but the centers still look soft and slightly puffy. Don’t overbake—these should stay tender! The color will intensify slightly as they bake.
- Cool. Let cookies cool on the baking sheet for 5 minutes (they’ll finish setting), then transfer to a wire rack. The aroma at this stage is pure holiday happiness!
- Troubleshooting tips: If cookies spread too much, chill the dough longer or add a touch more flour. If the hearts pop off, press them in just after baking while the cookies are still warm.
Honestly, the hardest part is waiting for them to cool! For best results, follow these steps closely, and don’t be afraid to adjust the color or shape—these cookies are meant to be fun and festive.
Cooking Tips & Techniques
After dozens of batches, I’ve collected a handful of tried-and-true tips for Grinch Sugar Cookies. Here’s how to make them consistently tender, vibrant, and Pinterest-perfect:
- Chill your dough. Even 20 minutes in the fridge makes a huge difference. Chilled dough keeps cookies thick and soft, and prevents excessive spreading. I learned this the hard way after a few flat, crispy batches!
- Use gel food coloring. Liquid coloring can water down the dough and make it tacky. Gel ensures vivid color with minimal mess (and doesn’t change the taste).
- Don’t overmix. After adding the flour, mix just until combined. Overmixing makes cookies tough. I used to overdo it, but now I stop as soon as the dough comes together.
- Cookie scoop for uniformity. Using a small scoop or measured tablespoon keeps cookies the same size—important for even baking.
- Parchment paper is your friend. Cookies slide right off, and you’ll save yourself a lot of scrubbing later.
- Timing matters. Bake just until the edges set. The centers should look slightly underdone; they’ll finish cooking as they cool. Trust the process—overbaked cookies lose that tender texture.
- Multitasking tip: While one batch bakes, scoop and shape the next batch. Keeps things moving and the kitchen lively.
Common mistakes? Using hot butter (makes cookies greasy), skipping the chill (results in flat cookies), or overcrowding the baking sheet (causes uneven baking). Honestly, I’ve made all those mistakes at least once. Learn from me—take your time, and don’t be afraid to get a little messy. The best cookies come from a little trial and error!
Variations & Adaptations
What’s fun about Grinch Sugar Cookies is how easily you can tweak them. Here are a few variations I’ve tried (and loved):
- Gluten-Free: Swap the all-purpose flour for a 1:1 gluten-free baking blend. I like Bob’s Red Mill for consistent results. The cookies stay soft, but with a slightly finer crumb.
- Dairy-Free: Use plant-based butter in place of regular. Earth Balance has worked well for me. The taste is still rich and festive.
- Vegan: Replace the egg with a flaxseed egg (1 tbsp flaxseed meal + 2.5 tbsp water, mixed and set for 5 minutes). The cookies turn out a little chewier but still delicious.
- Seasonal twist: Instead of green, try pastel pink or blue for Valentine’s or Easter celebrations—just swap the heart candy for a seasonal sprinkle.
- Flavor boost: Add a touch of citrus zest (lemon or orange) to the dough for a bright, fresh note. My kids love this twist—makes the cookies taste like sunshine!
Allergen swaps? Use sunflower seed butter for nut allergies, or omit almond extract. For chocolate lovers, press a mini chocolate chip instead of the heart (I’ve done this for picky eaters). My personal favorite variation: rolling the dough balls in colored sugar for a sparkly finish. So many ways to make these Grinch Sugar Cookies your own. Don’t be afraid to experiment—sometimes the “mistake” batches turn out the best!
Serving & Storage Suggestions
The best way to serve Grinch Sugar Cookies? Fresh out of the oven, slightly warm, and paired with a mug of hot cocoa or spiced tea. I like to stack them on a colorful plate, sprinkle with a little extra powdered sugar, and let the heart candies shine. These cookies make lovely gifts—just wrap them in wax paper and tie with a festive ribbon.
If you’re planning a party, arrange the cookies on a holiday platter alongside other Christmas treats like gingerbread or peppermint bark. They look gorgeous on a dessert table, and the cheerful green always stands out in photos.
For storage, keep cookies in an airtight container at room temperature for up to 5 days. They stay soft and tender! If you want to freeze them, place cooled cookies in a single layer in a freezer-safe bag. They’ll keep for up to 2 months—just thaw at room temp before serving. To reheat, a quick zap in the microwave (about 5 seconds) brings back that just-baked softness. Honestly, the flavors deepen after a day or two, so don’t be afraid to make them ahead for your Christmas celebrations.
Nutritional Information & Benefits
Each Grinch Sugar Cookie (about 23g each) is estimated to have:
- Calories: 110
- Total fat: 5g
- Saturated fat: 3g
- Carbohydrates: 16g
- Sugar: 8g
- Protein: 1g
The main health benefit here? Comfort and joy! Seriously, the butter provides a bit of vitamin A, and the flour adds a touch of B vitamins. If you use almond extract, you’ll get a hint of antioxidant punch. For gluten- or dairy-free swaps, these cookies fit most dietary needs—just watch for egg or nut allergies. I believe a little treat now and then is good for the soul, especially when shared with friends or family. These Grinch Sugar Cookies offer a sweet way to brighten up your holiday season (and your mood!).
Conclusion
There’s something magical about baking Grinch Sugar Cookies—maybe it’s the cheerful color, maybe it’s the buttery tenderness, or maybe it’s just how they make everyone smile. If you want a Christmas treat that’s fun, festive, and totally tender, this is the recipe to try. Customize them with your favorite extracts, toppings, or colors—they’re meant to be playful!
I love these cookies because they turn an ordinary day into a celebration. Every batch reminds me of family baking days, giggles over decorating, and the joy of sharing something homemade. If you bake these Grinch Sugar Cookies, I hope you’ll leave a comment below, share a photo, or tell me your favorite twist. Happy baking—may your holiday season be sweet, silly, and filled with lots of cookies!
Go ahead and bookmark this recipe—your Christmas parties are about to get a lot more fun!
FAQs
Can I make Grinch Sugar Cookies ahead of time?
Absolutely! You can prepare the dough up to 2 days ahead, chill it in the fridge, and bake fresh cookies when needed. The baked cookies also keep well for 5 days in an airtight container.
What if I can’t find red heart sprinkles?
No worries—swap in red M&Ms, red chocolate chips, or even shape a bit of red fondant for that signature Grinch heart look.
Can I freeze Grinch Sugar Cookies?
Yes! Place cooled cookies in a freezer-safe bag, separate layers with wax paper, and freeze for up to 2 months. Thaw at room temperature before serving.
Do I have to chill the dough?
Chilling is recommended for tender, thick cookies, but if you’re short on time, you can skip it. Just know the cookies may spread a little more.
What’s the best way to get the perfect Grinch green color?
Use gel food coloring for vibrant, even color. Start with a small amount and add more until you reach the shade you want—gel is much stronger than liquid food coloring!
Pin This Recipe!
Grinch Sugar Cookies

These festive Grinch Sugar Cookies are soft, tender, and vibrantly green with a signature red heart candy—perfect for Christmas parties, gifting, or holiday movie nights. Quick and easy to make, they bring nostalgic comfort and cheerful fun to any celebration.
- Prep Time: 15 minutes
- Cook Time: 10 minutes
- Total Time: 30 minutes
- Yield: 30-40 cookies 1x
- Category: Dessert
- Cuisine: American
Ingredients
- 2 3/4 cups all-purpose flour
- 1 teaspoon baking powder
- 1/2 teaspoon salt
- 1 cup unsalted butter, softened
- 1 cup granulated sugar
- 1 large egg, room temperature
- 1 teaspoon vanilla extract
- 1/2 teaspoon almond extract (optional)
- 1/2 teaspoon green gel food coloring (more as needed)
- 30–40 red heart-shaped candy sprinkles
- Powdered sugar (optional, for rolling)
Instructions
- Measure and prep all ingredients. Soften butter and preheat oven to 350°F (175°C). Line baking sheets with parchment paper or silicone mats.
- In a medium bowl, whisk together flour, baking powder, and salt. Set aside.
- Using an electric mixer, beat butter and sugar together on medium speed for 2-3 minutes until light and fluffy.
- Beat in egg, vanilla extract, and almond extract (if using) until fully incorporated.
- Add green gel food coloring and mix on low speed until the color is vibrant and evenly distributed.
- Gradually add the flour mixture to the wet ingredients, mixing on low speed until just combined. Scrape down the sides and bottom as needed.
- Cover and chill the dough in the refrigerator for 20-30 minutes (optional but recommended for tender cookies).
- Scoop tablespoon-sized portions of dough (about 1-inch balls). Roll each ball smooth and, if desired, roll lightly in powdered sugar.
- Arrange dough balls 2 inches apart on prepared baking sheets. Press a single red heart candy gently into the center of each ball.
- Bake for 8-10 minutes, until edges are set but centers are still soft and puffy. Do not overbake.
- Let cookies cool on the baking sheet for 5 minutes, then transfer to a wire rack to cool completely.
- If cookies spread too much, chill dough longer or add a touch more flour. If hearts pop off, press them in just after baking while cookies are warm.
Notes
Chilling the dough helps keep cookies thick and tender. Use gel food coloring for vibrant color. For gluten-free, dairy-free, or vegan adaptations, swap flour, butter, or egg as needed. Cookies can be made ahead, stored airtight for 5 days, or frozen for up to 2 months. Press heart candies in gently to avoid sinking.
Nutrition
- Serving Size: 1 cookie (about 23g)
- Calories: 110
- Sugar: 8
- Sodium: 45
- Fat: 5
- Saturated Fat: 3
- Carbohydrates: 16
- Protein: 1
Keywords: Grinch cookies, Christmas cookies, sugar cookies, holiday baking, festive treats, easy cookies, kid-friendly, party dessert


