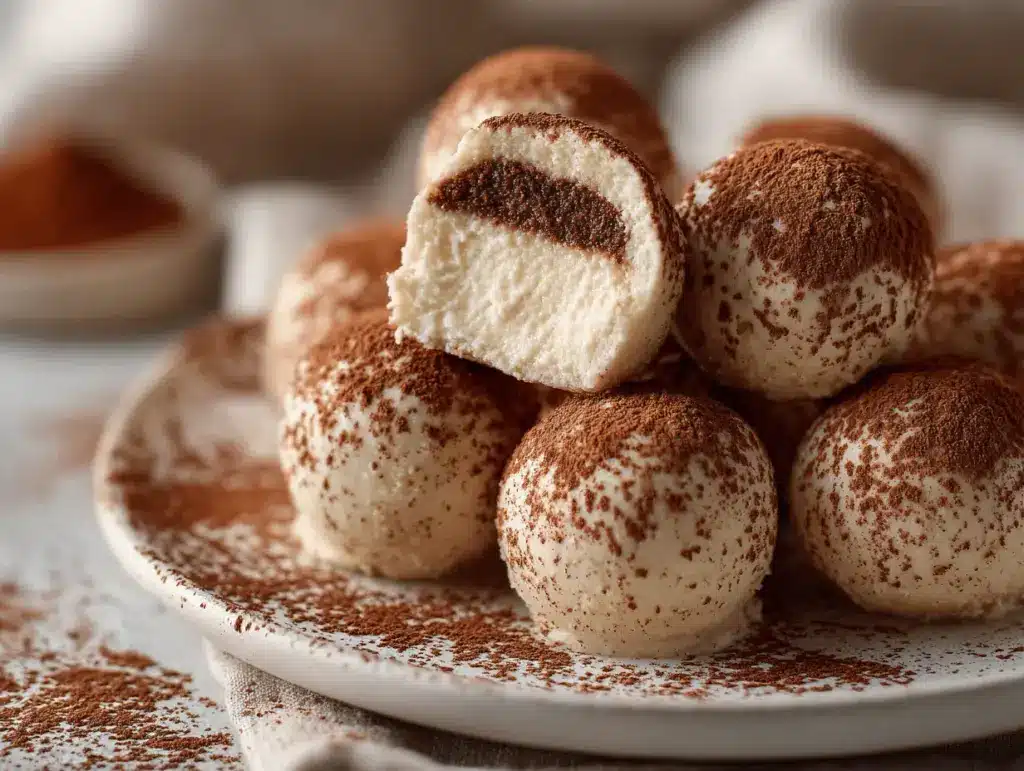
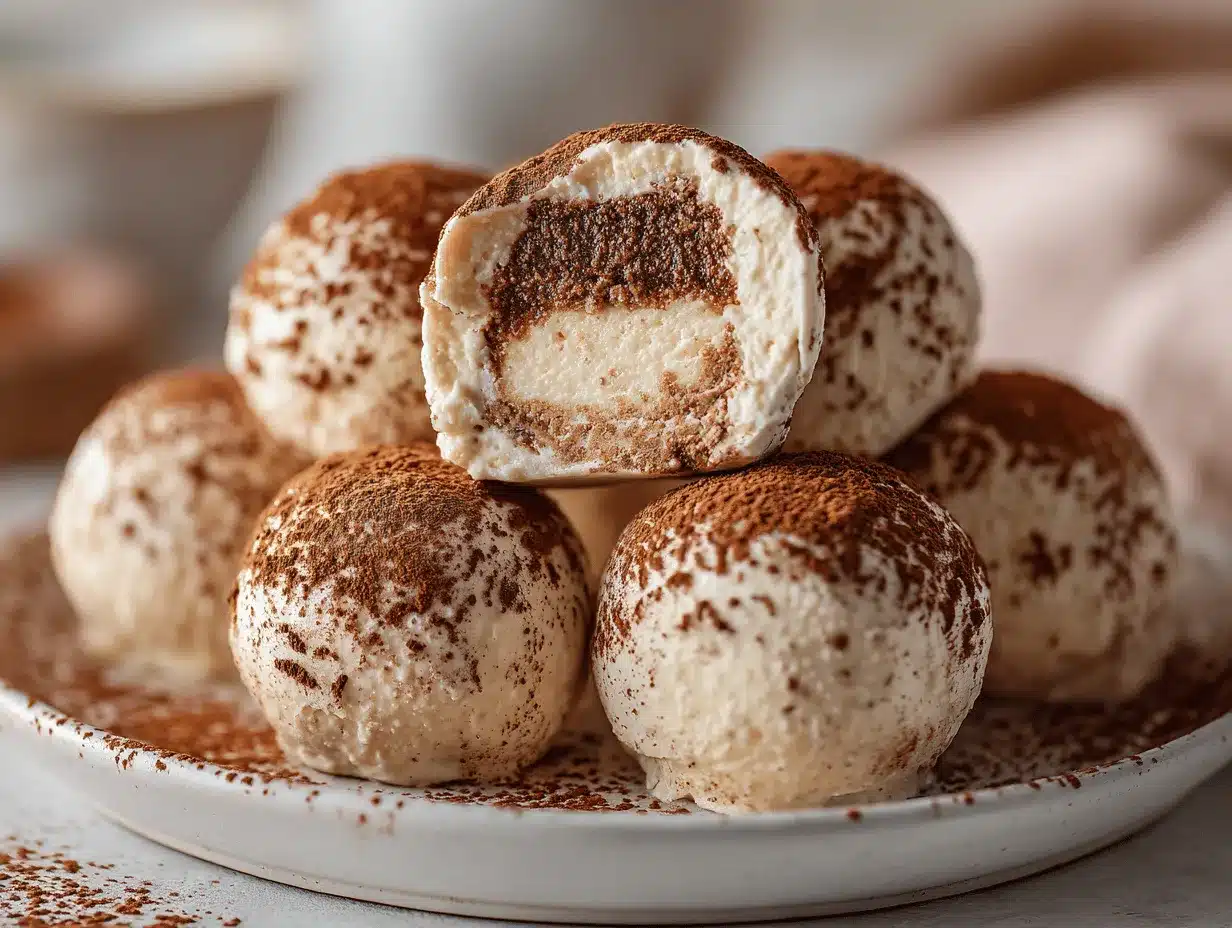
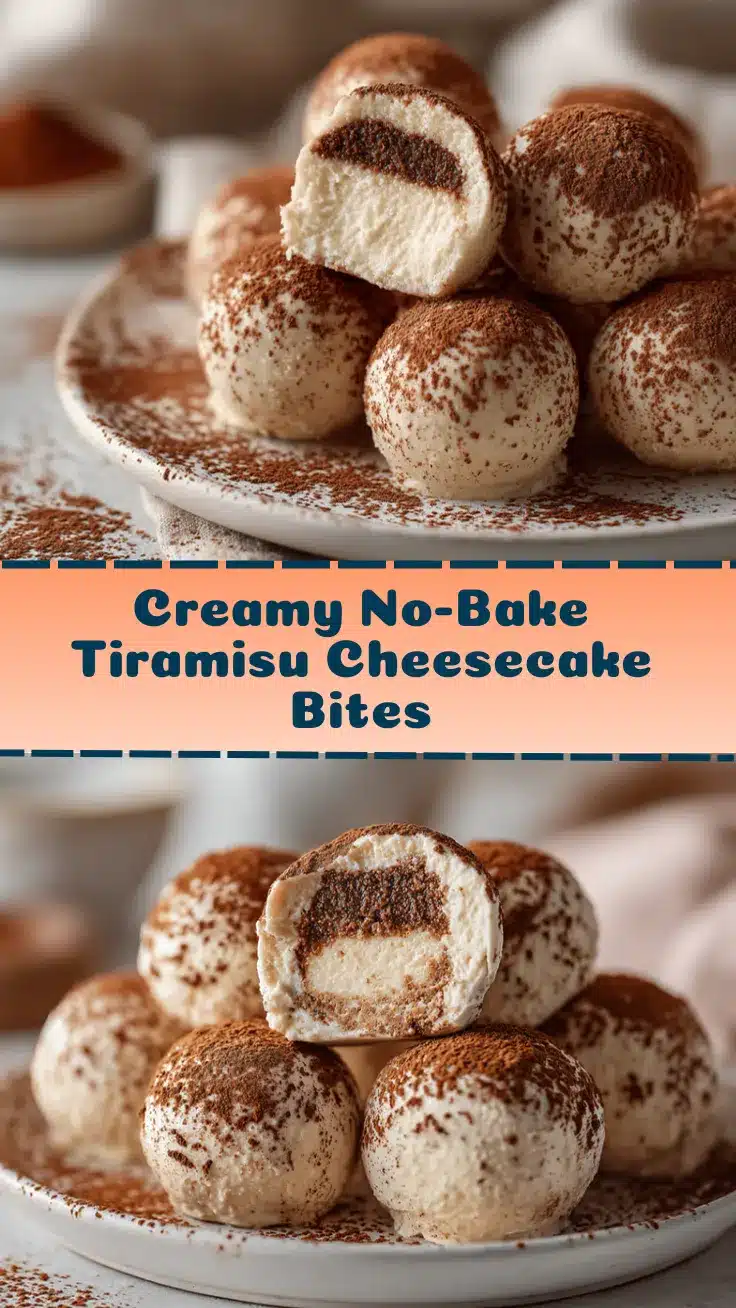
The first time I bit into one of these no-bake tiramisu cheesecake bites, I just closed my eyes and let out a little “wow.” Silky, creamy, with a hint of espresso and a cloud of cocoa—these little treats pack all the magic of classic tiramisu into a bite-sized, party-ready dessert. And let’s be honest, sometimes you want to impress your friends (or just yourself) without turning on the oven or wrestling with a complicated recipe. That’s exactly what these cheesecake bites deliver—big flavor, tiny effort.
I stumbled on the idea for no-bake tiramisu cheesecake bites during a holiday party prep panic. The oven was full, the clock was ticking, and I still needed a showstopper dessert. So, I mixed up some leftover mascarpone and cream cheese, swirled in espresso, and layered everything over coffee-soaked cookies. The result? Pure joy. Ever since, these bites have been my go-to for birthdays, girls’ nights, and, honestly, those “just because” cravings.
No-bake tiramisu cheesecake bites are the perfect answer for busy families, last-minute hosts, and anyone who loves dessert but hates fuss. I’ve tested and tweaked this recipe more times than I can count—so trust me, it’s foolproof. Whether you’re looking for a make-ahead treat for a party or a little afternoon pick-me-up, these bites deliver on decadence without the stress. Plus, they’re easy to customize (hello, gluten-free options!) and look downright adorable on any dessert table. If you’re searching for that one dessert everyone will rave about, you’ve found it. Let’s get into all the reasons you’ll love them!
Why You’ll Love This Recipe
- Quick & Easy: These no-bake tiramisu cheesecake bites come together in about 25 minutes, making them perfect for spontaneous gatherings or last-minute dessert emergencies.
- Simple Ingredients: There’s nothing fancy here—just mascarpone, cream cheese, ladyfingers (or cookies), espresso, and a few pantry staples. You probably have most of it already.
- Perfect for Parties: Their bite-sized shape makes them so easy to serve at potlucks, birthdays, bridal showers, or any event where finger food is king.
- Crowd-Pleaser: I’ve never seen anyone stop at just one. Kids love the creamy texture (use decaf if that’s a concern!), and adults adore the grown-up coffee kick.
- Unbelievably Delicious: They’re creamy, light, and packed with that signature tiramisu flavor—without being overly sweet or heavy.
What really sets these no-bake tiramisu cheesecake bites apart? For starters, blending the mascarpone and cream cheese results in a super-smooth filling (no lumps, no fuss). A quick dip in espresso gives the cookie base that iconic tiramisu flavor without sogginess. And instead of fussing with eggs or gelatin, the cheesecake filling sets perfectly in the fridge—no baking, no water baths, just pure simplicity.
Honestly, these bites taste like you spent hours in the kitchen. They bring the comfort and nostalgia of classic tiramisu but with a modern, stress-free twist. I love that they’re elegant enough to impress but simple enough for a casual get-together. If you want a dessert that looks and tastes like a million bucks but takes less time than making a cup of coffee, this is it. I’ve served them at family dinners and fancy events alike—always a hit, always requested again.
What Ingredients You Will Need
This recipe uses simple, wholesome ingredients to deliver bold flavor and satisfying texture without the fuss. Most are pantry staples, and you can easily swap things in and out based on what you have at home.
- For the Cheesecake Filling:
- Mascarpone Cheese (8 oz / 225g, room temperature) – Classic Italian cheese for that signature tiramisu taste. I prefer Galbani or BelGioioso brands.
- Cream Cheese (8 oz / 225g, softened) – Adds tang and creaminess. Use full-fat for best texture.
- Powdered Sugar (3/4 cup / 90g, sifted) – Sweetens and keeps the filling smooth.
- Heavy Cream (1/2 cup / 120ml, cold) – Whipped in for a light, fluffy texture.
- Vanilla Extract (1 tsp) – Adds warmth and depth to the filling.
- Instant Espresso Powder (1 tsp, optional) – Enhances the coffee flavor. Leave out if you want a milder taste.
- For the Cookie Base:
- Ladyfingers (about 15-18 pieces, or 120g) – Traditional for tiramisu, but you can use vanilla wafers, digestive biscuits, or even graham crackers.
- Freshly Brewed Espresso or Strong Coffee (1/2 cup / 120ml, cooled) – Dip the cookies lightly for that classic flavor.
- Optional: Coffee Liqueur (2 tbsp / 30ml, like Kahlua or Tia Maria) – For a grown-up twist. Swap with extra coffee if you prefer alcohol-free.
- For Assembly & Garnish:
- Unsweetened Cocoa Powder (for dusting) – Classic tiramisu finish. Dutch-process gives a rich color.
- Mini Chocolate Chips or Shaved Chocolate (optional) – Adds a little crunch and visual flair.
- Fresh Berries or Mint Leaves (optional) – For a pop of color, especially if you’re serving these at a party.
Ingredient Notes & Substitutions:
- If you’re gluten-free, swap ladyfingers for gluten-free cookies or almond flour “shortbread.”
- No mascarpone? Use all cream cheese, though the flavor will be a bit tangier (still delicious!).
- Dairy-free? Try plant-based cream cheese and coconut cream instead of heavy cream and mascarpone.
- For a nutty twist, sprinkle crushed toasted hazelnuts or almonds between cheesecake layers.
- I’ve used decaf instant coffee for kid-friendly versions—works perfectly!
Equipment Needed
- Electric Hand Mixer or Stand Mixer: For whipping the cheesecake filling until smooth and fluffy. A sturdy whisk and some elbow grease can work in a pinch, but your arm might protest.
- Medium Mixing Bowls: You’ll need at least two—one for the filling, one for dipping cookies.
- Measuring Cups & Spoons: Precise measurements make all the difference with cheesecake!
- Small Baking Sheet or Tray: For assembling and chilling your cheesecake bites. I sometimes use a large plate lined with parchment paper if I’m short on trays.
- Cookie Scoop or Tablespoon: For portioning the filling evenly. A melon baller works, too.
- Parchment Paper: Prevents sticking and makes cleanup a breeze.
- Sifter or Fine Mesh Strainer: For dusting cocoa powder on top. I’ve used a small tea strainer in a pinch—it works just fine!
If you don’t have a stand mixer, a hand mixer (even an old-fashioned rotary beater) does the job. For portioning, two regular spoons work, though the bites might look a little more rustic (honestly, no one complains). Keep your mixer beaters and bowls cold for fluffier results, especially in a warm kitchen. If you’re on a budget, dollar-store measuring cups and bowls are totally fine—I’ve used them for years and they hold up surprisingly well.
Preparation Method
-
Prep Your Ingredients:
Let the mascarpone and cream cheese sit at room temperature for about 30 minutes. This makes mixing smoother (no stubborn lumps). -
Make the Cheesecake Filling:
In a medium bowl, beat together 8 oz (225g) mascarpone and 8 oz (225g) cream cheese until creamy and lump-free (about 2 minutes). Add 3/4 cup (90g) powdered sugar, 1 tsp vanilla extract, and 1 tsp espresso powder (if using). Beat on medium speed until smooth and fluffy (another 1-2 minutes).
Pour in 1/2 cup (120ml) cold heavy cream. Beat on high until the mixture is light and forms soft peaks (about 2 minutes). The filling should hold its shape but still look silky—don’t over-whip or it might get grainy. -
Prepare the Cookie Base:
Pour 1/2 cup (120ml) espresso or strong coffee into a shallow bowl. Stir in 2 tbsp (30ml) coffee liqueur if you’re feeling fancy. Break ladyfingers into pieces about 1.5 inches (4 cm) long.
Quickly dip each cookie piece into the coffee mixture (just 1-2 seconds). Don’t soak! You want them moist but not mushy. -
Assemble the Bites:
On a parchment-lined tray, place a layer of dipped ladyfinger pieces. Using a small cookie scoop or tablespoon, dollop a mound (about 1 tbsp) of cheesecake filling on top of each cookie. Press gently to anchor the filling.
Optional: Add another small piece of dipped cookie on top, then another little scoop of filling for extra layers. -
Chill:
Refrigerate the assembled bites for at least 2 hours, or until firm. Overnight is even better—the flavors meld and the texture sets up beautifully. -
Finish & Serve:
Just before serving, use a fine mesh strainer to dust each bite generously with unsweetened cocoa powder. Garnish with mini chocolate chips, chocolate shavings, or a fresh berry for extra flair.
Troubleshooting & Tips:
- If your filling is too runny, try chilling it for 15 minutes before assembling. Warm kitchens can make the mixture soft.
- If ladyfingers soak up too much coffee and fall apart, try a quick “roll” instead of a dip. Practice makes perfect here!
- To save time, set up an assembly line—dip cookies, scoop filling, repeat.
- Work in small batches if your tray is small—the bites are easy to transfer once chilled.
- If you want perfectly round bites, roll the filling into balls with damp hands after chilling. They’ll look super neat (but rustic blobs taste just as good, trust me).
Cooking Tips & Techniques
Over the years, I’ve learned a few tricks to make these no-bake tiramisu cheesecake bites turn out perfect every single time. Here’s what I wish I’d known the first time I made them (so you can breeze right through):
- Room Temperature Ingredients: Don’t rush this step! Mascarpone and cream cheese blend so much more smoothly when they’re not fridge-cold. If you forget, a quick 10-second zap in the microwave (unwrapped and in a bowl) can help—but watch closely.
- Don’t Over-Soak the Cookies: It’s tempting to let the ladyfingers soak up lots of coffee, but just a quick dip is all you need. Too much liquid and you’ll have a soggy mess on your hands (been there, cleaned that).
- Chill Thoroughly: This recipe really shines after a proper chill. Two hours is the minimum, though overnight is even better. Flavors deepen, texture firms, and the bites hold their shape beautifully.
- Use a Cookie Scoop: For even, tidy bites, a small cookie scoop is your best friend. If you don’t have one, two spoons (one to scoop, one to slide) work fine—but embrace a little imperfection!
- Work Clean: These can get a bit sticky—keep a damp kitchen towel handy to wipe your hands and utensils as you go.
- Make-Ahead Magic: You can prep the filling and dip the cookies a day in advance. Just assemble right before serving, dust with cocoa, and you’re ready to wow.
I’ll admit, once I over-whipped the filling and it turned a little grainy. Lesson learned: Stop beating as soon as it’s thick and fluffy. Also, if your kitchen is warm, pop the filling in the fridge for a few minutes before assembling—it holds up so much better.
Finally, multitasking is your ally. While the bites chill, you can tidy up, set the table, or just sneak a taste (I won’t tell). Consistency comes with practice, but even the “ugly” bites disappear first at my house!
Variations & Adaptations
One of the best things about no-bake tiramisu cheesecake bites is how adaptable they are. Here are a few favorite spins I’ve tried (and loved):
- Gluten-Free: Swap out the ladyfingers for your favorite gluten-free cookies or “sponge” biscuits. Almond flour shortbread makes an awesome base for anyone avoiding wheat.
- Dairy-Free: Use plant-based cream cheese and coconut cream in place of mascarpone and heavy cream. The texture is a bit lighter, but the flavor stays rich and indulgent.
- Seasonal Flavors: In summer, add a swirl of raspberry puree between layers for a fruity twist. In winter, sprinkle a little cinnamon or nutmeg into the filling for warmth.
- Chocolate Lovers: Fold in mini chocolate chips or a spoonful of Nutella to the cheesecake mixture. I’ve even rolled the finished bites in grated chocolate for extra decadence.
- Alcohol-Free: Simply skip the liqueur and use all coffee. For a kid-friendly version, use decaf and serve with hot cocoa on the side.
Personally, I love adding a bit of orange zest to the filling for a bright, citrusy kick—especially around the holidays! If you’re pressed for time, you can layer everything in mini cupcake liners instead of rolling or scooping. Seriously, don’t be afraid to play around. The base recipe is super forgiving, and sometimes those accidental changes end up being the best.
Serving & Storage Suggestions
These no-bake tiramisu cheesecake bites are best served chilled, straight from the fridge. The creamy filling and coffee-kissed base really shine when cool. For presentation, pile them on a pretty cake stand, scatter with berries or mint, and give a final dusting of cocoa powder just before guests arrive. They’re absolute eye-candy for any dessert table.
If you’re serving for a crowd, arrange the bites in mini cupcake liners—super cute and tidy. Pair with espresso, dessert wine, or even a cold brew coffee for a classic Italian vibe. For a lighter option, a platter of fresh fruit on the side balances the richness perfectly.
To store, place the bites in an airtight container and keep them in the fridge for up to 4 days. If you want to make them ahead, assemble, chill, and dust with cocoa right before serving (otherwise the cocoa can get a little damp). Freezing isn’t ideal for these—it can mess with the creamy texture—but I have stashed leftovers in the freezer for up to 2 weeks. Just thaw in the fridge overnight and enjoy. Flavors deepen over time, so day-two bites might taste even better!
Nutritional Information & Benefits
Each no-bake tiramisu cheesecake bite (assuming a batch of 18) is roughly 110-130 calories, with about 6g fat, 11g carbs, and 2g protein. They’re naturally egg-free and can be made gluten-free or dairy-free with simple swaps.
Mascarpone and cream cheese bring calcium and a dose of healthy fat, while coffee and cocoa powder add antioxidants. If you go easy on the sugar, these can fit into a lower-carb dessert plan. Just a note for allergy-conscious folks: classic ladyfingers contain gluten and sometimes traces of nuts, so check labels if needed. I love that these bites bring such big flavor in a small, portion-controlled package—you get all the tiramisu joy with less guilt (and no leftovers to tempt you for days!).
Conclusion
If you’re looking for a dessert that combines effortless prep with show-stopping results, these no-bake tiramisu cheesecake bites are your new best friend. They’re creamy, coffee-kissed, and totally addictive—plus, you don’t have to turn on the oven or fuss with complicated steps. I keep coming back to this recipe for everything from casual get-togethers to special celebrations because it’s that reliable (and that delicious).
Honestly, I love how customizable they are—swap flavors, change up the cookies, or add a little boozy flair. I hope you try them, tweak them, and make them your own. If you do, let me know in the comments or tag your photos—I love seeing all your creative spins!
So next time you want to treat yourself (or wow your friends) with minimal effort, give these cheesecake bites a go. You might just find yourself making them on repeat—don’t say I didn’t warn you!
FAQs
Can I make no-bake tiramisu cheesecake bites ahead of time?
Absolutely! You can make them up to 2 days in advance. Just assemble, chill, and dust with cocoa right before serving for the freshest look and taste.
What if I don’t have ladyfingers?
No problem. Substitute with vanilla wafers, graham crackers, or even shortbread cookies. Just dip quickly in coffee so they don’t get too soggy.
Can I freeze the cheesecake bites?
You can, though the texture gets a little softer after thawing. Freeze in a single layer, then thaw overnight in the fridge before serving. Dust with cocoa powder after thawing for the best look.
How do I make these bites gluten-free?
Use gluten-free ladyfingers or cookies as the base. Everything else in the recipe is naturally gluten-free (but always double-check labels for cross-contamination if needed).
Is there a way to make these without coffee?
Yes! You can dip the cookies in milk or a mix of milk and a little cocoa powder for a kid-friendly, caffeine-free version. The flavor is still delicious and dessert-like.
Pin This Recipe!
No-Bake Tiramisu Cheesecake Bites
These no-bake tiramisu cheesecake bites pack all the creamy, coffee-kissed magic of classic tiramisu into a bite-sized, party-ready dessert. Quick to make and easy to customize, they’re perfect for impressing guests or treating yourself without turning on the oven.
- Prep Time: 15 minutes
- Cook Time: 0 minutes
- Total Time: 2 hours 15 minutes (includes chilling)
- Yield: 18 bites 1x
- Category: Dessert
- Cuisine: Italian
Ingredients
- 8 oz (225g) mascarpone cheese, room temperature
- 8 oz (225g) cream cheese, softened
- 3/4 cup (90g) powdered sugar, sifted
- 1/2 cup (120ml) heavy cream, cold
- 1 tsp vanilla extract
- 1 tsp instant espresso powder (optional)
- 15–18 ladyfingers (about 120g), or substitute vanilla wafers, digestive biscuits, or graham crackers
- 1/2 cup (120ml) freshly brewed espresso or strong coffee, cooled
- 2 tbsp (30ml) coffee liqueur (optional, like Kahlua or Tia Maria)
- Unsweetened cocoa powder, for dusting
- Mini chocolate chips or shaved chocolate (optional, for garnish)
- Fresh berries or mint leaves (optional, for garnish)
Instructions
- Let mascarpone and cream cheese sit at room temperature for about 30 minutes for easier mixing.
- In a medium bowl, beat together mascarpone and cream cheese until creamy and lump-free (about 2 minutes).
- Add powdered sugar, vanilla extract, and espresso powder (if using). Beat on medium speed until smooth and fluffy (1-2 minutes).
- Pour in cold heavy cream. Beat on high until the mixture is light and forms soft peaks (about 2 minutes). Do not over-whip.
- Pour espresso or strong coffee into a shallow bowl. Stir in coffee liqueur if using. Break ladyfingers into pieces about 1.5 inches long.
- Quickly dip each cookie piece into the coffee mixture for 1-2 seconds. Do not soak.
- On a parchment-lined tray, place a layer of dipped ladyfinger pieces. Using a small cookie scoop or tablespoon, dollop about 1 tbsp of cheesecake filling on top of each cookie. Press gently to anchor the filling.
- Optional: Add another small piece of dipped cookie on top, then another scoop of filling for extra layers.
- Refrigerate the assembled bites for at least 2 hours, or until firm. Overnight is even better.
- Just before serving, dust each bite generously with unsweetened cocoa powder using a fine mesh strainer. Garnish with mini chocolate chips, chocolate shavings, or a fresh berry if desired.
Notes
For best results, use room temperature mascarpone and cream cheese. Do not over-soak the cookies—just a quick dip is enough. Chill thoroughly for at least 2 hours (overnight is best). For gluten-free, use gluten-free cookies. For dairy-free, use plant-based cream cheese and coconut cream. Dust with cocoa powder just before serving to prevent it from getting damp. Store in the fridge for up to 4 days.
Nutrition
- Serving Size: 1 bite
- Calories: 120
- Sugar: 7
- Sodium: 60
- Fat: 6
- Saturated Fat: 4
- Carbohydrates: 11
- Protein: 2
Keywords: no-bake, tiramisu, cheesecake bites, party dessert, easy dessert, Italian dessert, finger food, make-ahead, egg-free, coffee dessert


