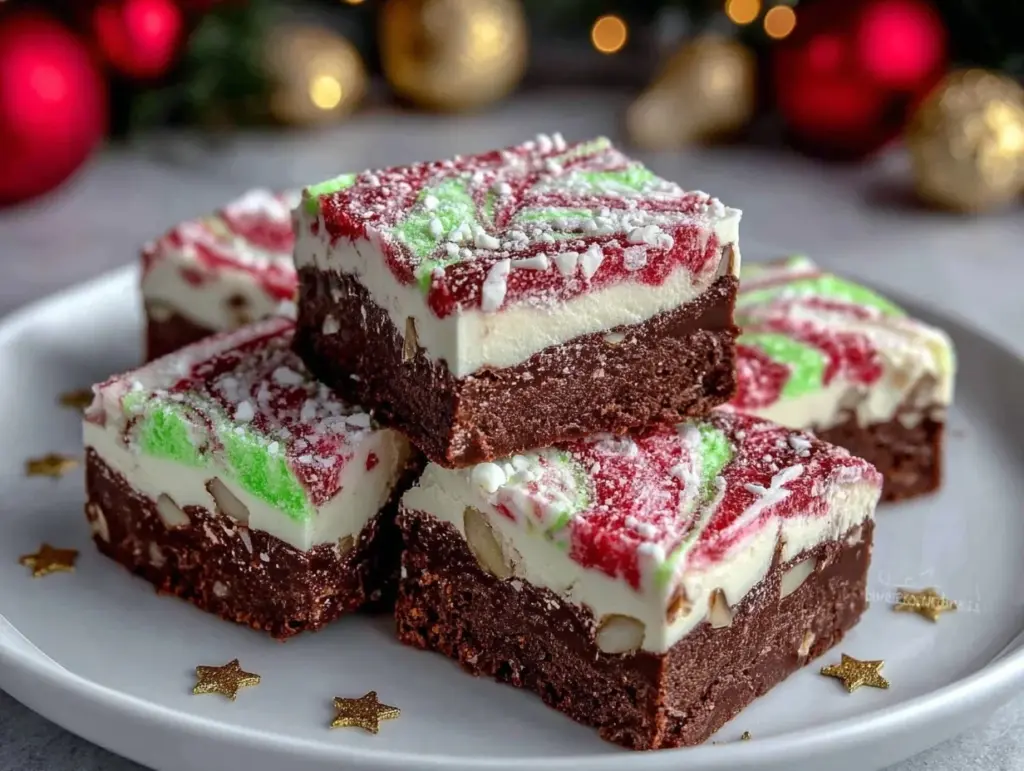
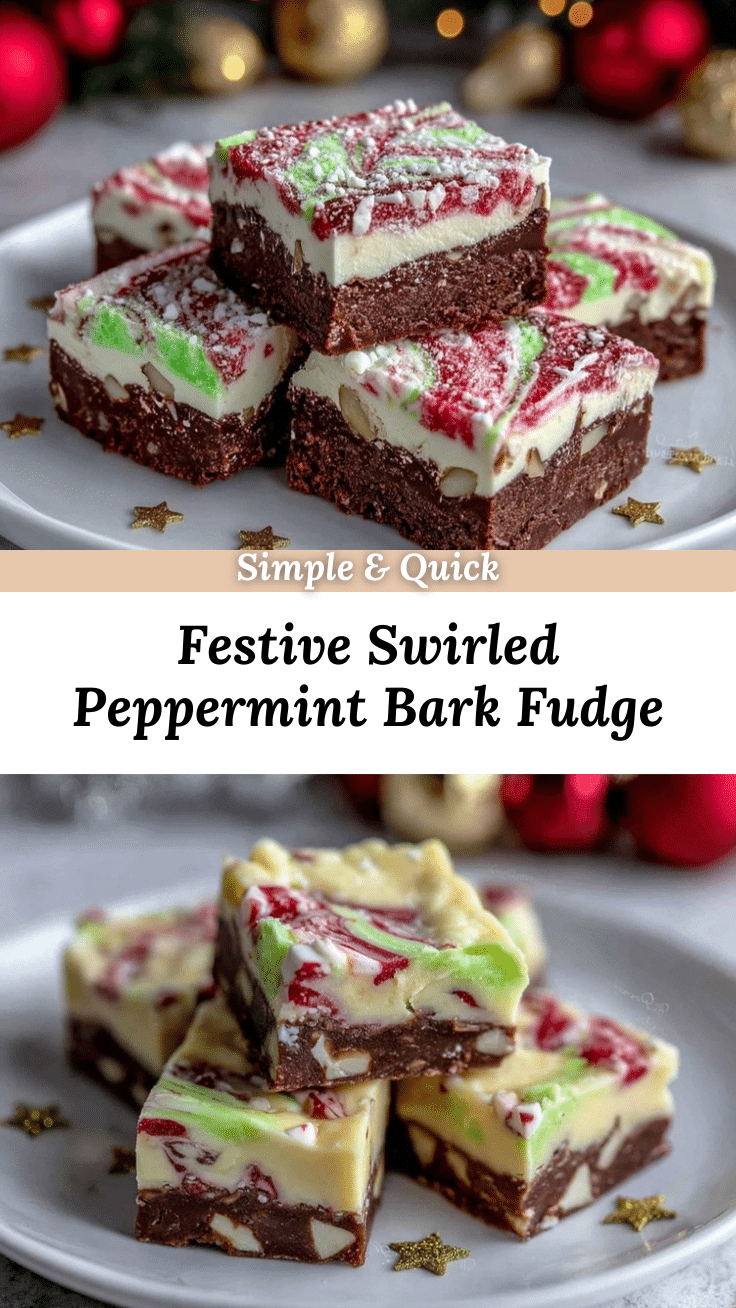
Let me set the scene—you walk into the kitchen and the air is thick with the cool, sweet scent of peppermint and creamy chocolate. The first time I pulled this Perfect Layered Peppermint Bark Fudge with Holiday Swirl out of my fridge, I swear time slowed down for a second. My kids’ eyes got huge, and honestly, even my husband (who claims not to have a sweet tooth) was reaching for a piece before it could settle on the serving plate. The colors are pure holiday magic—deep chocolate, snowy white, and a swirl of red that looks like something straight out of a winter wonderland.
You know what really hooked me? That first bite was everything—smooth fudge, a crackle of peppermint, and a creamy layer that melts on your tongue and makes you want to close your eyes for just a moment. It was the kind of moment where you pause, take a deep breath, and just smile because you know you’re onto something truly special. My grandma used to make peppermint bark every December, and this recipe feels like a grown-up version with a twist. I stumbled on the idea during a frantic search for something festive yet simple for a holiday bake sale years ago—when I was knee-high to a grasshopper, her peppermint bark was legendary in our family. Now, I wish I’d discovered this fudge years earlier. It’s dangerously easy and provides pure, nostalgic comfort.
Let’s face it, anything with chocolate and peppermint is a win, but this layered peppermint bark fudge takes it a step further. It’s perfect for potlucks, as a sweet treat for your kids, or to brighten up your Pinterest cookie board. My family couldn’t stop sneaking pieces off the cooling rack (and I can’t really blame them). I’ve tested it more times than I care to admit—in the name of research, of course—and it’s become a staple for family gatherings, gifting, and those moments when you need something that feels like a warm hug. You’re going to want to bookmark this one, trust me.
Why You’ll Love This Peppermint Bark Fudge Recipe
Take it from someone who’s burned, botched, and finally perfected fudge over the years—this recipe is a real crowd-pleaser. My kitchen has seen its fair share of fudge disasters, but after many trials (and taste tests), I can say this version is as close to foolproof as it gets. Here’s why you’ll love making (and eating) this peppermint bark fudge:
- Quick & Easy: Comes together in under 30 minutes (plus chilling). If you’re in a rush, this is your holiday hero.
- Simple Ingredients: No fancy grocery trips needed; you probably have most of these in your pantry already. Chocolate chips, sweetened condensed milk, candy canes—classic staples!
- Perfect for Any Occasion: Great for holiday parties, festive potlucks, DIY gift boxes, or just making your kitchen smell amazing on a snowy afternoon.
- Crowd-Pleaser: Kids love the swirly colors, adults appreciate the rich flavors, and honestly, everyone ends up fighting for the last piece.
- Unbelievably Delicious: The combination of creamy fudge, crunchy peppermint, and silky white chocolate is next-level comfort food. It’s rich but not overwhelming—just right.
What makes this fudge different from all the other peppermint bark recipes out there? For starters, the layering technique creates a gorgeous swirl that looks fancy but is actually super simple. I’ve experimented with blending the white chocolate layer using a touch of coconut oil for a smoother texture—you know, those little tweaks that take things from “good” to “can I have the recipe?” status. The peppermint flavor is balanced, never overpowering (just enough to clear your sinuses but not enough to make you feel like you’ve eaten toothpaste). If you want comfort food that’s easy, beautiful, and guaranteed to impress, this is the recipe to try.
This fudge isn’t just tasty—it’s the kind of treat that makes you pause after the first bite. It’s holiday magic in every square, with soul-soothing satisfaction and that “I made this myself!” pride. If you’re looking to impress guests with zero stress, or just turn an ordinary afternoon into a festive memory, you’ve found your match.
What Ingredients You Will Need
This peppermint bark fudge uses simple, wholesome ingredients to deliver bold flavor and a satisfyingly creamy texture (without the fuss). Most of these are pantry staples, and you can easily swap things out if needed. Here’s what you’ll need for each layer:
For the Chocolate Fudge Layer
- 2 cups (340g) semisweet chocolate chips (I like Ghirardelli for a deep, rich flavor)
- 1 (14 oz / 396g) can sweetened condensed milk (full-fat works best for creamy texture)
- 2 tablespoons (28g) unsalted butter (softened)
- 1 teaspoon pure vanilla extract
- Pinch of salt (balances the sweetness)
For the Peppermint White Chocolate Layer
- 2 cups (340g) white chocolate chips (use real white chocolate, not candy melts)
- 1/2 (7 oz / 198g) can sweetened condensed milk (about 1/2 cup)
- 1 tablespoon (14g) coconut oil (optional, for ultra-smooth texture)
- 1/2 teaspoon peppermint extract (not mint extract—it’s different!)
- Red gel food coloring (for swirl effect, a few drops)
For the Topping
- 4-5 peppermint candy canes, crushed (about 1/2 cup)
- Extra white or dark chocolate chips (optional, for drizzling)
Ingredient Tips and Substitutions
- Chocolate Chips: You can use dark chocolate chips for a deeper flavor, or milk chocolate for a sweeter bite. If you’re going dairy-free, try Enjoy Life brand or similar.
- Sweetened Condensed Milk: If you need a vegan version, there are coconut-based sweetened condensed milks out there—I’ve tried them and they work!
- Peppermint Candy: Any peppermint hard candy works. In summer, swap in a sprinkle of freeze-dried strawberries for a fruity twist.
- White Chocolate: Real white chocolate bars chopped up are even better than chips, but chips are easier to melt.
- Coconut Oil: Optional, but makes the white chocolate layer extra creamy. You can skip it or use a neutral oil instead.
- Food Coloring: Gel works best for bold swirls, but you can use liquid (just go easy so it doesn’t thin the chocolate).
Honestly, you can get creative here—swap almond extract for peppermint if you want a twist, or add mini marshmallows for a Rocky Road vibe. The base is forgiving, so don’t stress if you need to improvise with what’s already in your pantry.
Equipment Needed
The best part? You don’t need any fancy gear for peppermint bark fudge. Here’s what I use every time:
- 8×8 inch (20x20cm) square baking pan (glass or metal works; I prefer glass for easy monitoring)
- Parchment paper (makes lifting out the fudge a breeze)
- Microwave-safe bowls (for melting chocolate and white chocolate)
- Rubber spatula (for spreading and swirling)
- Measuring cups and spoons (accuracy matters for fudge texture)
- Knife or offset spatula (for cutting clean slices)
- Rolling pin or sturdy spoon (for crushing candy canes)
If you don’t have a microwave, a double boiler works just fine for melting chocolate—just watch closely so it doesn’t scorch. I’ve tried using silicone pans, which make slicing easy, but parchment paper is more reliable for clean removal. For candy cane crushing, my kids love using a zip-top bag and rolling pin (and let’s face it, it’s kind of fun to smash them up). If you’re on a budget, any regular baking pan will do—just line it well and grease lightly.
Preparation Method
- Prep Your Pan: Line an 8×8 inch (20x20cm) baking pan with parchment paper, leaving an overhang for easy lifting later. Lightly grease the sides if using metal. This keeps your fudge from sticking and makes for neat squares.
-
Make the Chocolate Fudge Layer: In a microwave-safe bowl, combine 2 cups (340g) semisweet chocolate chips, 1 can (14 oz / 396g) sweetened condensed milk, and 2 tablespoons (28g) unsalted butter. Microwave in 30-second bursts, stirring between each round, until fully melted and smooth (about 1½–2 minutes total). Stir in 1 teaspoon vanilla extract and a pinch of salt.
Note: If the mixture looks grainy, keep stirring—sometimes chocolate chips take a minute to smooth out. If it seizes, add a splash of condensed milk and microwave another 10 seconds. -
Spread and Chill: Pour the chocolate mixture into your prepared pan. Use a spatula to smooth into an even layer. Place the pan in the fridge for 20 minutes to set slightly while you prep the next layer.
Personal tip: Don’t rush this step. If the base is too soft, the layers will blur together. -
Make the Peppermint White Chocolate Layer: In a clean microwave-safe bowl, combine 2 cups (340g) white chocolate chips, 1/2 cup (half a 14 oz can) sweetened condensed milk, and 1 tablespoon (14g) coconut oil (if using). Microwave in 20-second bursts, stirring each time, until melted and smooth (about 1–1½ minutes). Stir in 1/2 teaspoon peppermint extract.
Troubleshooting: White chocolate is finicky! If it’s too thick, add a teaspoon more coconut oil. If it gets lumpy, keep stirring (sometimes it just needs patience). -
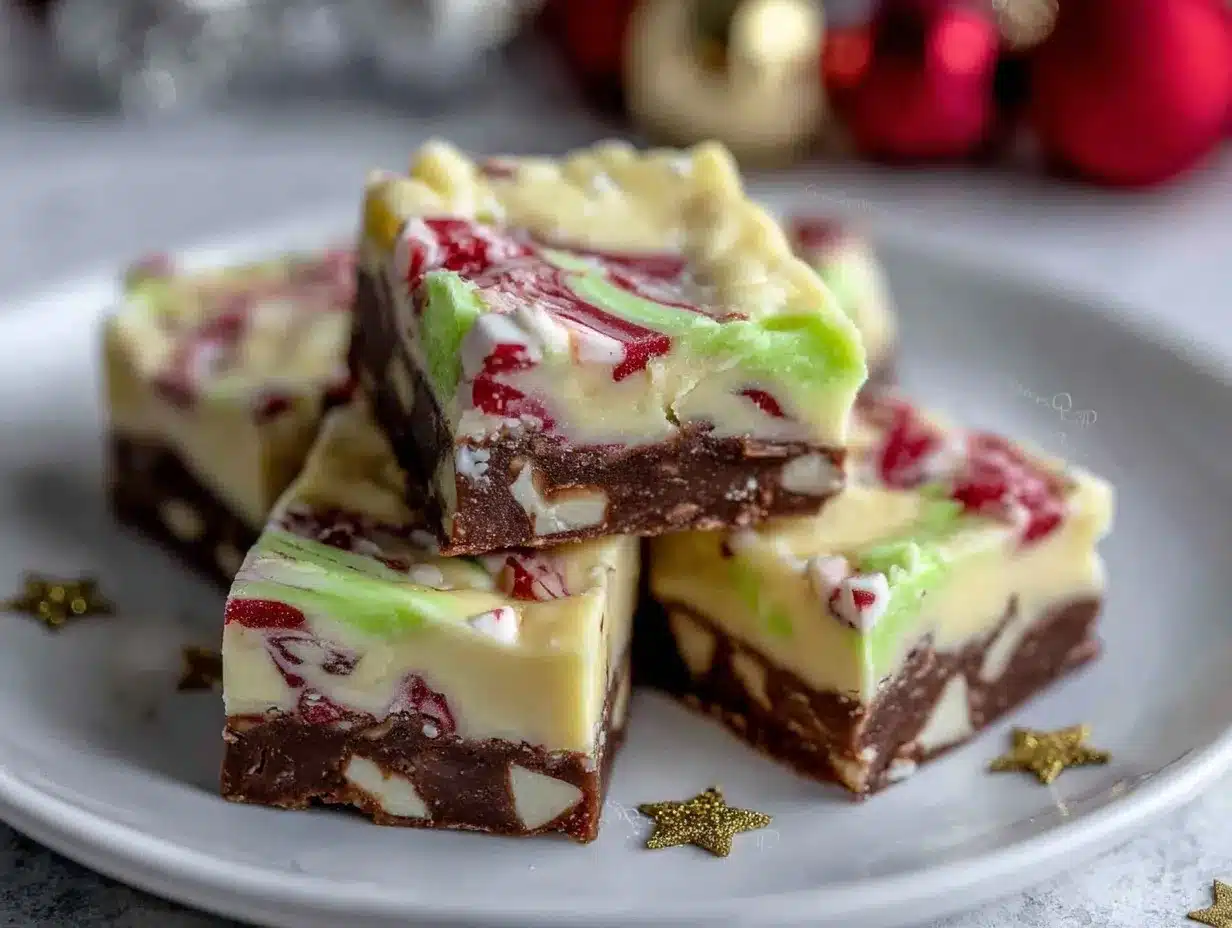
Layer and Swirl: Pour the peppermint white chocolate mixture over the cooled chocolate layer. Smooth gently with a spatula. Add 3–4 drops of red gel food coloring on top. Use a toothpick or tip of your spatula to swirl the color into festive patterns—don’t overmix or you’ll lose the swirl effect.
Sensory cue: The swirl should look marbled, not blended—like a peppermint candy! - Add Crunchy Toppings: Sprinkle 1/2 cup crushed candy canes evenly over the top. Press lightly so they stick. If you want a chocolate drizzle, melt a handful of chocolate chips and drizzle over before chilling.
-
Chill to Set: Refrigerate the pan for 2–3 hours (or overnight) until fully set. The fudge should feel firm and not sticky to the touch.
Efficiency tip: If you’re short on time, pop it in the freezer for 45 minutes. Just don’t freeze too long or it’ll be hard to slice. -
Slice and Serve: Use the parchment paper overhang to lift the fudge out of the pan. Run a sharp knife under hot water, wipe dry, and cut into squares (about 16 pieces). For clean edges, wipe the knife after each cut.
Personal note: I’ve learned the hard way—don’t rush slicing or you’ll break the layers. Take your time!
That’s it! You’ve got gorgeous, layered peppermint bark fudge with holiday swirl, ready to make spirits bright. If you’re gifting, wrap each square in wax paper and tuck into a festive box.
Cooking Tips & Techniques
Years of fudge-making have taught me a few things (mostly through trial and error, if I’m honest). Here are my top tips for perfect layered peppermint bark fudge every time:
- Use Fresh Chocolate: Old or stale chips won’t melt as smoothly and can seize. Always check your pantry stash before starting.
- Microwave in Short Bursts: Chocolate burns fast! Stick to 20–30 second intervals and stir well after each. If you go too long, you’ll end up with a scorched mess (trust me, been there).
- Don’t Overmix the Swirl: Less is more when swirling in the food coloring. Overdoing it makes the layer pink instead of marbled. Swirl with a light hand and stop when it looks festive.
- Layer Patience: Chill each layer before adding the next. If you rush, the colors bleed together and you lose those crisp layers. I’ve made this mistake enough times to know—patience pays off.
- Slicing Smart: For neat squares, run your knife under hot water, wipe dry, and slice slowly. Cold fudge cracks easily, so don’t force it.
- Consistency Is Key: Measure ingredients carefully. Too much condensed milk makes fudge runny, too little makes it crumbly. Stick to the recipe for best results.
- Multitasking: While one layer chills, crush candy canes and prep your toppings. Makes everything flow faster (especially when making multiple batches).
If you run into trouble—like the chocolate layer seizing or white chocolate clumping—don’t panic. A splash of coconut oil, gentle microwaving, and a little patience usually saves the day. And honestly, even the “imperfect” batches taste pretty fantastic.
Variations & Adaptations
The beauty of peppermint bark fudge is how easy it is to switch up for different diets, seasons, and taste buds. Here are a few tried-and-true variations I’ve tested (and loved):
- Gluten-Free: Use gluten-free chocolate chips and check your peppermint candy for hidden wheat starch (it happens). Most brands are safe, but read those labels!
- Vegan/Dairy-Free: Swap in coconut-based sweetened condensed milk and dairy-free chocolate chips (like Enjoy Life). Coconut oil helps keep the texture creamy. I’ve made this version for a vegan friend—she couldn’t tell the difference!
- Nutty Twist: Add 1/2 cup chopped roasted almonds or pistachios to the chocolate layer before chilling. It adds crunch and a savory bite.
- Seasonal Swaps: In spring, swap peppermint for lemon extract and use pastel sprinkles instead of candy canes. In summer, try orange extract and crushed freeze-dried strawberries for a citrusy twist.
- Flavor Boost: Add a teaspoon of instant espresso powder to the chocolate layer for mocha peppermint bark fudge. It’s subtle but makes the chocolate flavor pop!
- Allergen Substitutions: For nut allergies, skip any nut add-ins and stick with classic chocolate and peppermint.
Personally, my favorite tweak is adding mini marshmallows to the white chocolate layer for a peppermint “rocky road” vibe. The kids love it, and it makes the fudge even more fun. You can also experiment with colored sprinkles or drizzle with colored candy melts for extra Pinterest points. The base recipe is forgiving, so play around and make it your own.
Serving & Storage Suggestions
Peppermint bark fudge is best served chilled or at cool room temperature. The layers hold up beautifully, and the swirl stays vibrant for days. Here’s how I like to serve and store it:
- Serving: Arrange squares on a holiday platter, sprinkle with extra crushed candy canes, and serve with hot cocoa or coffee. For a party, stack pieces in a pyramid for a festive centerpiece.
- Pairings: Goes perfectly with mulled wine, peppermint tea, or a scoop of vanilla ice cream. It’s a great addition to a holiday dessert table alongside sugar cookies and gingerbread.
- Storage: Store fudge in an airtight container in the fridge for up to 2 weeks. If stacking, separate layers with wax or parchment paper to prevent sticking.
- Freezing: Freeze for up to 2 months. Wrap tightly in plastic wrap and place in a freezer bag. Thaw overnight in the fridge before serving.
- Reheating: Not needed—fudge is best cold! If it gets too firm, let it sit at room temperature for 10–15 minutes before slicing.
- Flavor Note: The peppermint flavor intensifies after a day or two, so if you like a strong minty taste, make it ahead of time.
Honestly, the only downside is how quickly it disappears. I’ve started making double batches just to have enough for gifting and snacking!
Nutritional Information & Benefits
Here’s a general breakdown for one piece (about 1/16 of the pan):
- Calories: Approx. 180
- Fat: 8g
- Carbohydrates: 24g
- Protein: 2g
- Sugar: 20g
Peppermint bark fudge isn’t exactly health food, but it does have some redeeming qualities. Dark chocolate is rich in antioxidants, and peppermint can help with digestion and freshen your breath (handy during the holidays, you know). If you use coconut oil, you get a dose of healthy fats. For gluten-free or dairy-free diets, the substitutions work well—just check labels for hidden ingredients. Candy canes and white chocolate are high in sugar, so if you’re watching carbs, keep portions small.
Honestly, for me, the wellness benefit is more about joy—sharing homemade treats, making memories, and indulging in a little festive comfort. Moderation is key, and this fudge is worth every bite.
Conclusion
If you’re after a holiday treat that’s easy, gorgeous, and always a hit, this peppermint bark fudge recipe needs a spot on your must-make list. The layers look impressive, but the process is simple enough for a beginner. You can tweak it for dietary needs, add your own touches, and it still delivers that classic chocolate-peppermint combo everyone loves.
I love this fudge because it’s more than just dessert—it’s a little slice of holiday happiness. Every batch reminds me of family traditions, laughter, and the simple joy of sharing something sweet. Try it, make it your own, and let me know how it turns out! Drop a comment with your favorite twist, share your photos, or tag me if you add your own swirl. Happy holidays, and happy fudge-making!
Frequently Asked Questions
How do I keep the layers from mixing together?
Let each layer chill until firm before adding the next. If the chocolate layer is too soft, the peppermint layer will sink in and blend. Be patient—chilling makes all the difference!
Can I use different types of chocolate?
Absolutely! Dark, milk, or even dairy-free chocolate chips all work. Just make sure they’re fresh and melt smoothly for best results.
What’s the best way to crush candy canes?
Place them in a zip-top bag and use a rolling pin or heavy spoon to smash them. I’ve found the bag method contains the mess and lets the kids help out!
Can I make this fudge ahead of time?
Yes—peppermint bark fudge actually tastes better the next day as the flavors meld. Store in an airtight container in the fridge for up to two weeks or freeze for longer storage.
How do I get clean, neat squares?
Use a sharp knife heated under hot water, wipe dry, and slice slowly. Clean the knife between cuts for perfect edges. If the fudge is too cold, let it sit at room temperature for 10 minutes before slicing.
Pin This Recipe!
Peppermint Bark Fudge Recipe: Easy Layered Holiday Swirl Treat
This festive layered peppermint bark fudge features rich chocolate, creamy white chocolate, and a swirl of peppermint for a holiday treat that’s easy to make and guaranteed to impress. Perfect for gifting, parties, or cozy family gatherings.
- Prep Time: 15 minutes
- Cook Time: 10 minutes
- Total Time: 2 hours 30 minutes
- Yield: 16 squares 1x
- Category: Dessert
- Cuisine: American
Ingredients
- 2 cups (12 oz) semisweet chocolate chips
- 1 (14 oz) can sweetened condensed milk
- 2 tablespoons unsalted butter, softened
- 1 teaspoon pure vanilla extract
- Pinch of salt
- 2 cups (12 oz) white chocolate chips
- 1/2 cup sweetened condensed milk (about half a 14 oz can)
- 1 tablespoon coconut oil (optional)
- 1/2 teaspoon peppermint extract
- Red gel food coloring (a few drops)
- 4–5 peppermint candy canes, crushed (about 1/2 cup)
- Extra white or dark chocolate chips (optional, for drizzling)
Instructions
- Line an 8×8 inch baking pan with parchment paper, leaving an overhang for easy lifting. Lightly grease the sides if using metal.
- In a microwave-safe bowl, combine semisweet chocolate chips, sweetened condensed milk, and unsalted butter. Microwave in 30-second bursts, stirring between each, until melted and smooth (about 1½–2 minutes). Stir in vanilla extract and a pinch of salt.
- Pour the chocolate mixture into the prepared pan and smooth into an even layer. Refrigerate for 20 minutes to set slightly.
- In a clean microwave-safe bowl, combine white chocolate chips, 1/2 cup sweetened condensed milk, and coconut oil (if using). Microwave in 20-second bursts, stirring each time, until melted and smooth (about 1–1½ minutes). Stir in peppermint extract.
- Pour the peppermint white chocolate mixture over the cooled chocolate layer. Smooth gently with a spatula. Add a few drops of red gel food coloring and swirl with a toothpick or spatula tip to create a marbled effect.
- Sprinkle crushed candy canes evenly over the top and press lightly so they stick. If desired, drizzle with melted chocolate chips.
- Refrigerate for 2–3 hours (or overnight) until fully set. For faster setting, freeze for 45 minutes, but do not over-freeze.
- Use the parchment paper overhang to lift the fudge out of the pan. Run a sharp knife under hot water, wipe dry, and cut into squares (about 16 pieces). Wipe the knife between cuts for clean edges.
Notes
For best results, chill each layer until firm before adding the next to keep layers distinct. Use fresh chocolate chips for smooth melting. Swirl food coloring lightly for a marbled look. Fudge can be made ahead and stored in the fridge for up to 2 weeks or frozen for up to 2 months. For vegan or dairy-free, use coconut-based sweetened condensed milk and dairy-free chocolate chips. Always check candy labels for gluten if needed.
Nutrition
- Serving Size: 1 square (1/16 of pa
- Calories: 180
- Sugar: 20
- Sodium: 40
- Fat: 8
- Saturated Fat: 5
- Carbohydrates: 24
- Fiber: 1
- Protein: 2
Keywords: peppermint bark fudge, holiday fudge, Christmas dessert, layered fudge, easy fudge, chocolate peppermint, homemade fudge, festive treat, edible gift, no bake dessert


