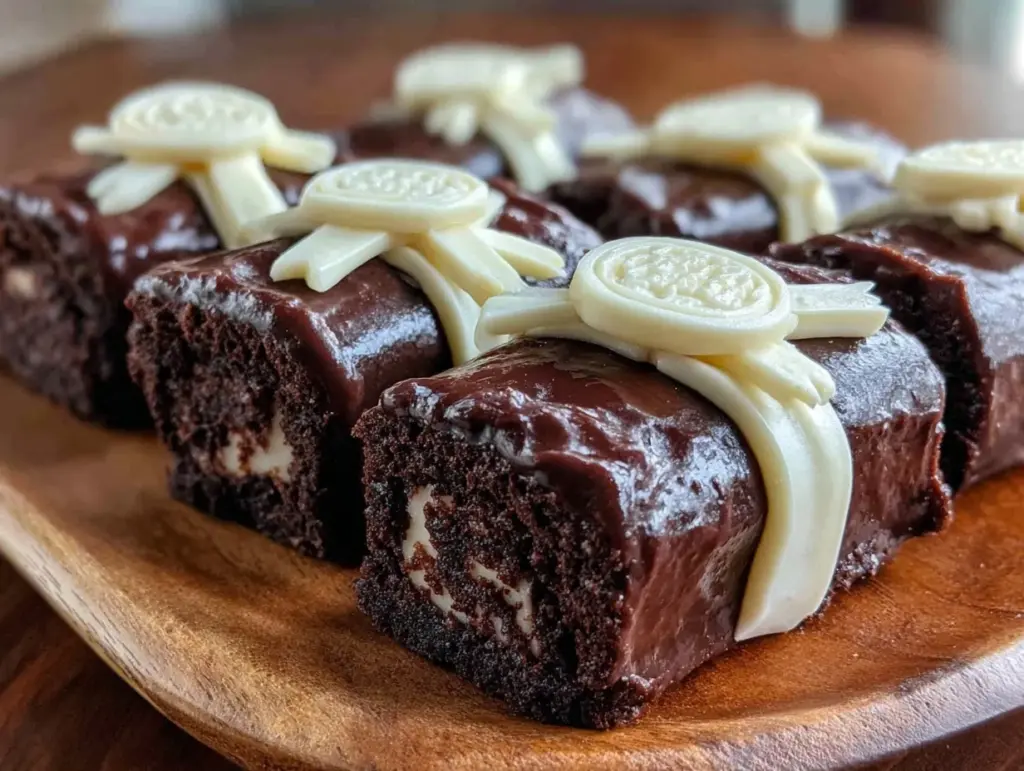
“You won’t believe the story behind these chocolate diploma cookies,” my neighbor chuckled as she handed me one during our neighborhood potluck last spring. Honestly, I wasn’t expecting much—just another decorated cookie—but that first bite? It stopped me cold. The rich, fudgy chocolate base paired with that impossibly smooth royal icing made me forget the chaos of a Thursday afternoon. It reminded me of the time I tried baking after a rushed day, accidentally swapping brown sugar for white, and ended up with something even better than planned. Maybe you’ve been there—when a happy accident in the kitchen turns into a new favorite.
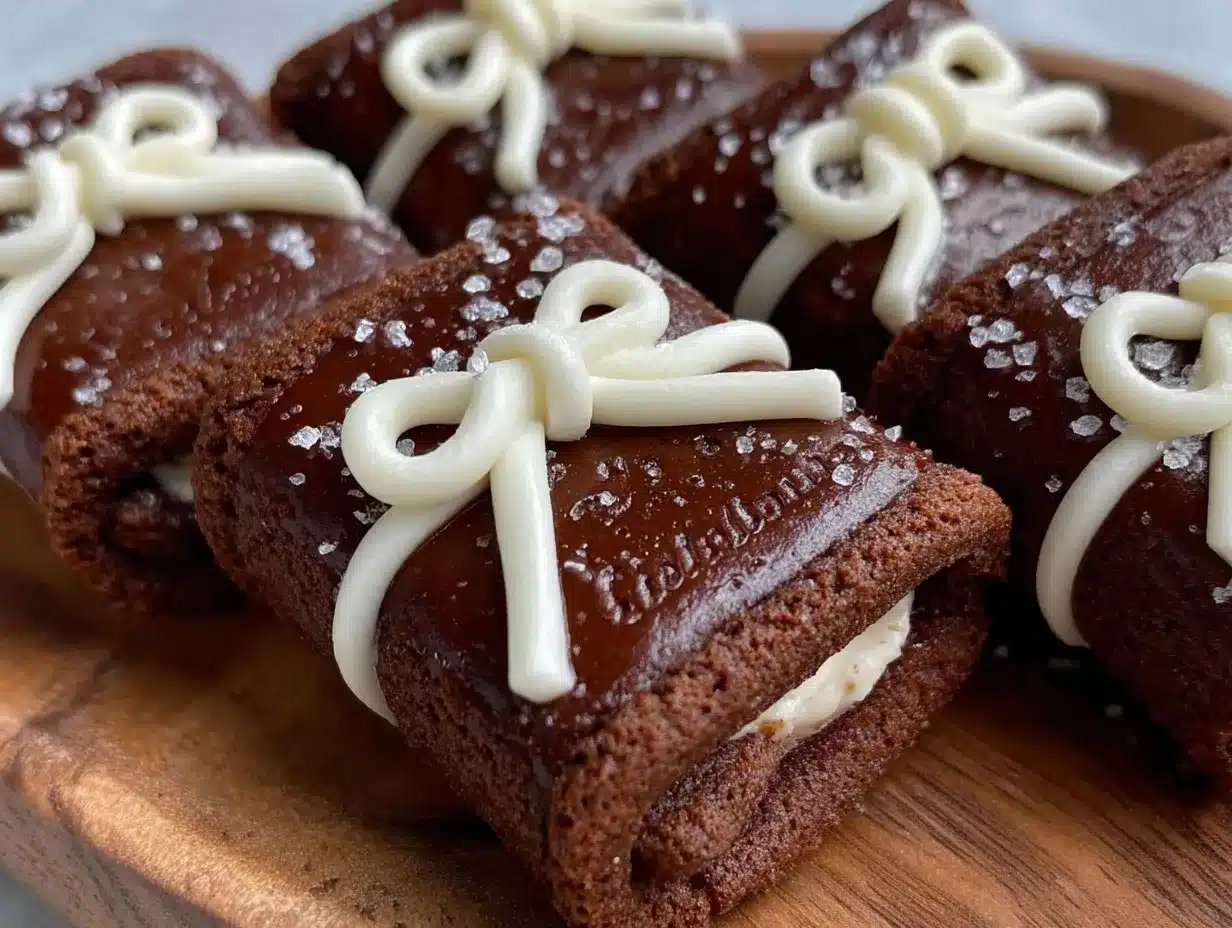
What struck me most was how these cookies looked like miniature diplomas, elegant enough for a graduation celebration but simple enough to whip up on a whim. I mean, who knew royal icing could be that forgiving and still turn out so polished? That cracked bowl I used (don’t ask) didn’t stop me from making a mess but somehow, those cookies came out picture-perfect. I keep making these not just for parties but whenever I need a reminder that even in the busiest weeks, a little chocolate and creativity can make things better. So, if you’ve ever wanted to impress with a cookie that’s both charming and delicious, this chocolate diploma cookies recipe might just be your new go-to.
Why You’ll Love This Recipe
After experimenting with countless cookie recipes, I can confidently say this chocolate diploma cookies recipe stands out for several reasons. It’s not just about looks—though the elegant royal icing definitely steals the show—it’s about the balance of textures and ease of preparation. Here’s why this recipe deserves a spot in your baking repertoire:
- Quick & Easy: Ready in under an hour, perfect for last-minute celebrations or when you just need a sweet pick-me-up.
- Simple Ingredients: Uses pantry staples like cocoa powder and powdered sugar—no trip to specialty stores required.
- Perfect for Graduations & Parties: These diploma-shaped cookies bring a festive touch without fuss.
- Crowd-Pleaser: Kids and adults alike rave about the rich chocolate flavor and smooth icing.
- Unbelievably Delicious: The chocolate cookie is dense yet tender, while the royal icing adds just the right sweet contrast.
What makes this recipe different? I swear by the technique of chilling the dough before cutting the diploma shapes—it helps keep edges sharp. Plus, the royal icing here is whipped just right for that glossy, pipe-ready consistency without cracking. Honestly, after testing various consistencies, this one nailed the balance between flow and hold. It’s not another cookie hidden among many; it’s a statement on a plate. Whether you’re an experienced baker or a weekend warrior, you’ll find this recipe straightforward yet impressive.
What Ingredients You Will Need
This recipe calls for simple, wholesome ingredients that work together to create bold chocolate flavor and elegant decoration without any hassle. Most are pantry staples, and substitutions are easy if you need to tweak for dietary needs.
- For the Chocolate Cookie Dough:
- 1 cup (130g) all-purpose flour (use gluten-free flour blend for GF option)
- ½ cup (45g) unsweetened cocoa powder (I recommend Hershey’s for deep chocolate taste)
- ½ teaspoon baking powder
- ¼ teaspoon salt
- ¾ cup (170g) unsalted butter, softened (or dairy-free butter alternative)
- 1 cup (200g) granulated sugar
- 1 large egg, room temperature
- 1 teaspoon pure vanilla extract
- For the Elegant Royal Icing:
- 3 cups (360g) powdered sugar, sifted
- 2 large egg whites or 5 tablespoons aquafaba (for vegan option)
- 1 teaspoon lemon juice (adds brightness and helps stabilize)
- Food coloring (optional, for diploma details)
Pro tip: For best results, choose fresh eggs and sift your powdered sugar to avoid lumps in the icing. During summer months, you can add a pinch of cream of tartar to help stabilize the royal icing if humidity is high. I’ve also found that swapping vanilla for almond extract adds a lovely subtle aroma if you want a twist.
Equipment Needed
To make these chocolate diploma cookies with elegant royal icing, gather the following tools:
- Mixing bowls (preferably glass or stainless steel)
- Electric mixer or stand mixer (hand mixer works too, but be ready to whip longer)
- Rolling pin (a silicone one is great for non-stick rolling)
- Diploma-shaped cookie cutter (about 3 inches long) or a sharp knife to cut rectangles and roll the edges slightly to mimic scrolls
- Baking sheets lined with parchment paper or silicone mats
- Cooling rack
- Piping bags and small round piping tips (size #1 or #2 for fine lines)
- Sifter for powdered sugar
If you don’t have a diploma-shaped cookie cutter, no worries—I use a simple rectangular cutter and carefully roll the edges with my fingers to create that scroll effect. For piping, I sometimes improvise with a small zip-top bag with a tiny hole snipped in the corner. And trust me, the right tools make a big difference, but you can get by with basics if you’re patient. Just keep your piping tips clean and dry to avoid clogging!
Preparation Method
- Prepare the Cookie Dough (15 minutes): In a medium bowl, whisk together the all-purpose flour, cocoa powder, baking powder, and salt. Set aside. In a large bowl, cream the softened butter and granulated sugar using an electric mixer on medium speed until light and fluffy (about 3-4 minutes). Beat in the egg and vanilla extract until combined.
- Combine Dry & Wet Ingredients (2 minutes): Gradually add the dry ingredients to the wet mixture, mixing on low speed just until incorporated. Be careful not to overmix—you want the dough uniform but tender.
- Chill the Dough (at least 1 hour): Shape the dough into a flat disc, wrap tightly in plastic wrap, and refrigerate. This step is crucial for sharp cookie edges and prevents spreading during baking.
- Roll & Cut the Cookies (20 minutes): Preheat the oven to 350°F (175°C). On a lightly floured surface, roll the dough to about ¼-inch (6mm) thickness. Use the diploma-shaped cookie cutter or a knife to cut rectangular shapes approximately 3 inches (7.5cm) long and 1.5 inches (4cm) wide. For the scroll effect, gently roll the top and bottom edges inward with your fingers. Place the cookies on parchment-lined baking sheets, spacing about 1 inch (2.5cm) apart.
- Bake the Cookies (10-12 minutes): Bake in the preheated oven until the edges look set and the centers are just firm—avoid overbaking to keep them tender. They’ll feel slightly soft but will firm up as they cool. Remove from oven and transfer to a cooling rack.
- Prepare the Royal Icing (10 minutes): While cookies cool, combine sifted powdered sugar with egg whites (or aquafaba) and lemon juice in a clean bowl. Beat on medium-high speed until the icing holds stiff peaks but is still pipeable (about 5-7 minutes). The texture should be glossy and smooth.
- Decorate the Cookies (30 minutes+ drying): Fill piping bags with royal icing. Pipe a neat border along each cookie’s edge, then flood the center with a thinner layer of icing for a smooth “paper” look. Use a smaller tip to add diploma details like lines or little bows. Let the icing dry completely at room temperature, ideally overnight, to avoid smudging.
Note: If the icing thickens while decorating, add a few drops of water to thin it slightly. Keep leftover icing covered with a damp cloth to prevent drying out.
Cooking Tips & Techniques
Mastering these chocolate diploma cookies is easier when you keep a few insider tricks in mind. First, chilling the dough is a game changer; skipping this leads to misshapen cookies that lose their crisp edges. Honestly, I once baked the dough straight away and ended up with cookies looking more like blobs than diplomas!
When rolling out dough, dust your surface lightly with cocoa powder instead of flour to keep the chocolate color rich. Also, rolling between two sheets of parchment paper can save you from sticky situations. For royal icing, always use fresh eggs or pasteurized whites to keep things safe and smooth.
Timing is everything. Bake the cookies until they feel just firm to the touch but still soft inside; they’ll harden as they cool. Trying to decorate warm cookies? Bad idea—your icing will melt right off.
Pro tip: Practice piping on parchment before decorating the actual cookies. It helps build confidence and keeps your cookies neat. And don’t rush the drying time; royal icing needs patience to set properly. Trust me, it’s worth the wait for that professional finish.
Variations & Adaptations
You can easily tweak this recipe to suit different tastes or dietary needs. Here are a few ideas:
- Flavor Variations: Add a teaspoon of instant espresso powder to the dough for a mocha twist, or replace vanilla with orange zest for a citrus note.
- Dietary Adaptations: Use almond or oat flour for a gluten-free version (adjust liquids slightly). Swap butter for coconut oil and egg whites for aquafaba to make it vegan-friendly.
- Alternative Decorations: Instead of royal icing, try melted white chocolate for a softer, creamy finish. You can also use colored royal icing to match school colors or party themes.
Once, I made a batch with peppermint extract and decorated them with crushed candy canes for a festive holiday look—talk about crowd-pleasers! Feel free to experiment with shapes too; stars or scrolls work beautifully and keep that diploma vibe.
Serving & Storage Suggestions
Serve these chocolate diploma cookies at room temperature to enjoy the full depth of their fudgy texture and smooth icing. They make a stunning addition to any graduation party spread, paired nicely with coffee, milk, or sparkling cider.
Store cookies in an airtight container at room temperature for up to 5 days. If you need longer storage, freeze the undecorated cookies in a single layer wrapped tightly in plastic wrap, then transfer to a freezer bag. Thaw completely before decorating.
Decorated cookies can be stored in a single layer, separated by parchment, at room temperature for up to 3 days. Avoid refrigeration as it can cause the royal icing to sweat or soften. Reheating isn’t necessary; these cookies are best enjoyed fresh or slightly rested to let flavors meld.
Nutritional Information & Benefits
Each chocolate diploma cookie (without icing) contains approximately 150 calories, 8 grams of fat, 20 grams of carbohydrates, and 2 grams of protein. The cocoa powder adds antioxidants, while the egg offers a modest protein boost. Using unsalted butter keeps sodium levels low.
This recipe can be adjusted for gluten-free or vegan diets, making it accessible for many. While these cookies are a treat, they’re made with real ingredients you can trust—no artificial preservatives or strange additives.
From a wellness perspective, sometimes a little indulgence is part of balance. These cookies satisfy chocolate cravings with a dose of joy—because, honestly, happiness counts too.
Conclusion
If you’re looking for a chocolate cookie recipe that’s both charming and approachable, these perfect chocolate diploma cookies with elegant royal icing fit the bill. They’re easy enough for everyday bakers but polished enough to impress guests. I love how they bring a touch of celebration to any moment—whether it’s an actual graduation or just a Tuesday that deserves a little sweetness.
Feel free to customize the decorations or try the variations I mentioned to make them your own. I’d love to hear how your cookies turn out or what creative tweaks you make. Don’t hesitate to share your stories or questions in the comments below—baking is always better together!
Now, grab your rolling pin and get ready to bake some smiles.
FAQs
What if I don’t have a diploma-shaped cookie cutter?
No worries! Use a rectangular cutter or a knife to cut rectangles about 3 inches long, then gently roll the edges to create a scroll effect. It looks just as elegant.
Can I make the royal icing ahead of time?
Yes, you can prepare royal icing a day ahead. Store it in an airtight container and cover the surface with plastic wrap to prevent drying. Stir well before using.
How do I keep royal icing from cracking?
Maintain the right consistency—too thick and it cracks, too thin and it won’t hold shape. Adding lemon juice helps stabilize. Let the icing dry slowly at room temperature, away from drafts.
Can I substitute butter with oil in the cookie dough?
Butter is best for flavor and texture here, but you can try coconut oil as a substitute. The texture may be slightly different and less firm, so chilling the dough is even more important.
How long do these cookies stay fresh?
Stored in an airtight container at room temperature, they stay fresh for up to 5 days. Decorated cookies are best eaten within 3 days for optimal icing texture.
Pin This Recipe!

Perfect Chocolate Diploma Cookies Recipe Easy Elegant Royal Icing Tutorial
These chocolate diploma cookies feature a rich, fudgy chocolate base paired with smooth royal icing, perfect for graduation celebrations or any festive occasion. The recipe is quick, easy, and uses simple pantry staples.
- Prep Time: 37 minutes
- Cook Time: 12 minutes
- Total Time: 1 hour 49 minutes
- Yield: 24 cookies 1x
- Category: Dessert
- Cuisine: American
Ingredients
- 1 cup (130g) all-purpose flour (use gluten-free flour blend for GF option)
- ½ cup (45g) unsweetened cocoa powder
- ½ teaspoon baking powder
- ¼ teaspoon salt
- ¾ cup (170g) unsalted butter, softened (or dairy-free butter alternative)
- 1 cup (200g) granulated sugar
- 1 large egg, room temperature
- 1 teaspoon pure vanilla extract
- 3 cups (360g) powdered sugar, sifted
- 2 large egg whites or 5 tablespoons aquafaba (for vegan option)
- 1 teaspoon lemon juice
- Food coloring (optional)
Instructions
- Prepare the Cookie Dough (15 minutes): In a medium bowl, whisk together the all-purpose flour, cocoa powder, baking powder, and salt. Set aside. In a large bowl, cream the softened butter and granulated sugar using an electric mixer on medium speed until light and fluffy (about 3-4 minutes). Beat in the egg and vanilla extract until combined.
- Combine Dry & Wet Ingredients (2 minutes): Gradually add the dry ingredients to the wet mixture, mixing on low speed just until incorporated. Be careful not to overmix—you want the dough uniform but tender.
- Chill the Dough (at least 1 hour): Shape the dough into a flat disc, wrap tightly in plastic wrap, and refrigerate. This step is crucial for sharp cookie edges and prevents spreading during baking.
- Roll & Cut the Cookies (20 minutes): Preheat the oven to 350°F (175°C). On a lightly floured surface, roll the dough to about ¼-inch (6mm) thickness. Use the diploma-shaped cookie cutter or a knife to cut rectangular shapes approximately 3 inches (7.5cm) long and 1.5 inches (4cm) wide. For the scroll effect, gently roll the top and bottom edges inward with your fingers. Place the cookies on parchment-lined baking sheets, spacing about 1 inch (2.5cm) apart.
- Bake the Cookies (10-12 minutes): Bake in the preheated oven until the edges look set and the centers are just firm—avoid overbaking to keep them tender. They’ll feel slightly soft but will firm up as they cool. Remove from oven and transfer to a cooling rack.
- Prepare the Royal Icing (10 minutes): While cookies cool, combine sifted powdered sugar with egg whites (or aquafaba) and lemon juice in a clean bowl. Beat on medium-high speed until the icing holds stiff peaks but is still pipeable (about 5-7 minutes). The texture should be glossy and smooth.
- Decorate the Cookies (30 minutes+ drying): Fill piping bags with royal icing. Pipe a neat border along each cookie’s edge, then flood the center with a thinner layer of icing for a smooth “paper” look. Use a smaller tip to add diploma details like lines or little bows. Let the icing dry completely at room temperature, ideally overnight, to avoid smudging.
Notes
Chill dough for at least 1 hour to keep edges sharp and prevent spreading. Use fresh eggs or pasteurized whites for royal icing safety. Dust rolling surface with cocoa powder instead of flour to keep cookie color rich. Let icing dry completely at room temperature, ideally overnight. If icing thickens while decorating, add a few drops of water to thin it. Store decorated cookies in a single layer separated by parchment for up to 3 days; undecorated cookies can be stored up to 5 days or frozen.
Nutrition
- Serving Size: 1 cookie
- Calories: 150
- Fat: 8
- Carbohydrates: 20
- Protein: 2
Keywords: chocolate cookies, diploma cookies, royal icing, graduation cookies, easy chocolate cookies, decorated cookies, party cookies


