Perfect Chocolate Diploma Cookies Recipe Easy Elegant Royal Icing Tutorial
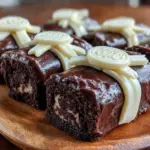
These chocolate diploma cookies feature a rich, fudgy chocolate base paired with smooth royal icing, perfect for graduation celebrations or any festive occasion. The recipe is quick, easy, and uses simple pantry staples.
- Prep Time: 37 minutes
- Cook Time: 12 minutes
- Total Time: 1 hour 49 minutes
- Yield: 24 cookies 1x
- Category: Dessert
- Cuisine: American
Ingredients
- 1 cup (130g) all-purpose flour (use gluten-free flour blend for GF option)
- ½ cup (45g) unsweetened cocoa powder
- ½ teaspoon baking powder
- ¼ teaspoon salt
- ¾ cup (170g) unsalted butter, softened (or dairy-free butter alternative)
- 1 cup (200g) granulated sugar
- 1 large egg, room temperature
- 1 teaspoon pure vanilla extract
- 3 cups (360g) powdered sugar, sifted
- 2 large egg whites or 5 tablespoons aquafaba (for vegan option)
- 1 teaspoon lemon juice
- Food coloring (optional)
Instructions
- Prepare the Cookie Dough (15 minutes): In a medium bowl, whisk together the all-purpose flour, cocoa powder, baking powder, and salt. Set aside. In a large bowl, cream the softened butter and granulated sugar using an electric mixer on medium speed until light and fluffy (about 3-4 minutes). Beat in the egg and vanilla extract until combined.
- Combine Dry & Wet Ingredients (2 minutes): Gradually add the dry ingredients to the wet mixture, mixing on low speed just until incorporated. Be careful not to overmix—you want the dough uniform but tender.
- Chill the Dough (at least 1 hour): Shape the dough into a flat disc, wrap tightly in plastic wrap, and refrigerate. This step is crucial for sharp cookie edges and prevents spreading during baking.
- Roll & Cut the Cookies (20 minutes): Preheat the oven to 350°F (175°C). On a lightly floured surface, roll the dough to about ¼-inch (6mm) thickness. Use the diploma-shaped cookie cutter or a knife to cut rectangular shapes approximately 3 inches (7.5cm) long and 1.5 inches (4cm) wide. For the scroll effect, gently roll the top and bottom edges inward with your fingers. Place the cookies on parchment-lined baking sheets, spacing about 1 inch (2.5cm) apart.
- Bake the Cookies (10-12 minutes): Bake in the preheated oven until the edges look set and the centers are just firm—avoid overbaking to keep them tender. They’ll feel slightly soft but will firm up as they cool. Remove from oven and transfer to a cooling rack.
- Prepare the Royal Icing (10 minutes): While cookies cool, combine sifted powdered sugar with egg whites (or aquafaba) and lemon juice in a clean bowl. Beat on medium-high speed until the icing holds stiff peaks but is still pipeable (about 5-7 minutes). The texture should be glossy and smooth.
- Decorate the Cookies (30 minutes+ drying): Fill piping bags with royal icing. Pipe a neat border along each cookie’s edge, then flood the center with a thinner layer of icing for a smooth “paper” look. Use a smaller tip to add diploma details like lines or little bows. Let the icing dry completely at room temperature, ideally overnight, to avoid smudging.
Notes
Chill dough for at least 1 hour to keep edges sharp and prevent spreading. Use fresh eggs or pasteurized whites for royal icing safety. Dust rolling surface with cocoa powder instead of flour to keep cookie color rich. Let icing dry completely at room temperature, ideally overnight. If icing thickens while decorating, add a few drops of water to thin it. Store decorated cookies in a single layer separated by parchment for up to 3 days; undecorated cookies can be stored up to 5 days or frozen.
Nutrition
- Serving Size: 1 cookie
- Calories: 150
- Fat: 8
- Carbohydrates: 20
- Protein: 2
Keywords: chocolate cookies, diploma cookies, royal icing, graduation cookies, easy chocolate cookies, decorated cookies, party cookies