
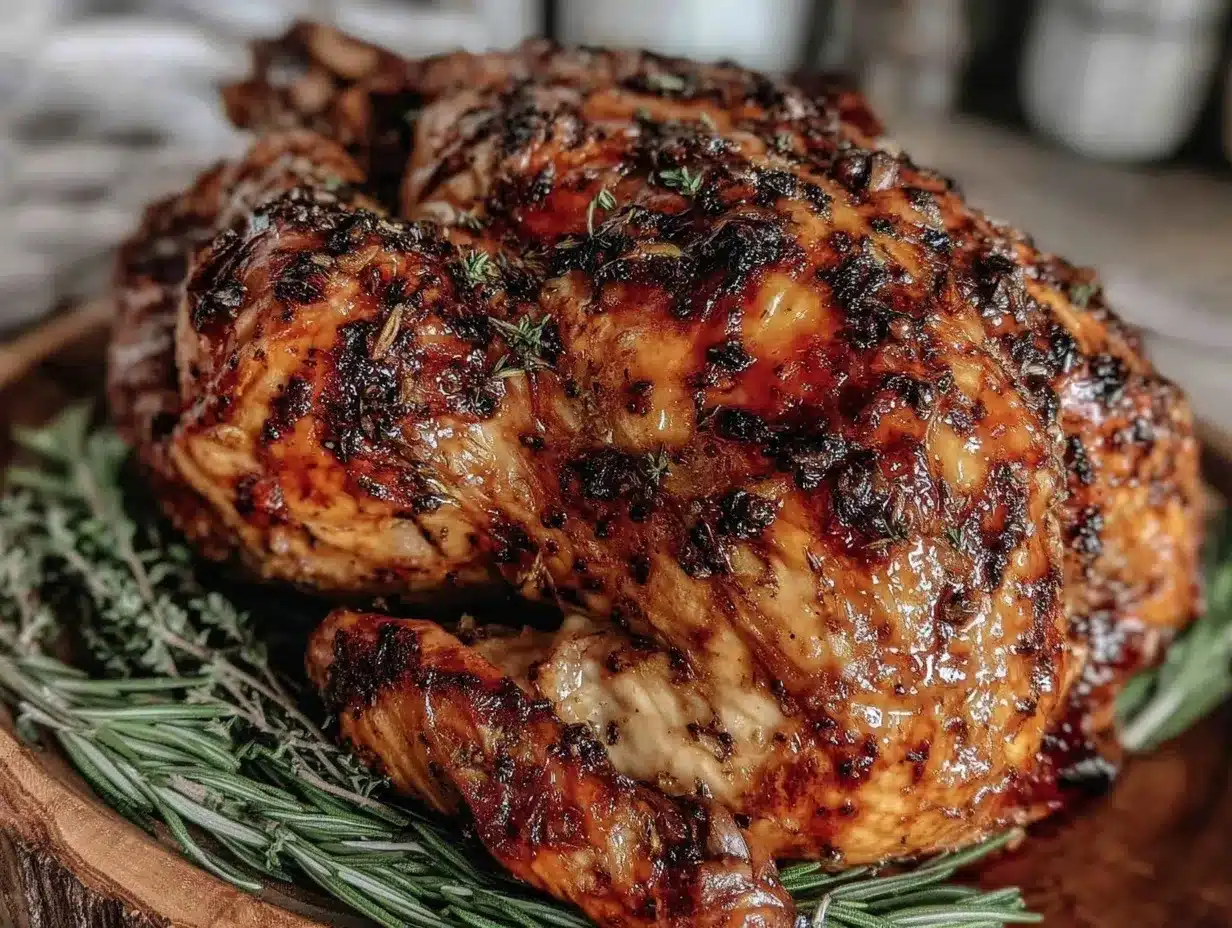
Let me tell you, there’s something about the aroma of a perfectly roasted turkey filling the kitchen that just stops you in your tracks. The crisp, golden skin crackling under the knife, the tender, juicy meat promising pure comfort — honestly, it’s pure magic. The first time I roasted this classic turkey recipe, I was instantly hooked. I remember that moment so vividly: the kind where you pause, take a deep breath, and just smile because you know you’re onto something truly special.
Years ago, when I was knee-high to a grasshopper, my grandma used to make her turkey with a secret blend of herbs and a careful roasting technique that made every holiday meal feel like a warm hug. I tried to recreate that feeling on a rainy weekend, and this recipe was born. I wish I’d discovered it years ago because it’s dangerously easy and honestly, delivers that juicy, flavorful bird every single time. My family couldn’t stop sneaking slices off the platter (and I can’t really blame them!).
You know what? This Perfect Classic Roast Turkey is just what you need for your next holiday feast—whether it’s Thanksgiving, Christmas, or any cozy gathering. It brightens up the table, makes your kitchen smell amazing, and satisfies even the pickiest eaters. After testing this recipe multiple times (in the name of research, of course), it’s become a staple for family gatherings and gifting season alike. Trust me, you’re going to want to bookmark this one.
Why You’ll Love This Recipe
This Perfect Classic Roast Turkey recipe isn’t just another roast bird — it’s the result of lots of trial, error, and love. Here’s why it stands out:
- Quick & Easy: Comes together in about 30 minutes of prep, then you just let it roast—perfect for busy holiday prep days.
- Simple Ingredients: No fancy or hard-to-find items here, just pantry staples and fresh herbs that pack big flavor.
- Perfect for Holiday Feasts: Whether it’s Thanksgiving, Christmas, or any chilly day, this turkey steals the show.
- Crowd-Pleaser: Kids and adults alike rave about the tender meat and crispy skin — it’s a universal winner.
- Unbelievably Juicy: Thanks to a classic brining step and slow roasting, this bird stays moist and flavorful all the way through.
What makes this turkey different? Honestly, it’s the balance of seasoning and the roasting approach. I use a simple herb butter rub that seeps under the skin, creating a flavor explosion you don’t get with store-bought birds. Plus, the slow, steady oven temperature means no dry edges or chewy bites. You’ll close your eyes after the first forkful, I promise. This recipe turns a classic comfort dish into something you’ll want to serve again and again.
What Ingredients You Will Need
This Perfect Classic Roast Turkey recipe uses simple, wholesome ingredients to deliver bold flavor and that satisfying, juicy texture without any fuss. Most of these are pantry staples or fresh items you can easily find at your grocery store.
- Whole turkey (12-14 pounds / 5.4-6.4 kg): Thawed completely for even cooking.
- Kosher salt (for brining): Helps tenderize and season the meat throughout.
- Water (for brine): The base of your brine solution.
- Brown sugar: Balances the saltiness in the brine and adds a subtle sweetness.
- Fresh herbs: Rosemary, thyme, and sage (about 2-3 sprigs each) — these add that classic holiday aroma.
- Unsalted butter (1 cup / 225 g, softened): This is your secret weapon for moistness and flavor; I recommend a high-quality butter like Plugrá.
- Garlic (4 cloves, minced): Adds a lovely depth to the herb butter rub.
- Black pepper (freshly ground): For seasoning the bird.
- Onion (1 large, quartered): Placed inside the cavity to keep things moist and fragrant.
- Carrots and celery (optional, for roasting pan): Creates a natural roasting rack and adds flavor to drippings.
- Olive oil (2 tbsp): To lightly coat the skin before roasting for extra crispiness.
Substitution tips: You can swap the fresh herbs for dried if needed (use about 1 tbsp mixed herbs). If you’re dairy-free, try vegan butter or coconut oil in place of butter. For a gluten-free twist, make sure your broth or any added seasoning is certified gluten-free.
Equipment Needed
- Large roasting pan with rack: Essential for even roasting and catching drippings. If you don’t have a rack, you can improvise with sturdy vegetables like carrots and celery.
- Meat thermometer: A must-have to check doneness without slicing into the bird (I use a digital instant-read thermometer for accuracy).
- Large bowl or container: For brining the turkey. Make sure it’s big enough to fully submerge the bird.
- Basting brush or spoon: To apply the herb butter under the skin.
- Kitchen twine: Helpful for trussing the legs, though optional if you prefer.
- Sharp carving knife: For serving—trust me, it makes all the difference.
Budget tip: If you don’t want to invest in a roasting rack, you can use a rimmed baking sheet lined with foil and sturdy veggies as a makeshift rack. And if you don’t have a thermometer, just check for clear juices and that tender texture, but do get one—it’s a game changer.
Preparation Method
- Brine the turkey (12-24 hours): In a large container, dissolve 1 cup kosher salt and ½ cup brown sugar in 2 gallons (7.6 liters) cold water. Submerge the thawed turkey completely. Refrigerate for 12 to 24 hours. This step is key for juicy, flavorful meat.
- Prep the bird: Remove the turkey from the brine, rinse under cold water to wash off excess salt, and pat dry thoroughly with paper towels. This helps get crispy skin.
- Make the herb butter: In a bowl, combine softened 1 cup unsalted butter, minced 4 garlic cloves, chopped 2 tbsp fresh rosemary, 2 tbsp thyme, 1 tbsp sage, and freshly ground black pepper to taste. Mix well until fragrant.
- Loosen the skin: Gently separate the skin from the turkey breast with your fingers, creating pockets on both sides. Spread half the herb butter mixture under the skin, directly onto the meat, for maximum flavor and moisture.
- Rub the outside: Spread the remaining herb butter all over the turkey’s skin. Drizzle 2 tbsp olive oil evenly on the skin to help it crisp up.
- Stuff the cavity: Place the quartered onion and a few sprigs of herbs inside the turkey cavity. You can also add garlic cloves if you like.
- Truss the legs (optional): Tie the legs together with kitchen twine to ensure even cooking and a neat presentation.
- Preheat oven to 325°F (165°C): This low-and-slow method helps keep the turkey juicy.
- Prepare the roasting pan: Place chopped carrots and celery in the bottom of the pan to create a natural rack and add flavor to the drippings.
- Roast the turkey: Place the turkey breast side up on the rack or veggies. Roast uncovered, basting every 45 minutes with pan juices if you like (though it’s not absolutely necessary). Cooking time is about 13-15 minutes per pound, so for a 12-pound bird, expect roughly 2.5 to 3 hours.
- Check temperature: Use a meat thermometer inserted into the thickest part of the thigh without touching bone. The turkey is done when it reaches 165°F (74°C). If the skin browns too fast, tent loosely with foil.
- Rest the turkey: Remove from the oven and cover loosely with foil. Let it rest for at least 20-30 minutes before carving—this locks in those juices.
Pro tip: If you want extra-crispy skin, increase the oven temp to 425°F (220°C) for the last 20 minutes of roasting, keeping a close eye so it doesn’t burn. Also, rinsing the turkey after brining is crucial to avoid overly salty meat.
Cooking Tips & Techniques
Let’s be honest, roasting a turkey can feel intimidating, but these tips will make it feel like second nature.
- Don’t skip the brine: I’ve tried roasting without it, and the difference is night and day. The brine keeps the meat juicy and adds subtle seasoning all the way through.
- Pat dry thoroughly: Moisture on the skin means soggy skin. I always double-check with paper towels before buttering the bird.
- Loosen the skin carefully: Use your fingers gently so you don’t tear the skin—it creates little pockets that hold the herb butter and keep the breast meat juicy.
- Use a digital meat thermometer: Guesswork leads to dry turkey or undercooked meat. The thermometer takes the stress out and guarantees perfect doneness every time.
- Rest before carving: This step is non-negotiable. The juices redistribute, making each slice tender and flavorful.
- Basting isn’t mandatory: I used to obsess over basting every 20 minutes, but it’s really optional. If you baste too much, you open the oven door too often, which drops the temperature.
Honestly, the key to a juicy turkey is patience and attention to detail, not complicated steps. I’ve learned that rushing or skipping the brine almost always leads to disappointment.
Variations & Adaptations
This Perfect Classic Roast Turkey can easily be adapted to suit different tastes and dietary needs.
- Herb variations: Swap rosemary and thyme for tarragon and parsley for a fresh twist. I once added a bit of smoked paprika to the herb butter for a subtle smoky flavor that was a hit.
- Gluten-free option: This recipe is naturally gluten-free, but just double-check any broth or seasoning blends you use to avoid hidden gluten.
- Cooking method: If you’re short on oven space, try spatchcocking the turkey (removing the backbone and flattening it) — it roasts faster and more evenly. Just adjust cooking time accordingly.
- Dietary swaps: Use dairy-free margarine or coconut oil instead of butter for a dairy-free version.
- Make it spicy: Add crushed red pepper flakes to the herb butter for a gentle heat that wakes up the palate.
One time, I tried adding citrus zest (orange and lemon) to the herb butter, which added a lovely brightness — highly recommend if you want to mix things up!
Serving & Storage Suggestions
Serve your Perfect Classic Roast Turkey warm, right after resting, for the best texture and flavor. Carve it on a large platter garnished with fresh herbs and some roasted vegetables for a beautiful presentation.
This turkey pairs wonderfully with traditional sides like mashed potatoes, cranberry sauce, and green bean casserole. For drinks, a crisp white wine or a light, fruity cider complements the rich flavors.
Leftovers? Store any extra turkey in airtight containers in the refrigerator for up to 4 days. You can also freeze portions for up to 3 months — just make sure to wrap tightly to prevent freezer burn.
To reheat, gently warm slices in a covered dish with a splash of broth at 325°F (165°C) until heated through, or use the microwave on low power to avoid drying it out. Flavors often deepen after a day or two in the fridge, making leftovers even tastier.
Nutritional Information & Benefits
This classic roast turkey is a lean protein powerhouse, providing about 160 calories and 30 grams of protein per 3-ounce (85 g) serving. It’s naturally low in fat, especially if you remove the skin, making it a great choice for balanced meals.
Turkey is rich in B vitamins, selenium, and zinc, which support energy metabolism and immune health — perfect for staying strong during the busy holiday season. Using fresh herbs adds antioxidants and flavor without extra calories.
This recipe can be easily adapted for gluten-free and dairy-free diets, making it accessible for many. Just be mindful of potential allergens in additional seasoning or sides.
Conclusion
So there you have it — your go-to recipe for the Perfect Classic Roast Turkey that’s juicy, flavorful, and honestly not as complicated as it seems. Customize it with your favorite herbs or cooking style, and make it your own. I love this recipe because it brings my family together, fills the house with cozy scents, and gives that satisfying feeling of a well-earned feast.
Give it a try this holiday season, and please let me know how it turns out! Share your tweaks, your successes, or even those funny kitchen mishaps (because, hey, they happen). Happy roasting!
FAQs
How long should I brine my turkey?
Brining for 12 to 24 hours is ideal. Less than 12 hours won’t season as well, and over 24 hours can make the meat too salty.
Can I roast a frozen turkey?
It’s best to fully thaw your turkey before roasting to ensure even cooking. Thawing in the fridge can take several days depending on size.
What if I don’t have fresh herbs?
Dried herbs work fine; just use about one-third the amount of fresh. Mix them into the butter as usual.
How do I know when the turkey is done?
Use a meat thermometer; the thickest part of the thigh should reach 165°F (74°C). This ensures it’s safe and juicy.
Can I prepare the turkey the day before?
Yes! You can brine and butter the turkey the day before, then keep it refrigerated until roasting. Just bring it to room temperature before putting it in the oven.
Pin This Recipe!

Perfect Classic Roast Turkey Recipe for a Juicy Holiday Feast Made Easy
A simple and foolproof recipe for a juicy, flavorful roast turkey perfect for holiday feasts. Features a classic herb butter rub and slow roasting for tender meat and crispy skin.
- Prep Time: 30 minutes
- Cook Time: 2.5 to 3 hours
- Total Time: 3 to 3.5 hours plus 12-24 hours brining
- Yield: 12-14 servings 1x
- Category: Main Course
- Cuisine: American
Ingredients
- Whole turkey (12-14 pounds / 5.4-6.4 kg), thawed completely
- 1 cup kosher salt (for brining)
- 2 gallons (7.6 liters) cold water (for brine)
- ½ cup brown sugar (for brining)
- Fresh herbs: rosemary, thyme, and sage (2-3 sprigs each)
- 1 cup (225 g) unsalted butter, softened
- 4 cloves garlic, minced
- Freshly ground black pepper, to taste
- 1 large onion, quartered
- Carrots and celery (optional, for roasting pan)
- 2 tablespoons olive oil
Instructions
- Brine the turkey: In a large container, dissolve 1 cup kosher salt and ½ cup brown sugar in 2 gallons cold water. Submerge the thawed turkey completely. Refrigerate for 12 to 24 hours.
- Remove the turkey from the brine, rinse under cold water, and pat dry thoroughly with paper towels.
- Make the herb butter: Combine softened butter, minced garlic, chopped rosemary, thyme, sage, and freshly ground black pepper in a bowl. Mix well.
- Loosen the skin gently from the turkey breast and spread half the herb butter under the skin onto the meat.
- Rub the remaining herb butter all over the turkey skin. Drizzle olive oil evenly on the skin.
- Stuff the cavity with quartered onion and a few sprigs of herbs. Optionally add garlic cloves.
- Truss the legs with kitchen twine if desired.
- Preheat oven to 325°F (165°C).
- Place chopped carrots and celery in the bottom of a roasting pan to create a natural rack and add flavor.
- Place the turkey breast side up on the rack or vegetables. Roast uncovered, basting every 45 minutes if desired. Roast about 13-15 minutes per pound (approximately 2.5 to 3 hours for a 12-pound bird).
- Check doneness with a meat thermometer inserted into the thickest part of the thigh; turkey is done at 165°F (74°C). Tent with foil if skin browns too fast.
- Remove turkey from oven and cover loosely with foil. Let rest for 20-30 minutes before carving.
Notes
Brining is essential for juicy meat. Pat turkey dry thoroughly before applying butter for crispy skin. Use a digital meat thermometer for perfect doneness. Rest turkey before carving to lock in juices. Basting is optional and can lower oven temperature if done too often. For extra crispy skin, increase oven temperature to 425°F (220°C) for last 20 minutes.
Nutrition
- Serving Size: 3 ounces (85 grams)
- Calories: 160
- Protein: 30
Keywords: roast turkey, holiday turkey, Thanksgiving turkey, Christmas turkey, classic turkey recipe, juicy turkey, herb butter turkey, easy turkey recipe


