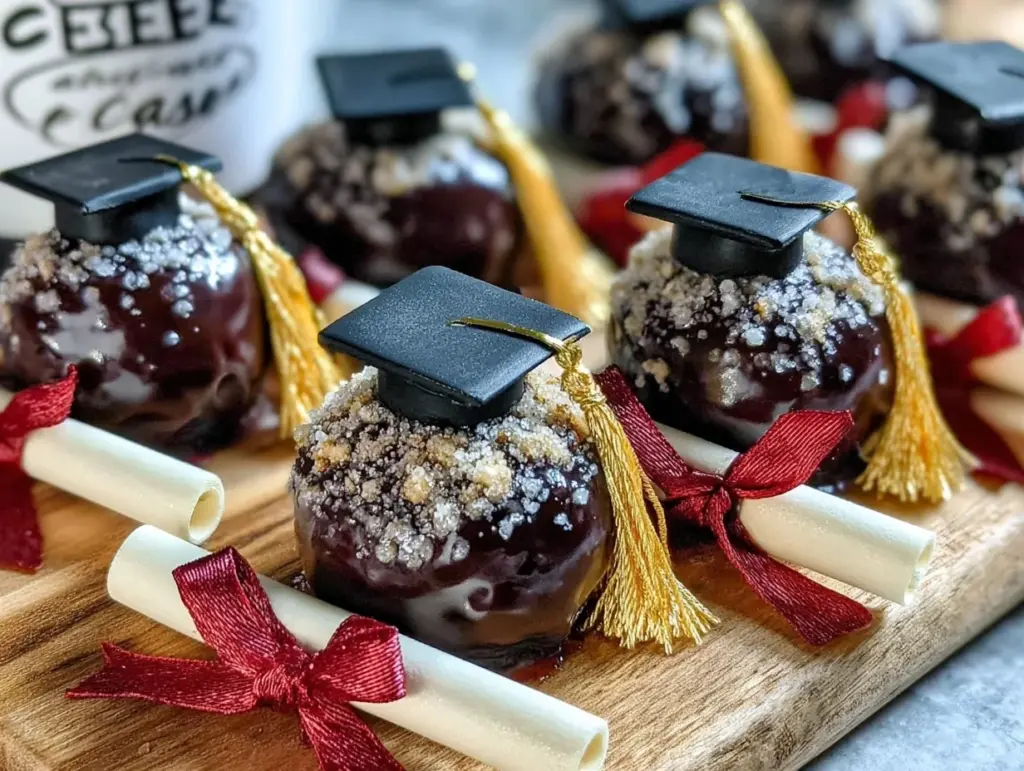
Let me tell you, the sight of those perfectly shaped graduation cap cake pops lined up on a platter is enough to make any celebration extra special. The glossy black “cap,” the delicate little diploma detail tied with a tiny ribbon—it’s like holding a bite-sized celebration in your hand. The first time I made these stunning graduation cap cake pops, I was instantly hooked. Honestly, the kind of moment where you pause, take a deep breath, and just smile because you know you’re onto something truly special. It felt like capturing the proud spirit of graduation in a sweet, fun treat.
When I was knee-high to a grasshopper, my grandma used to bake cookies for every occasion, but cake pops? They weren’t even on my radar until a rainy weekend years ago when I tried to recreate a fancy bakery treat. Now, this recipe has become a staple for family gatherings, gifting, and, of course, graduation parties. My family couldn’t stop sneaking them off the cooling rack (and I can’t really blame them!). You know what’s great? These graduation cap cake pops are dangerously easy to make but look utterly elegant—pure, nostalgic comfort meets fancy party vibes.
Perfect for potlucks, proud grad celebrations, or a sweet treat for your Pinterest cookie board, these cake pops bring a little magic and a lot of smiles. I’ve tested this recipe multiple times in the name of research, of course, and trust me, you’re going to want to bookmark this one.
Why You’ll Love This Recipe
After making graduation cap cake pops a handful of times, I can honestly say this recipe hits all the right notes. Here’s why it stands out:
- Quick & Easy: Comes together in under 2 hours, perfect for last-minute party prep or weekend baking.
- Simple Ingredients: No fancy shopping trips here—most of these ingredients are pantry staples or easy to find.
- Perfect for Celebrations: Whether it’s a graduation party, a school send-off, or a congratulatory gift, these cake pops shine.
- Crowd-Pleaser: Kids and adults alike always rave about these, and you’ll find them disappearing fast!
- Unbelievably Delicious: The moist cake center pairs perfectly with the smooth chocolate coating, delivering that perfect bite every time.
This recipe isn’t just another cake pop tutorial—it’s the best graduation cap cake pops recipe you’ll find. The secret? A perfectly balanced cake texture, the right chocolate coating thickness for that glossy finish, and the elegant diploma detail that adds a wow factor. It’s comfort food with class, the kind that makes you close your eyes after the first bite and savor the moment. If you want to impress guests without stress or turn a simple dessert into a memorable highlight, this is the recipe for you.
What Ingredients You Will Need
This recipe uses simple, wholesome ingredients to deliver bold flavor and satisfying texture without the fuss. Most of these you likely already have on hand, and a few specialty touches make all the difference.
- For the Cake Pops:
- 1 box of chocolate cake mix (or your favorite homemade recipe)
- 1 cup (240 ml) water
- 1/2 cup (120 ml) vegetable oil
- 3 large eggs, room temperature
- 1 teaspoon vanilla extract
- For the Frosting:
- 1/2 cup (115 g) unsalted butter, softened (I prefer Kerrygold for creaminess)
- 1 1/2 cups (180 g) powdered sugar, sifted
- 2 tablespoons (30 ml) heavy cream or milk
- 1 teaspoon vanilla extract
- For Decorating:
- 12 oz (340 g) black candy melts or black chocolate coating (Wilton brand works great)
- 12 oz (340 g) white candy melts (for the diploma detail)
- Edible gold or silver food paint or edible markers for diploma accents
- Thin black licorice strings or black fondant strips (to create tassels)
- Small white fondant pieces or white royal icing (to make diploma scrolls)
- Wooden or paper lollipop sticks
If you want to switch things up, you can use gluten-free cake mix or dairy-free frosting alternatives easily, and almond bark instead of candy melts if you prefer. When choosing candy melts, pick good quality for that smooth, glossy finish. In summer, try a touch of edible shimmer on top to give your cake pops an extra festive glow.
Equipment Needed
- Mixing bowls – one large for cake batter, another medium for frosting
- Electric mixer or stand mixer (handheld mixer works too)
- Baking pan (9×13 inch / 23×33 cm recommended)
- Cooling rack
- Large spoon or cookie scoop to portion cake crumbs
- Microwave-safe bowls for melting candy melts
- Styrofoam block or cake pop stand to hold pops while drying
- Small paintbrush for edible paint or fine decorating
- Sharp knife or fondant tools for shaping diploma details
If you don’t have a cake pop stand, a block of styrofoam or even a shallow bowl filled with rice works well to keep your pops upright. I’ve tried everything from chopsticks to floral foam, but the styrofoam block is my go-to. For melting candy melts, a double boiler method is gentler if you’re worried about scorching. And hey, if you’re on a budget, many of these tools are multipurpose and easy to find secondhand or in basic kitchen sets.
Preparation Method
- Bake the Cake: Preheat your oven to 350°F (175°C). Prepare the cake mix according to package instructions or your homemade recipe—usually mixing water, oil, eggs, and vanilla with the dry mix. Pour batter into a greased 9×13 inch (23×33 cm) pan and bake for 30-35 minutes or until a toothpick inserted in the center comes out clean. Let the cake cool completely on a wire rack (about 1 hour).
- Crumble the Cake: Once cooled, crumble the cake finely into a large mixing bowl. You want no big chunks, just a soft crumb texture that’s easy to mix with frosting.
- Mix the Frosting: Beat the softened butter until creamy. Gradually add powdered sugar, alternating with cream and vanilla extract. Mix until smooth and fluffy. If the frosting is too thick, add a splash more cream; if too thin, add a bit more powdered sugar.
- Combine Cake and Frosting: Add frosting to cake crumbs a little at a time, mixing gently until the mixture holds together when pressed but isn’t too sticky (think cookie dough consistency). This usually takes about 3/4 cup (180 ml) of frosting but adjust as needed.
- Shape Cake Pops: Scoop about 1 1/2 tablespoons (20 g) of the mixture and roll into tight, smooth balls. Place on parchment-lined baking sheet. Chill in the fridge for at least 1 hour or freezer for 15 minutes to firm up.
- Prepare Candy Melts: Melt black candy melts in microwave-safe bowl in 30-second intervals, stirring until smooth. Repeat with white candy melts separately.
- Insert Sticks: Dip one end of each lollipop stick about 1 inch (2.5 cm) into melted black candy, then insert into the center of each cake ball. This “glues” the stick in place. Chill again for 30 minutes.
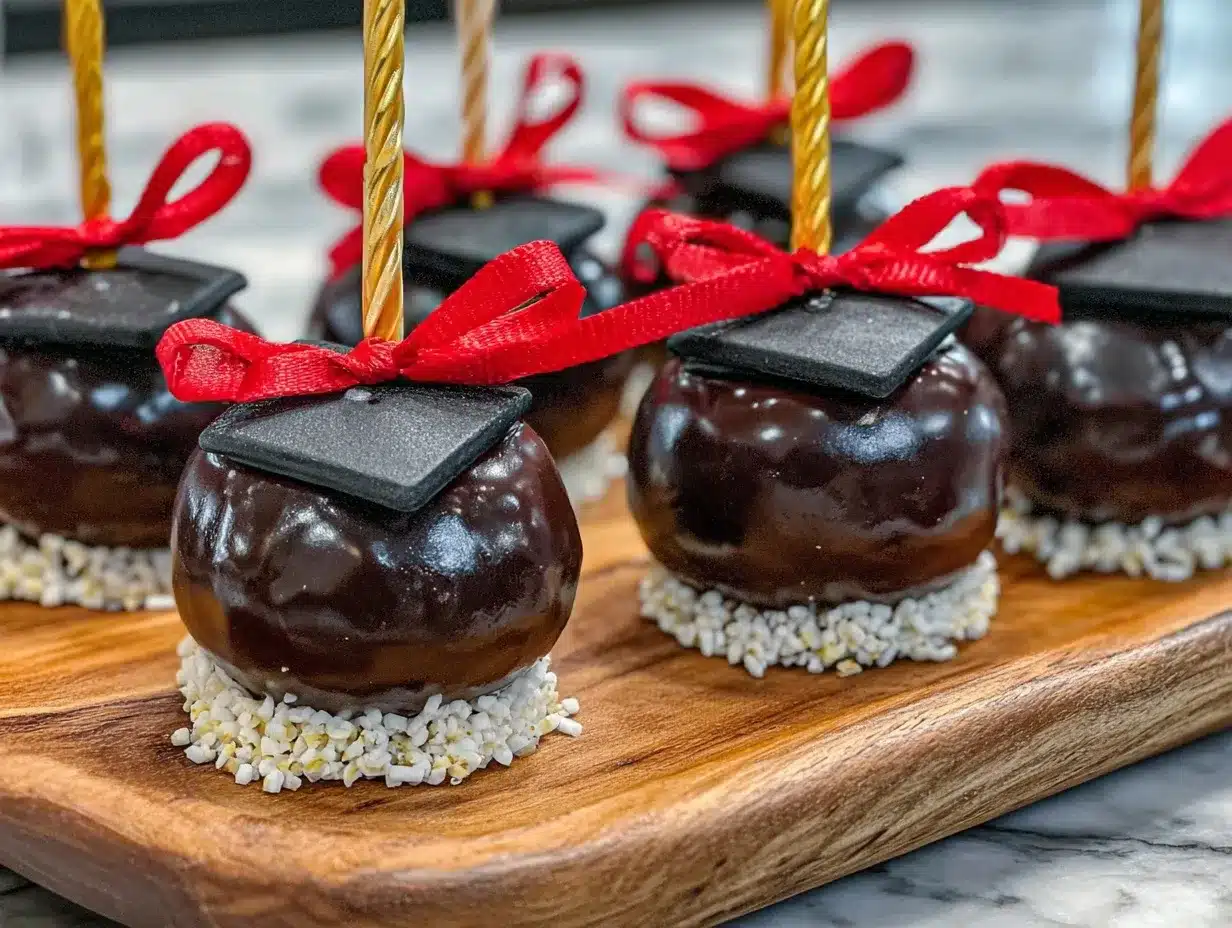
- Coat Cake Pops: Dip each cake pop into melted black candy melts, covering completely. Gently tap off excess and rotate to smooth the coating. Place stick upright in styrofoam block to dry completely (about 30 minutes).
- Create The Graduation Cap: Use black fondant or candy melts to form a flat square “mortarboard” on top of each cake pop. You can press a small square piece gently onto the top while the coating is still tacky or attach with a dab of melted candy.
- Make The Diploma: Roll small strips of white fondant or pipe white royal icing into tiny scroll shapes. Tie with a thin edible ribbon or paint on a small band with edible gold paint. Attach next to the cap with a tiny dab of melted candy.
- Add Tassels and Details: Use thin black licorice or fondant to create tassels hanging off the cap. Add final touches with edible markers or paint to highlight diploma edges and cap details.
- Let Dry Completely: Allow all decorations to set and harden fully before serving or packaging (about 1 hour).
If your coating starts to harden too quickly during dipping, warm it gently to keep smooth. And don’t rush the chilling steps—they make your pops easier to handle and prevent cracking. When rolling cake balls, keep your hands cool and lightly dusted with powdered sugar to prevent sticking.
Cooking Tips & Techniques
Making graduation cap cake pops can feel like an art, but a few tricks make the process way smoother. First, chilling is your best friend. Chilling the cake balls firms them up so they don’t fall apart when you dip. I learned this the hard way after a few crumbled disasters!
When melting candy melts, use low heat and stir often to avoid burning. If they get too thick, add a tiny splash of vegetable oil to loosen the texture. For smooth dipping, a deep, narrow container works better than a shallow bowl, allowing you to dip the pop fully without swirling.
Creating the diploma detail might seem fiddly, but using fondant or royal icing lets you shape it ahead of time. Edible paint adds that elegant touch, but if you don’t have it, a fine-tipped food-safe marker works too. The key is patience—let each layer set before adding the next.
Finally, take your time with assembly. Rushing can cause decorations to slip or crack. Multitasking by preparing all cake balls first, then melting coatings, and decorating in stages keeps things organized. You’ll find with a little practice, these cake pops come together wonderfully and consistently.
Variations & Adaptations
Want to switch things up? Here are a few fun ways to adapt this graduation cap cake pops recipe:
- Flavor Variations: Swap the chocolate cake for vanilla, red velvet, or even lemon for a fresh twist. You can tint the candy melts to match school colors instead of classic black.
- Dietary Adjustments: Use gluten-free cake mix and dairy-free frosting to make these cake pops allergy-friendly. Coconut or almond milk works well in frosting substitutes.
- Decorating Styles: Instead of fondant diplomas, pipe delicate scrolls with royal icing or use mini edible paper scrolls available online. For tassels, try colored edible glitter or sprinkles for extra sparkle.
Personally, I once tried a salted caramel cake pop with dark chocolate coating and golden tassels for a friend’s graduation. It was a hit and showed just how versatile this recipe can be. Don’t hesitate to get creative and tailor these cake pops to your grad’s personality and school spirit.
Serving & Storage Suggestions
Graduation cap cake pops are best served at room temperature, allowing the chocolate coating to be perfectly crisp and the cake center moist. Arrange them on a platter or in a decorative box for gifting. They pair beautifully with a light tea, coffee, or sparkling cider for celebrations.
To store, keep the cake pops in an airtight container at room temperature for up to 3 days. For longer storage, refrigerate them in a sealed container for up to a week. When refrigerated, allow them to come to room temperature before serving to avoid condensation on the coating.
These cake pops also freeze well. Wrap individually in plastic wrap and place in a freezer-safe container. Thaw overnight in the fridge and then bring to room temperature before serving. Flavors tend to deepen after a day, so making them ahead can actually boost their deliciousness.
Nutritional Information & Benefits
Each graduation cap cake pop provides a sweet treat with approximately 160-180 calories, depending on size and ingredients used. The cake base supplies carbohydrates and a small amount of protein from eggs, while the candy coating adds sugar and fat.
Using quality unsalted butter and real vanilla extract adds subtle richness without artificial ingredients. For those mindful of allergens, this recipe can be made gluten-free and dairy-free with simple swaps. Though a celebratory dessert, these cake pops offer a portion-controlled way to indulge without going overboard.
Plus, making them at home means you control ingredients, avoiding preservatives and artificial colors common in store-bought options. It’s a festive way to treat your loved ones with a special homemade touch that tastes as good as it looks.
Conclusion
These perfect graduation cap cake pops with elegant diploma details are more than just a dessert—they’re a celebration you can hold in your hand. With simple ingredients, straightforward steps, and a little patience, you’ll create a show-stopping treat that’s sure to impress at any grad party. Customize the colors and flavors to suit your graduate’s style, and watch these pops disappear fast.
I love this recipe because it combines nostalgia with creativity, making each bite feel like a proud moment. So go ahead, give it a try, and let me know how your cake pops turn out! Don’t forget to share your photos and any fun twists you put on the recipe—I’d love to hear all about it.
Here’s to sweet celebrations and making memories, one cake pop at a time!
FAQs
How long do graduation cap cake pops last?
Stored in an airtight container at room temperature, they last about 3 days. Refrigerated, they can keep up to a week, but bring them back to room temp before serving for best taste.
Can I make cake pops ahead of time?
Absolutely! You can make and freeze them up to a month ahead. Just thaw overnight in the fridge and serve at room temperature.
What’s the best way to prevent cake pops from falling off the sticks?
Dipping the stick end in melted candy before inserting into the cake ball creates a glue effect that helps secure them. Also, chilling the cake balls before dipping is key.
Can I use homemade cake instead of box mix?
Yes! Homemade cake works great as long as it’s moist and crumbly. Avoid overly dense cakes for best results.
How do I make the diploma decorations look neat?
Use fondant or royal icing to shape scrolls and tie with edible ribbon or paint. Allow each piece to dry before attaching for clean, professional-looking details.
Pin This Recipe!

Perfect Graduation Cap Cake Pops
Elegant and easy-to-make graduation cap cake pops featuring a moist cake center coated in glossy black chocolate with delicate diploma details. Perfect for celebrations and gifting.
- Prep Time: 30 minutes
- Cook Time: 35 minutes
- Total Time: 2 hours
- Yield: 24 cake pops 1x
- Category: Dessert
- Cuisine: American
Ingredients
- 1 box of chocolate cake mix (or your favorite homemade recipe)
- 1 cup (240 ml) water
- 1/2 cup (120 ml) vegetable oil
- 3 large eggs, room temperature
- 1 teaspoon vanilla extract
- 1/2 cup (115 g) unsalted butter, softened
- 1 1/2 cups (180 g) powdered sugar, sifted
- 2 tablespoons (30 ml) heavy cream or milk
- 1 teaspoon vanilla extract
- 12 oz (340 g) black candy melts or black chocolate coating
- 12 oz (340 g) white candy melts
- Edible gold or silver food paint or edible markers
- Thin black licorice strings or black fondant strips
- Small white fondant pieces or white royal icing
- Wooden or paper lollipop sticks
Instructions
- Preheat oven to 350°F (175°C). Prepare cake mix according to package or homemade recipe instructions by mixing water, oil, eggs, and vanilla with dry mix. Pour batter into greased 9×13 inch pan and bake 30-35 minutes until toothpick comes out clean. Cool completely on wire rack (~1 hour).
- Crumble cooled cake finely into a large mixing bowl, avoiding big chunks.
- Beat softened butter until creamy. Gradually add powdered sugar alternating with cream and vanilla extract. Mix until smooth and fluffy. Adjust consistency with more cream or powdered sugar as needed.
- Add frosting gradually to cake crumbs, mixing gently until mixture holds together like cookie dough (about 3/4 cup frosting).
- Scoop about 1 1/2 tablespoons of mixture and roll into smooth balls. Place on parchment-lined baking sheet. Chill in fridge at least 1 hour or freezer 15 minutes to firm.
- Melt black candy melts in microwave-safe bowl in 30-second intervals, stirring until smooth. Repeat with white candy melts separately.
- Dip one end of each lollipop stick about 1 inch into melted black candy, then insert into center of each cake ball to secure. Chill 30 minutes.
- Dip each cake pop into melted black candy melts, covering completely. Tap off excess and rotate to smooth coating. Place stick upright in styrofoam block to dry (~30 minutes).
- Form flat square mortarboard caps on top of each cake pop using black fondant or candy melts. Attach while coating is tacky or with melted candy.
- Roll small strips of white fondant or pipe white royal icing into tiny scroll shapes. Tie with thin edible ribbon or paint band with edible gold paint. Attach next to cap with melted candy.
- Create tassels using thin black licorice or fondant strips hanging off the cap. Add final details with edible markers or paint.
- Allow all decorations to dry and harden fully before serving or packaging (~1 hour).
Notes
Chill cake balls before dipping to prevent crumbling. Use low heat and stir often when melting candy melts to avoid burning. Add a splash of vegetable oil to candy melts if too thick. Use a deep, narrow container for dipping cake pops. Let each decoration layer dry before adding the next. Keep hands cool and lightly dusted with powdered sugar when rolling cake balls to prevent sticking.
Nutrition
- Serving Size: 1 cake pop
- Calories: 160180
- Sugar: 18
- Sodium: 150
- Fat: 8
- Saturated Fat: 4
- Carbohydrates: 24
- Fiber: 1
- Protein: 2
Keywords: graduation cake pops, cake pops recipe, graduation party dessert, chocolate cake pops, elegant cake pops, diploma cake pops


