Let me tell you, the moment the sweet scent of vanilla and cocoa hits your kitchen while baking the perfect Minecraft cake, it’s enough to make anyone’s mouth water. The first time I baked this pixelated delight, I was instantly hooked—the kind of moment where you pause, take a deep breath, and just smile because you know you’re onto something truly special. When I was knee-high to a grasshopper, my family and I would gather around the computer, building block by block, dreaming of recreating those pixel worlds in real life. Years ago, I stumbled upon the idea to bring Minecraft’s iconic cake into the real world, combining my love for gaming with baking.
Honestly, my family couldn’t stop sneaking bites off the cooling rack (and I can’t really blame them). Let’s face it, this recipe is dangerously easy and offers pure, nostalgic comfort with a fun gamer twist. Whether you’re planning a birthday bash for your little gamers, a sweet treat for your kids, or just want to brighten up your Pinterest cookie board, this Minecraft cake recipe fits the bill perfectly. After testing it multiple times (in the name of research, of course), it’s become a staple for family gatherings, gifting, and those cozy weekend baking sessions. It feels like a warm hug from your favorite game and you’re going to want to bookmark this one.
Why You’ll Love This Recipe
From my years of baking and gaming, I can tell you that this perfect Minecraft cake recipe stands out for several reasons. It’s not just another cake—it’s a playful, delicious way to bring your favorite game to life in the kitchen. Here’s why this recipe has earned its spot in my regular rotation:
- Quick & Easy: Comes together in under 45 minutes, perfect for busy weeknights or last-minute party plans.
- Simple Ingredients: No fancy grocery trips needed; you likely already have everything in your kitchen pantry.
- Perfect for Gaming Parties: Great for birthdays, game nights, or just because you want to impress your fellow gamers.
- Crowd-Pleaser: Always gets rave reviews from kids and adults alike, thanks to its moist texture and rich flavor.
- Unbelievably Delicious: The texture and flavor combo is next-level comfort food with a fun pixelated look that makes it stand out.
What makes this recipe different? It’s all about the clever layering technique to mimic Minecraft’s blocky design, plus a perfectly balanced vanilla and cocoa flavor that feels just like the in-game cake but better—because you get to eat it! This isn’t just good—it’s the kind of cake that makes you close your eyes after the first bite. It’s comfort food reimagined for gamers—fun, nostalgic, and satisfying without the fuss. Perfect for impressing guests without stress or turning a simple meal into something memorable.
What Ingredients You Will Need
This Minecraft cake recipe uses simple, wholesome ingredients to deliver bold flavor and a satisfying texture without the fuss. Most of these are pantry staples, and you can easily swap some out if needed.
- For the Cake Base:
- 1 ¾ cups (220g) all-purpose flour (I recommend King Arthur for best texture)
- 1 cup (200g) granulated sugar
- 1/3 cup (40g) unsweetened cocoa powder (use Dutch-processed for deeper flavor)
- 1 teaspoon baking powder
- ½ teaspoon baking soda
- ½ teaspoon salt
- 2 large eggs, room temperature
- 1 cup (240ml) whole milk (or dairy-free milk if needed)
- ½ cup (120ml) vegetable oil (adds moisture)
- 2 teaspoons pure vanilla extract
- ½ cup (120ml) boiling water (makes the cake extra moist)
- For the Minecraft “Icing” and Decoration:
- 1 cup (240ml) heavy whipping cream, chilled (or coconut cream for dairy-free)
- 2 tablespoons powdered sugar
- Food coloring gels (red, green, yellow, and brown) to create pixel blocks
- Optional: edible pixel squares or colored sprinkles for decoration
If you want a gluten-free version, use a 1:1 gluten-free all-purpose flour blend. For vegan bakers, swap eggs with flax eggs (1 tablespoon ground flaxseed + 3 tablespoons water per egg) and use plant-based milk and cream. In summer, fresh berries add a lovely twist to the decoration, giving it a vibrant, natural touch.
Equipment Needed
- 9×9 inch (23×23 cm) square cake pan – perfect for that Minecraft block shape
- Mixing bowls – at least two for batter and whipped cream
- Electric mixer or stand mixer – makes whipping cream and mixing batter a breeze
- Measuring cups and spoons – for precise ingredient amounts
- Spatula – for folding and smoothing batter and icing
- Wire cooling rack – to cool the cake evenly
- Optional: piping bags and small square tips for decorating the pixel blocks
If you don’t have a stand mixer, a hand mixer works just fine. I’ve used both, and honestly, the hand mixer is just as reliable for this recipe. For budget-friendly options, silicone spatulas and inexpensive aluminum pans do the job without sacrificing quality. Just remember to grease your pan well or line it with parchment paper to prevent sticking!
Preparation Method
- Preheat the oven to 350°F (175°C). Grease and flour your 9×9 inch (23×23 cm) square cake pan or line it with parchment paper. This helps the cake release easily after baking.
- Mix dry ingredients: In a large bowl, sift together 1 ¾ cups (220g) all-purpose flour, 1 cup (200g) granulated sugar, ⅓ cup (40g) cocoa powder, 1 teaspoon baking powder, ½ teaspoon baking soda, and ½ teaspoon salt. Give it a good stir to combine evenly.
- Combine wet ingredients: In another bowl, whisk 2 large eggs, 1 cup (240ml) whole milk, ½ cup (120ml) vegetable oil, and 2 teaspoons vanilla extract until smooth and well blended.
- Mix wet and dry: Pour the wet ingredients into the dry mix, stirring gently but thoroughly. Don’t overmix; a few lumps are okay—this keeps the cake tender.
- Add boiling water: Carefully stir in ½ cup (120ml) boiling water. The batter will be thin, but that’s exactly what makes the cake moist.
- Bake: Pour the batter into your prepared pan. Bake for 30-35 minutes or until a toothpick inserted in the center comes out clean. Oven temps vary, so start checking at 30 minutes.
- Cool completely: Let the cake cool in the pan for 10 minutes, then transfer it to a wire rack to cool fully. This step’s key to getting a neat, clean cut for the pixel blocks.
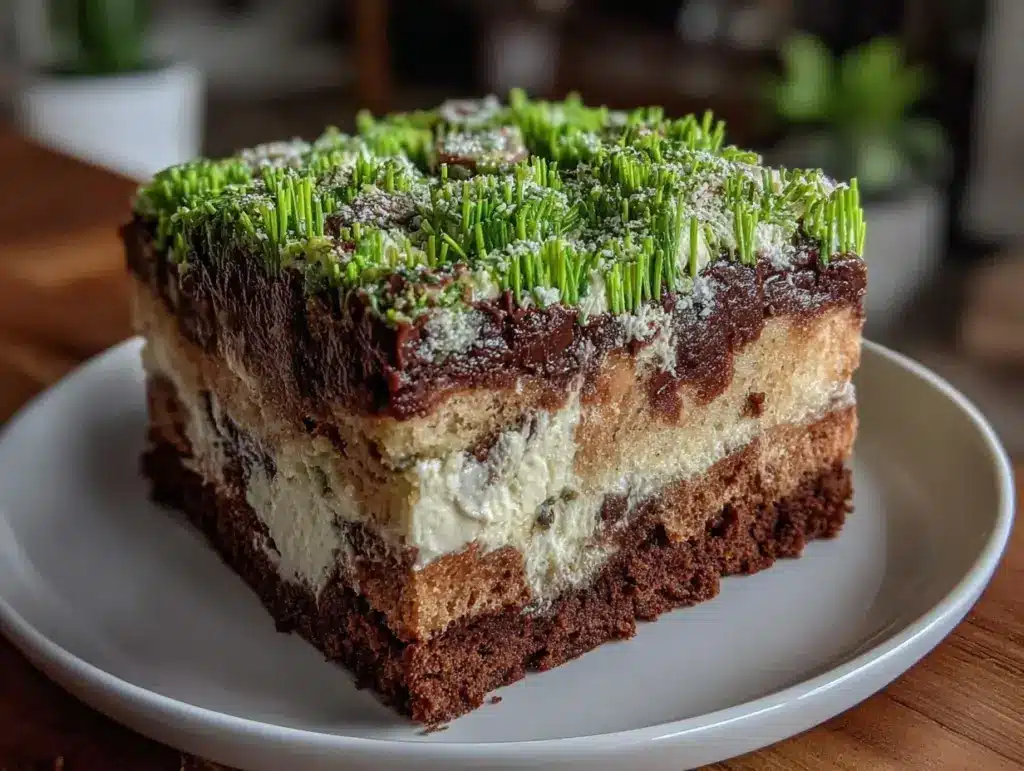
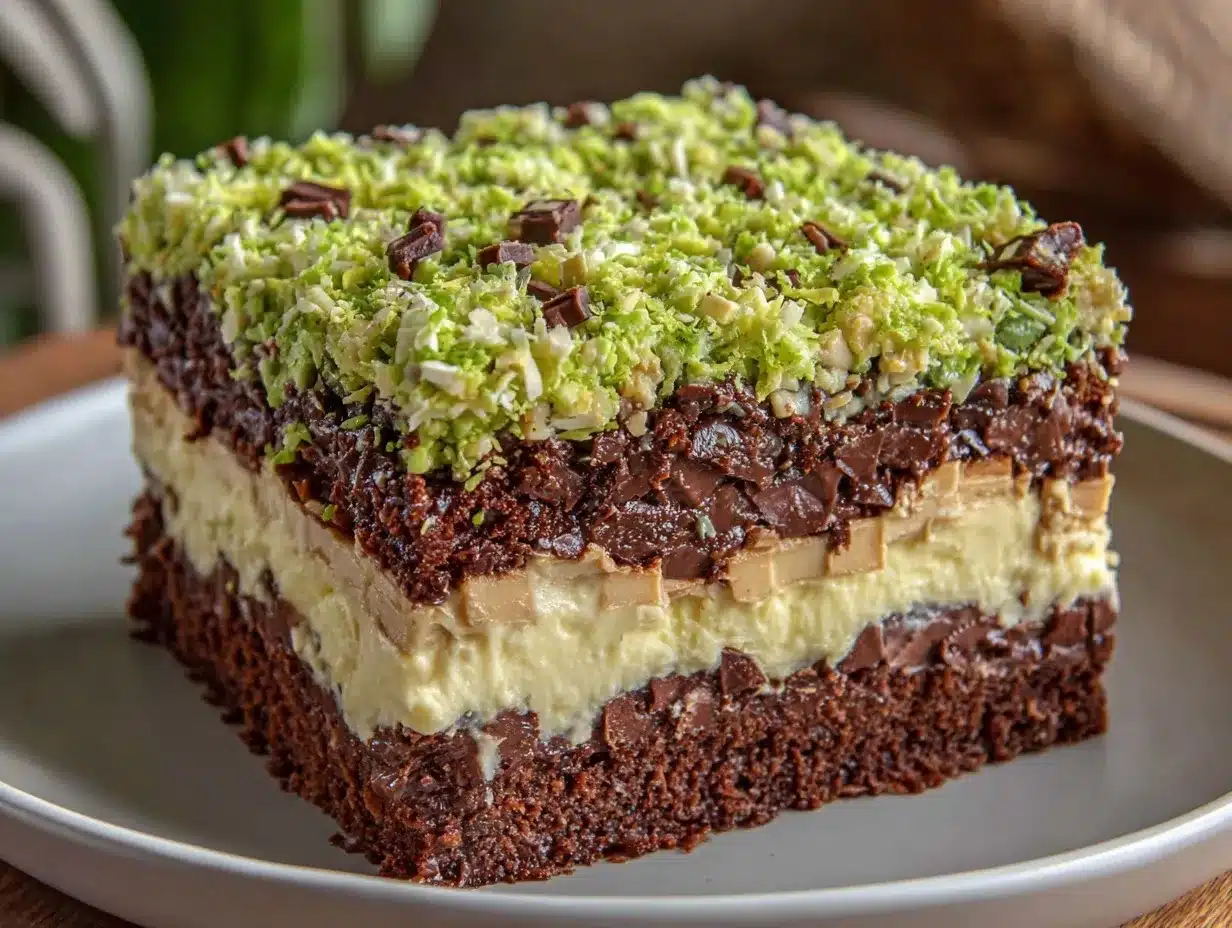
- Prepare the icing: Whip 1 cup (240ml) heavy cream with 2 tablespoons powdered sugar until soft peaks form. Divide the cream into small bowls and tint each with your food coloring gels—red, green, yellow, and brown—to mimic Minecraft pixels.
- Decorate: Once the cake is fully cooled, slice it into even squares. Use a spatula or piping bag to apply colored cream squares on top, creating a pixelated Minecraft cake pattern. Add edible pixel squares for extra fun!
If your cake feels dry, that boiling water step might have been missed or reduced—trust me, it’s the secret to moistness. Also, don’t rush cooling before decorating; warm cake causes the cream to melt and lose that perfect pixel shape. Patience here pays off!
Cooking Tips & Techniques
Making the perfect Minecraft cake is about getting both flavor and aesthetics right. Here are some lessons from my own baking battles:
- Measure ingredients accurately: Baking’s a science, so spoon and level your flour instead of scooping to avoid dense cake.
- Don’t skip the boiling water: It’s what makes the cake moist and tender, mimicking that melt-in-your-mouth Minecraft cake texture.
- Use gel food coloring: They give vibrant colors without watering down your cream icing.
- Chill your bowl and beaters: For whipped cream, cold tools help you reach stiff peaks faster—saving time and effort.
- Keep your decorating simple: Small square piping tips or even a small offset spatula work wonders for pixel shapes.
- Watch your oven: Every oven bakes differently, so keep an eye starting at 30 minutes to avoid drying out your cake.
One time, I accidentally swapped baking powder for baking soda—trust me, the cake spread out like a pancake. Lesson learned! Also, multitasking by prepping your icing while the cake bakes saves time and keeps momentum flowing. Consistency comes with practice, so don’t fret if your first try isn’t pixel-perfect. I promise it tastes amazing no matter what.
Variations & Adaptations
Want to switch things up? This Minecraft cake recipe is super flexible:
- Vegan Version: Use flax eggs, plant-based milk, and coconut cream for whipping. The flavor stays rich and satisfying.
- Fruit-Filled Pixels: Add a layer of raspberry jam or fresh berries between cake layers to mimic pixel colors with a fruity twist.
- Different Frosting: Swap whipped cream for cream cheese frosting for a tangier, denser texture that still pipes nicely.
- Chocolate Overload: Add chocolate chips to the batter or drizzle melted chocolate over the finished cake to please any chocoholic gamer.
- Mini Cakes: Bake in small square pans or muffin tins for individual pixel cakes—perfect for party favors or quick bites.
I once tried a peanut butter whipped cream variation for a friend allergic to dairy—it was a game-changer! Also, baking at high altitude? Add a little extra liquid and reduce baking powder slightly to keep the cake from drying out.
Serving & Storage Suggestions
This Minecraft cake tastes best served slightly chilled or at room temperature, so the whipped cream holds its shape but the cake stays tender. Present it on a square cake board or platter to highlight its pixel design—kids especially love the blocky look!
Pair it with cold milk, hot chocolate, or your favorite fruity iced tea for a perfect gaming snack setup. Leftovers? Store the cake tightly covered in the refrigerator for up to 3 days. The flavors actually develop nicely overnight, making it even better the next day.
For longer storage, freeze the unfrosted cake wrapped in plastic wrap and foil for up to 2 months. Thaw in the fridge before decorating. Reheat individual slices gently in the microwave (10-15 seconds) if you want that fresh-from-the-oven warmth. Just remember, whipped cream doesn’t reheat well, so add it fresh after warming.
Nutritional Information & Benefits
One slice (1/9 of the cake) roughly contains:
| Calories | 320 |
|---|---|
| Fat | 15g |
| Carbohydrates | 40g |
| Protein | 4g |
This recipe uses simple ingredients like eggs and milk that provide protein and calcium. Cocoa powder adds antioxidants, which is a nice bonus. If you swap to plant-based milk and coconut cream, it’s suitable for dairy-free diets. Gluten-free bakers can use a blend flour to make it safe for gluten intolerance. Just remember, this cake is a treat—perfect for celebrations and not an everyday indulgence.
Conclusion
The perfect Minecraft cake recipe is a fun, tasty way to bring your favorite game into your kitchen. It’s simple to make, visually impressive, and delicious enough to satisfy both gamers and bakers alike. You can customize it to your taste, dietary needs, and occasion, making it a versatile go-to for celebrations or just a sweet weekend project.
I love this recipe because it combines nostalgia, creativity, and comfort food all in one. Plus, watching the joy on faces when they see this pixelated masterpiece is priceless. Give it a try and share your own adaptations—I can’t wait to hear how yours turns out!
Don’t forget to leave a comment below or share this recipe with your fellow gamers and bakers. Trust me, this Minecraft cake is one you’ll want to make again and again.
FAQs
Can I make this Minecraft cake ahead of time?
Yes! Bake the cake a day ahead and store it wrapped tightly. Decorate just before serving for the freshest look and taste.
What if I don’t have food coloring gels?
You can use liquid food coloring, but gels give brighter colors without thinning the whipped cream, which helps keep those sharp pixel edges.
Can I use a different pan size for this cake?
A 9×9 inch square pan is ideal for the blocky look, but you can use an 8×8 inch pan too. Just adjust baking time slightly and keep an eye on doneness.
How do I make the cake dairy-free?
Swap milk for almond or oat milk, use coconut cream for whipping, and replace eggs with flax eggs or a vegan egg substitute.
What’s the best way to cut the cake into pixel blocks?
Use a sharp serrated knife and cut into equal squares after the cake has cooled completely. Chilling the cake briefly before cutting helps get cleaner edges.
Pin This Recipe!
Perfect Minecraft Cake Recipe Easy Step-by-Step Guide for Gamers
A fun and nostalgic Minecraft-themed cake recipe that combines vanilla and cocoa flavors with a pixelated design, perfect for gaming parties and family gatherings.
- Prep Time: 15 minutes
- Cook Time: 30-35 minutes
- Total Time: 45-50 minutes
- Yield: 9 servings 1x
- Category: Dessert
- Cuisine: American
Ingredients
- 1 ¾ cups (220g) all-purpose flour
- 1 cup (200g) granulated sugar
- 1/3 cup (40g) unsweetened cocoa powder
- 1 teaspoon baking powder
- ½ teaspoon baking soda
- ½ teaspoon salt
- 2 large eggs, room temperature
- 1 cup (240ml) whole milk or dairy-free milk
- ½ cup (120ml) vegetable oil
- 2 teaspoons pure vanilla extract
- ½ cup (120ml) boiling water
- 1 cup (240ml) heavy whipping cream or coconut cream
- 2 tablespoons powdered sugar
- Food coloring gels (red, green, yellow, brown)
- Optional: edible pixel squares or colored sprinkles
Instructions
- Preheat the oven to 350°F (175°C). Grease and flour a 9×9 inch (23×23 cm) square cake pan or line it with parchment paper.
- In a large bowl, sift together the flour, sugar, cocoa powder, baking powder, baking soda, and salt. Stir to combine evenly.
- In another bowl, whisk the eggs, milk, vegetable oil, and vanilla extract until smooth and well blended.
- Pour the wet ingredients into the dry ingredients and stir gently but thoroughly. Do not overmix; a few lumps are okay.
- Carefully stir in the boiling water. The batter will be thin, which makes the cake moist.
- Pour the batter into the prepared pan and bake for 30-35 minutes or until a toothpick inserted in the center comes out clean.
- Let the cake cool in the pan for 10 minutes, then transfer to a wire rack to cool completely.
- Whip the heavy cream with powdered sugar until soft peaks form. Divide into small bowls and tint each with food coloring gels to create pixel colors.
- Once the cake is fully cooled, slice it into even squares. Use a spatula or piping bag to apply colored cream squares on top, creating a pixelated Minecraft cake pattern. Add edible pixel squares if desired.
Notes
Do not skip the boiling water to keep the cake moist. Chill the cake completely before decorating to prevent the cream from melting. Use gel food coloring for vibrant colors without thinning the cream. For vegan or gluten-free versions, substitute ingredients as noted. Watch the oven starting at 30 minutes to avoid overbaking.
Nutrition
- Serving Size: 1 slice (1/9 of the
- Calories: 320
- Fat: 15
- Carbohydrates: 40
- Protein: 4
Keywords: Minecraft cake, gaming cake, pixel cake, easy cake recipe, vanilla cocoa cake, gaming party dessert, pixelated cake


