Mixing batter while the kids are screaming and the phone is ringing off the hook—yeah, that’s usually not the best time to try a new recipe. But there I was, whisk in one hand, grabbing a rogue crayon with the other, realizing halfway through the chaos that I didn’t have a box mix for the birthday party cake. So, I threw together this perfect red velvet flag cake with cream cheese frosting from scratch, hoping it would come out okay. The kitchen smelled like a cocoa-and-vanilla dream, with that tangy cream cheese frosting thickening up just right. Honestly, it wasn’t just a lifesaver for that hectic afternoon — it quickly became my go-to showstopper for celebrations.
What stuck with me was how this cake wasn’t just about looks (though those sharp red and white layers with blue berries on top do steal the show). It’s about that moist crumb, the subtle cocoa hint, and the frosting that’s creamy but not too sweet — all coming together in an unpretentious, crowd-pleasing way. I’ve made it for everything from last-minute barbecues to more planned-out holiday brunches, and it always gets the thumbs-up. It’s a bit like the dependable friend of cakes: you don’t have to fuss, but it still impresses.
While it might sound fancy, this red velvet flag cake with cream cheese frosting is surprisingly straightforward, which really means you can nail it even if your kitchen looks like a disaster zone (trust me, I’ve been there). I think that’s why it’s stuck around — it’s indulgent, festive, and yet forgiving enough for the busiest or most distracted cooks. If you’re looking for a recipe that brings a bit of fun and tradition to your table without stress, this one’s worth making your own.
Why You’ll Love This Recipe
From my many experiments and some inevitable kitchen mess-ups, I’ve come up with a version of the perfect red velvet flag cake with cream cheese frosting that’s truly a crowd-pleaser. Here’s why it’s become a staple in my recipe box:
- Quick & Easy: You can whip up the batter and get it in the oven within 30 minutes — perfect for busy weeknights or last-minute party plans.
- Simple Ingredients: No need for specialty stores — this recipe calls for pantry staples like cocoa powder, buttermilk, and cream cheese you probably already have.
- Perfect for Patriotic Occasions: Whether it’s the Fourth of July, Memorial Day, or just a summer gathering, the flag design adds a festive, homemade touch.
- Crowd-Pleaser: Kids and adults alike go nuts over the moist cake and tangy frosting combo — it’s an all-ages hit.
- Unbelievably Delicious: The delicate cocoa flavor mingles with the cream cheese frosting so well, it’s like a little slice of southern charm in every bite.
What sets this cake apart? Well, I like to blend the cream cheese frosting until it’s ultra-smooth and velvety, which makes spreading and piping a breeze — no crumb drag here. Also, I balance the cocoa with just the right amount of vinegar and buttermilk to keep the cake tender yet flavorful. This isn’t just any red velvet cake; it’s the one I reach for when I want something that looks impressive but doesn’t require a pastry degree to pull off.
What Ingredients You Will Need
This recipe uses straightforward, wholesome ingredients to deliver that classic red velvet flavor and striking flag presentation without complicated prep or hard-to-find items. You can find most of these in your pantry or fridge, and substitutions are easy if needed.
- For the Cake Batter:
- All-purpose flour (2½ cups / 315 g) – sifted for lightness
- Granulated sugar (1¾ cups / 350 g) – use a trusted brand like Domino for consistent sweetness
- Unsweetened cocoa powder (1½ tbsp / 11 g) – Dutch-processed preferred for smooth flavor
- Baking soda (1 tsp / 5 g) – key for that tender crumb
- Salt (½ tsp / 3 g) – enhances all the flavors
- Buttermilk (1 cup / 240 ml) – room temperature, adds tang and moisture (substitute with milk + 1 tbsp vinegar or lemon juice if needed)
- Vegetable oil (1 cup / 240 ml) – keeps the cake moist
- Large eggs (2) – room temperature for even mixing
- Vanilla extract (1 tsp / 5 ml) – pure vanilla for best aroma
- Red food coloring (2 tbsp / 30 ml) – gel or liquid, depending on preference
- White vinegar (1 tsp / 5 ml) – reacts with baking soda for lift
- For the Cream Cheese Frosting:
- Cream cheese (16 oz / 450 g) – softened, I prefer Philadelphia brand for smooth texture
- Unsalted butter (½ cup / 115 g) – softened, adds richness
- Powdered sugar (4 cups / 480 g) – sifted to avoid lumps
- Vanilla extract (1 tsp / 5 ml) – balances the tang of cream cheese
- Salt (a pinch) – cuts the sweetness perfectly
- For Decoration:
- Fresh blueberries (1 cup / 150 g) – for the blue stripes of the flag
- Strawberries or raspberries (½ cup / 75 g) – optional for extra red accents
- Two 9-inch (23 cm) round cake pans — light-colored metal pans work best for even baking.
- Mixing bowls — a large one for dry ingredients and a medium one for wet.
- Electric hand mixer or stand mixer — makes cream cheese frosting silky smooth.
- Measuring cups and spoons — accuracy matters for baking success.
- Rubber spatula — essential for scraping down the bowl and folding the batter gently.
- Wire cooling racks — to cool cake layers evenly and avoid sogginess.
- Offset spatula or butter knife — for frosting the cake neatly.
- Toothpicks or cake tester — to check doneness.
- Optional: piping bag and round tip if you want to pipe the cream cheese frosting edges.
- Preheat and Prep: Heat your oven to 350°F (175°C). Grease and flour your two 9-inch cake pans or line them with parchment paper. Set aside.
- Combine Dry Ingredients: In a large bowl, sift together 2½ cups (315 g) all-purpose flour, 1¾ cups (350 g) granulated sugar, 1½ tbsp (11 g) cocoa powder, 1 tsp (5 g) baking soda, and ½ tsp (3 g) salt. Whisk until evenly mixed. This step helps avoid lumps and ensures even rising.
- Mix Wet Ingredients: In another bowl, whisk 1 cup (240 ml) buttermilk, 1 cup (240 ml) vegetable oil, 2 large eggs, 1 tsp (5 ml) vanilla extract, 2 tbsp (30 ml) red food coloring, and 1 tsp (5 ml) white vinegar until smooth. The buttermilk and vinegar combo is classic red velvet magic; it tenderizes the crumb and reacts with baking soda.
- Combine Wet and Dry: Slowly pour the wet ingredients into the dry, stirring gently with a spatula. Don’t overmix — stop once the batter is smooth and fully combined. A few small lumps are okay; overmixing can make the cake dense.
- Divide Batter: Evenly distribute the batter between the two prepared pans. Smooth the tops with your spatula for even layers.
- Bake: Place pans in the center rack of the oven and bake for 25–30 minutes. Start checking at 25 minutes by inserting a toothpick into the center — it should come out clean or with a few moist crumbs. Avoid opening the oven too often to prevent sinking.
- Cool: Let cakes cool in pans for 10 minutes, then invert onto wire racks to cool completely before frosting. You want the layers completely cool to avoid frosting melt-down.
- Prepare Frosting: Beat 16 oz (450 g) softened cream cheese and ½ cup (115 g) softened unsalted butter with an electric mixer on medium speed until creamy and lump-free, about 2–3 minutes. Gradually add 4 cups (480 g) powdered sugar, mixing on low to start, then medium until smooth. Add 1 tsp (5 ml) vanilla extract and a pinch of salt; mix well. Taste and adjust sweetness if needed.
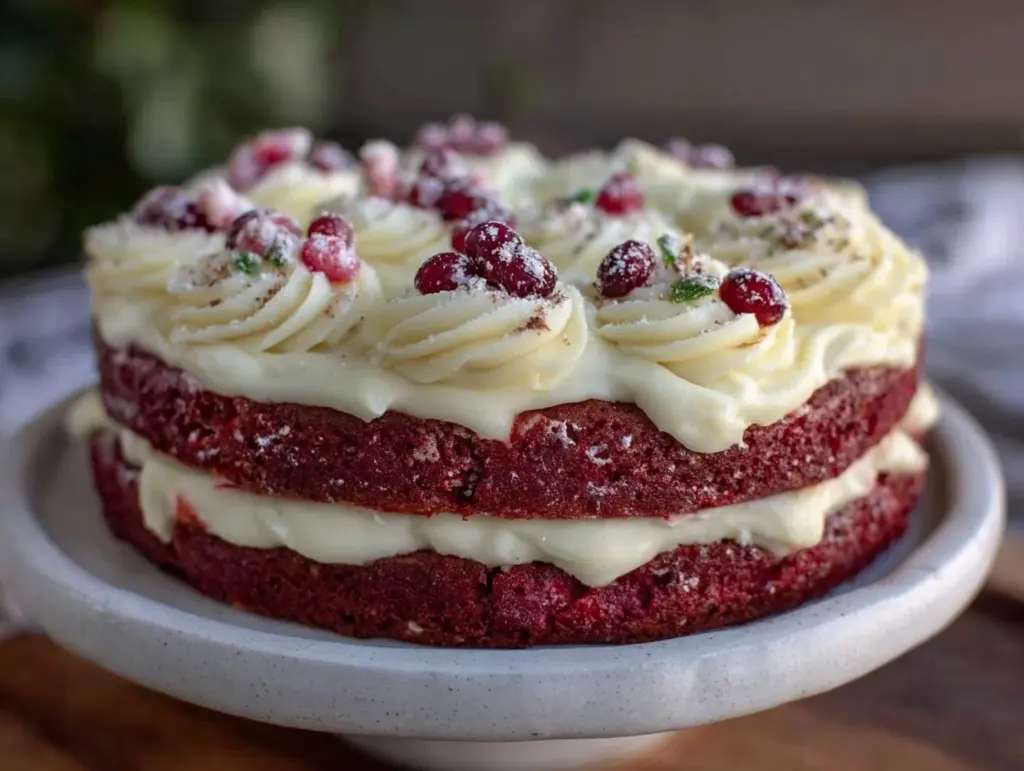
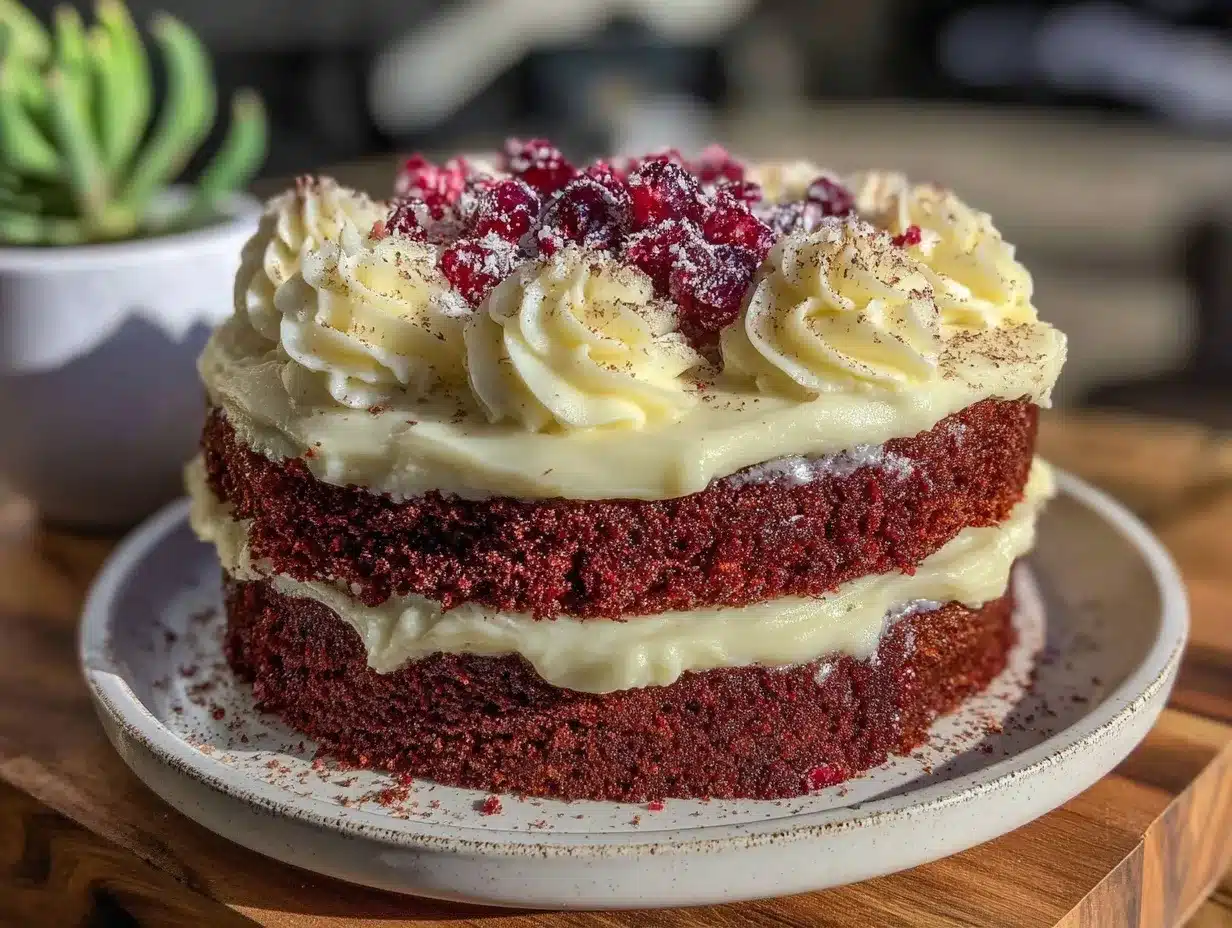
- Assemble Cake: Place one cake layer on your serving plate. Spread a generous ½ cup (120 g) of cream cheese frosting evenly on top. Add the second cake layer and frost the top and sides with the remaining frosting. Use an offset spatula for an even, smooth finish.
- Create the Flag Design: Arrange fresh blueberries in the top left corner to form the blue field of the flag. Use strips of frosting and red fruit like sliced strawberries or raspberries to create the flag’s stripes. Keep it simple and rustic — the homemade charm is part of the appeal.
- Don’t skip sifting: Cocoa powder tends to clump, so sifting prevents pockets of dry ingredients and gives a lighter texture.
- Use room temperature ingredients: Eggs and buttermilk at room temp blend more easily, helping the batter to come together smoothly without overmixing.
- Handle the batter gently: Overmixing develops gluten and can make the cake tougher — stir just until combined.
- Watch oven times closely: Ovens vary. Check your cake a few minutes before the timer goes off to avoid drying out.
- Chill your frosting if needed: Cream cheese frosting can get too soft if the kitchen is warm. A quick chill helps firm it up for easier spreading and piping.
- Layer trimming: Leveling your cakes gives a tidy, professional look and helps the layers stack evenly.
- Multi-task: While the cake layers bake, use that time to whip up the frosting. It’s a great way to keep the momentum going without feeling rushed.
- Personal fail: I once added too much vinegar trying to speed up the reaction, and the cake got oddly tangy — lesson learned: measure carefully!
- Dietary twists: Swap regular flour for gluten-free blend to make it gluten-free. Use vegan cream cheese and coconut oil instead of butter for a dairy-free frosting version.
- Flavor boost: Add a teaspoon of espresso powder to the batter to deepen the cocoa notes without tasting like coffee.
- Seasonal fruit: In winter, substitute fresh blueberries with frozen ones or use pomegranate seeds for red accents. Summer calls for fresh, vibrant berries.
- Shape shift: Instead of a round cake, bake the batter in rectangular pans and create a flag pattern with frosting and fruit stripes for a sheet cake version, easier for big crowds.
- Frosting variation: For a lighter option, fold whipped cream into the cream cheese frosting to create a fluffier texture.
This recipe is flexible — you can swap all-purpose flour with gluten-free blend if needed, or use dairy-free cream cheese and butter alternatives for a vegan-friendly frosting.
Equipment Needed
If you don’t have two pans, you can bake the layers one at a time; just adjust your timing. I’ve also used silicone pans occasionally — just keep an eye on baking time as they tend to brown faster. For frosting, a stand mixer with a paddle attachment is ideal, but a hand mixer works just fine (just don’t overbeat or your frosting might get too soft).
Preparation Method
Pro Tip: If your frosting gets too soft while decorating, pop it in the fridge for 15 minutes to firm up. Also, for neater layers, trim the cake tops slightly before frosting to make sure they’re flat.
Cooking Tips & Techniques
Making a red velvet cake from scratch can feel intimidating, but a few learned tricks go a long way:
Variations & Adaptations
This red velvet flag cake recipe is versatile and can be adjusted to fit different needs or flavor preferences:
Personally, I once swapped the blueberries for blackberries and the look was rustic but still stunning — plus, the slight tartness was a hit with my family. Feel free to get creative based on what’s fresh or on hand.
Serving & Storage Suggestions
Serve this cake at room temperature to truly enjoy the soft crumb and creamy frosting balance. If you refrigerate it (which you should, to keep the cream cheese frosting fresh), take it out 30 minutes before serving to soften up.
This cake pairs beautifully with a cold glass of milk or a cup of lightly brewed coffee. For a summer picnic or barbecue, it’s a sweet finish after savory dishes like pulled pork sliders with creamy coleslaw or the tangy patriotic layered hummus dip that echo the festive vibe.
Storage: Keep the cake covered in the refrigerator for up to 4 days. For longer storage, slice and freeze portions wrapped tightly in plastic wrap and foil for up to 2 months. Thaw overnight in the fridge before serving.
Reheating tip: Warm a slice briefly in the microwave (about 10 seconds) to soften the frosting if chilled.
Over time, the flavors meld wonderfully — the cocoa deepens, and the frosting gets creamier, making leftovers just as delicious (if you’re lucky enough to have any!).
Nutritional Information & Benefits
A typical slice (1/12th of the cake) contains approximately 350 calories, 18g fat, 45g carbohydrates, and 4g protein. The cream cheese adds calcium and a touch of protein, while the buttermilk provides some vitamin B12 and probiotics.
This cake isn’t exactly health food — it’s a treat to be enjoyed in moderation. However, using real ingredients like buttermilk and fresh fruit for decoration adds some nutritional value. For those with dietary restrictions, swapping in gluten-free flour or dairy-free alternatives makes it accessible for more people.
From a wellness perspective, I appreciate that this recipe focuses on balance — indulgent but not overloaded with artificial ingredients or preservatives. It’s a dessert that feels homemade and honest.
Conclusion
The perfect red velvet flag cake with cream cheese frosting is one of those recipes that’s reliably impressive yet forgiving enough for hectic days (or chaotic kitchens). I keep coming back to it because it manages to be festive, delicious, and quick — all at once. Plus, the cream cheese frosting, when whipped to that perfect velvety consistency, just makes the whole thing sing.
Feel free to play around with the fruit decorations or frosting consistency to make it your own. I love how this cake brings a little patriotic spirit and sweetness to gatherings, whether planned or last-minute. It’s earned a special place in my recipe lineup and, hopefully, yours too.
If you try making it, I’d love to hear how your version turned out or what tweaks you made! Sharing tips and stories makes cooking even better.
FAQs About Perfect Red Velvet Flag Cake
How do I prevent the red velvet cake from turning brown?
Use light-colored metal pans and avoid overbaking. Also, keeping the oven temperature steady at 350°F (175°C) helps keep the vibrant red color.
Can I make this cake ahead of time?
Yes! Bake the layers a day before, wrap them tightly, and refrigerate. Make the frosting fresh on the day you assemble for best texture.
What’s the best way to get the layers even?
Use a serrated knife to level the domed tops after cooling. Alternatively, bake in cake strips to reduce doming.
Can I freeze the frosted cake?
Freezing a frosted cream cheese cake isn’t ideal—it can affect texture and cause frosting to separate. Better to freeze unfrosted layers and frost after thawing.
What if I don’t have buttermilk?
Mix 1 cup (240 ml) milk with 1 tbsp (15 ml) lemon juice or vinegar. Let it sit 5 minutes before using as a buttermilk substitute.
Pin This Recipe!
Perfect Red Velvet Flag Cake with Cream Cheese Frosting
A moist and flavorful red velvet cake with a creamy, tangy cream cheese frosting, decorated with fresh berries to create a festive flag design. Perfect for celebrations and easy to make from scratch.
- Prep Time: 30 minutes
- Cook Time: 25-30 minutes
- Total Time: 55-60 minutes
- Yield: 12 servings 1x
- Category: Dessert
- Cuisine: American
Ingredients
- 2½ cups (315 g) all-purpose flour, sifted
- 1¾ cups (350 g) granulated sugar
- 1½ tbsp (11 g) unsweetened cocoa powder, Dutch-processed preferred
- 1 tsp (5 g) baking soda
- ½ tsp (3 g) salt
- 1 cup (240 ml) buttermilk, room temperature (or 1 cup milk + 1 tbsp vinegar/lemon juice)
- 1 cup (240 ml) vegetable oil
- 2 large eggs, room temperature
- 1 tsp (5 ml) vanilla extract
- 2 tbsp (30 ml) red food coloring (gel or liquid)
- 1 tsp (5 ml) white vinegar
- 16 oz (450 g) cream cheese, softened
- ½ cup (115 g) unsalted butter, softened
- 4 cups (480 g) powdered sugar, sifted
- 1 tsp (5 ml) vanilla extract (for frosting)
- Pinch of salt (for frosting)
- 1 cup (150 g) fresh blueberries (for decoration)
- ½ cup (75 g) strawberries or raspberries (optional, for decoration)
Instructions
- Preheat oven to 350°F (175°C). Grease and flour two 9-inch round cake pans or line with parchment paper.
- In a large bowl, sift together flour, sugar, cocoa powder, baking soda, and salt. Whisk until evenly mixed.
- In another bowl, whisk together buttermilk, vegetable oil, eggs, vanilla extract, red food coloring, and white vinegar until smooth.
- Slowly pour wet ingredients into dry ingredients, stirring gently with a spatula until smooth and combined. Do not overmix.
- Divide batter evenly between prepared pans and smooth tops with a spatula.
- Bake for 25–30 minutes, checking at 25 minutes with a toothpick; it should come out clean or with a few moist crumbs.
- Cool cakes in pans for 10 minutes, then invert onto wire racks to cool completely.
- For frosting, beat cream cheese and butter with an electric mixer on medium speed until creamy and lump-free, about 2–3 minutes.
- Gradually add powdered sugar, mixing on low then medium speed until smooth. Add vanilla extract and a pinch of salt; mix well.
- Place one cake layer on serving plate. Spread ½ cup of frosting evenly on top.
- Add second cake layer and frost top and sides with remaining frosting using an offset spatula for smooth finish.
- Decorate by arranging fresh blueberries in the top left corner to form the blue field of the flag.
- Use strips of frosting and red fruit (strawberries or raspberries) to create the flag’s stripes. Keep decoration simple and rustic.
Notes
If frosting becomes too soft while decorating, chill in the fridge for 15 minutes. For neater layers, trim cake tops before frosting. Use room temperature ingredients for best results. Avoid overmixing batter to keep cake tender. Store cake covered in refrigerator up to 4 days or freeze unfrosted layers up to 2 months.
Nutrition
- Serving Size: 1 slice (1/12th of c
- Calories: 350
- Sugar: 35
- Sodium: 250
- Fat: 18
- Saturated Fat: 7
- Carbohydrates: 45
- Fiber: 1
- Protein: 4
Keywords: red velvet cake, cream cheese frosting, patriotic cake, flag cake, homemade cake, easy cake recipe, celebration cake


