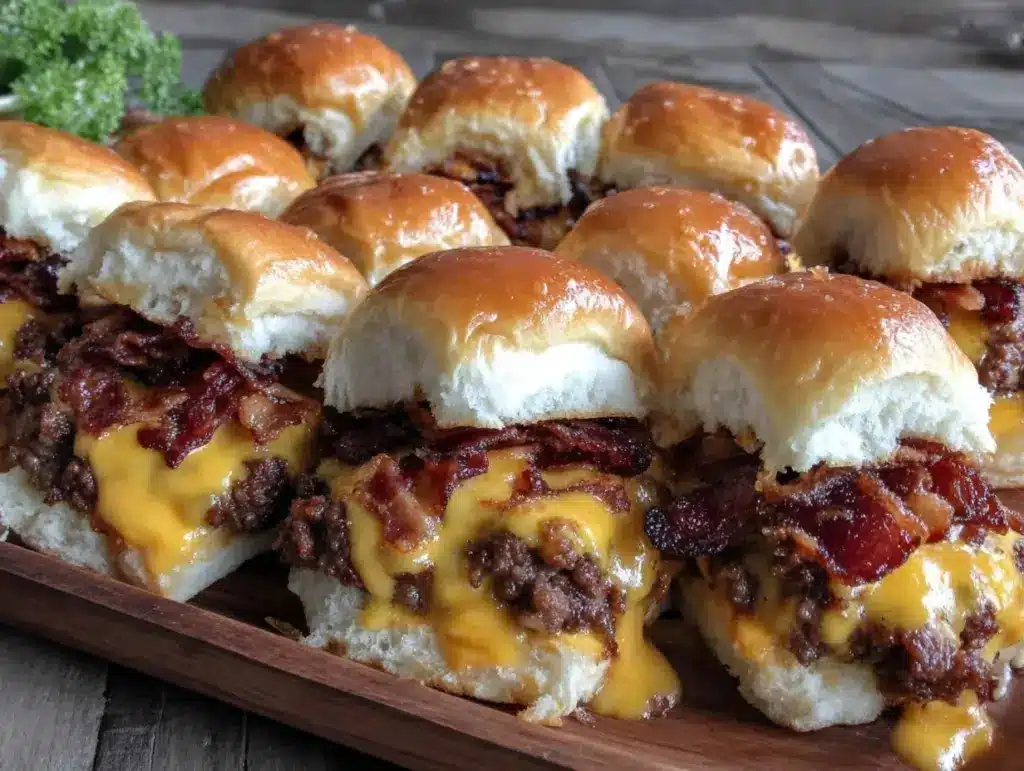
Picture this: the aroma of sizzling bacon and juicy ground beef fills your kitchen, mingling with the sweet notes of caramelized onions as they dance across a golden sheet pan. The cheese starts to melt, bubbling just right, and you know—this is about to become something truly irresistible. The first time I pulled these Sheet Pan Bacon Cheeseburger Sliders out of the oven, I had to pause and just smile, soaking in the excitement (the kind of moment where the anticipation is almost too much!). My family was circling like hungry sharks, and let’s face it, I couldn’t really blame them.
Years ago, when I was knee-high to a grasshopper, my grandma used to whip up big trays of sliders for family gatherings. It was pure comfort—no fuss, just good food and good company. Fast forward to today, and this easy sheet pan method has become my secret weapon for crowd-pleasing meals. I stumbled upon the idea on a rainy weekend when we had an unexpected group of friends drop by, and I needed something hearty, quick, and fun. Honestly, I wish I’d known about sheet pan sliders ages ago!
The reactions are always the same: kids grabbing seconds before the adults, my spouse sneaking an extra slider off the tray when my back is turned, and friends asking for the recipe before they’ve even finished. It’s the kind of meal that feels like a warm hug—nostalgic, comforting, and dangerously easy to pull off. Whether you’re prepping for a football party, a birthday bash, or just want to brighten up your Pinterest recipe board, these Sheet Pan Bacon Cheeseburger Sliders are ready to steal the show.
I’ve tested this recipe more times than I can count (in the name of research, of course)—and it hasn’t failed me yet. It’s become a staple for game nights, potlucks, and even those laid-back Sunday dinners. If you want a dish that delivers pure joy and zero stress, you’re going to want to bookmark this one!
Why You’ll Love This Recipe
I’ve made these Sheet Pan Bacon Cheeseburger Sliders for everything from rowdy birthday parties to cozy family movie nights, and let me tell you—it always delivers. Over years of tweaking, testing, and taste-testing (with plenty of happy volunteers), I’ve landed on a recipe that’s both foolproof and totally fun. Whether you’re a busy parent or just love a classic cheeseburger flavor in bite-sized form, here’s why these sliders deserve a spot in your meal rotation:
- Quick & Easy: Comes together in under 40 minutes, so you can satisfy burger cravings without standing over a grill.
- Simple Ingredients: No wild goose chase at the grocery store. You probably have everything you need right now.
- Perfect for Parties: Ideal for game nights, potlucks, backyard BBQs, or lazy Sunday afternoons. They travel well and reheat beautifully.
- Crowd-Pleaser: Kids and adults can’t get enough. I’ve seen even the pickiest eaters go back for seconds (and thirds!).
- Unbelievably Delicious: The layers of juicy beef, crispy bacon, gooey cheese, and soft slider buns create a comfort food experience that hits all the right notes.
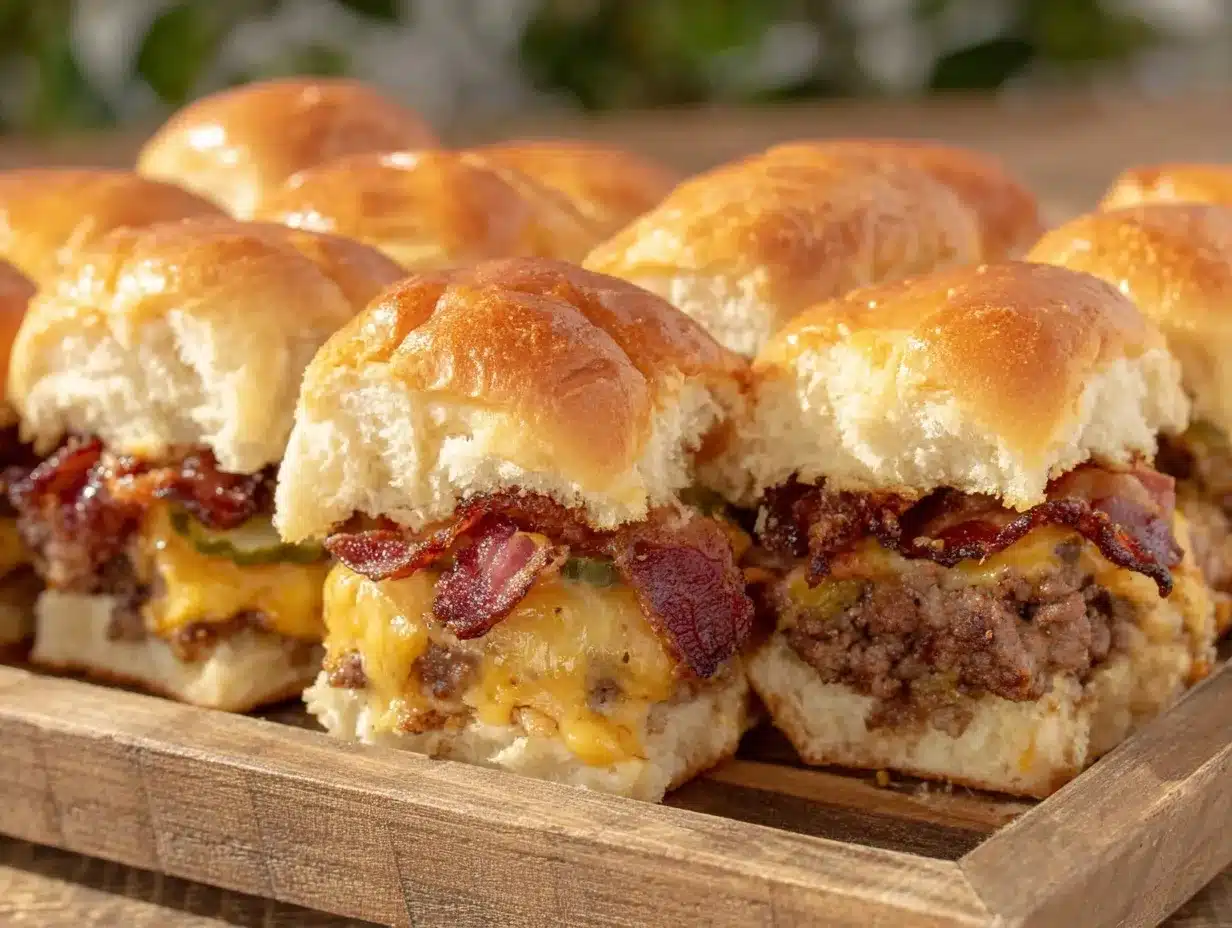
What sets this sheet pan bacon cheeseburger sliders recipe apart is its clever construction. Instead of shaping individual patties, you press the beef right onto the pan for even cooking and zero fuss. The bacon crisps up perfectly, and the cheese blankets everything in melty goodness. A finishing brush of butter and sprinkle of sesame seeds gives it that bakery-fresh vibe. I blend my onions with the beef for extra moisture and flavor (a little trick I picked up after one too many dry sliders).
Honestly, these sliders make you pause after the first bite—eyes closed, smile spreading, just soaking in the goodness. They’re classic comfort food, but with all the ease of modern cooking. Whether you’re impressing guests or simply turning a weeknight meal into something memorable, this recipe is your best bet. Trust me, it’s a keeper!
What Ingredients You Will Need
This easy sheet pan bacon cheeseburger sliders recipe relies on a few staple ingredients to create bold flavor and irresistible texture. Most are pantry staples, and you can swap or tweak as needed for your taste or dietary needs. No fancy stuff—just honest, crave-worthy components.
- For the Beef Layer:
- 2 lbs (900 g) ground beef (80/20 blend for best juiciness)
- 1 small yellow onion, finely diced (adds moisture and flavor)
- 1 teaspoon kosher salt
- 1/2 teaspoon freshly ground black pepper
- 1 teaspoon garlic powder
- 1 teaspoon Worcestershire sauce (optional, but really amps up the savoriness)
- For the Bacon:
- 8 slices thick-cut bacon (about 6 oz/170 g), cooked and chopped
- For the Cheese:
- 8 slices cheddar cheese (or American, for classic meltiness)
- Optional: Swiss or pepper jack for a twist
- For the Buns:
- 1 package (12-count) slider buns or Hawaiian rolls
- For Topping & Finish:
- 2 tablespoons unsalted butter, melted
- 1 tablespoon sesame seeds (for that classic burger bun look)
- Optional: 2 tablespoons finely chopped pickles (for tang)
- For Serving:
- Lettuce leaves, sliced tomato, extra pickles
- Ketchup, mustard, mayo (classic condiments)
Ingredient Tips: I always use King’s Hawaiian rolls for their slight sweetness and ultra-soft texture. For beef, choose fresh ground chuck, not pre-formed patties. If you’re gluten-free, swap slider buns for gluten-free rolls (Schar is a good brand). For dairy-free, use plant-based cheese and skip the butter finish.
You can swap bacon for turkey bacon or even plant-based bacon if you like. In summer, add a layer of grilled onions or fresh tomatoes. If you want a spicier bite, toss in some jalapeño slices before baking. This recipe is endlessly flexible—just the way I like it!
Equipment Needed
- Large rimmed sheet pan (about 13×18 inches / 33×46 cm)—a must for even baking and easy assembly
- Parchment paper or nonstick foil—helps with cleanup and prevents sticking
- Mixing bowls—for blending beef and seasonings
- Spatula or bench scraper—perfect for pressing and spreading the beef evenly
- Sharp knife—for slicing slider buns and chopping bacon
- Small saucepan or microwave-safe bowl—to melt butter for brushing
- Oven mitts—don’t forget these for safety!
- Wire rack (optional)—for cooling the finished sliders
If you don’t have a large sheet pan, use two smaller pans and adjust the baking time slightly. I’ve found that parchment paper is easier for cleanup than foil, but either works. A bench scraper is my secret weapon for spreading ground beef evenly—if you don’t have one, the back of a spoon does the trick. For melting butter, the microwave is fastest, but a small pan works if you’re already cooking bacon on the stove.
Budget tip: Dollar store pans work fine if you don’t bake often, but invest in a sturdy rimmed sheet pan if you plan to make these sliders for every occasion (like me!). Keep your pans in good shape by washing by hand to avoid warping.
Preparation Method
-
Prep the sheet pan: Line a large rimmed sheet pan (13×18 inches / 33×46 cm) with parchment paper for easy cleanup. Preheat your oven to 375°F (190°C).
Tip: Make sure the parchment hangs over the edges for easy lifting later. -
Cook the bacon: Lay bacon strips on a separate pan and bake at 375°F (190°C) for 15-18 minutes, until crispy. Drain on paper towels and chop into small pieces.
If you’re short on time, use pre-cooked bacon bits. -
Mix the beef: In a large bowl, combine 2 lbs (900 g) ground beef, diced onion, salt, pepper, garlic powder, and Worcestershire sauce. Mix gently with your hands (don’t overwork, or the meat gets tough).
The mixture should feel slightly sticky but not mushy. -
Press beef onto sheet pan: Spread the meat mixture evenly onto the parchment-lined pan, forming a rectangle about 1/2 inch (1.3 cm) thick. Press down firmly so it cooks evenly.
If the beef shrinks during baking, don’t worry—just trim the edges later. -
Bake the beef layer: Place the pan in the oven and bake for 18-20 minutes, until the beef is cooked through and juices run clear. (Internal temperature should reach 160°F/71°C.)
Look for browning around the edges and bubbling juices. -
Add cheese and bacon: Remove the pan from the oven. Layer cheese slices evenly over the hot beef, then sprinkle chopped bacon on top. Return to oven for 2-3 minutes, until cheese melts.
Cheese should be bubbly and just starting to brown at the edges. -
Prepare the buns: While the beef is baking, slice the slider buns in half horizontally (keep tops and bottoms intact as sheets). Arrange bottom halves on another parchment-lined tray.
If buns are dry, brush lightly with melted butter. -
Assemble sliders: Carefully lift the beef/cheese/bacon layer using the parchment edges and transfer onto the bun bottoms. Top with condiments (optional: ketchup, mustard, mayo) and pickle slices if desired.
This step is a little messy—embrace it! -
Add bun tops: Place the top halves of buns over the assembled sliders. Brush with melted butter and sprinkle with sesame seeds for classic burger flavor.
Butter makes the tops golden and extra tasty. -
Final bake: Return the assembled sliders to the oven for 6-8 minutes, just until buns are warm and slightly toasted.
Watch closely—burnt tops are no fun! -
Slice and serve: Use a sharp knife to cut the big slider slab into individual pieces (about 12). Serve hot, with lettuce, tomato, and extra pickles on the side.
If you want perfect edges, trim before slicing.
Troubleshooting: If beef shrinks too much, gently press the cheese and bacon layer to fill gaps. If buns are too soft, toast them a little longer. For extra melty cheese, cover with foil for the last bake. Honestly, don’t stress—these sliders are forgiving!
Cooking Tips & Techniques
After making these Sheet Pan Bacon Cheeseburger Sliders countless times, I’ve gathered a few pro tips and learned the hard way (believe me, there were some dry beef disasters!).
- Don’t overwork the beef: Mix gently to avoid tough sliders. If you knead like bread dough, the texture gets dense.
- Even thickness is key: Use a spatula or the back of a spoon to press the beef evenly across the pan. Uneven beef leads to undercooked or overcooked spots.
- Layer flavors: Mix onions into the beef for moisture, and try a dash of Worcestershire for umami. Sometimes I add a pinch of smoked paprika for a subtle BBQ vibe.
- Cheese placement: Overlapping slices a little helps cover every bite. If you like cheese pulls, use extra cheese in the center.
- Multitasking magic: Cook bacon while the beef bakes. Melt butter while cheese is melting. This keeps prep time tight and makes you look like a kitchen ninja (even if you’re chasing kids around).
- Common mistakes: Undercooked beef (always check for 160°F/71°C), soggy buns (toast longer or use bakery-fresh rolls), and dry sliders (add a tablespoon of milk or extra onion to beef if you’re using lean meat).
- Personal lesson: The first time I tried pre-shredded cheese, it didn’t melt right. Always use slices for best results!
- Consistency tip: Cut the finished slab with a serrated knife, wiping between cuts for neat edges. It makes for Pinterest-worthy photos and happy eaters.
Above all, relax and enjoy the process. A little imperfection just means it’s homemade!
Variations & Adaptations
One of my favorite things about sheet pan sliders is how customizable they are. You can tweak this recipe for any dietary need, flavor preference, or season. Here are a few ideas:
- Low-Carb Variation: Swap out the slider buns for thinly sliced roasted eggplant or portobello mushroom caps. Use cheddar or pepper jack for bold flavor.
- Vegetarian Option: Use plant-based ground “beef” (like Impossible or Beyond Meat), and veggie bacon. Add sautéed mushrooms and caramelized onions for extra umami.
- Spicy Southwest Sliders: Add taco seasoning to the beef, layer with pepper jack cheese, and top the sliders with pickled jalapeños and chipotle mayo.
- Cooking Methods: If you don’t have an oven, use a grill-safe pan on the BBQ. You can also cook the beef layer on the stovetop in batches, then assemble and broil the sliders for melty cheese.
- Allergen Substitutions: For gluten-free, use GF slider rolls. For dairy-free, try vegan cheese slices and olive oil instead of butter.
- Personal twist: I’ve tried adding a thin layer of barbecue sauce under the cheese—it gives the sliders a smoky, tangy kick that’s always a hit at summer parties.
Feel free to get creative! Honestly, the base recipe is just a starting point for all kinds of flavor adventures.
Serving & Storage Suggestions
These Sheet Pan Bacon Cheeseburger Sliders are best served hot, straight from the oven. I like to slice them up and pile them onto a big platter, then garnish with fresh lettuce leaves, tomato slices, and a bowl of pickles for guests to build their own perfect bite. For parties, add a side of crispy fries or a simple green salad.
If you’re prepping ahead, store the cooled sliders in an airtight container in the refrigerator for up to 3 days. For freezing, wrap individual sliders tightly in foil and freeze for up to 2 months. To reheat, pop them in a 350°F (175°C) oven for 10 minutes (foil off for crispy buns).
The flavors actually get deeper after a day in the fridge—the beef and cheese meld together, and the buns soak up all the yummy juices. If you like a little crunch, reheat under the broiler for a minute (watch closely!). These sliders travel well, too, making them perfect for potlucks or lunchboxes.
Nutritional Information & Benefits
Each slider (based on 12 servings) has approximately:
| Calories | 260 |
|---|---|
| Protein | 15g |
| Carbohydrates | 18g |
| Fat | 14g |
| Sodium | 420mg |
Health Benefits: Ground beef is a solid source of protein and iron, while onions add antioxidants and flavor. If you opt for turkey bacon or lean beef, you can cut down on fat. The sliders are easy to adapt for low-carb or gluten-free diets by swapping the buns. Allergens to watch: gluten (in buns), dairy (cheese and butter).
From my own wellness perspective, these sliders are all about balance—indulgent but portion-controlled, and easy to tweak for family needs. I love that you can pack in extra veggies or swap ingredients to suit your goals.
Conclusion
If you’re looking for a crowd-pleasing meal that’s easy, fun, and packed with classic cheeseburger flavor, these Sheet Pan Bacon Cheeseburger Sliders are a must-try. They combine everything you love about burgers—juicy beef, crispy bacon, melty cheese—into a format that’s perfect for sharing and enjoying together. Plus, the sheet pan method makes them a total breeze!
Whether you stick to the classic version or try one of the tasty adaptations, these sliders are made for customizing to suit your family’s favorites. I come back to this recipe again and again because it’s reliable, delicious, and honestly just makes people happy. Go ahead—give it a shot, then let me know how you made it your own!
Leave a comment below if you try these sliders, or share your creative twists! I’d love to hear about your favorite toppings, party success stories, or any fun mishaps along the way. Here’s to more meals that bring smiles and full bellies!
Frequently Asked Questions
Can I make Sheet Pan Bacon Cheeseburger Sliders ahead of time?
Absolutely! Assemble and bake the beef/cheese/bacon layer, then cool and refrigerate. Add buns and finish heating right before serving for fresh taste.
How do I keep the slider buns from getting soggy?
Toast the buns lightly before assembling, and let the beef layer drain briefly on paper towels if it’s very juicy. A quick final bake crisps them up!
Can I use ground turkey instead of beef?
Yes! Substitute ground turkey (same amount) and add a splash of milk or extra onion for moisture. Flavor will be a little lighter but still tasty.
How spicy can I make these sliders?
For a kick, add chopped jalapeños to the beef or use pepper jack cheese. Try chipotle mayo or sriracha for serving options.
What’s the best cheese for sheet pan sliders?
Classic American or cheddar cheese melts perfectly for that gooey burger taste. Swiss or pepper jack are great for flavor twists—mix and match!
Pin This Recipe!
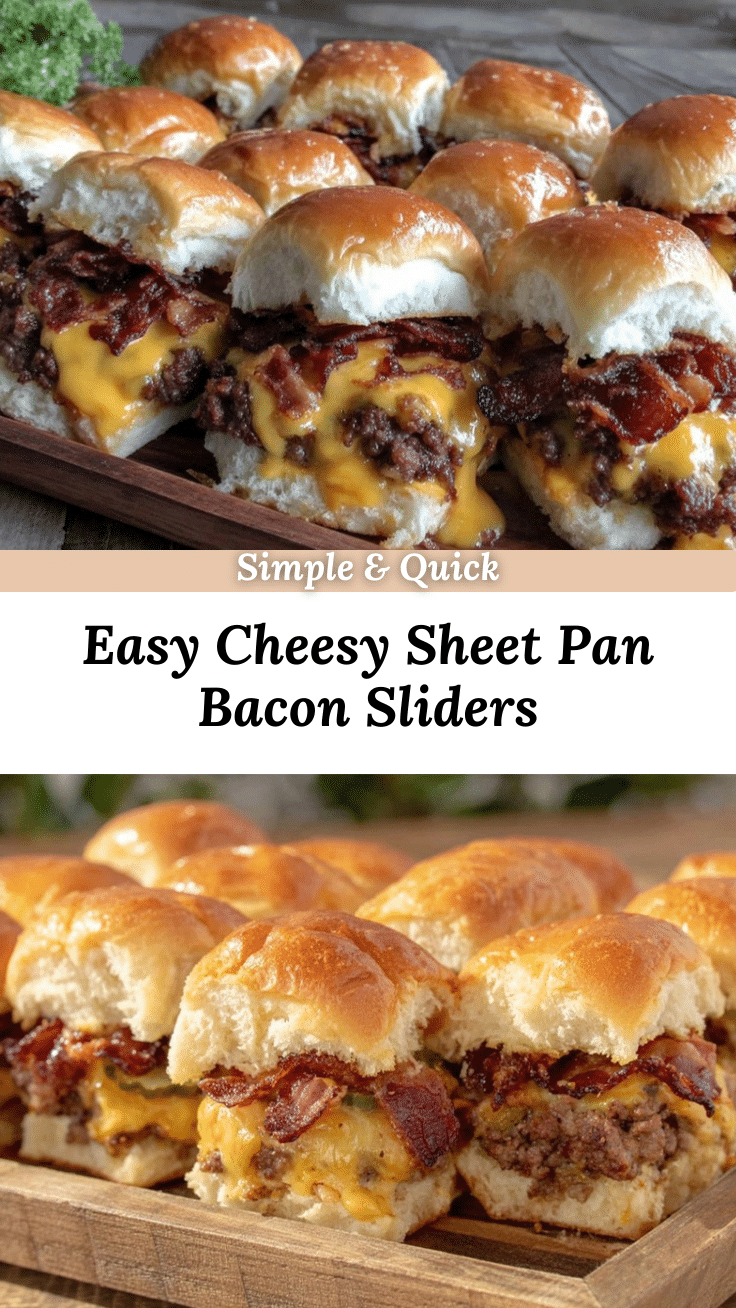
Sheet Pan Bacon Cheeseburger Sliders

These Sheet Pan Bacon Cheeseburger Sliders are a crowd-pleasing, easy-to-make comfort food featuring juicy ground beef, crispy bacon, melty cheese, and soft slider buns, all baked together on a single sheet pan. Perfect for parties, game nights, or family dinners, they deliver classic cheeseburger flavor in a fun, shareable format.
- Prep Time: 15 minutes
- Cook Time: 25 minutes
- Total Time: 40 minutes
- Yield: 12 sliders 1x
- Category: Main Course
- Cuisine: American
Ingredients
- 2 lbs ground beef (80/20 blend)
- 1 small yellow onion, finely diced
- 1 teaspoon kosher salt
- 1/2 teaspoon freshly ground black pepper
- 1 teaspoon garlic powder
- 1 teaspoon Worcestershire sauce (optional)
- 8 slices thick-cut bacon (about 6 oz), cooked and chopped
- 8 slices cheddar cheese (or American cheese)
- 1 package (12-count) slider buns or Hawaiian rolls
- 2 tablespoons unsalted butter, melted
- 1 tablespoon sesame seeds
- 2 tablespoons finely chopped pickles (optional)
- Lettuce leaves
- Sliced tomato
- Extra pickles
- Ketchup
- Mustard
- Mayonnaise
Instructions
- Line a large rimmed sheet pan (13×18 inches) with parchment paper. Preheat oven to 375°F (190°C).
- Lay bacon strips on a separate pan and bake at 375°F for 15-18 minutes until crispy. Drain and chop.
- In a large bowl, combine ground beef, diced onion, salt, pepper, garlic powder, and Worcestershire sauce. Mix gently.
- Spread beef mixture evenly onto the parchment-lined pan, forming a rectangle about 1/2 inch thick. Press down firmly.
- Bake beef layer for 18-20 minutes, until cooked through (internal temperature should reach 160°F).
- Remove pan from oven. Layer cheese slices evenly over hot beef, then sprinkle chopped bacon on top. Return to oven for 2-3 minutes, until cheese melts.
- While beef is baking, slice slider buns in half horizontally. Arrange bottom halves on another parchment-lined tray.
- Carefully lift beef/cheese/bacon layer using parchment edges and transfer onto bun bottoms. Top with condiments and pickle slices if desired.
- Place top halves of buns over assembled sliders. Brush with melted butter and sprinkle with sesame seeds.
- Return assembled sliders to oven for 6-8 minutes, until buns are warm and slightly toasted.
- Use a sharp knife to cut the slider slab into 12 individual pieces. Serve hot with lettuce, tomato, and extra pickles.
Notes
For best results, use King’s Hawaiian rolls for sweetness and soft texture. Mix onions into beef for moisture. Use sliced cheese for optimal melt. For gluten-free or dairy-free, substitute buns and cheese as needed. Toast buns lightly to avoid sogginess. Sliders can be made ahead and reheated. Customize with jalapeños, barbecue sauce, or different cheeses for flavor twists.
Nutrition
- Serving Size: 1 slider
- Calories: 260
- Sugar: 4
- Sodium: 420
- Fat: 14
- Saturated Fat: 6
- Carbohydrates: 18
- Fiber: 1
- Protein: 15
Keywords: sheet pan sliders, bacon cheeseburger sliders, party food, easy sliders, crowd pleaser, game day recipe, comfort food, oven baked sliders


